We are repairing the Dallas chip with a dead battery in the IBM 55SX
So, I had at my disposal an IBM PS / 2 55SX computer ( description ).

When attempting to run, she issued two short beeps and showed an error code. A list of error codes can be found here . In my case it was an error 161 - System options are not set; "Dead" battery.
Solution under .
After searching in the depths of Google, an article was found. I want to present her retelling with my own photos.
The culprit himself looks like this:

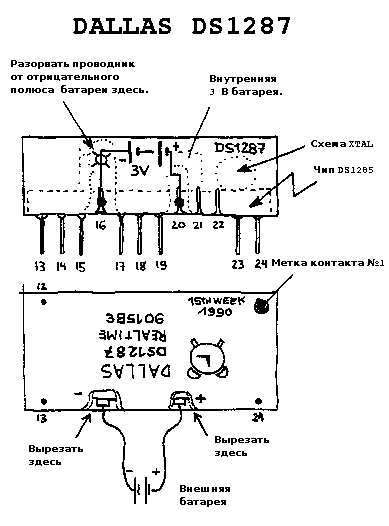
Chip scheme and the opening scheme is shown in the diagram:
For work you will need:
- flat file
- tester
- knife
- small soldering iron, solder and rosin
- block for AA or AAA batteries
- suitable wires
Let's get started Putting the chip end on the table, we begin to carefully cut the case in the place where the contacts 16 and 20 should be (see diagram) until the metal contacts appear.

At this stage, it makes sense to check the voltage on the contacts. There should be from a few millivolts to a couple of volts (the battery in the chip is 3 V.) The chip is rather coarse, but some caution must be taken. :) Special attention should be paid to pin 16, which comes to the negative pole of the battery. This contact will be somewhat longer than contact 20. After the metal appears, you should clean the contacts of plastic residue, and then carefully but firmly break the conductor on contact 16 (closer to the top of the chip) where it becomes a little thinner.

In this picture, the contact is already broken.
After that, it is worth checking the voltage on the bare contacts. There must be exactly "0". Otherwise, you should repeat the operation of breaking the circuit, otherwise the built-in battery will charge and heat up, which is fraught with damage to the chip. After that, you need to carefully solder the wires from the battery pack to the above contacts. It should strictly follow the polarity. Pin 16 is "-"!

After that, you can carefully withdraw the conductors and, preferably, isolate them from each other. We insert the modified chip into the socket, install the batteries (it is better not to save). The battery pack should be secured in the case.


We start the car.
For resuscitation will need the so-called "reference disk" from IBM. Some archive of those is here (you need Windows OS :() Insert the diskette into the drive, turn on the power again. The BIOS recovery procedure is simple. On the first boot, press F8, then Enter, wait for the autoconfiguration to complete, press Enter again and wait for the reboot. Diskette while removing no need - the clock is not yet configured. They should be installed at the next boot (what the on-screen menu will talk about.) There are also a large number of different tests and settings on the diskette, all of them are well described. After setting the date and time, we can overheat again press machine, listen to a single "beep", indicating the normal load. If there is the OS on the hard drive, we arrive in a few minutes ...

Unfortunately, the original keyboard and mouse is not preserved. :(
Thanks for attention. Hope was helpful.
PS The topic does not claim to be in the top. I simply did not find a similar article in Russian (almost) language, so I decided to write so that such an article would remain in Google’s archives. =)
When attempting to run, she issued two short beeps and showed an error code. A list of error codes can be found here . In my case it was an error 161 - System options are not set; "Dead" battery.
Solution under .
After searching in the depths of Google, an article was found. I want to present her retelling with my own photos.
The culprit himself looks like this:
Chip scheme and the opening scheme is shown in the diagram:
For work you will need:
- flat file
- tester
- knife
- small soldering iron, solder and rosin
- block for AA or AAA batteries
- suitable wires
Let's get started Putting the chip end on the table, we begin to carefully cut the case in the place where the contacts 16 and 20 should be (see diagram) until the metal contacts appear.
At this stage, it makes sense to check the voltage on the contacts. There should be from a few millivolts to a couple of volts (the battery in the chip is 3 V.) The chip is rather coarse, but some caution must be taken. :) Special attention should be paid to pin 16, which comes to the negative pole of the battery. This contact will be somewhat longer than contact 20. After the metal appears, you should clean the contacts of plastic residue, and then carefully but firmly break the conductor on contact 16 (closer to the top of the chip) where it becomes a little thinner.
In this picture, the contact is already broken.
After that, it is worth checking the voltage on the bare contacts. There must be exactly "0". Otherwise, you should repeat the operation of breaking the circuit, otherwise the built-in battery will charge and heat up, which is fraught with damage to the chip. After that, you need to carefully solder the wires from the battery pack to the above contacts. It should strictly follow the polarity. Pin 16 is "-"!
After that, you can carefully withdraw the conductors and, preferably, isolate them from each other. We insert the modified chip into the socket, install the batteries (it is better not to save). The battery pack should be secured in the case.
We start the car.
For resuscitation will need the so-called "reference disk" from IBM. Some archive of those is here (you need Windows OS :() Insert the diskette into the drive, turn on the power again. The BIOS recovery procedure is simple. On the first boot, press F8, then Enter, wait for the autoconfiguration to complete, press Enter again and wait for the reboot. Diskette while removing no need - the clock is not yet configured. They should be installed at the next boot (what the on-screen menu will talk about.) There are also a large number of different tests and settings on the diskette, all of them are well described. After setting the date and time, we can overheat again press machine, listen to a single "beep", indicating the normal load. If there is the OS on the hard drive, we arrive in a few minutes ...
Unfortunately, the original keyboard and mouse is not preserved. :(
Thanks for attention. Hope was helpful.
PS The topic does not claim to be in the top. I simply did not find a similar article in Russian (almost) language, so I decided to write so that such an article would remain in Google’s archives. =)
')
Source: https://habr.com/ru/post/38883/
All Articles