Home Video Surveillance
The reason I made a home video surveillance system is simple. The child grew up, his wife incredibly wanted to go to work, albeit briefly. But to give the child to the kindergarten is still early. So we hired a nanny, and one of the monitoring tools was a video surveillance system.
I started with such a digression that the tasks that the system should solve are clear:

For starters, I began to choose cameras. Unfortunately, the ruble exchange rate is now such that almost everything on the market has become more expensive. I even considered the option of buying black and white analog cameras, and the BU-shnogo DVR. It was scary to buy cameras on ebay or aliexpress, because they cost not so little, delivery time to Ekaterinburg is about a month, and there is also an illusory chance to buy a “like a megapixel” video camera with a 320x240 sensor and extrapolation curve.
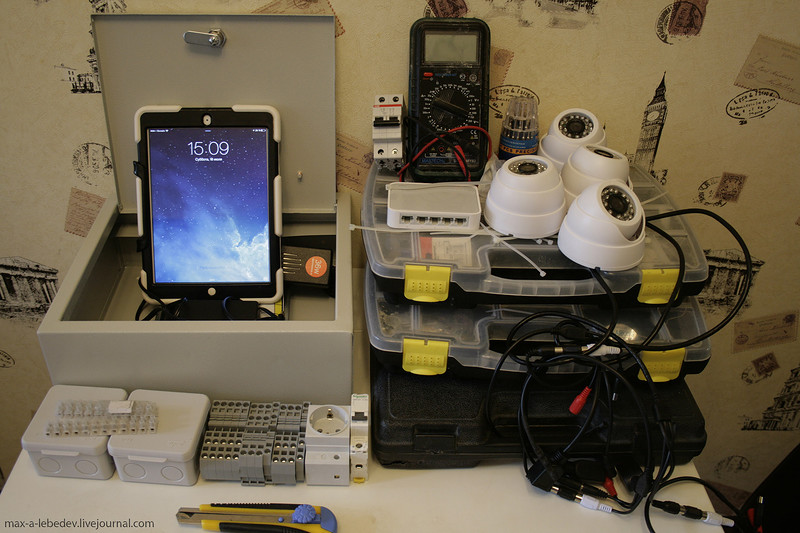
As a result, I found a local vendor on Avito, bought four color IP cameras with microphones. I checked it on the spot, the test picture arranged for me.
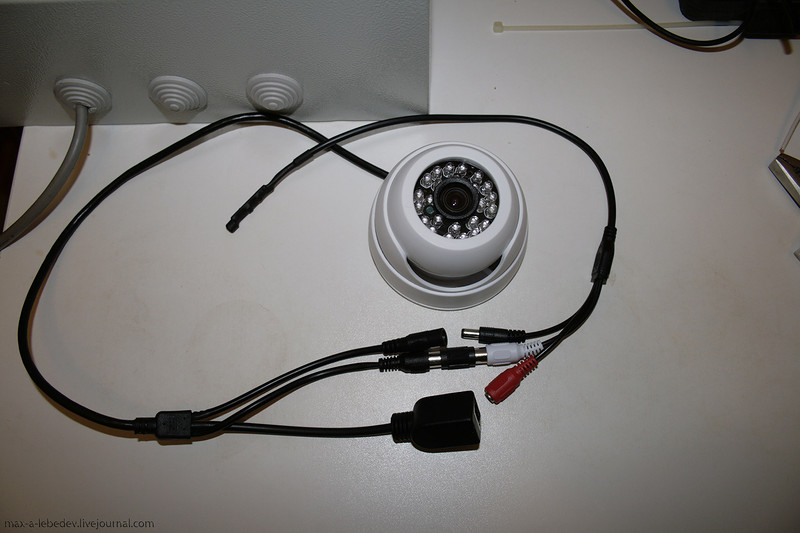
The cameras are the real NoName from the team of Comrade Llyao. About the manufacturer do not find out neither the packaging nor the information on the camera. There is no turning mechanism, infrared illumination is. In the dark, the camera switches to black and white. Consumption 1 ampere, supply voltage 12 volts. PoE support is missing.
')
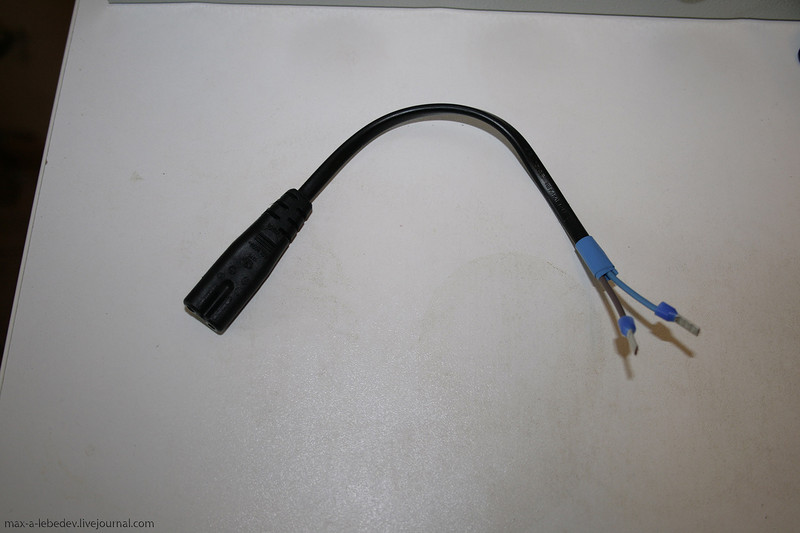
So, in order for cameras to start working, they need power and an interface cable. Since these are IP cameras, they transmit video data via ethernet, and since there is no PoE, the power cable must be laid separately. The power supply unit at 12 volts I suddenly found, but at 1.5 amps. Additionally, I bought another 3 amp Motorolla power supply.
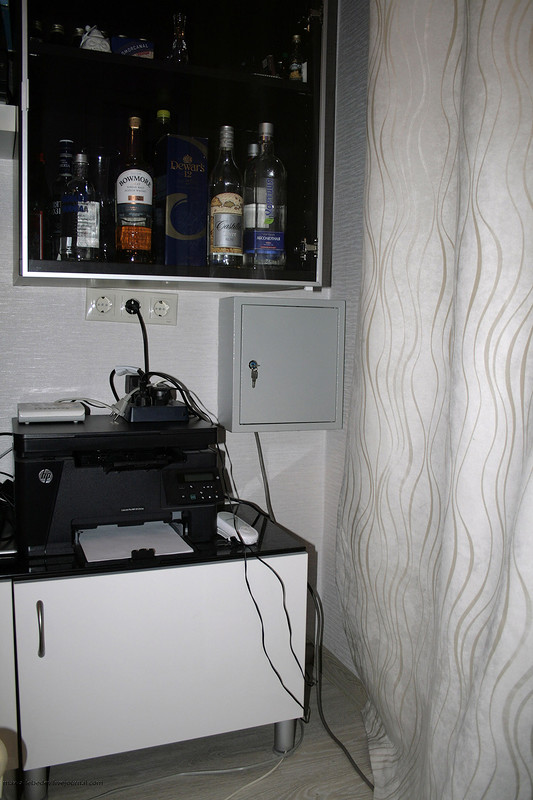
My router has only two Ethernet ports, in addition to the WAN, so I had to buy a separate switch for 5 ports. All this equipment must somehow be connected, somewhere located, so that simultaneously acquired electrical locker known company IEK with two DIN rails. I called the wardrobe SHVN , just for the sake of having at least some name. The cabinet does not contain any tools for recording and storing videos, only power and network.
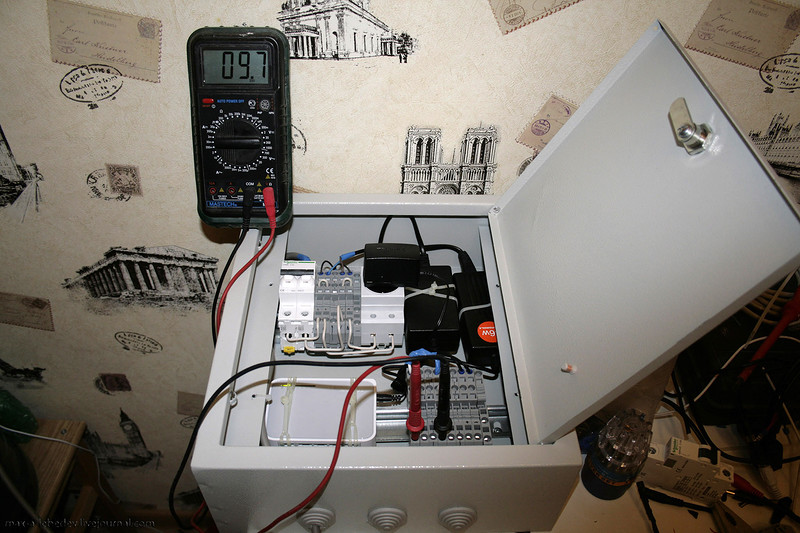
The wiring diagram did not, because the circuit is simple, there is little equipment. At the entrance of the machine, in case of short circuit . The outlet was not originally planned, but the power supply of the switch is plugged directly into the outlet, so I had to add it. All terminal strips are assembled from WAGO terminals simply because I had them. One 220V terminal block, power supplies and a socket are connected to it. Another terminal block is 12 volts, the power supply lines of the cameras are connected to it.
Unfortunately, I did not have end plates, so the last terminal in each terminal row is turned upside down. WAGO jumper was also not found, did not buy, made of wire. After assembly, of course, all the chains “rang out”, checked without load. The power supply produced, for some reason, not 12, but a little less than 10 volts. But that was enough for me.
If someone has a question, why all this, the cabinet, terminals and everything else - I will answer that I am opposed to “snot” and “twists”. The terminal provides extremely reliable contact, which over time will not become loose, will not crack. No matter, the self-tightening terminal, or with the “bolt-on” clip, guaranteed good contacts are reliably relieved of the thoughts “can the wiring have gone away?”.
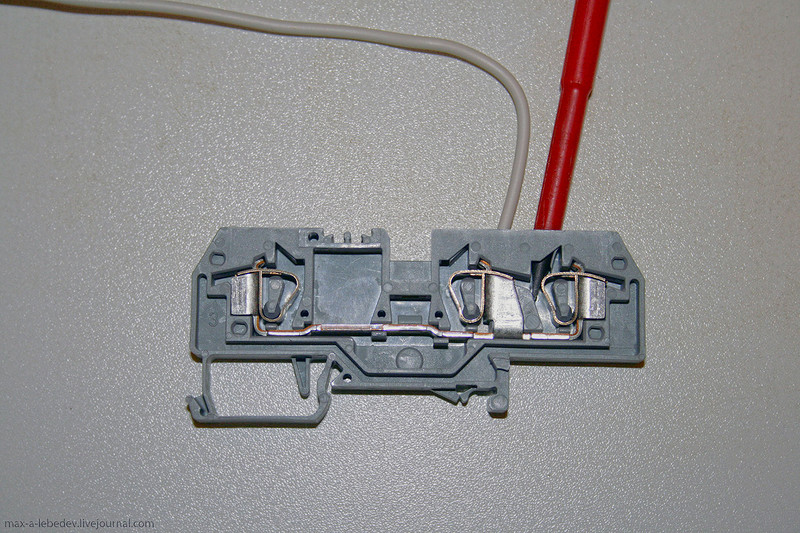
Flexible wires, the conductors of which consist of many conductors, must be terminated. Tips, too, were found in the farm. If they are not there, you can simply twist the conductors and cheat. If there is no special crimping tool, you can either buy it, although the same crimping tools from WAGO cost 100 euros, or compress with pliers and then press the tip with nippers in several places. It turns out not so reliably, but I still failed to wrest a vein from it.
So, the cabinet is assembled checked, the installation location is selected. To install it took a couple of dowels and screws. Due to the fact that I do not need exceptional reliability, I did not provide a UPS. All the same, I am doing a video surveillance system in the house, and not a full-fledged COT .
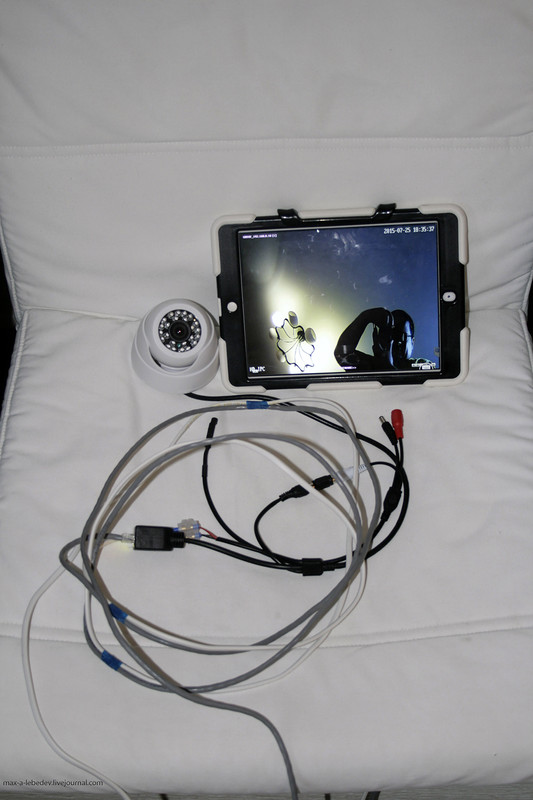
Approximate camera installation locations Two rooms, a corridor, a kitchen. Theoretically, the camera allows you to adjust the view horizontally and vertically after installation. It is spinning well, though manually. But if you initially put it in the wrong place, the subsequent settings will still give a bad result. Therefore, I decided to use one camera as a test.
I installed the video surveillance software, set up (about it below), made a temporary “carrying” of a twisted pair cable and a power cable, turned on the camera, and went to configure. As a feedback, I used a tablet on which TeamViewer was launched, which showed a video surveillance server. Thus, at the time of installing the camera, I saw what it shows, chose the optimal place, did the markup and moved to another installation site.
As a result, I found the exact coordinates of the installation locations of 4 cameras, knowing what they would show, even before installation. In a large object, of course, this is not done, so sometimes you have to rewire cameras after the system starts up for a better view.
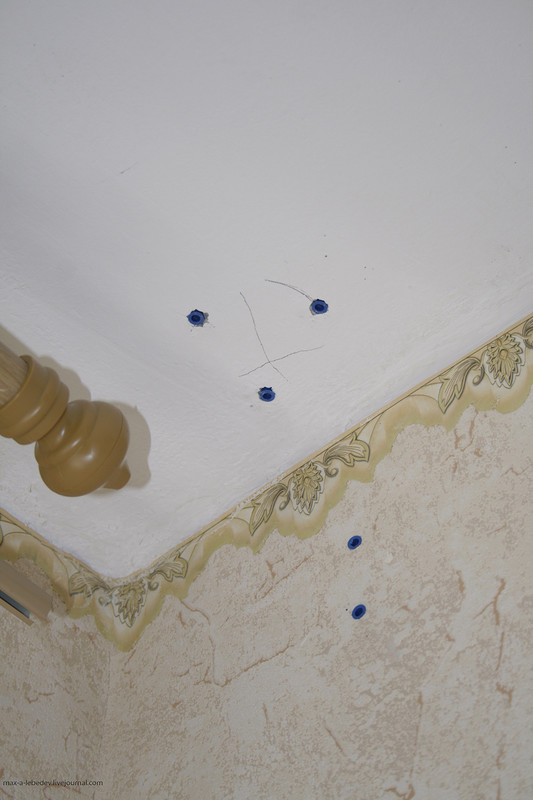
My hammer drill could not penetrate either the walls or the ceiling, so I had to borrow a hammer drill in a friendly company. The perforator made holes in the panel walls and ceilings as in oil, therefore I recommend not to suffer with low-power “hummers”. Of course, it is not necessary to buy, but you can rent it.
Installation of the cable I performed superficial. That is just the walls. Of course, he planned to install plastic boxes and put cables into them. I wanted it for a long time, the video has been working for a month, but I haven’t bought the box :-) The lack of time affects.
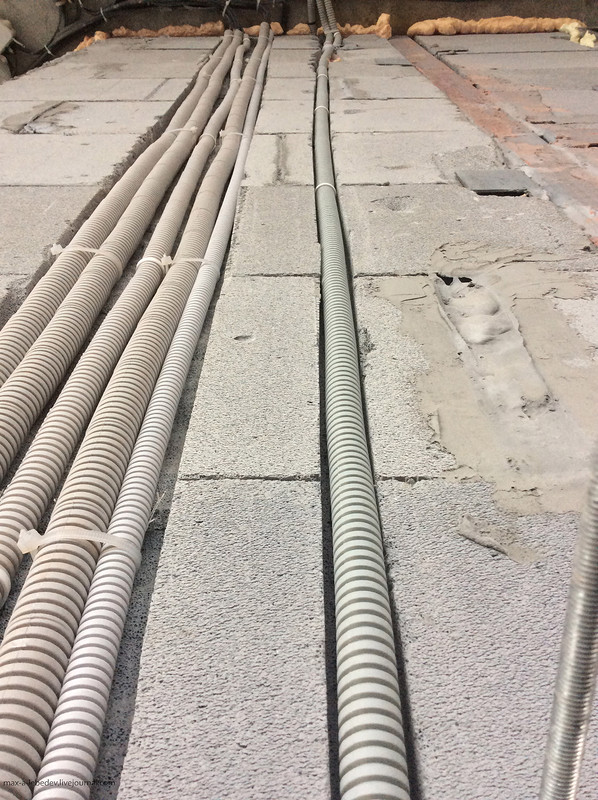
And if the installation of a video surveillance system, and indeed any cable installation is combined with the repair of an apartment, I would advise a hidden gasket in the gate. The work is dusty, but the cable will be completely hidden. The cable in the gate is better to lay in the corrugation. Otherwise, if you accidentally pierce it, you can pull out a new one from the corrugations, and it is unlikely to be completely plastered. Photo from one of the construction sites.
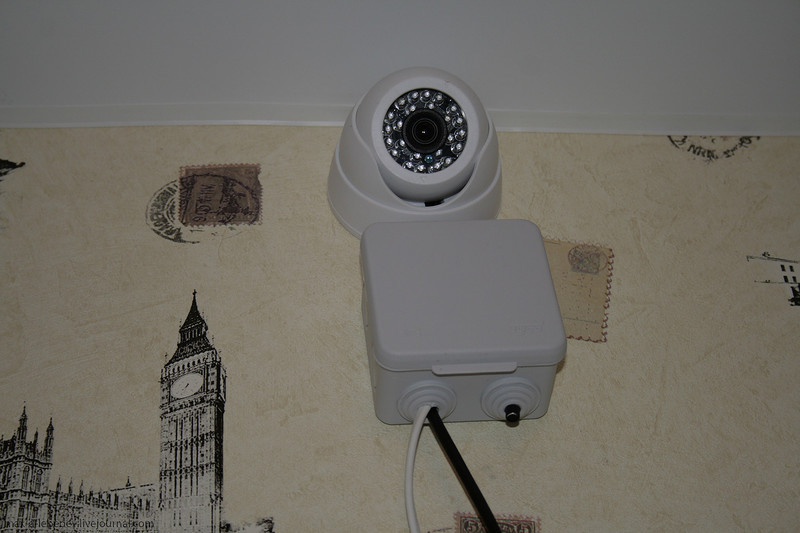
So, the cameras are installed, all connections are hidden in the box. In the box the microphone is laid, which looks out from one gland a little bit.
Installation is complete. Go to the last stage.
All cameras have a web server on board, with it all settings are made. The only thing that I categorically did not like was that in order to reach the camera, I had to add its IP address to the most reliable nodes and allow the installation of unsigned ActiveX components. And also it was possible to work with cameras only through Internet Explorer. Even through the Edge browser in Windows 10, as well as through its previous incarnation of Project Spartan in the pre-release builds of Windows 10, it was not possible to configure the cameras. About Chrome silent.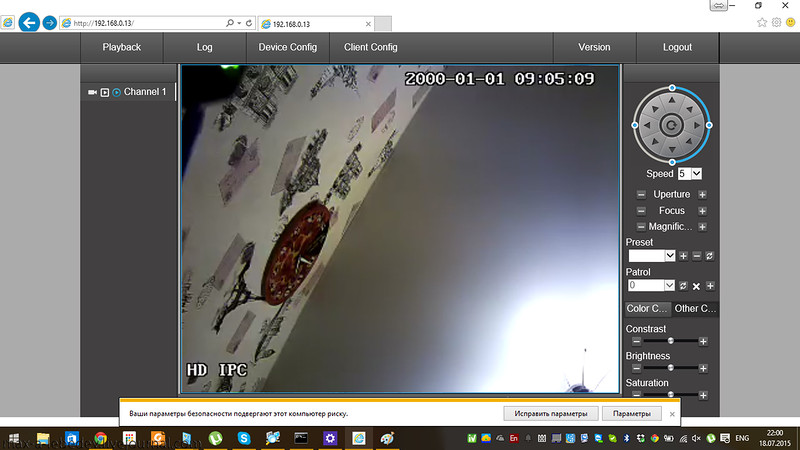
Anyway, I set up the camera. As can be seen from the subsequent and previous screenshots - the web server is written for different camera models, but neither PTZ nor WiFi are on my own . In the future, one of the glitches was preserved, when the IP address is set to static, receiving the IP address from the DHCP server is disabled, but if there is an active DHCP server on the network, the camera will receive an IP address from it. This is incredibly inconvenient because all video surveillance software identifies cameras by IP addresses. It was necessary in the router to assign permanent IPs to certain devices and give the same cameras to the cameras.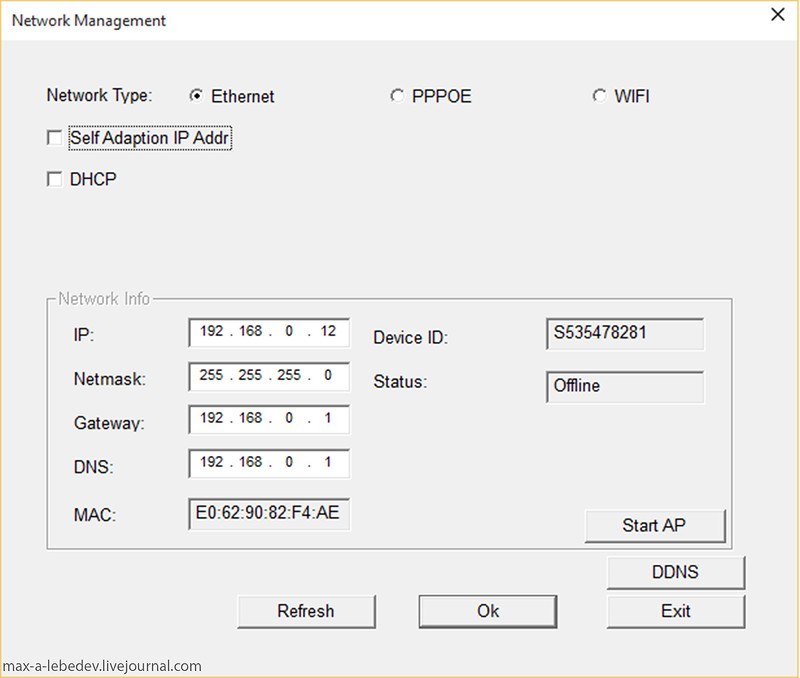
Soft tried different, and focused on free software, eventually tried or tried to try:
A special subtle mockery of DS ControlPoint above me was the fact that on the virtual machine, he quietly allowed to connect 4 cameras for free. Our people in Schneider Electric technical support shrugged. In the end, I spat and began to try another software.
What is bad is the limitations of the free version. Without buying a tariff plan, you can use 2 cameras. Additional cameras can be connected, at the time of this writing, for 600 rubles per year. On the one hand it is inexpensive. But I had to buy not 2, but 3 licenses. Because ivideon found a USB webcam that could not be removed from the server configuration and which was among the 2 free cameras. Total, for my system, it turned out 1800 rubles a year.
On the one hand, I spend more time on coffee a month, on the other hand, I myself put forward requirements for a minimum budget.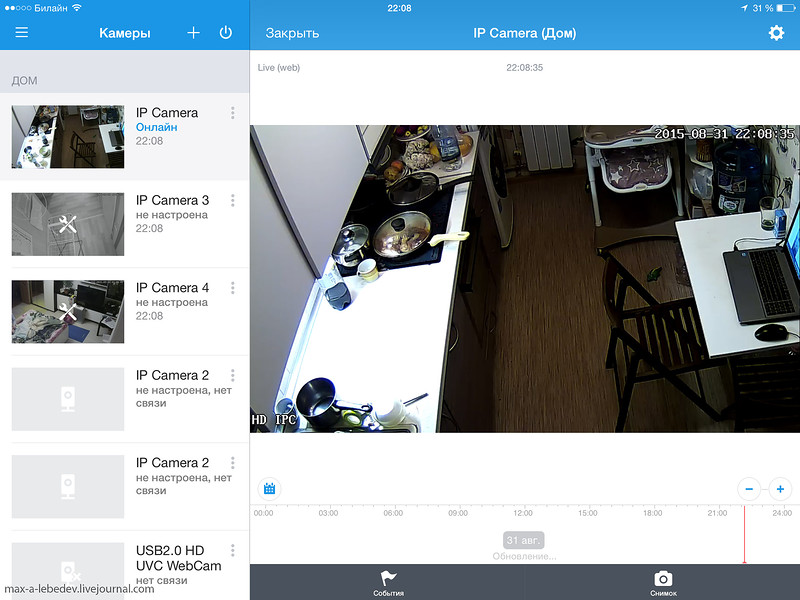
The archive for a week weighs about 150 GB, video records on the movement.
It is very easy to configure, it defines all the cameras. Free, you can use 16 cameras and 1 server. I do not even remember why I did not like him. In principle, everything was convenient, but SecurOs Lite turned out to be more convenient. Is that one camera sometimes fell off, showed a red window with the words of errors, then the connection was restored.
The software is very famous, and I was sure that it was free. But it is free only with the purchase of a camera or another iron. To excel and try different tricks did not.
Disadvantages of the built system:
Of the benefits:
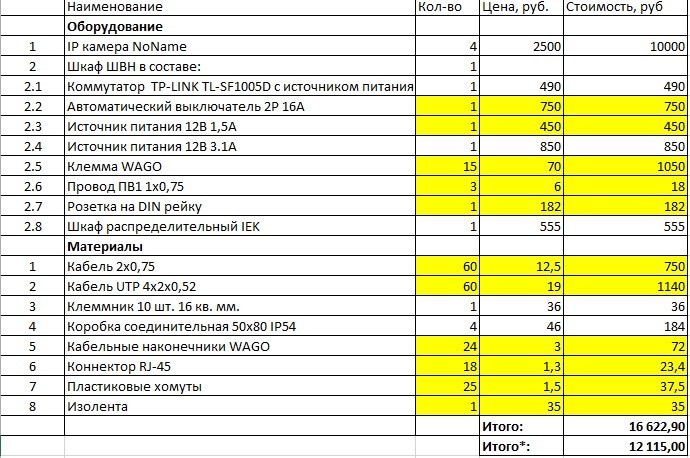
Below I quote the cost of materials and equipment, with the exception of a video surveillance server. Yellow highlighted positions that I did not buy, and which were found in the bins. So my budget is in the Total line *.
I started with such a digression that the tasks that the system should solve are clear:
- Monitoring people indoors;
- There is no dedicated operator position;
- Remote access;
- Video archiving for at least 7 days;
- Maximum budget savings.
Equipment selection
The block diagram is generally simple, and most video surveillance systems are similar.- Four IP video cameras;
- Video server (ordinary computer, with video surveillance software);
- Ethernet switch, communication cables and related equipment
For starters, I began to choose cameras. Unfortunately, the ruble exchange rate is now such that almost everything on the market has become more expensive. I even considered the option of buying black and white analog cameras, and the BU-shnogo DVR. It was scary to buy cameras on ebay or aliexpress, because they cost not so little, delivery time to Ekaterinburg is about a month, and there is also an illusory chance to buy a “like a megapixel” video camera with a 320x240 sensor and extrapolation curve.
As a result, I found a local vendor on Avito, bought four color IP cameras with microphones. I checked it on the spot, the test picture arranged for me.
The cameras are the real NoName from the team of Comrade Llyao. About the manufacturer do not find out neither the packaging nor the information on the camera. There is no turning mechanism, infrared illumination is. In the dark, the camera switches to black and white. Consumption 1 ampere, supply voltage 12 volts. PoE support is missing.
')
So, in order for cameras to start working, they need power and an interface cable. Since these are IP cameras, they transmit video data via ethernet, and since there is no PoE, the power cable must be laid separately. The power supply unit at 12 volts I suddenly found, but at 1.5 amps. Additionally, I bought another 3 amp Motorolla power supply.
My router has only two Ethernet ports, in addition to the WAN, so I had to buy a separate switch for 5 ports. All this equipment must somehow be connected, somewhere located, so that simultaneously acquired electrical locker known company IEK with two DIN rails. I called the wardrobe SHVN , just for the sake of having at least some name. The cabinet does not contain any tools for recording and storing videos, only power and network.
Installation
The wiring diagram did not, because the circuit is simple, there is little equipment. At the entrance of the machine, in case of short circuit . The outlet was not originally planned, but the power supply of the switch is plugged directly into the outlet, so I had to add it. All terminal strips are assembled from WAGO terminals simply because I had them. One 220V terminal block, power supplies and a socket are connected to it. Another terminal block is 12 volts, the power supply lines of the cameras are connected to it.
Unfortunately, I did not have end plates, so the last terminal in each terminal row is turned upside down. WAGO jumper was also not found, did not buy, made of wire. After assembly, of course, all the chains “rang out”, checked without load. The power supply produced, for some reason, not 12, but a little less than 10 volts. But that was enough for me.
If someone has a question, why all this, the cabinet, terminals and everything else - I will answer that I am opposed to “snot” and “twists”. The terminal provides extremely reliable contact, which over time will not become loose, will not crack. No matter, the self-tightening terminal, or with the “bolt-on” clip, guaranteed good contacts are reliably relieved of the thoughts “can the wiring have gone away?”.
Flexible wires, the conductors of which consist of many conductors, must be terminated. Tips, too, were found in the farm. If they are not there, you can simply twist the conductors and cheat. If there is no special crimping tool, you can either buy it, although the same crimping tools from WAGO cost 100 euros, or compress with pliers and then press the tip with nippers in several places. It turns out not so reliably, but I still failed to wrest a vein from it.
So, the cabinet is assembled checked, the installation location is selected. To install it took a couple of dowels and screws. Due to the fact that I do not need exceptional reliability, I did not provide a UPS. All the same, I am doing a video surveillance system in the house, and not a full-fledged COT .
Approximate camera installation locations Two rooms, a corridor, a kitchen. Theoretically, the camera allows you to adjust the view horizontally and vertically after installation. It is spinning well, though manually. But if you initially put it in the wrong place, the subsequent settings will still give a bad result. Therefore, I decided to use one camera as a test.
I installed the video surveillance software, set up (about it below), made a temporary “carrying” of a twisted pair cable and a power cable, turned on the camera, and went to configure. As a feedback, I used a tablet on which TeamViewer was launched, which showed a video surveillance server. Thus, at the time of installing the camera, I saw what it shows, chose the optimal place, did the markup and moved to another installation site.
As a result, I found the exact coordinates of the installation locations of 4 cameras, knowing what they would show, even before installation. In a large object, of course, this is not done, so sometimes you have to rewire cameras after the system starts up for a better view.
My hammer drill could not penetrate either the walls or the ceiling, so I had to borrow a hammer drill in a friendly company. The perforator made holes in the panel walls and ceilings as in oil, therefore I recommend not to suffer with low-power “hummers”. Of course, it is not necessary to buy, but you can rent it.
Installation of the cable I performed superficial. That is just the walls. Of course, he planned to install plastic boxes and put cables into them. I wanted it for a long time, the video has been working for a month, but I haven’t bought the box :-) The lack of time affects.
And if the installation of a video surveillance system, and indeed any cable installation is combined with the repair of an apartment, I would advise a hidden gasket in the gate. The work is dusty, but the cable will be completely hidden. The cable in the gate is better to lay in the corrugation. Otherwise, if you accidentally pierce it, you can pull out a new one from the corrugations, and it is unlikely to be completely plastered. Photo from one of the construction sites.
So, the cameras are installed, all connections are hidden in the box. In the box the microphone is laid, which looks out from one gland a little bit.
Installation is complete. Go to the last stage.
Adjustment and selection of software
All cameras have a web server on board, with it all settings are made. The only thing that I categorically did not like was that in order to reach the camera, I had to add its IP address to the most reliable nodes and allow the installation of unsigned ActiveX components. And also it was possible to work with cameras only through Internet Explorer. Even through the Edge browser in Windows 10, as well as through its previous incarnation of Project Spartan in the pre-release builds of Windows 10, it was not possible to configure the cameras. About Chrome silent.
Anyway, I set up the camera. As can be seen from the subsequent and previous screenshots - the web server is written for different camera models, but neither PTZ nor WiFi are on my own . In the future, one of the glitches was preserved, when the IP address is set to static, receiving the IP address from the DHCP server is disabled, but if there is an active DHCP server on the network, the camera will receive an IP address from it. This is incredibly inconvenient because all video surveillance software identifies cameras by IP addresses. It was necessary in the router to assign permanent IPs to certain devices and give the same cameras to the cameras.
Soft tried different, and focused on free software, eventually tried or tried to try:
- VideoNet Prime
- SecurOS lite
- Ivideon
- Trassir
- iSpy
- DS ControlPoint
- go1984
- Axxonnext
DS ControlPoint
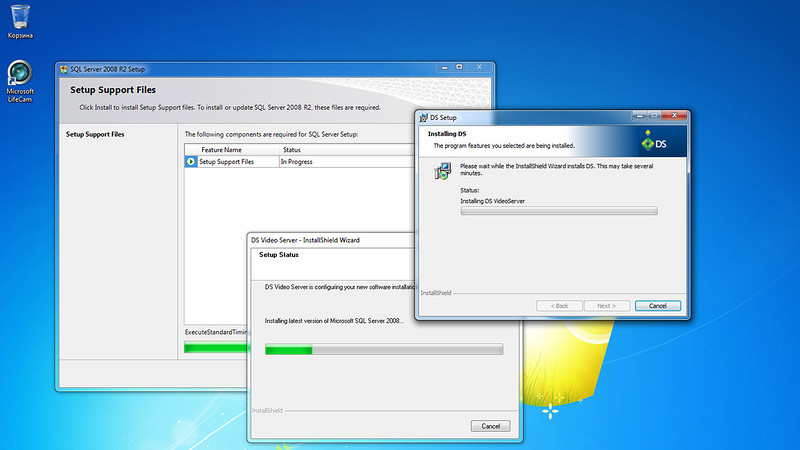
Software respected company Pelco. Without buying license keys, the user can use this product to connect 4 IP cameras. The software is installed for a long time, at the same time it installs additional software, including MS SQL Server. But what I did not try, I did not see free licenses. I reinstalled the software and components, I upgraded Windows 7 to Windows 10, not intending to do that, just out of despair. I reinstalled Windows 7 as a clean system, but there were no free licenses for 4 cameras on it either. I upgraded my clean system to Windows 10, but nothing happened either. About three days I was fiddling with the software, installing and reinstalling, updating and deleting the operating systems, but DS ControlPoint categorically did not want me to give a free opportunity to connect 4 cameras.A special subtle mockery of DS ControlPoint above me was the fact that on the virtual machine, he quietly allowed to connect 4 cameras for free. Our people in Schneider Electric technical support shrugged. In the end, I spat and began to try another software.
Ivideon
I was pleasantly surprised by the convenience and capabilities. I installed the server part, the cameras were all found automatically, the iOs application is convenient.What is bad is the limitations of the free version. Without buying a tariff plan, you can use 2 cameras. Additional cameras can be connected, at the time of this writing, for 600 rubles per year. On the one hand it is inexpensive. But I had to buy not 2, but 3 licenses. Because ivideon found a USB webcam that could not be removed from the server configuration and which was among the 2 free cameras. Total, for my system, it turned out 1800 rubles a year.
On the one hand, I spend more time on coffee a month, on the other hand, I myself put forward requirements for a minimum budget.
SecurOS lite
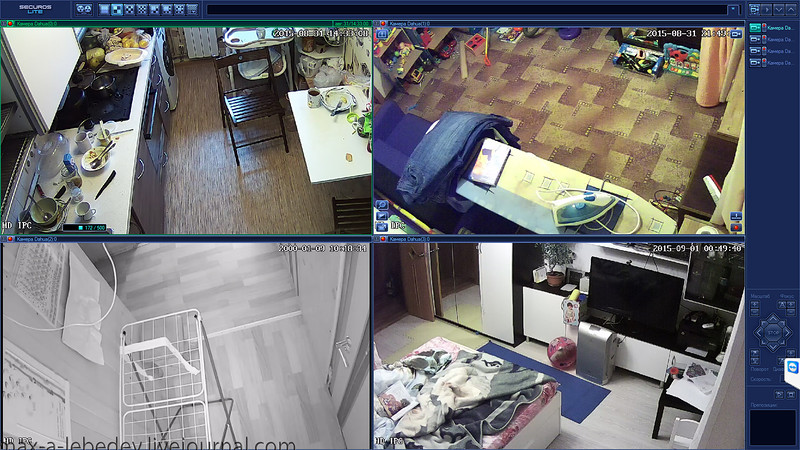
In the free version you can use 4 video cameras. For my requirements, this is suitable. The automatic search did not help, I managed to manually adjust them when I pointed out the manufacturer “Dahua”. :-) I still haven't really figured out the sound. Video writes well, exports too. What is bad - remote access only if you purchase an additional paid module. So I had to use TeamViewer. But in the end I chose SecurOs Lite.The archive for a week weighs about 150 GB, video records on the movement.
VideoNet Prime
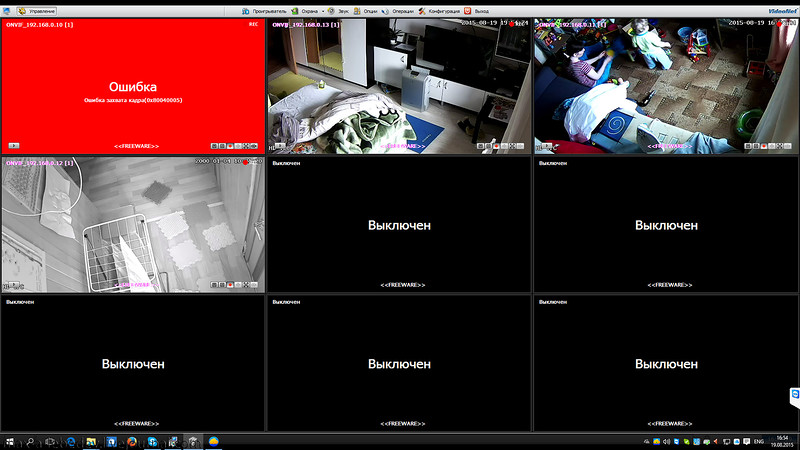
It is very easy to configure, it defines all the cameras. Free, you can use 16 cameras and 1 server. I do not even remember why I did not like him. In principle, everything was convenient, but SecurOs Lite turned out to be more convenient. Is that one camera sometimes fell off, showed a red window with the words of errors, then the connection was restored.
Trassir
The software is very famous, and I was sure that it was free. But it is free only with the purchase of a camera or another iron. To excel and try different tricks did not.
go1984
10 years ago I tried it. And now it failed, under Windows 10 it works, probably. In processes, the file is hanging, resources are consuming, but I did not see the interface. I admit that the software did not work because of incompatibility with some product from the zoo of programs on a working laptop. I didn’t try on a clean home server system.Axxonnext
The complex is seemingly powerful. However, I could not earn money on my server. I could not see the camera either automatically or manually.iSpy
Not the most convenient software, and even in the free mode, access is possible only from a LAN. Continue the experiments did not.Summary
Disadvantages of the built system:
- Impossibility of scaling (all ports of the switch are occupied, SecurOs will not allow connecting more cameras);
- Cameras are cheap, how will they behave in six months is unknown. The software in them is completely incomprehensible, it is possible that a VPN server will merge video from my apartment :-);
- SecurOs, like most other products that I have tried, forces the user to log in to the operating system. That is, getting up in the morning, you must not forget to connect, log in, manually start the video surveillance software.
Of the benefits:
- The budget is minimal;
- The created system solves the tasks that I set for it. There is an archive, there is, not the most convenient, but still remote access. With a good channel, TeamViewer gives you a decent picture, but if you need to pick up the archives, I can turn on the TV, which is connected to the server, like a media center.
Below I quote the cost of materials and equipment, with the exception of a video surveillance server. Yellow highlighted positions that I did not buy, and which were found in the bins. So my budget is in the Total line *.
Source: https://habr.com/ru/post/383905/
All Articles