Macro: from large to small
Hello, dear readers of the Geektimes resource! This post is an attempt to systematize the bumps I fill in the field of macrophotography. For this, I collected my own separate sketches in one outline. Perhaps the information will be useful to someone.
Part 1. Theory
1. What is macrophotography?
2. What to photograph
3. Stacking
4. Lighting
')
Part 2. Practice
1. My "shishkonabivanie"
2. Photo examples
1. A bit of theory
Macro photography - obtaining large-scale images of small objects. The main criterion is considered to be the scale of shooting. It is calculated as the ratio of the size of the object on the matrix or film to the true physical size. If the image size is 2 times the original, we have a 2: 1 scale. If it is less than 2 times - the scale is 1: 2. And with equality - 1: 1. Main scale division:
macro photography - from 1: 5 to 5: 1;
micrograph - from 12: 1 and larger.
2. How to photograph macro?
I will begin the list of methods with the simplest and budget. Recommendation for choosing a carcass of a camera: preferably with a cropping-format matrix (since the depth of field and image size, other things being equal, will be larger compared to the full frame), the ability to remotely control via cable and the pre-lift function of the mirror (if selected from DSLRs).
2.1. The way is budgetary. You need to take the lens and just deploy it. To obtain the largest scale, you can use a standard whale lens (for example, 18-55mm). To do this, you need to buy a reversing ring for the diameter of the light filter of your lens. It is an adapter, on the one hand of which the lens is wound, the other side attached to the camera's bayonet.
Fig. 2 Reversible and revolving rings:

Naturally, no automation works. All parameters must be set manually. But, firstly, a very budget solution. And secondly, if a standard macro lens can produce a picture at a scale of 1: 1, then the resulting _Frankenshteyn_ can easily shoot at a scale of up to 4: 1, if not more (depends on the experimental lens). In my opinion, these are minor inconveniences for the ability to photograph with such a scale.
Pros:
- Cheapness (you need to buy only wrapped ring).
Minuses:
- The diaphragm is not controlled in the regular way;
- The quality depends on the specific instance and can be disgusting.
2.2. The docking of two lenses with the front sides to each other. For this you need:
- Fix with the shortest possible focal length and a good aperture (because on it the diaphragm must be fully opened);
- A lens with the longest focal length (fixed or zoom);
- Bilateral circulating macro ring for connecting these lenses.
Pros:
- We get a huge increase from improvised lenses;
- Cheapness (in the presence of lenses, you need to buy only wrapped ring);
- Autofocus and aperture work (although autofocus is useless at such magnifications).
Minuses:
- Photograph at a scale larger than 2: 1 only with a tripod, plus to this, it would be better to use the remote;
- The rear lens of the front lens can quickly get dirty, so either take photos at home or collectively protect the filter on its own.
2.3. Extension rings. You can dock with any lens. Allow you to focus from a closer distance to any lens.
Fig. 3 Set of extension rings:

Pros:
- Allows any lens to approach a macro lens in scale.
Minuses:
- The luminous flux decreases, especially if the blackening of the inner surface is of poor quality.
2.3.1. Macromech. The meaning is the same as for extension rings: they allow focusing from a closer distance to any lens. They allow you to adjust the focal length by removing / bringing the lens closer to the image projection plane (film, matrix).
2.4. Lenses for macro. There are different designs (from simple lenses to mini-lenses). Differ in price and, accordingly, quality.
Pros:
- Increases and approximates;
- Convenient mount (about Raynox).
Minuses:
- Price.
2.5. Specialized macro lens. There are many of them and for a different wallet. The longer the focal length, the more distant you can focus on, the less likely you are to flush out the “game”. But the price increases, respectively, focal length. I want to mention only one macro lens - Canon MP-E 65mm f / 2.8 1-5x Macro Photo, which allows you to shoot with variable magnification from 1: 1 to 5: 1:
Fig. 3 Canon MP-E 65mm f / 2.8 1-5x Macro Photo is essentially a conventional inverted lens:

If I were a Kenonist, then I would not have to fence the whole garden with lens connections, etc. Here I envy them white envy, because Nikon has no analogue.
2.6. The use of non-core lenses. For example, from microscopes, etc.
In principle, these are all basic devices for obtaining macro photographs.
3. Stacking
Having overcome the difficulties that accompanied the search for the desired magnification, I immediately encounter another problem arising from a high degree of magnification: the GRIP with such magnifications is negligible and amounts to a fraction of a millimeter, even with a tightly closed diaphragm.
Fig. 4 Read / write head of the hard disk. The depth of field in this image is ~ 0.07 mm:

Accordingly, nothing good can be removed. To get an image with a sufficient depth of field, you need to use stacking technology — taking several shots at different focusing distances and then combining them. That is, we will shoot several frames of one object, focusing successively on several points, starting from the closest and ending at the farthest. By combining them, we will get much more in focus on the resulting frame than could be done in one shot.
3.1. How to get pictures for stacking? I tried three ways:
- Manual. It’s the most budget-friendly: manually rotate the focus ring of the lens for a short distance after each frame.
- Soft. Connect the camera to a computer by installing a specialized program on it, which will be consistently focused for you. Or use a combine that can do everything: focus sequentially, take a picture, stitch, etc. An example of such a complex is Helicon Focus Pro. Or, you can use the camera's native program to move the autofocus and shoot, they allow it. For Nikon, this is Camera Control Pro.
- Mechanical. Use macrorails. There are a great many of them and a very different wallet. Subdivided into manual and motorized.
Fig. 5 Manual focus mode:

3.2. In which program to stack the pictures?
- Photoshop. I use this program if there are no more than 10 images for the stack. When more is a very long process of stitching and a lot of mistakes. At the same time, editing is difficult.
- Using a specialized program for stacking. For example, Zerene stacker.
4. Lighting
With high magnification and covered aperture, natural light is not enough. I tried two ways to get enough exposure:
- The use of a constant light source (LED, incandescent, etc.). In this case, the shutter speed can be quite large and reach a second. This is where the pre-rise of the mirror and the remote descent come in, since even the slightest vibrations result in blurred images.
- Use one or more flashes. A better option, because allows you to set a short exposure. But it also has its pitfalls: a very harsh light that needs to be built and softened.
Part 2. Practice
1. My "shishkonabivanie"
I am sitting on the Nikon system, so all of the lenses listed and specialized accessories belong to it. Using them, he experimented by searching between the degree of magnification and the quality of the resulting image.
1.1. Inverted with a reversing ring whale lens 18-55mm. It is necessary to lock the diaphragm lever. I did this with a piece of toothpick, putting the lever in about the middle position. If this is not done, then the aperture will be covered to its minimum value:
Fig. 6 Locked diaphragm lever:

That's all. The resulting design can cling to the carcass. It looks like this:
Fig. 7 Carcass with inverted lens:

Fig. 8 Photo example (without processing, only 100% cropped and in the corner of the original image):

1.2. Inverted lenses. I used 50mm 1.4 fix and 70-210mm:
Fig. 9 Nikkor 50mm 1.4:

Fig. 10 Nikkor 70-210mm 4-5.6:

Initially I tried to experiment with the whale 18-55. I didn’t really like this pair because On the full format, the image occupies only the central part of the frame, but I do not have a crop now. Therefore, 18-55 was replaced by 105mm 2.8 VR micro. The magnification of the increase was 105/50 (i.e., 2: 1). This was not very impressive, so the 105mm 2.8 VR micro was replaced with the Nikkor telephoto 70-210 mm. Accordingly, it turned out a macro-zoom. The zoom scale turned out: from 70/50 to 210/50. That is, from 1.4: 1 to 4.2: 1.
Fig. 11 Docked with front lenses Nikkor 50mm 1.4 and Nikkor 70-210mm 4-5.6:

Fig. 12 Tulle, shot with a regular lens:

Fig. 13 It’s with a minimum magnification (70mm):

Fig. 14 It is with the maximum magnification (210mm):

1.3. Extension rings. I use the Kenko kit 36, 20, 12mm (Fig. 3). If you are a Nikonist, buy simple ones. Support screwdriver drive is not needed, just overpay money. Added them to two inverted lenses (2.2.), Got such a monster. Next to compare whale D40:
Fig. 15 Nikkor 50mm 1.4 + Nikkor 70-210mm 4-5.6 + 3 rings. Looking at this building, I want to cry:

In fact, I photographed this “ShYdevr” on the phone, so in fact the sag of the whole structure is not so big. But all the same, this moment from “Pirates of the Caribbean” is immediately recalled:

A few examples of cloth taken on this monster (Fig. 12):
Fig. 17 Tulle with a minimum increase (70mm):

Fig. 18 It’s with the maximum magnification (210mm):

Extension rings with a fix 50mm. In terms of quality and magnification, my favorite budget option was:
Fig. 19 Nikkor 50mm 1,4 + 3 rings:

An example of a picture taken on this design:
Fig. 20 Photographed on Nikkor 50mm 1.4 + 3 rings:

Fig. 21 For comparison, shot on Nikkor 105 mm 2.8 VR Micro:

Personally, I do not see the difference. As a result, with the help of three extension rings and a standard Nikkor 50mm 1.4 lens, we get a macro lens, in terms of quality and scale, is almost as good as the specialized Nikkor macro lens 105mm. In this case, the cost is two times smaller.
1.4. Lens on the lens. I am using Raynox m-250. Rather, it is a small lens, because The design consists of several high-quality lenses made of coated glass (3 elements in 2 groups). Causes some positive emotions:
- quick mount lenses from 52 to 67 mm
- increase 8 diopters (x3 times)
- high-quality image
Fig. 22 Raynox m-250:

And if you add a lens to the previous set, you’ll have a great beauty!
Fig. 23 Nikkor 50mm 1.4 + 3 rings + Raynox m-250:

1.5. Macro lens I have this Nikkor 105 mm 2.8 VR Micro. Allows you to shoot macro with a scale of 1: 1. I use as 3 in 1:
- Very cool portrait;
- Weak telephoto;
- Well, actually, a macro lens.
Only one minus is the price.
Fig. 24 Nikkor 105 mm 2.8 VR Micro:

Fig. 25 Example of a photo taken with the Nikkor 105 mm 2.8 VR Micro:

1.6. Nikon's lens for a Nikon CFI microscope plan achromat 10x.
Fig. 26 Nikon CFI plan achromat 10x with transition ring 62mm:

It fits through the adapter with the front lens of any lens. I tried to dock with the Nikkor 105mm, but the increase seemed to me not large enough. Therefore, I stopped at the variant of its docking with the Nikkor 70-210mm.
Fig. 27 Nikon CFI plan achromat 10x + Nikkor 70-210mm:

At the same time, the scale of shooting reached 13: 1. For a slow shooting at home I use this particular bundle. For the stack, you have to do an average of 100 frames.
1.7. I use Cognisys StackShot Macro Rail motorized rails. They allow you to set all the parameters necessary for shooting a stack and independently manage the camera. I can quietly go and drink tea.
Fig. 28 Cognisys Stackshot Macro Rail:

Fig. 29 Now at home the process looks like this:

A cropped bottle of kefir serves as a scatterer.
For shooting live objects I use Nikkor 105 mm + Ring 30mm + Raynox m-250. I always take pictures with my hands at a diaphragm of 25 (and sometimes, oh, horror, close to 29!). Full frame he is. I highlight one or two flashes. If the object allows, then I take a few frames, then in Photoshop I combine the sharp zones of these frames manually.
2. Photo examples
Fig. 30 Inverted lenses Nikkor 50mm 1.4 + 70-210mm + 2 rings:

Fig. 31 The mechanism of watches. Nikkor 105 mm + 3 rings + Raynox m-250:

Fig. 32 Butterfly. Nikkor 105 mm + 3 rings + Raynox m-250:

Fig. 33 Butterfly wing. Nikkor 70-210mm + Nikon CFI plan achromat 10x:

Fig. 34 Onion cells:

Fig. 35 Butterfly foot:

Fig. 36 pixels display camera:

Fig. 37 Cells of the photosensitive matrix of the camera (pixel size 0.00168mm X 0.00168mm):

Fig. 38 Butterfly eyes facets:

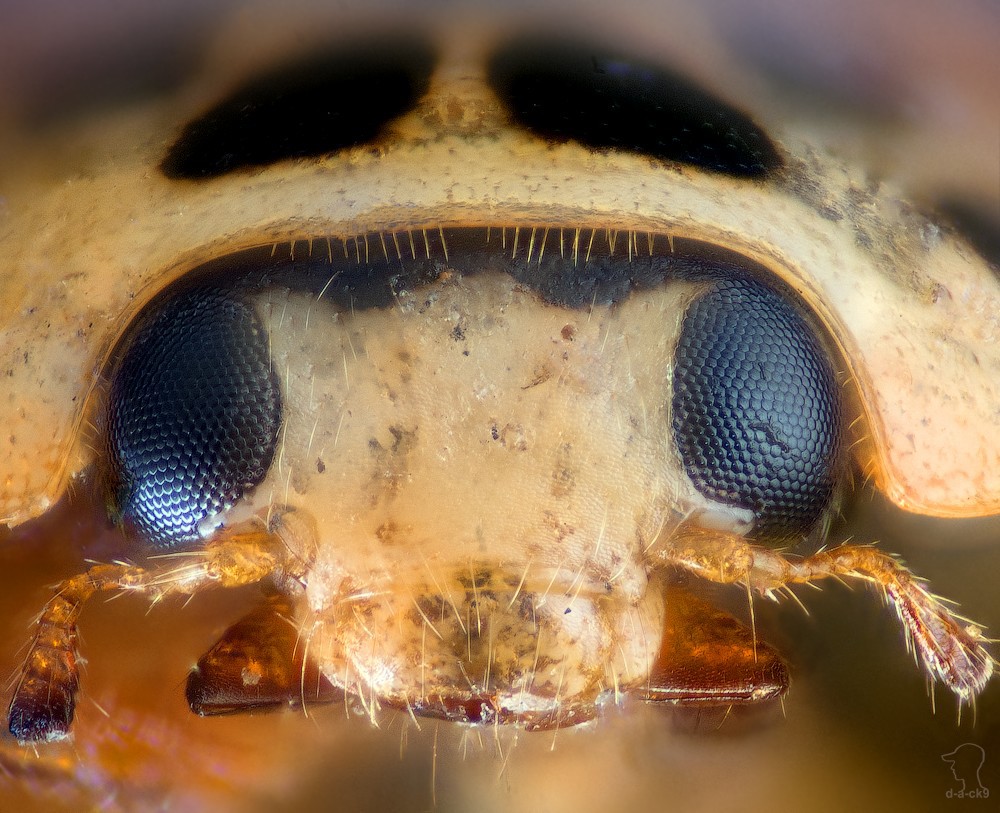
Photos of wildlife with Nikkor 105 mm + Ring 30mm + Raynox m-250.
Fig. 39 Cute foot silkworm grass:

Fig. 40 Bowl Arrow:

Fig. 41 Why not go for a good shot! While this vampire was sucking the precious liquid out of me, I managed to take about five frames:

Fig. 42 Mini Alien - Ghost Mantis:

Fig. 43 Senoedi nymph from the order Psocoptera:

Fig. 44 White-foamy cicada nymphs:

Fig. 45 Just an ant:

Thanks for attention!
Source: https://habr.com/ru/post/377291/
All Articles