Ultimate Hacking Keyboard Creation
Translation of the story of the idea and creation of the Ultimate Hacking Keyboard - an unusual keyboard, the project of which is soon planned to be launched on Kickstarter.
In August 2007, at work, I noticed how far from ideal a standard keyboard for a PC was. I have to move my hands to different places hundreds of times a day, and you need to keep your palms close to each other, which is not very convenient. I thought that there must be a better way.
I began to think how to improve the keyboard and came to this:
')
Having only the experience of software development and not knowing anything about electronics, we managed to develop and create a powerful and attractive device. It was a very interesting experience. In the article I want to describe how it was done and how it works.
Let's try to start with something simple, for example with Arduino, and gradually increase the degree of complexity, in order to come to the Ultimate Hacking Keyboard at the end.
Make a USB-keyboard, which gives the symbol x once a second. For this, the Arduino Micro is ideal. There is an ATmega32U4 on it - this is the same AVR microcontroller that serves as the brain of the UHK.

With the USB AVR microcontroller, the easiest way to work is through the Lightweight USB Framework for AVRs (LUFA) library. When connected to a USB device must transfer special data structures - USB descriptors. They tell computers the type and properties of the connected device and are represented as a tree. In this case, the device can implement several functions.
Here is the descriptor structure for UHK:
Standard keyboards provide only one handle. But on our keyboard, you can program arbitrary keys so that they perform the role of a mouse. And the GenericHID interface works as a channel for communication and transfer of settings. The full implementation for a device based on LUFA can be found here.
Now you can send the x character every second:
The USB protocol works on the principle of polling, that is, the computer polls the device at certain intervals (usually 125 times per second). The callback function CALLBACK_HID_Device_CreateHIDReport () sends the symbol scancode to the computer if the isSecondElapsed variable contains 1. The variable is assigned 1 in the loop every second, and 0 in the callback function.
While our keyboard is not particularly useful. To be able to type something, you need keys. They should be arranged according to some scheme (matrix). The 104-key keyboard has 6 rows and 18 columns, but for now we will limit ourselves to a 2x2 matrix. Scheme:

What it looks like on the prototyping board:

If ROW1 is connected to PINA0, ROW2 with PINA1, COL1 with PORTB0 and COL2 with PORTB1, then the code for polling clicks looks like this:
The code scans the keyboard one column at a time, and in the column reads the state of the individual switches. Then the state of the buttons is stored in the array. Inside CALLBACK_HID_Device_CreateHIDReport (), appropriate scancodes will be assigned based on this array.
Continuing the path to the UHK, you must add the second half of the keyboard. It will contain another matrix of keys that will work using the same method. An interesting point is the communication of the two halves with each other. The three most popular protocols for connecting devices are SPI, I2C and UART. The article will be used UART.

Bilateral communication goes through the RX to the right and through TX to the left. VCC and GND are needed for power transmission. For a UART, all devices must have the same transmission rate, the number of data bits and stop bits.
So far, the left side sends single-byte messages to the right via UART, which are keystrokes and keystrokes. The right half processes them and creates a matrix for the full keyboard.
Sending messages from the left:
The KeyboardRxCallback () interrupt handler is triggered when a byte is received. For the fastest response of handlers, the received messages are added to the ring buffer. It is processed from the main loop, and the keyboard matrix is updated based on this message.
This is a simplified description, the resulting protocol will be somewhat more complicated. It will be necessary to process multibyte messages, and check messages for correctness on checksums.
The prototype already looks impressive:

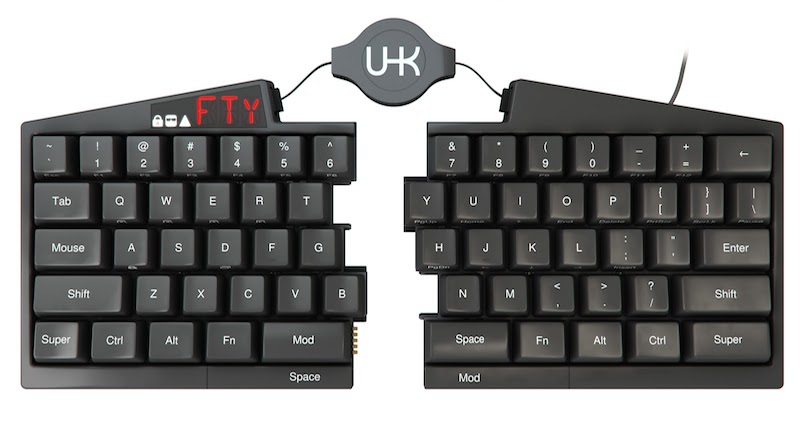
We wanted the UHK to have several layouts, and the user to know which one was in use at the moment. For this we need a LED display.

The display is a matrix of 8x6

Each two rows of red characters is one of 14-segment displays. White characters - three additional status indicators.
In order for the LED to light up, a high voltage is applied to the corresponding column, and a low voltage to the row. It follows that only one column can work. It can be decided that because of this, it is impossible to work with all the displays at the same time - but the point is that they just blink so fast that the eye does not notice.
The LED matrix is controlled by two integrated circuits (IC), one of which controls the rows, and the other controls the rows. The columns are controlled by PCA9634 I2C:

Rows are controlled by TPIC6C595:

Code:
LedMatrix_UpdateNextRow () is called every millisecond and updates the matrix row. The LedStates array saves the status of individual LEDs, and is updated via the UART based on messages on the right side of the keyboard, much like the keystrokes are processed.
So we built the components for our keyboard. The inside of the keyboard is a computer network in miniature: a set of nodes connected to each other.

It is necessary to mention the software that works with the keyboard on the side of the computer - UHK Agent. Unlike the iron part, the Agent is still in a rudimentary state. But the basic principles of his work are already defined, which I want to mention.
UHK Agent - application for keyboard settings for the needs of the user. Although it is a fat (rich) client, Agent uses web technologies and runs on the webkit platform. With the keyboard, it communicates through the node-usb library. He Express.js to access third-party applications through the REST API. He also has Angular.js for drawing a beautiful user interface.
Each command has an 8-bit identifier and a set of arguments depending on the command. Now only the re-enumerate command is implemented.
What can this software? Agent can display the wear of the buttons and warn about the need to replace them. It can provide an interface for customizing different layouts. Set the speed and acceleration of the mouse cursor. And a lot of everything else.
The prototypes take a lot of effort. First you need to decide on the mechanical design - it is in itself a difficult task, for which you need to prepare a lot of plastic parts, laser cut out parts from stainless steel sheets, carve high-precision steel guides and adapt neodymium magnets that will hold the two halves together. Previously all the details are calculated in CAD.

Keyboard case printed on a 3D printer:

Based on the mechanical design and the circuit, you need to make a printed circuit board. The right-hand side of KiCad looks like this:

We make the board and manually solder the elements:

Finally, having made all the parts, typing and grinding the plastic parts, and putting it all together, we get a working prototype of the keyboard:

I compare the keyboard for developers with musical instruments. The keyboard is a rather intimate object. We use them all day to create tomorrow's programs, typing one character after another.
Therefore, for me, the development of UHK is a privilege, and despite all the difficulties, it is an exciting adventure and a wonderful learning experience in new things.
For more information, I invite you to visit the site ultimatehackingkeyboard.com , and there you can subscribe to the notice of the beginning of our crowdfunding company.
How I decided to build the perfect developer keyboard from scratch
In August 2007, at work, I noticed how far from ideal a standard keyboard for a PC was. I have to move my hands to different places hundreds of times a day, and you need to keep your palms close to each other, which is not very convenient. I thought that there must be a better way.
I began to think how to improve the keyboard and came to this:
')
Having only the experience of software development and not knowing anything about electronics, we managed to develop and create a powerful and attractive device. It was a very interesting experience. In the article I want to describe how it was done and how it works.
How to make a keyboard?
Let's try to start with something simple, for example with Arduino, and gradually increase the degree of complexity, in order to come to the Ultimate Hacking Keyboard at the end.
Step 1: Keyboard without keys
Make a USB-keyboard, which gives the symbol x once a second. For this, the Arduino Micro is ideal. There is an ATmega32U4 on it - this is the same AVR microcontroller that serves as the brain of the UHK.
With the USB AVR microcontroller, the easiest way to work is through the Lightweight USB Framework for AVRs (LUFA) library. When connected to a USB device must transfer special data structures - USB descriptors. They tell computers the type and properties of the connected device and are represented as a tree. In this case, the device can implement several functions.
Here is the descriptor structure for UHK:
Device descriptor Configuration descriptor Interface descriptor 0: GenericHID Endpoint descriptor Interface descriptor 1: Keyboard Endpoint descriptor Interface descriptor 2: Mouse Endpoint descriptor Standard keyboards provide only one handle. But on our keyboard, you can program arbitrary keys so that they perform the role of a mouse. And the GenericHID interface works as a channel for communication and transfer of settings. The full implementation for a device based on LUFA can be found here.
Now you can send the x character every second:
uint8_t isSecondElapsed = 0; int main(void) { while (1) { _delay_us(1000); isSecondElapsed = 1; } } bool CALLBACK_HID_Device_CreateHIDReport(USB_ClassInfo_HID_Device_t* const HIDInterfaceInfo, uint8_t* const ReportID, const uint8_t ReportType, void* ReportData, uint16_t* const ReportSize) { USB_KeyboardReport_Data_t* KeyboardReport = (USB_KeyboardReport_Data_t*)ReportData; if (isSecondElapsed) { KeyboardReport->KeyCode[0] = HID_KEYBOARD_SC_X; isSecondElapsed = 0; } *ReportSize = sizeof(USB_KeyboardReport_Data_t); return false; } The USB protocol works on the principle of polling, that is, the computer polls the device at certain intervals (usually 125 times per second). The callback function CALLBACK_HID_Device_CreateHIDReport () sends the symbol scancode to the computer if the isSecondElapsed variable contains 1. The variable is assigned 1 in the loop every second, and 0 in the callback function.
Step 2: Keyboard with four keys
While our keyboard is not particularly useful. To be able to type something, you need keys. They should be arranged according to some scheme (matrix). The 104-key keyboard has 6 rows and 18 columns, but for now we will limit ourselves to a 2x2 matrix. Scheme:
What it looks like on the prototyping board:
If ROW1 is connected to PINA0, ROW2 with PINA1, COL1 with PORTB0 and COL2 with PORTB1, then the code for polling clicks looks like this:
/* , */ typedef struct { volatile uint8_t *Direction; volatile uint8_t *Name; uint8_t Number; } Pin_t; /* Flash SRAM. */ typedef struct { const uint8_t ColNum; const uint8_t RowNum; const Pin_t *ColPorts; const Pin_t *RowPins; } KeyMatrixInfo_t; /* SRAM */ typedef struct { const __flash KeyMatrixInfo_t *Info; uint8_t *Matrix; } KeyMatrix_t; const __flash KeyMatrixInfo_t KeyMatrix = { .ColNum = 2, .RowNum = 2, .RowPins = (Pin_t[]) { { .Direction=&DDRA, .Name=&PINA, .Number=PINA0 }, { .Direction=&DDRA, .Name=&PINA, .Number=PINA1 } }, .ColPorts = (Pin_t[]) { { .Direction=&DDRB, .Name=&PORTB, .Number=PORTB0 }, { .Direction=&DDRB, .Name=&PORTB, .Number=PORTB1 }, } }; void KeyMatrix_Scan(KeyMatrix_t *KeyMatrix) { for (uint8_t Col=0; Col<KeyMatrix->Info->ColNum; Col++) { const Pin_t *ColPort = KeyMatrix->Info->ColPorts + Col; for (uint8_t Row=0; Row<KeyMatrix->Info->RowNum; Row++) { const Pin_t *RowPin = KeyMatrix->Info->RowPins + Row; uint8_t IsKeyPressed = *RowPin->Name & 1<<RowPin->Number; KeyMatrix_SetElement(KeyMatrix, Row, Col, IsKeyPressed); } } } The code scans the keyboard one column at a time, and in the column reads the state of the individual switches. Then the state of the buttons is stored in the array. Inside CALLBACK_HID_Device_CreateHIDReport (), appropriate scancodes will be assigned based on this array.
Step 3: keyboard of two halves
Continuing the path to the UHK, you must add the second half of the keyboard. It will contain another matrix of keys that will work using the same method. An interesting point is the communication of the two halves with each other. The three most popular protocols for connecting devices are SPI, I2C and UART. The article will be used UART.
Bilateral communication goes through the RX to the right and through TX to the left. VCC and GND are needed for power transmission. For a UART, all devices must have the same transmission rate, the number of data bits and stop bits.
So far, the left side sends single-byte messages to the right via UART, which are keystrokes and keystrokes. The right half processes them and creates a matrix for the full keyboard.
Sending messages from the left:
USART_SendByte(IsKeyPressed<<7 | Row*COLS_NUM + Col); : void KeyboardRxCallback(void) { uint8_t Event = USART_ReceiveByte(); if (!MessageBuffer_IsFull(&KeyStateBuffer)) { MessageBuffer_Insert(&KeyStateBuffer, Event); } } The KeyboardRxCallback () interrupt handler is triggered when a byte is received. For the fastest response of handlers, the received messages are added to the ring buffer. It is processed from the main loop, and the keyboard matrix is updated based on this message.
This is a simplified description, the resulting protocol will be somewhat more complicated. It will be necessary to process multibyte messages, and check messages for correctness on checksums.
The prototype already looks impressive:
Step 4: LED display
We wanted the UHK to have several layouts, and the user to know which one was in use at the moment. For this we need a LED display.
The display is a matrix of 8x6
Each two rows of red characters is one of 14-segment displays. White characters - three additional status indicators.
In order for the LED to light up, a high voltage is applied to the corresponding column, and a low voltage to the row. It follows that only one column can work. It can be decided that because of this, it is impossible to work with all the displays at the same time - but the point is that they just blink so fast that the eye does not notice.
The LED matrix is controlled by two integrated circuits (IC), one of which controls the rows, and the other controls the rows. The columns are controlled by PCA9634 I2C:
Rows are controlled by TPIC6C595:
Code:
uint8_t LedStates[LED_MATRIX_ROWS_NUM]; void LedMatrix_UpdateNextRow(bool IsKeyboardColEnabled) { TPIC6C595_Transmit(LedStates[ActiveLedMatrixRow]); PCA9634_Transmit(1 << ActiveLedMatrixRow); if (++ActiveLedMatrixRow == LED_MATRIX_ROWS_NUM) { ActiveLedMatrixRow = 0; } } LedMatrix_UpdateNextRow () is called every millisecond and updates the matrix row. The LedStates array saves the status of individual LEDs, and is updated via the UART based on messages on the right side of the keyboard, much like the keystrokes are processed.
Overall plan
So we built the components for our keyboard. The inside of the keyboard is a computer network in miniature: a set of nodes connected to each other.
It is necessary to mention the software that works with the keyboard on the side of the computer - UHK Agent. Unlike the iron part, the Agent is still in a rudimentary state. But the basic principles of his work are already defined, which I want to mention.
UHK Agent - application for keyboard settings for the needs of the user. Although it is a fat (rich) client, Agent uses web technologies and runs on the webkit platform. With the keyboard, it communicates through the node-usb library. He Express.js to access third-party applications through the REST API. He also has Angular.js for drawing a beautiful user interface.
var enumerationModes = { 'keyboard' : 0, 'bootloader-right' : 1, 'bootloader-left' : 2 }; function sendReenumerateCommand(enumerationMode, callback) { var AGENT_COMMAND_REENUMERATE = 0; sendAgentCommand(AGENT_COMMAND_REENUMERATE, enumerationMode, callback); } function sendAgentCommand(command, arg, callback) { setReport(new Buffer([command, arg]), callback); } function setReport(message, callback) { device.controlTransfer( 0x21, // bmRequestType ( ) 0x09, // bmRequest ( ) 0, // wValue (MSB , LSB ) interfaceNumber, // wIndex ( ) message, // callback ); } Each command has an 8-bit identifier and a set of arguments depending on the command. Now only the re-enumerate command is implemented.
What can this software? Agent can display the wear of the buttons and warn about the need to replace them. It can provide an interface for customizing different layouts. Set the speed and acceleration of the mouse cursor. And a lot of everything else.
Prototyping
The prototypes take a lot of effort. First you need to decide on the mechanical design - it is in itself a difficult task, for which you need to prepare a lot of plastic parts, laser cut out parts from stainless steel sheets, carve high-precision steel guides and adapt neodymium magnets that will hold the two halves together. Previously all the details are calculated in CAD.
Keyboard case printed on a 3D printer:
Based on the mechanical design and the circuit, you need to make a printed circuit board. The right-hand side of KiCad looks like this:
We make the board and manually solder the elements:
Finally, having made all the parts, typing and grinding the plastic parts, and putting it all together, we get a working prototype of the keyboard:
Conclusion
I compare the keyboard for developers with musical instruments. The keyboard is a rather intimate object. We use them all day to create tomorrow's programs, typing one character after another.
Therefore, for me, the development of UHK is a privilege, and despite all the difficulties, it is an exciting adventure and a wonderful learning experience in new things.
For more information, I invite you to visit the site ultimatehackingkeyboard.com , and there you can subscribe to the notice of the beginning of our crowdfunding company.
Source: https://habr.com/ru/post/376919/
All Articles