WDS (Windows Deployment Services). Quickly deploy client machines from the server. Creating a WIM Deployment Image
Beginning and the end
Good day to all who read!
Many articles were about this, many blogs, but the HowTo article, without a file, was not found, and this is extremely sad.
For small deployments, this thing out of the box is simply irreplaceable.
For those who do not know: WDS (Deployment Center) is a special tool that is in the server operating system of Microsoft, with the help of it you can install the system on a large number of computers at the same time, using the network using PXE.
There will also be information about the preparation of wim, and a little bit about DHCP.
So let's start under the cut.
Part 1. Installation
This part can be skipped to those who at least once made the installation of services \ components in Server 2012R2. From this block, only point 1.3 is needed.
')
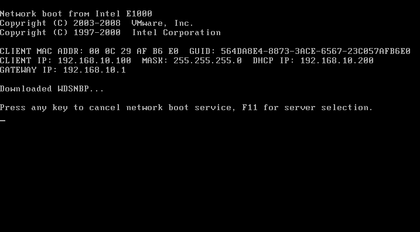
Ideal for WDS is if the DHCP server is the same machine. Then he can correctly transfer information about PXE Boot.
1.1 Turning on WDS
Installing WDS in pictures. It's simple.
It's simple.
Time

Two

Three
Time
Two
Three
Then begins what will require a little more than just Nextnextnext) /
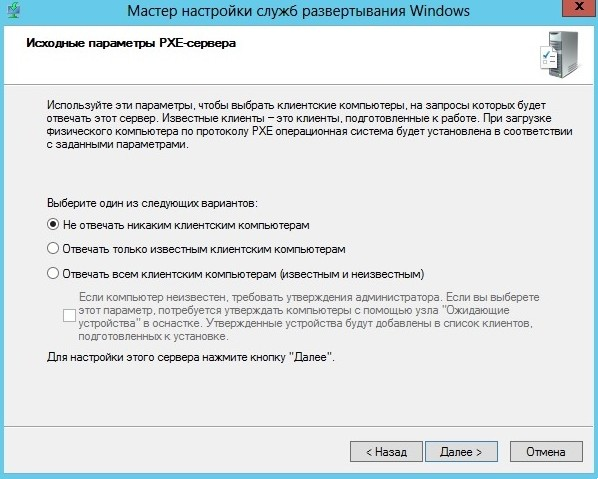
1.2 Role Enable
Customization
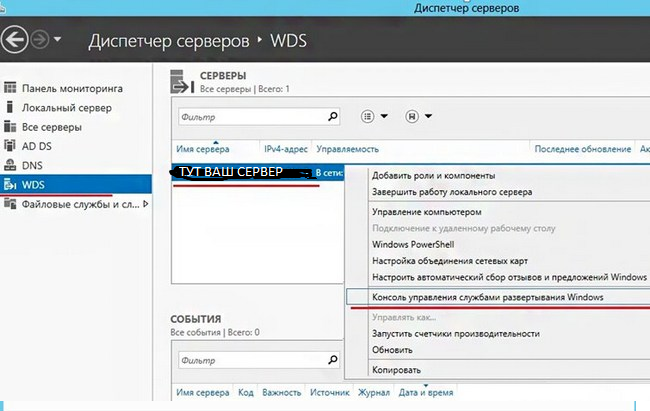
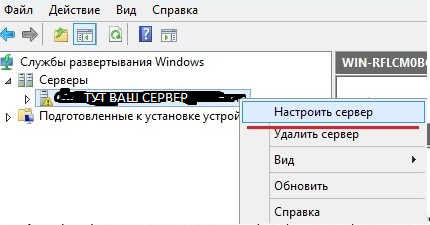
After installation, select our WDS server in the console list.


Since the default offers boot and installation images to store on the system disk (which is not recommended), we create on the E: folder the RemoteInstall folder, which was indicated to the server setup wizard.
Here is your choice
Since the default offers boot and installation images to store on the system disk (which is not recommended), we create on the E: folder the RemoteInstall folder, which was indicated to the server setup wizard.
Here is your choice
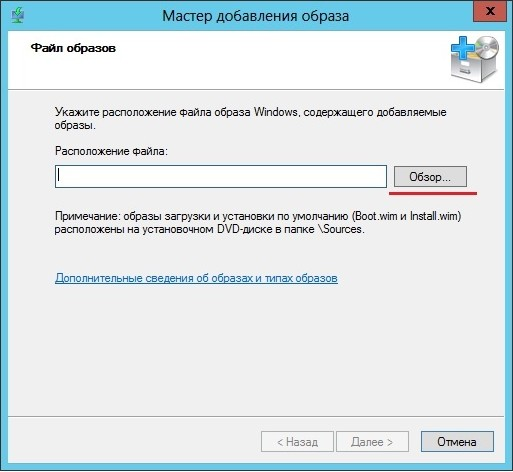
1.3 Images
On the installation disk with any system, starting with Vista, there is a source folder, there are two files boot.wim and install.wim
Boot.wim is a pre-boot boot image.
install.wim is an image of the system itself.
If boot.wim still needs to be prepared for work, then install.wim is immediately ready for installation.

In Server Manager, boot - boot images, install - install images.

Part 2. Dissection Boot.wim
Very often one big problem arises:

Immediately integrate the necessary drivers in this image in order to avoid this problem.
It occurs due to the lack of drivers for a network card in the image that is integrated \ installed on the computer on which the OS will be installed.
2.1 Utilities
By default, in 2012 the server, after installing WDS, the dism utility can work with wim images to the full.
For 2008 / R2 or 7, you will need the Windows Automated Installation Kit (WAIK) and you will have the dism tool.
Create a folder structure: c: \ drivers \ mount - mount folder for WIM image; c: \ drivers \ lan_drivers - folder with drivers for the network card.
Copy the boot.wim from the OS to the c: \ drivers folder
I warn you! The more drivers, the more versatility, but the size of the image greatly increases, it must be taken into account. The whole image is poured into RAM.
2.2 Dissection
For 2008 \ 7 we start Deployment Tools Command Prompt from the start menu with administrator rights.
For 2012 - run the command prompt with administrator rights.
Look at the contents of the boot image boot.wim:
dism / get-wiminfo /wimfile:c:\drivers\boot.wim
In theory, it should be like this:
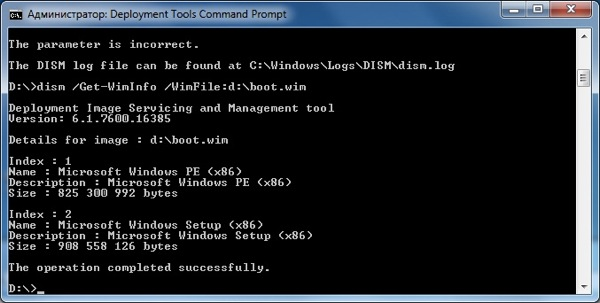
As you can see from the screenshot, boot.wim contains two images - Windows PE (Index 1) and Windows Setup (Index 2). Drivers for the network card should be added to Windows Setup, so we will work with image 2 (Index 2).
But not so easy.
We carry out:
Dism / Export-Image /SourceImageFile:c:\drivers\boot.wim / SourceIndex: 1 /DestinationImageFile:c:\drivers\boot1.wim
Dism / Export-Image /SourceImageFile:c:\drivers\boot.wim / SourceIndex: 2 /DestinationImageFile:c:\drivers\boot1.wim
Accordingly, we reloaded the Windows PE \ Setup images into a new file.
First copied the first, then the second index.
Remove boot.wim, rename boot1.wim to boot.wim
dism / get-wiminfo /wimfile:c:\drivers\boot.wim
Must issue the same two sections, with index 1 & 2.
2.3 Adding Drivers
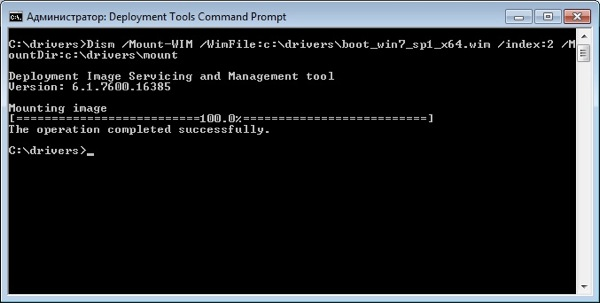
Mount the image with index 2 from the boot.wim file in the “c: \ drivers \ mount” folder with the command:
dism / Mount-Wim /WimFile:c:\drivers\boot.wim / index: 2 / MountDir: c: \ drivers \ mount
Add drivers to the image. Drivers can be added one at a time, or all at once from a specific directory.
To add a driver, specify the full path to the .INF file:
dism / image: c: \ drivers \ mount / add-driver / driver: thatC::drivers\lan_drivers\E1C5232.INF »
If there are many drivers, then we specify the directory as a source for searching and adding drivers:
dism / image: c: \ drivers \ mount / add-driver / driver: "C: \ drivers \ lan_drivers" / recurse / forceunsigned
the / recurse parameter is used to install drivers from nested directories, and / ForceUnsigned to install unsigned drivers.
After adding all the drivers, the boot image needs to be closed (unmounted).
dism / unmount-wim / mountdir: c: \ drivers \ mount / commit
The / commit parameter indicates that all changes to the image should be saved; without it, all changes will be lost.
2.4 Image in storage
Now we will copy it to any directory where your images will be stored.
And install on the server WDS.


Now you need to specify a name. The image name is what you will see when choosing boot loaders, if you have several.

2.5 Security
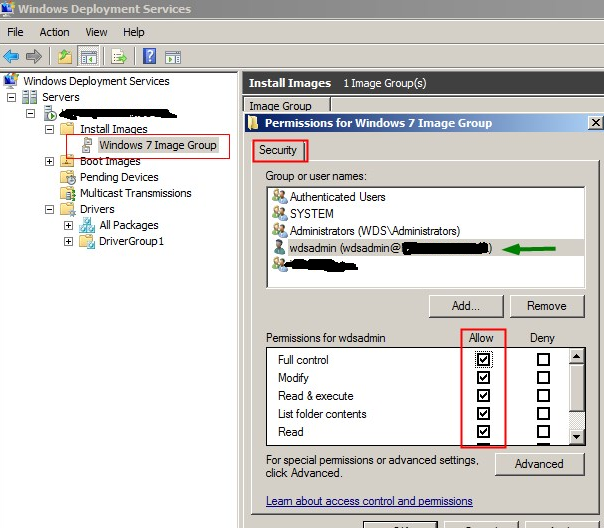
Security - To add permissions for a user account to an image group, right-click on the group and click security. Add a user account from AD and configure full control. If you use a domain administrator account during WDS installation, you can not do this.
Part 3. Image of the system. Custom option
First, install the OS. We put all that is necessary.
Next, we dissect it. Under the link create a customized operating system image
A good article on IMAGEX + WINPE creating an image there are also links at the beginning of the article for creating WIN7 & WIN8. Or we find on the Internet open spaces of WindowsPE, according to your desire)
For the next, we need a WinPe image with ImageX utility of the correct bit depth .
3.1 Creating an image and copying it to a network share using Windows PE and ImageX
Now we will write down the image of the computer, using the Windows PE environment and the ImageX program and save it on a network resource.
To do this, you need to boot from the disk Windows PE.
In order to have write access to a network resource, you need to connect to it by entering the following command:
NET USE y: \\ nmp \ oem \ <folder name> / USER: AD \ *
And enter your password.
! you need to understand what kind of disk it is, for this, using the DIR C command: (D, E, F & etc), iterate through the disks if there are several of them
Next, you need to write the image of the main installation using the ImageX program, located in Windows PE, or on another disk, to a network resource. To do this, enter the following command:e: \ imagex.exe / capture d: y: \ <name> .wim "<name>" / compress fast / verify
Where e: \ - RAM Disk, D: - OS Disc, Y: - network drive. After that, the process of creating and copying the image to the specified network resource will go.
Upon completion of creating an image and copying it to a network share, you must enter the exit command and the application closes and the computer starts to reboot.3.1.1 Manual Deployment
If you need to manually expand the image (without WDS) but over the networkThe system bit must be the same as the system we are unpacking.
After creating an image, you can deploy it to new hardware using ImageX and Windows PE.
We format a disk, for unpacking on it WMI.
To do this, enter the following commands:diskpart
select disk 0
clean
create partition primary size = 100
select partition 1
format fs = ntfs label = "system"
assign letter = c
active
create partition primary
select partition 2
format fs = ntfs QUICK
assign letter = e
exit
You can create a script for this procedure by saving the information in a text file in the image folder. To run the script from the Windows PE command line, enter the command: diskpart / s <script name> .txt
Formatting should be carried out ONLY in Windows PE. If you format a hard disk on another computer using Windows, and then insert this hard disk into the destination computer, the image with 80% probability will NOT EXPAND.
Connect to a network resource to deploy an image by entering the following command:NET USE y: \\ nmp \ oem \ <folder name> / USER: AD \ *
Enter the password.
! you need to understand what kind of disk it is, for this, using the DIR C command: (D, E, F & etc), iterate through the disks if there are several of them
We deploy the image to the hard disk using the ImageX program from a network share by entering the following command:d: \ imagex.exe / apply y: \ <name> .wim 1 e: / verify
After that, the process of image deployment to the specified hard disk from a network resource will go.
Next, using the BCDboot tool, you need to initialize the boot configuration data store (BCD) and copy the boot environment files to the system partition by entering the following command on the command line:e: \ windows \ system32 \ bcdboot e: \ windows
Upon completion of creating an image and copying it to a network share, you must enter the exit command and the application closes and the computer starts to reboot.
The customized image is deployed to the destination computer.3.2 Server
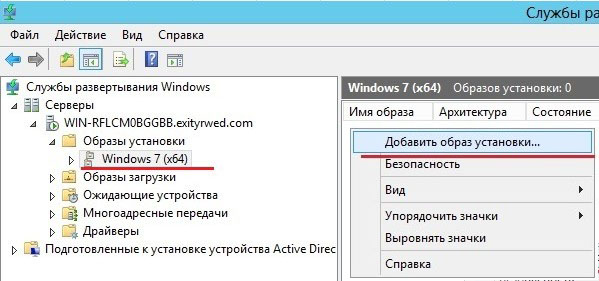
Configure the server to work with images.
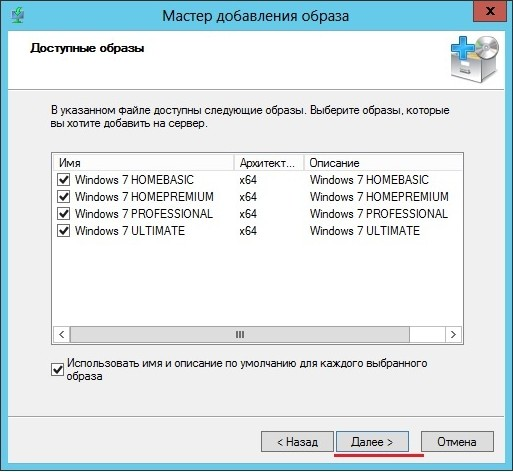
Add our finished image to the “Installation Images”:
As in the case of the boot image, we indicate to the wizard the path to the wim file that we created:
The original install.wim file may contain several revisions:
But only one should be created.Part 4. Great and terrible DHCP
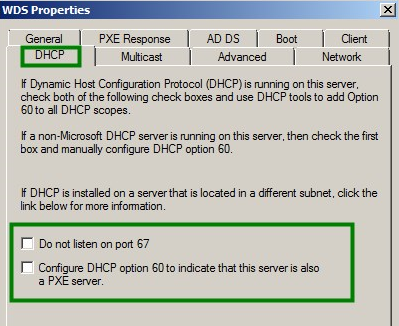
1) WDS and DHCP are installed on the same server.
WDS and DHCP cannot occupy UDP port 67 at the same time. By preventing WDS from listening on UDP port 67, you can provide a port for DHCP traffic and set DHCP parameter 60 (domain or server parameter) to PXEClient, eliminating the conflict.
If WDS is installed on a DHCP server, the DHCP Option 60 page appears during setup. Check the Do not listen on port 67 and Configure DHCP option 60 to PXEClient check boxes. The message received by the client from the DHCP server contains the IP address, subnet mask, and parameter 60.
As a result, it becomes clear to the client that the DHCP server is also a WDS server at the same time. If you later add DHCP to the WDS server, you can configure this setting by right-clicking on the server name in the WDS snap-in and selecting Properties. There are similar checkboxes on the DHCP tab.
2) WDS and DHCP are located on different servers, on the same subnet as the clients.
No additional configuration is required, since WDS and DHCP are located on different servers. Both services can listen on UDP port 67, and clients are on the same subnet as the WDS and DHCP servers, so broadcast traffic is available to all.
3) WDS and DHCP are installed on different servers, in different subnets.
WDS and DHCP services installed on different servers do not interfere with each other to listen on UDP port 67.
You must configure the router to send broadcast packets, because most often we see that broadcast packets cannot go to other subnets. In addition, all traffic to UDP port 4011 from client computers to the Windows Deployment Services server must be directed accordingly.
To help the WDS client find the WDS server, we need to configure DHCP option 66 and DHCP option 67.
Configuring DHCP options on an IPv4 network is done from the DHCP snap-in available from the Administrative Tools section of the Start menu.
In the DHCP snap-in, expand IPv4, and then right-click Server Options (or scope options) and select Configure Options. Scroll to 066 Boot Server Host Name, select the check box and enter the host name of the WDS server in the text box (you can use the name, but preferably IP).
Then check the box 067 Bootfile Name. In the text box, enter the path and file name of the Preboot Execution Environment (PXE) file to download on the client. Text value for parameter 67:boot \ x86 \ wdsnbp.com - 32 bit
OR
boot \ x64 \ wdsnbp.com - 64 bit
There are also recommendations from foreign sites:Configure DHCP option 67 with the right boot image file.
For 32-bits systems \ boot \ x86 \ wdsnbp.com
For 64-bits systems \ boot \ x64 \ wdsnbp.com4.1 CNP
Client Naming Policy - in the WDS server settings, select AD DS. In the Client Naming Policy, specify the format based on which computers will be given a name.
The default naming pattern is% 61Username% #, this means WDS will create a computer name using the name of the user who entered the remote name during the installation process and # this number is 1,2,3 ... up to 999 will be added after the user name.4.2 Cisco DHCP MODE
It's not as scary as it seems:BU # ip dhcp pool DATA
BU # option 66 ascii "1.2.3.4"
BU # option 67 ascii "bootfile.pxe"Part 5. A bit of afterword
Actually everything. This is a small article, and it seems to be finished.
Someone would not say, but for small grids this is a very necessary thing.
For those who want to expand the functionality, there is just a great article on Geektimes: "Add WDS universality . "
On this, I hasten to bow out, thanks to all who are interested in this article.
Giktayms Forever!
If there is a Chip in the text write in personal messages, flood and troll is not sports! If you can add something important, add to the article.
UPD. thank you darthslider and navion
There is a MDT (Microsoft Delpoyment Toolkit).
With it, you can immediately add a key to the image and install products with a quiet installation.
Also configure the admin username and password.
Requires a separate computer and installed dependencies.
darthslider
First of all, MDT is a Task Seqence support, that is, any scripts and settings at any stage of the installation.
It is also a convenient editor unattend.xml
Well, in addition, software installation, post-configuration, input to the domain, etc., as well as support for OS update scripts (capture and settings, install new OS, restore), user migration to a new PC (similar to the previous script). But the last 2 points are pretty strong shamanism.
(About setting and raising video HERE. )


Source: https://habr.com/ru/post/376531/
All Articles