Another home stereolithography printer
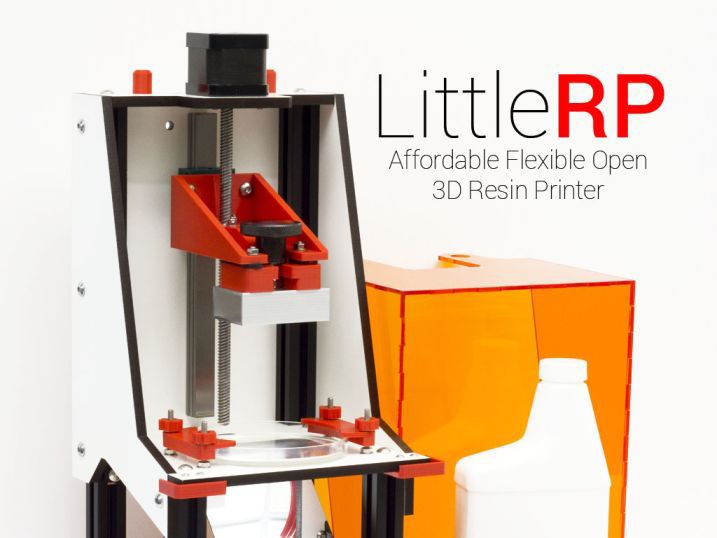
In September last year, the fundraiser for a new printer, the LittleRP, ended up on a kickstarter. Compared to its counterparts, it was distinguished by the price (without a projector, the printer could cost you $ 500). Since the necessary funds were collected in just a couple of hours, I can say that I was lucky enough to get into the first group of backers, and I received it last week. Seeing that the topic is relevant, I decided to share with the public an impression of the acquisition.
The printer went disassembled, but the design is so well done that he gathered at home with neat and unhurried work in less than two hours. The workmanship is beyond praise - everything is perfectly cut out, fitted, during assembly it could not even think of what could have been done better. Also included was 100ml of resin (you could choose MadeSolid or MakerJuice), additional petri dishes and silicone for their restoration, everything below will be described in more detail (even there was a piece of emery paper to make the surface to which the model sticks, more rough - a trifle , but nice). Total parcel weight was 6.5 kg. And about 1.5 kg. I had to pack - everything was rather carefully laid out in boxes and protected from possible damage.

')
Appearance and print examples are abundantly present both on the kickstart page and on the manufacturer’s website , so I don’t see a great need to overload the post with photos. All plastic parts are printed on the FDM printer, and all models for printing can be taken on the manufacturer's website, and those who wish could even save $ 20 and print them themselves. The assembly process is simple and well illustrated with photographs .
The result is exactly what was expected:

On the base there are several holes for mounting different models of projectors. Unfortunately, the bolts that are designed for this purpose did not fit my mind - it was necessary for the tests to simply put a magazine in order to raise it to the desired height.

About the printer itself.
I initially liked the idea of using a projector - unlike the laser, the entire layer is baked immediately in 1-5 seconds (depending on the layer thickness and the type of resin), with the speed of printing there is not much to compare with. And the location of the projector itself is not vertically screwed somewhere inside, but due to the use of a mirror, it is simply installed on the platform in front of the working capacity, and it can also be easily removed and used for its intended purpose.
Working volume is 60 * 40 * 100 mm. To some, this may seem too small, but I, who are working on the desktop Warhammer, are quite enough. If desired, this volume can easily be increased by yourself - just take a bigger mirror and cut a larger hole under the resin tank (or even just replace this part) with a jigsaw - the design and operation principle are very simple and understandable, neither the mechanics nor the software part changes at all. this Although for fairness it is worth mentioning that, unlike similar printers with a laser, with an increase in the working volume, the print resolution along the X / Y axis will increase. But the projector itself can be used as a source of UV light after washing the printed model (when printing with a laser, a separate device is needed for this). Well, in my opinion, for large volumes there is a cheaper FDM technology.
With a layer size of 60 * 40 mm and FullHD projector, the print resolution is 31 and 37 microns in X and Y, respectively, along the Z axis, theoretically, the printer allows you to get a layer thickness of 5 microns, but not sure that the mechanics errors will allow it to withstand. In any case, printing on 15 microns is quite successful.
In the comments to a similar printer, someone asked why such a low Z resolution, if it is much more on other axes, but the software for such devices (and this is the Creation Workshop ) allows Anti-Aliasing to be exposed for the layer map, which smooths the edges, and thus, even with a higher resolution than along the Z axis, the edges of the layer are obtained without steps. While I can not provide photos in sufficient quality to see the difference in printing with and without antialyazingom, but with the naked eye, it is noticeable.
The projector .
The printer can work with any DLP projector, but I stopped my choice on the Acer P1500, as it doesn’t require any revision - it truly focuses its FullHD at a distance of 5-7 cm from the lens. It was important to me not only for the printer, but also for the 3D scanner (there will be an article about it later). Yes, and as I wrote earlier - the projector can be easily removed and used for its intended purpose. Before the dollar appreciation, this projector could be bought for 25-30 thousand rubles, currently it is possible to purchase it in one well-known network for 37 thousand, which on the one hand is certainly a lot, but on the other, the printer + projector costs even at a new rate 70K rubles, which is much cheaper than analogs.
Resin.
The manufacturer tested two grades of resin - MakerJuice and MadeSolid , i.e. with them, the printer is guaranteed to work.
On the main page of the first of them there is a mention of this printer model at once - You can buy a liter of resin of the same color for $ 65 or a set of 4 resins of different colors for $ 130 (half a liter each).
Much more attractive compared to the URANUS, which was recently an article , it said about the price of 10 000 rubles per 0.5 liter of resin. Moreover, in the set only those colors that are normally baked from the projector. It turns out that the color of the resin matters, some colors are much worse baked.
More interesting is the case with MadeSolid.

In addition to the usual resin (which I chose with a printer for the first tests and the price of which is $ 100 per liter), this company has two more interesting compounds.
1 - FireCast Resin . What some have called for another printer "chip" is the ability to burn a printed model in shape for subsequent metal casting. In this case, this is not something special - this resin is intended for this, it does not leave ashes when burning, it was developed for jewelers.
A liter of this resin costs already $ 275 (500ml - $ 150, 250ml - $ 89). But if you are going to engage in jewelry, then, in my opinion, this is not exorbitant prices.
2 - Vorex Resin . The slogan of this resin is - Giving your print it needs. According to the developer, the products made from this resin are much stronger than from others, and for comparison, he gives such a diagram -

The price of this resin is $ 135 per liter.
I repeat - these are only those resins that have been tested by the manufacturer, and with which this model will precisely cope. Since people got their printers, other types of resins began to be tested, so the range of materials available has expanded.
Bath for printing.
Standardly, the printer uses round Petri dishes with a diameter of 100 mm from Nalgene. The manufacturer made a choice in their favor on the basis of the price-to-production ratio and the quality of the cups. Glass can also be used, the main thing is that there are no defects on the bottom, which will greatly hinder printing (small distortions due to non-uniform refraction are not so terrible due to the fact that baking takes place almost close to the surface). A couple of illustrations -


Same capacity. And although the bottom clearly gives distortions, they do not affect the print quality.
After sending all the backers (and with the advent of printers in the free market), it will be possible to buy additional containers from the manufacturer separately.
Immediately to the printer it was possible to purchase four additional containers, which I did. The bottom of the bowls has a special coating so that the resin to be baked does not stick to them. According to the description, it is silicone coated, it can withstand up to 10-15 prints in one place, after which it is easy to replace (50 ml of a two-component blend came to the printer for this, 10 ml is required to restore the coating of one cup).

When printing small products, they can be placed in different parts of the printer's working space, or simply rotate the cup itself so that the print is in the most intact part of the coating. In any case, these formulations are available for free (half a liter of sylgard 184 on ebay costs $ 50, i.e., one cover recovery costs about $ 1), and there is easy video on the Internet to correctly restore the capacities for similar printers. composition.
In conclusion
The setting of the print itself is quite simple, but the first tests showed that it is necessary to correctly process the model after printing. Namely, rinse in alcohol and then subject to additional UV light. Without alcohol, the model remains oily, and without additional lighting it also seems soft to the touch, as if covered with a thin layer of rubber (although in some cases it may be useful for handles, for example).

layer thickness 50 microns, printing time 23 minutes.

Incomplete print of 15 microns (there was nothing to climb on the settings while printing is in progress :)). Perhaps in this photo, and you can see that Anti-Aliasing allows you to get the best result on the X / Y axis, although their resolution is two times higher than that of Z.
Alas, 100 ml of resin that came with the printer do not allow to print a lot of things for photos, but as for me - the result is very decent.
PS - Although only the first batch was sent, our Chinese friends are already selling a copy of this printer. Links do not give.
Source: https://habr.com/ru/post/376307/
All Articles