Visualization of architectural lighting
A simple method, told in the LiDS lighting design school, which makes it possible to make an evening view from the daylight photograph of the building and create architectural lighting. This method of visualization is used by students-architects for their works, but it can be used by anyone who wants to come up with lighting, for example, for his summer cottage.
1) We take a photo of the building in the afternoon in cloudy weather, when there are no harsh shadows, but there is enough light for the camera to make a good picture.
')

2) Select the “magic wand” sky, create a new layer and fill the selection with solid color. Now removing the selection, you can return it at any time, holding Cntrl and clicking on the layer icon with a red field.

3) We throw on the picture any suitable sky, and by inverting the prepared selection (Select> Inverse), remove the unnecessary from the sky layer.

And the new sky falls into place.

4) Create a copy of the theater layer and create twilight, reducing the layer's lightness (Image> Adjustments> Hue / Saturation) to "-60".

5) Using a magic wand, select the glass in some windows and remove them from the layer with the twilight theater. Under the removal, “daytime” glass becomes visible, which enlivens the picture and makes the building even more twilight in contrast with its bright windows.

6) In order for the building to acquire evening color, we create a gradient from a dark blue sky to reddish lighting with sodium lamps.

7) And put this gradient on a new layer on top of others

9) Change the blending mode of the gradient layer from “normal” to “overlay”. If the effect seems too harsh, you can reduce the transparency of the layer, making it less than 100% to taste. And so the building was plunged into vespers urban darkness.

10) Create a reflection of the columns on the marble around the fountain. To do this, duplicate the layer with the building (Layer> Duplicate Layer), press “Cntrl + T”, turn and compress the layer so that the reflection of the columns goes where it is needed.

Press "Enter", accepting the transformation layer. With a soft rubber band, we will remove everything except the columns from it and change the layer blending mode from “normal” to “overlay”. Voila - a reflection of the columns of the building appeared in the marble under the fountain. To make the reflection less cartoony and more realistic, you can light up the whole layer with reflection (Filter> Blur> Gaussian Blur) and, if desired, reduce the transparency of the layer.

11) Now let's turn on the lights. To do this, create a new layer.

Change the blending mode of the layer from “normal” to “overlay”, and now everything we draw on this layer with a white brush will become light.

And if we double-click on the layer icon, put a tick "Color Overlay" in its properties, choose a warm shade of color and blend mode "Overlay" ...

... the lights will become much more expressive:

12) Erase the trial light zigzag and draw the actual lights. Let's start with the columns - selecting the column with a magic wand and shading the border of the selection (Select> Modify> Feather), draw a white to transparent gradient over it.

13) Holding Shift + Alt and hooking the arrow with this light, move it to all the other columns. So in a few seconds we will propagate typical lighting to other elements of the building.

14) Adjusting the transparency and rigidity of the brush, draw white light on the highlight layer the rest of the light in accordance with the concept. For greater realism, you need to leave the shadows under the trees and add light on the sidewalks from the street lamps - this light should not be even.

And to make the lights become softer and more natural, we apply a small bluer to the entire backlight layer (Filter> Blur> Gaussian Blur).

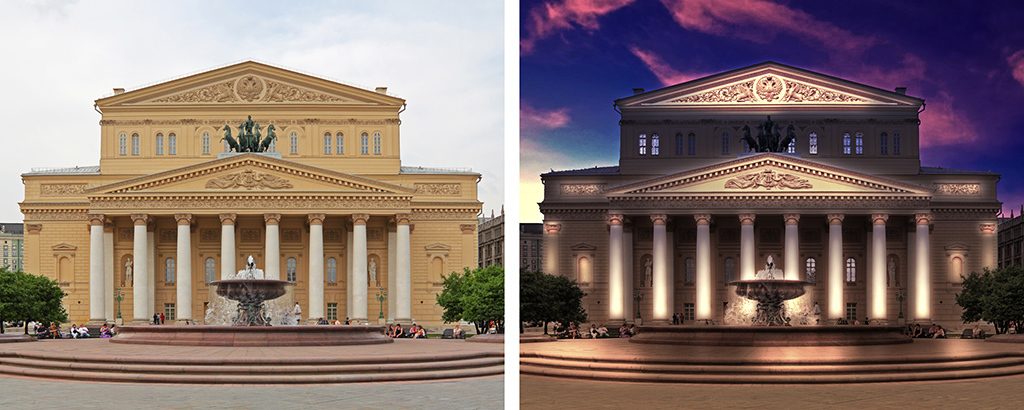
15) The visualization is almost ready, but I could not resist and applied HDRToning (Image> Adjustments> HDRToning) to it.

Result:

In the same way, you can virtually highlight any architectural object, starting with your own summer house, and play around with concepts, making up a lighting plan.
For those who want to try: the original photo with the theater , and the sky used in the example .
1) We take a photo of the building in the afternoon in cloudy weather, when there are no harsh shadows, but there is enough light for the camera to make a good picture.
')
2) Select the “magic wand” sky, create a new layer and fill the selection with solid color. Now removing the selection, you can return it at any time, holding Cntrl and clicking on the layer icon with a red field.
3) We throw on the picture any suitable sky, and by inverting the prepared selection (Select> Inverse), remove the unnecessary from the sky layer.
And the new sky falls into place.
4) Create a copy of the theater layer and create twilight, reducing the layer's lightness (Image> Adjustments> Hue / Saturation) to "-60".
5) Using a magic wand, select the glass in some windows and remove them from the layer with the twilight theater. Under the removal, “daytime” glass becomes visible, which enlivens the picture and makes the building even more twilight in contrast with its bright windows.
6) In order for the building to acquire evening color, we create a gradient from a dark blue sky to reddish lighting with sodium lamps.
7) And put this gradient on a new layer on top of others
9) Change the blending mode of the gradient layer from “normal” to “overlay”. If the effect seems too harsh, you can reduce the transparency of the layer, making it less than 100% to taste. And so the building was plunged into vespers urban darkness.
10) Create a reflection of the columns on the marble around the fountain. To do this, duplicate the layer with the building (Layer> Duplicate Layer), press “Cntrl + T”, turn and compress the layer so that the reflection of the columns goes where it is needed.
Press "Enter", accepting the transformation layer. With a soft rubber band, we will remove everything except the columns from it and change the layer blending mode from “normal” to “overlay”. Voila - a reflection of the columns of the building appeared in the marble under the fountain. To make the reflection less cartoony and more realistic, you can light up the whole layer with reflection (Filter> Blur> Gaussian Blur) and, if desired, reduce the transparency of the layer.
11) Now let's turn on the lights. To do this, create a new layer.
Change the blending mode of the layer from “normal” to “overlay”, and now everything we draw on this layer with a white brush will become light.
And if we double-click on the layer icon, put a tick "Color Overlay" in its properties, choose a warm shade of color and blend mode "Overlay" ...
... the lights will become much more expressive:
12) Erase the trial light zigzag and draw the actual lights. Let's start with the columns - selecting the column with a magic wand and shading the border of the selection (Select> Modify> Feather), draw a white to transparent gradient over it.
13) Holding Shift + Alt and hooking the arrow with this light, move it to all the other columns. So in a few seconds we will propagate typical lighting to other elements of the building.
14) Adjusting the transparency and rigidity of the brush, draw white light on the highlight layer the rest of the light in accordance with the concept. For greater realism, you need to leave the shadows under the trees and add light on the sidewalks from the street lamps - this light should not be even.
And to make the lights become softer and more natural, we apply a small bluer to the entire backlight layer (Filter> Blur> Gaussian Blur).
15) The visualization is almost ready, but I could not resist and applied HDRToning (Image> Adjustments> HDRToning) to it.
Result:
In the same way, you can virtually highlight any architectural object, starting with your own summer house, and play around with concepts, making up a lighting plan.
For those who want to try: the original photo with the theater , and the sky used in the example .
Source: https://habr.com/ru/post/376095/
All Articles