Use Onion Omega2 to create devices with Linux and Wi-Fi
Recently, in front of me often get up the task to do this or that DIY device with Wi-Fi. I considered different versions of single-board computers and microcontrollers, on the basis of which it is better to do this, and as a result, Onion Omega2 became my favorite.
Now I will tell why I like her so much, and show by example how to use it. As usual, this will be in the form of a traditional text article, and through video.
')
To begin with, let's look at what tools are available on the market in general in order to easily add Wi-Fi to our DIY device. Especially if this device is part of a smart home.
Very many will most likely immediately say - Raspberry Pi . And yes, this is a full-fledged single-board computer, very powerful and with video output. And it is ideal for some complex tasks that require large computing power and the ability to connect a TV / monitor. For example, based on it, you can make a video player or a game console, but for simple tasks like controlling devices of a smart home, it is too cumbersome and expensive. It's like shooting a gun on sparrows. Of course, there is also the Raspberry Pi Zero model, which is positioned as a small and ultra-cheap, but so far they are still quite expensive to install in each switch and kettle.
The other extreme is ESP8266 . This is a very popular Wi-Fi microcontroller that costs less than two dollars. And this is really a very worthy solution, which will be enough for many tasks. Only now, on the contrary, it is often too primitive, because it is necessary to write firmware for it, Linux is no longer there, and separate libraries are used to work with the periphery and the network stack.
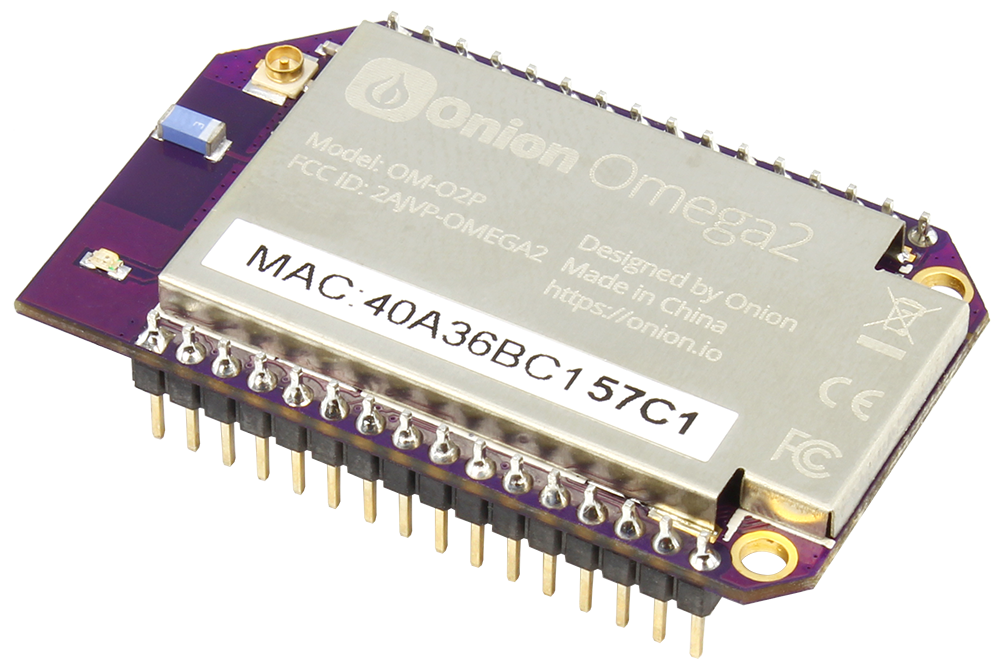
Onion Omega2 , which I fell in love with, is the golden mean. This is a single-board computer based on a MIPS processor with Linux, Wi-Fi, Ethernet, UART, PWM, I2C, SPI, USB, and of course GPIO. Initially, the manufacturer announced a price of $ 5, but with all the additional costs and delivery for the end user, such a thing is still worth about 9-10 dollars, probably cheaper in the future. There is a slightly more expensive version, with an SD card slot, but believe me, the 16 MB internal memory is enough for most everyday tasks. Announced another version for surface mounting, which is likely to be even cheaper, even less and have even more conclusions. But I have already bought myself a whole box of ordinary omegas, because at this price you can safely stick Linux and Wi-Fi into every switch.
As usual, many will ask me - why? Why doesn’t the ultra-cheap ESP8266 suddenly suit me, and how did it happen that I suddenly dropped to something so high-level?
Yes, the matter is banal in usability and maintenance. If we talk about the smart home, it is not just control of the iron via the Internet, it is a complex of devices that work together on the same network and respond to each other’s events. In this case, programming is an integral part of the use of a smart home, because devices need to periodically explain what needs to be done in which case. And Linux in this regard greatly facilitates the task, it takes upon itself the whole headache with multitasking and the execution of tasks on a schedule, while Linux is a huge base of already familiar software. Here you have a full-fledged web server, and Perl, and PHP, and Ruby, and various network utilities, thanks to which you don’t need to reinvent the wheel, and with the help of which you can quite easily change the behavior of a device in real time, without recompiling. Yes, many everyday tasks can be implemented in bash-scripts.
I will not be cunning, Omega2 has enough shortcomings in comparison with classical wire solutions and microcontrollers too.
First, it is of course food. This thing can consume up to 500 milliamperes and it’s not so sick of warming up. And if all my old smart home was powered by a single power supply, then there is already a separate unit for each device.
Secondly, Linux does very poorly with real-time tasks. If you need to work with signals with a duration of microseconds, you have to write a kernel module, or even connect an additional microcontroller.
Thirdly, Omega has no ADC, that is, no analog inputs, and this is very necessary when working with analog sensors. This problem is solved by connecting an external ADC or, again, by connecting a cheap microcontroller, especially under Linux there is software for their firmware, which completely eliminates the need to use a programmer.
The fourth flaw is peculiar to all Wi-Fi-devices, rather than just Omega. This lack of decentralization. The use of Wi-Fi implies that the entire system has one weak point - a Wi-Fi router, without it, the devices lose contact with each other. But in fact, absolutely in any configuration there is such a weak link. I have here before, as I said, everything was powered by a single power supply. And the whole smart house died when my uninterruptible power supply unit broke. And it should be noted that Omega2 constantly works as a Wi-Fi access point. Therefore, even in the absence of a router, you can always connect to the device, for example, from a telephone. In addition, in any case, it is important to make the device with the calculation and to work without a network.
I do not know what else to dig up, but probably we can say about the load time. Omega2 long enough to boot and get in touch. This is absolutely unimportant for devices that work around the clock, but can be a problem for devices that plug into the outlet only occasionally.
I was ordered to make a device that should simply automatically open the door to the entrance when calling the intercom, while being able to configure remotely via the Internet. The fact is that the customer periodically rents his apartment through one site, while being in another city. And he needs a person to be able to get on the porch on the day of the check-in, and there he can already take the key from a special box. Let's try to do it on the basis of Omega2.
The task for me is not entirely new. I already did an intercom with an answering machine that can not only pick up the phone, but also respond with messages recorded on the SD card, plus write messages to the same SD card from those who came. In essence, you just need to simplify this scheme (you do not need an answering machine) and use Omega2 instead of ATMEGA64.
The principle of operation of intercom handsets is very simple. When the tube is hanging, its speaker is connected to the intercom network directly, respectively, the tube has a resistance of about 50 ohms. When the receiver is removed, its resistance increases somewhere to a kilooma and changes slightly when we speak into the microphone, thus transmitting the sound. Finally, when we press the door open button, the resistance of the tube increases even more.
Accordingly, from the hardware point of view, we need:
* The first is to determine the moment when someone calls the intercom. This is done easily, only at this moment tension appears in the line. To determine the presence of voltage, you can use a transistor. As soon as a meager current flows through its base, it will open and close one of the legs of omega to the ground;
* Second - after a while pick up the phone, increasing the resistance of the device. For this you can use a trite relay. It is cumbersome, they click, but very reliably. Resistance is better to make adjustable, because different manufacturers of intercoms, this value may be slightly different;
* Third - after some time, even more to increase the resistance of the device, again, you can do it through a relay.
Everything is quite simple. It is worth remembering to add such trifles as a button, a pair of LEDs to display the current mode, and piezo-dynamics to make sounds.
It is worth noting that not all Omega2 pins can be used in GPIO mode.

Its flash-memory is connected via SPI, respectively, these pins can be used only for connecting SPI devices. If you hang something else there, it will most likely prevent Omega2 from loading. In addition, pins 1, 12 and 45 should not be pulled either to the ground or to the power during device startup.
In the end, I got such a fee:
And such a device:

Connect the power to breathe life into it, and Omega immediately starts to load.
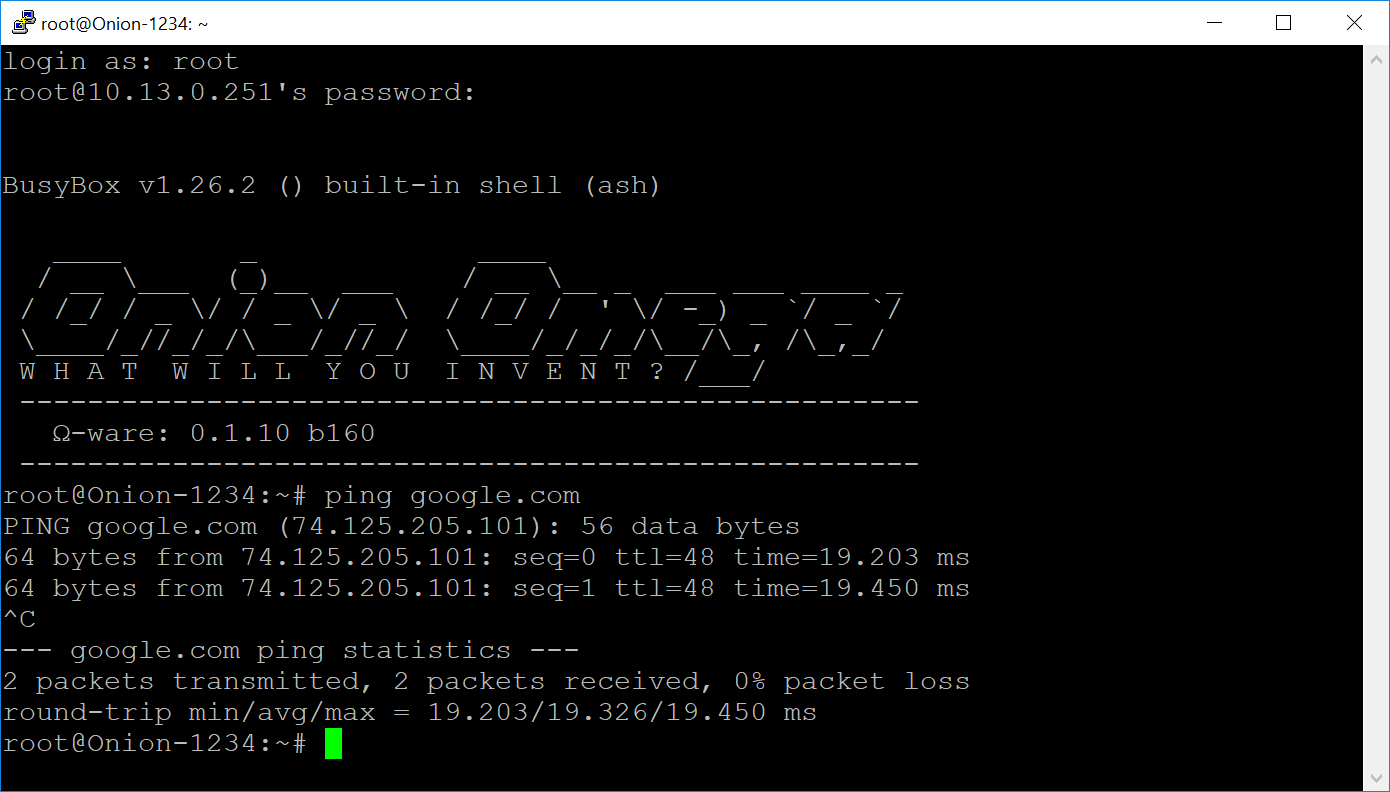
Soon you will see a new Wi-Fi point called Onion + the last four digits of the MAC address. Connect to it, the default password is "12345678".
Inside this interface, Omega has an IP address of 192.168.3.1 by default, connect to it via SSH, log in as root using the “onioneer” password, and first of all set up a connection to a Wi-Fi point. To do this, there is a pre-installed script “wifisetup”.
If everything is done correctly, through ifconfig you can see the IP address that the router issued to Omega. Now you can disconnect from the access point of the omega itself and connect to it already at this IP address using a regular network, because now it is part of my home network.
Again, log in via SSH and check that Omega now has an Internet connection.
The first step is to upgrade the firmware using the “oupgrade” command. This is especially true in the light of the recently discovered vulnerabilities in the Wi-Fi protocol.
All software is installed from the repository using "opkg". The web server is already there, I will need more PHP:
You need to remember to set up a web server while doing this, Ohmega uses uhttpd:
We add to the main section:
Yes, Omega2 firmware is made on the basis of OpenWRT firmware, so many tools are inherited from there. The configuration is edited and stored using the UCI - Unified Configuration Interface . This is something like a simple database, which is optimized to reduce the number of flash-memory overwrites. For my own purposes, I will use it.
As for the management of peripherals and GPIO, it is quite easy to do directly from the command line. Omega already has several utilities preinstalled for this.
First of all, you should pay attention to the fact that many of the findings have several functions; the utility “omega2-ctrl” is used to switch between them.

You can change the output direction and output value using the “gpioctl” or faster “fast-gpio” utilities. You can also manage them through pseudo-files in Linux, which is a more versatile and portable method.
I decided to write the code directly in bash scripts, this is Linux after all. The task is quite simple: if a number of conditions are fulfilled, then we expect a call to the intercom and open the door after a specified period of time, we react to pressing the button in the settings specified in the settings, we blink the LEDs, make sounds if necessary ...
It was then that I suddenly had a problem. To generate sound, I decided to use PWM. However, software PWM, which is provided by Omega utilities, is very unstable. Although he works at the core level, his timings float a lot, which is clearly noticeable by ear. Too noticeable, so you can not leave.
However, Omega2 seems to have hardware PWM declared. It can be seen in the utility for switching the pin operation mode, it is in the documentation for the processor that is used in Omega, but there are no means to work with it. Apparently, the developers have not done them yet. Well, let's do it ourselves! The same processor documentation describes the registers for working with PWM.
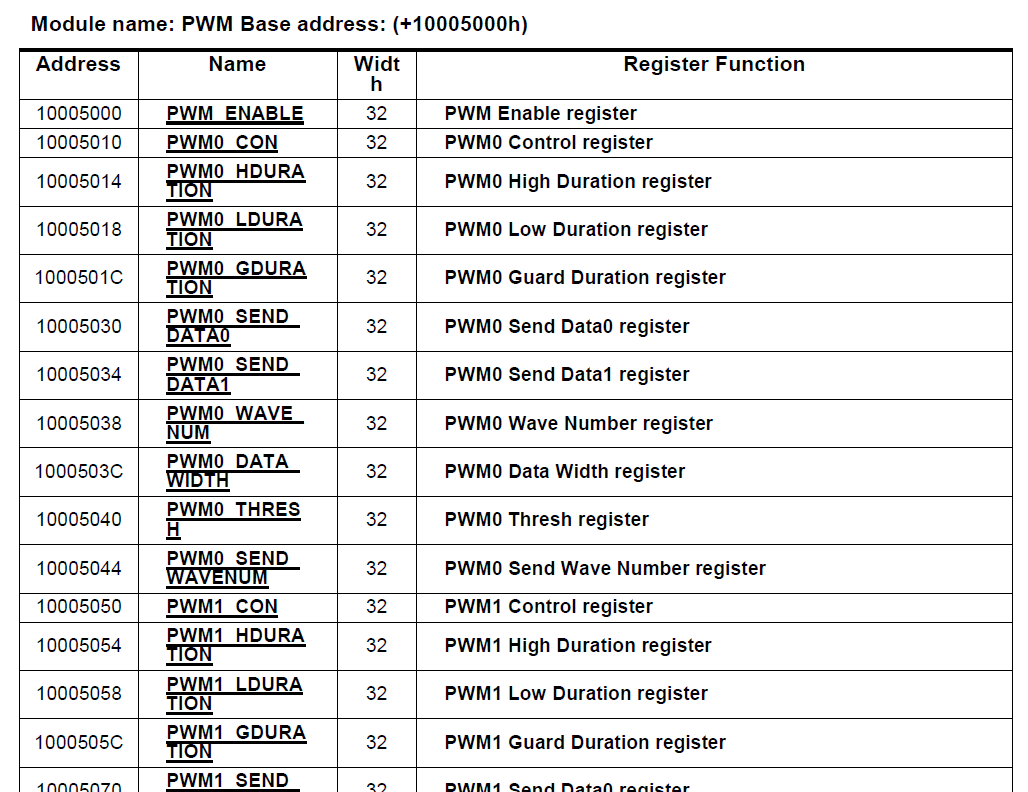
There are many, local PWM is very flexible to set up. Here you can even specify arbitrary wave generation sequences.
As a result, I wrote a native C program that works directly with these registers and generates a wave of a given frequency and duty cycle using hardware PWM. I posted the source code for this utility on GitHub: github.com/ClusterM/omega2-pwm
So use if you need someone. The sound as a result began to be published without defects.
It remains only to make a web interface so that the customer can easily configure and manage everything from any browser. Web technologies are my weak side, here I am 20 years behind the life, so there will be another shit here. As I said, I don’t bother and use PHP in conjunction with JavaScript. I don’t know how to design, and I don’t need this here, so I’ve brazenly copied it from the Lucy interface from OpenWRT.
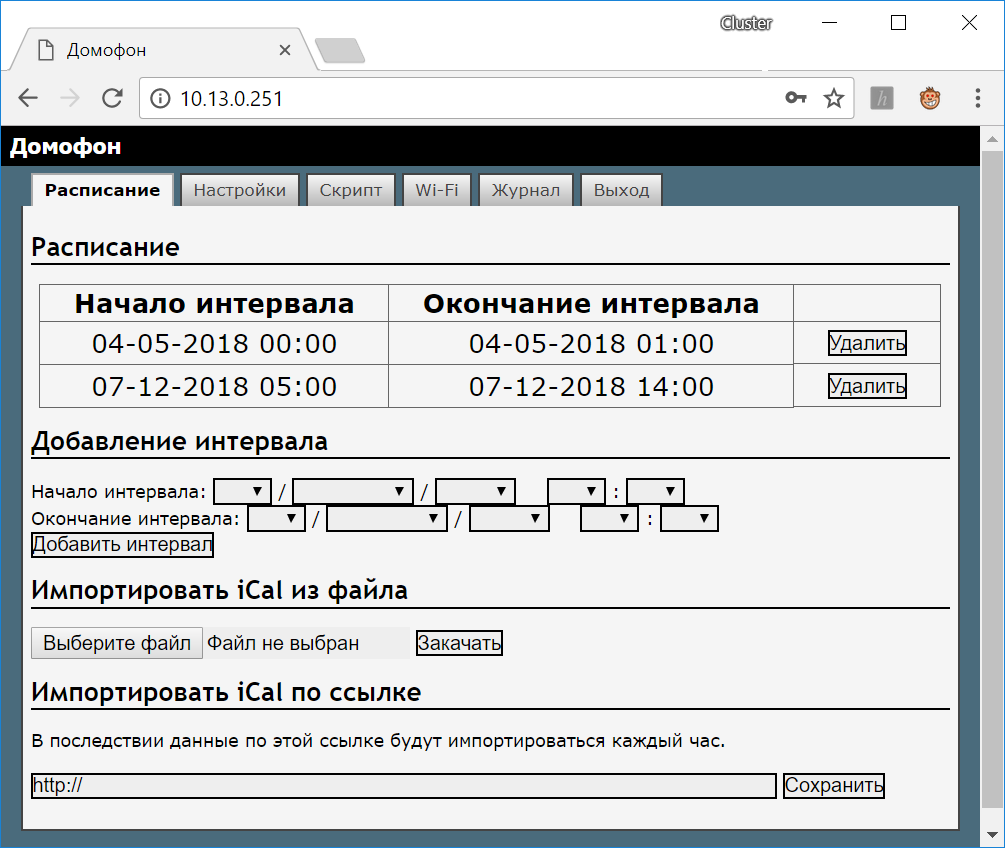
Here is such a simple admin panel turned out. First, here you can watch and add intervals when our intercom will automatically open. On the same page you can import the schedule from the “ical” file. Yes, I forgot to immediately say that it was one of the customer's requirements. The fact is that on the site where this person rents an apartment, you can export the schedule or get it on the link. As a result, the customer will not even need to enter his hands in the device settings, it will be filled from the site itself, where he rents an apartment. Of course, you need to remember to configure the periodic execution of this script via cron.
Even in the admin panel, you can change various settings - whether to make sounds, how quickly you need to open the door, how to respond to a button press, and of course changing the password for the admin panel.
On a separate tab, you can watch the logs, where all actions will be recorded. Of course there is a tab with the settings of Wi-Fi. Here you can see what nearby access points there are and connect to the selected one.

It is understood that when the device is first turned on, the customer will connect to the device, for example, from a smartphone, enter the admin area and configure its connection to the router.
I also made a tab in the admin where you can write an arbitrary script that will be executed when someone calls the intercom. The customer did not ask for this, and for the average user is not particularly needed, but this way you can perform any actions when calling the intercom. For example, especially with the curl utility. For example, you can send push notifications to your phone. You can write for this your program for a smartphone, but I prefer to use the service pushover.net (not advertising). For the customer, I have already written a script template, it remains only to substitute my own keys, which you get on the service website. So he can almost instantly find out if someone rang the intercom.
At this stage, everything is ready. It remains only to print the case on a 3D printer.
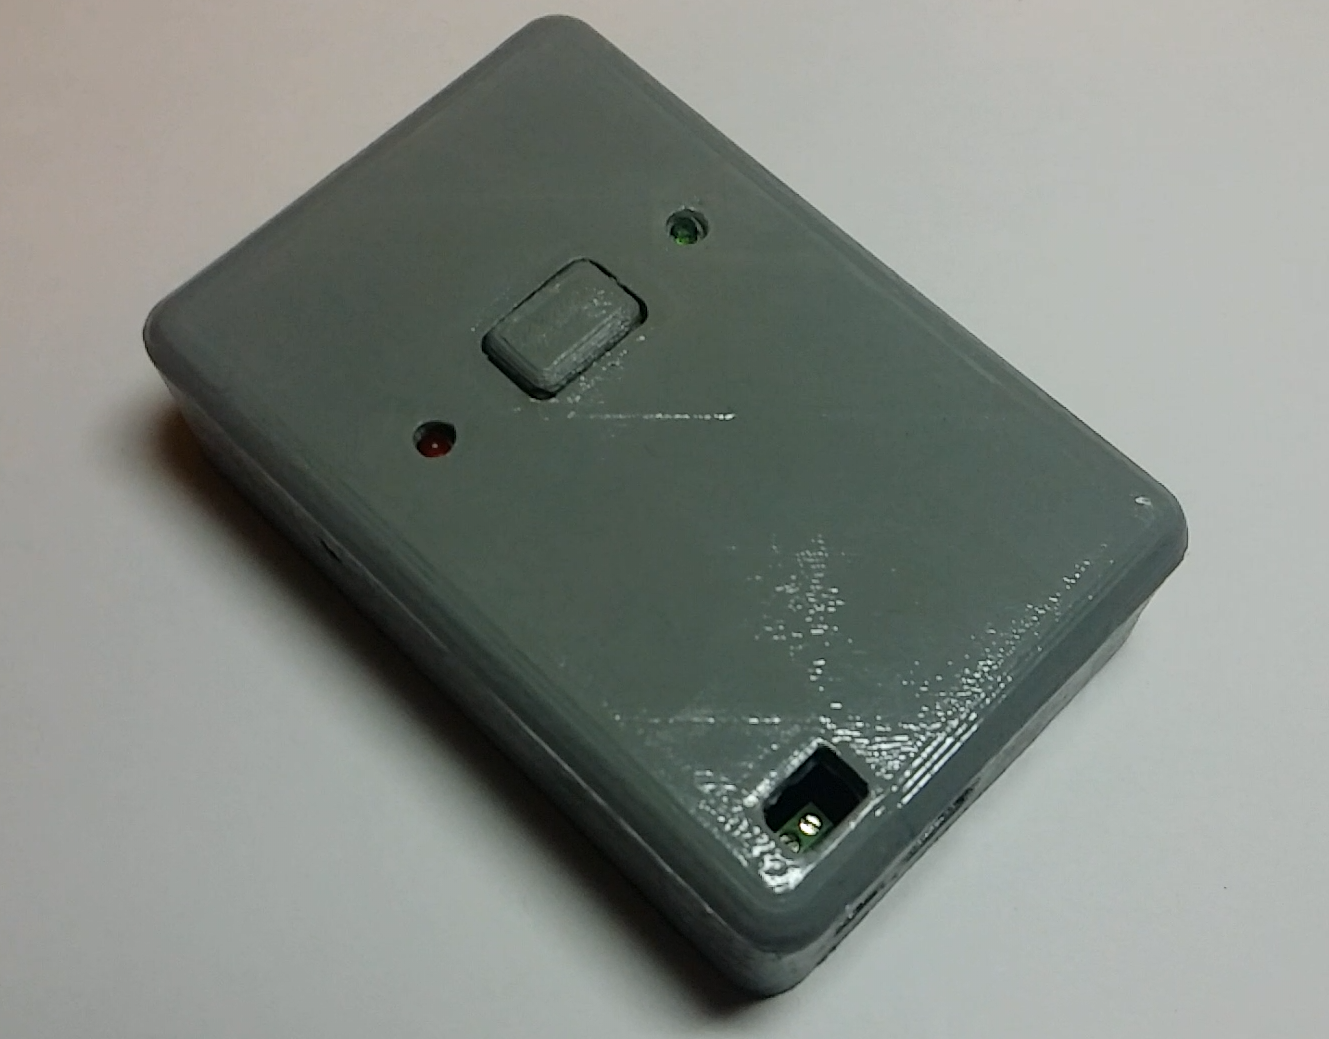
It looks somewhat handicraft, but its functionality performs perfectly.
But this development is not over. What happened was what I feared the most. I checked everything on my intercom, but it didn’t work on the customer’s intercom. He is there of another company and apparently works a little differently. The problem was that the device thought that someone was ringing the intercom when it didn't actually happen. In this case, the customer lives far away, I could not come and see. However, I told you that Linux greatly simplifies device maintenance. The customer sent me an SSH port on the router, I connected remotely and figured out what was wrong. Just in the intercom line, he had short-term interference, which can be easily filtered by refining the script. It is necessary to react only if there is a signal in the line for some time. It's great that this can be easily corrected. Only had to force the customer to run to the entrance for testing.
I hope, on this simple example, I showed how Omega2 is convenient, and how Linux makes it easier to create such devices. If you like the article, I will continue to talk about how I use Omega2, and I will try to do it in more detail. I still have a lot of projects with it, both simpler and more complex.
Now I will tell why I like her so much, and show by example how to use it. As usual, this will be in the form of a traditional text article, and through video.
')
Video
Article
Why Omega2
To begin with, let's look at what tools are available on the market in general in order to easily add Wi-Fi to our DIY device. Especially if this device is part of a smart home.
Very many will most likely immediately say - Raspberry Pi . And yes, this is a full-fledged single-board computer, very powerful and with video output. And it is ideal for some complex tasks that require large computing power and the ability to connect a TV / monitor. For example, based on it, you can make a video player or a game console, but for simple tasks like controlling devices of a smart home, it is too cumbersome and expensive. It's like shooting a gun on sparrows. Of course, there is also the Raspberry Pi Zero model, which is positioned as a small and ultra-cheap, but so far they are still quite expensive to install in each switch and kettle.
The other extreme is ESP8266 . This is a very popular Wi-Fi microcontroller that costs less than two dollars. And this is really a very worthy solution, which will be enough for many tasks. Only now, on the contrary, it is often too primitive, because it is necessary to write firmware for it, Linux is no longer there, and separate libraries are used to work with the periphery and the network stack.
Onion Omega2 , which I fell in love with, is the golden mean. This is a single-board computer based on a MIPS processor with Linux, Wi-Fi, Ethernet, UART, PWM, I2C, SPI, USB, and of course GPIO. Initially, the manufacturer announced a price of $ 5, but with all the additional costs and delivery for the end user, such a thing is still worth about 9-10 dollars, probably cheaper in the future. There is a slightly more expensive version, with an SD card slot, but believe me, the 16 MB internal memory is enough for most everyday tasks. Announced another version for surface mounting, which is likely to be even cheaper, even less and have even more conclusions. But I have already bought myself a whole box of ordinary omegas, because at this price you can safely stick Linux and Wi-Fi into every switch.
As usual, many will ask me - why? Why doesn’t the ultra-cheap ESP8266 suddenly suit me, and how did it happen that I suddenly dropped to something so high-level?
Yes, the matter is banal in usability and maintenance. If we talk about the smart home, it is not just control of the iron via the Internet, it is a complex of devices that work together on the same network and respond to each other’s events. In this case, programming is an integral part of the use of a smart home, because devices need to periodically explain what needs to be done in which case. And Linux in this regard greatly facilitates the task, it takes upon itself the whole headache with multitasking and the execution of tasks on a schedule, while Linux is a huge base of already familiar software. Here you have a full-fledged web server, and Perl, and PHP, and Ruby, and various network utilities, thanks to which you don’t need to reinvent the wheel, and with the help of which you can quite easily change the behavior of a device in real time, without recompiling. Yes, many everyday tasks can be implemented in bash-scripts.
Disadvantages of Omega2
I will not be cunning, Omega2 has enough shortcomings in comparison with classical wire solutions and microcontrollers too.
First, it is of course food. This thing can consume up to 500 milliamperes and it’s not so sick of warming up. And if all my old smart home was powered by a single power supply, then there is already a separate unit for each device.
Secondly, Linux does very poorly with real-time tasks. If you need to work with signals with a duration of microseconds, you have to write a kernel module, or even connect an additional microcontroller.
Thirdly, Omega has no ADC, that is, no analog inputs, and this is very necessary when working with analog sensors. This problem is solved by connecting an external ADC or, again, by connecting a cheap microcontroller, especially under Linux there is software for their firmware, which completely eliminates the need to use a programmer.
The fourth flaw is peculiar to all Wi-Fi-devices, rather than just Omega. This lack of decentralization. The use of Wi-Fi implies that the entire system has one weak point - a Wi-Fi router, without it, the devices lose contact with each other. But in fact, absolutely in any configuration there is such a weak link. I have here before, as I said, everything was powered by a single power supply. And the whole smart house died when my uninterruptible power supply unit broke. And it should be noted that Omega2 constantly works as a Wi-Fi access point. Therefore, even in the absence of a router, you can always connect to the device, for example, from a telephone. In addition, in any case, it is important to make the device with the calculation and to work without a network.
I do not know what else to dig up, but probably we can say about the load time. Omega2 long enough to boot and get in touch. This is absolutely unimportant for devices that work around the clock, but can be a problem for devices that plug into the outlet only occasionally.
We use in practice
I was ordered to make a device that should simply automatically open the door to the entrance when calling the intercom, while being able to configure remotely via the Internet. The fact is that the customer periodically rents his apartment through one site, while being in another city. And he needs a person to be able to get on the porch on the day of the check-in, and there he can already take the key from a special box. Let's try to do it on the basis of Omega2.
The task for me is not entirely new. I already did an intercom with an answering machine that can not only pick up the phone, but also respond with messages recorded on the SD card, plus write messages to the same SD card from those who came. In essence, you just need to simplify this scheme (you do not need an answering machine) and use Omega2 instead of ATMEGA64.
The principle of operation of intercom handsets is very simple. When the tube is hanging, its speaker is connected to the intercom network directly, respectively, the tube has a resistance of about 50 ohms. When the receiver is removed, its resistance increases somewhere to a kilooma and changes slightly when we speak into the microphone, thus transmitting the sound. Finally, when we press the door open button, the resistance of the tube increases even more.
Accordingly, from the hardware point of view, we need:
* The first is to determine the moment when someone calls the intercom. This is done easily, only at this moment tension appears in the line. To determine the presence of voltage, you can use a transistor. As soon as a meager current flows through its base, it will open and close one of the legs of omega to the ground;
* Second - after a while pick up the phone, increasing the resistance of the device. For this you can use a trite relay. It is cumbersome, they click, but very reliably. Resistance is better to make adjustable, because different manufacturers of intercoms, this value may be slightly different;
* Third - after some time, even more to increase the resistance of the device, again, you can do it through a relay.
Everything is quite simple. It is worth remembering to add such trifles as a button, a pair of LEDs to display the current mode, and piezo-dynamics to make sounds.
It is worth noting that not all Omega2 pins can be used in GPIO mode.
Its flash-memory is connected via SPI, respectively, these pins can be used only for connecting SPI devices. If you hang something else there, it will most likely prevent Omega2 from loading. In addition, pins 1, 12 and 45 should not be pulled either to the ground or to the power during device startup.
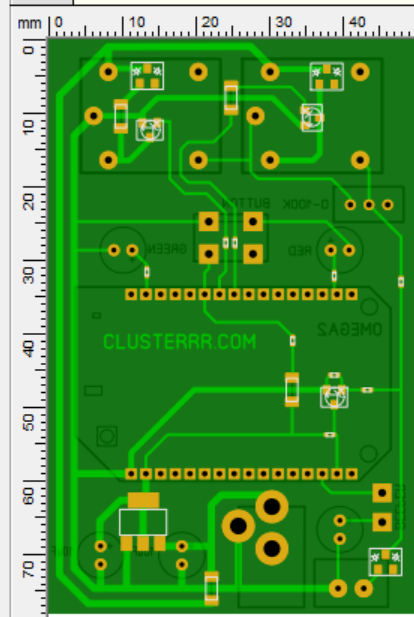
In the end, I got such a fee:
And such a device:
Connect the power to breathe life into it, and Omega immediately starts to load.
Soon you will see a new Wi-Fi point called Onion + the last four digits of the MAC address. Connect to it, the default password is "12345678".
Inside this interface, Omega has an IP address of 192.168.3.1 by default, connect to it via SSH, log in as root using the “onioneer” password, and first of all set up a connection to a Wi-Fi point. To do this, there is a pre-installed script “wifisetup”.
If everything is done correctly, through ifconfig you can see the IP address that the router issued to Omega. Now you can disconnect from the access point of the omega itself and connect to it already at this IP address using a regular network, because now it is part of my home network.
Again, log in via SSH and check that Omega now has an Internet connection.
The first step is to upgrade the firmware using the “oupgrade” command. This is especially true in the light of the recently discovered vulnerabilities in the Wi-Fi protocol.
All software is installed from the repository using "opkg". The web server is already there, I will need more PHP:
opkg update opkg install php7 php7-cgi php7-cli You need to remember to set up a web server while doing this, Ohmega uses uhttpd:
vi /etc/config/uhttpd We add to the main section:
list interpreter ".php=/usr/bin/php-cgi" option index_page 'index.php' Yes, Omega2 firmware is made on the basis of OpenWRT firmware, so many tools are inherited from there. The configuration is edited and stored using the UCI - Unified Configuration Interface . This is something like a simple database, which is optimized to reduce the number of flash-memory overwrites. For my own purposes, I will use it.
As for the management of peripherals and GPIO, it is quite easy to do directly from the command line. Omega already has several utilities preinstalled for this.
First of all, you should pay attention to the fact that many of the findings have several functions; the utility “omega2-ctrl” is used to switch between them.
You can change the output direction and output value using the “gpioctl” or faster “fast-gpio” utilities. You can also manage them through pseudo-files in Linux, which is a more versatile and portable method.
I decided to write the code directly in bash scripts, this is Linux after all. The task is quite simple: if a number of conditions are fulfilled, then we expect a call to the intercom and open the door after a specified period of time, we react to pressing the button in the settings specified in the settings, we blink the LEDs, make sounds if necessary ...
It was then that I suddenly had a problem. To generate sound, I decided to use PWM. However, software PWM, which is provided by Omega utilities, is very unstable. Although he works at the core level, his timings float a lot, which is clearly noticeable by ear. Too noticeable, so you can not leave.
However, Omega2 seems to have hardware PWM declared. It can be seen in the utility for switching the pin operation mode, it is in the documentation for the processor that is used in Omega, but there are no means to work with it. Apparently, the developers have not done them yet. Well, let's do it ourselves! The same processor documentation describes the registers for working with PWM.
There are many, local PWM is very flexible to set up. Here you can even specify arbitrary wave generation sequences.
As a result, I wrote a native C program that works directly with these registers and generates a wave of a given frequency and duty cycle using hardware PWM. I posted the source code for this utility on GitHub: github.com/ClusterM/omega2-pwm
So use if you need someone. The sound as a result began to be published without defects.
It remains only to make a web interface so that the customer can easily configure and manage everything from any browser. Web technologies are my weak side, here I am 20 years behind the life, so there will be another shit here. As I said, I don’t bother and use PHP in conjunction with JavaScript. I don’t know how to design, and I don’t need this here, so I’ve brazenly copied it from the Lucy interface from OpenWRT.
Here is such a simple admin panel turned out. First, here you can watch and add intervals when our intercom will automatically open. On the same page you can import the schedule from the “ical” file. Yes, I forgot to immediately say that it was one of the customer's requirements. The fact is that on the site where this person rents an apartment, you can export the schedule or get it on the link. As a result, the customer will not even need to enter his hands in the device settings, it will be filled from the site itself, where he rents an apartment. Of course, you need to remember to configure the periodic execution of this script via cron.
Even in the admin panel, you can change various settings - whether to make sounds, how quickly you need to open the door, how to respond to a button press, and of course changing the password for the admin panel.
On a separate tab, you can watch the logs, where all actions will be recorded. Of course there is a tab with the settings of Wi-Fi. Here you can see what nearby access points there are and connect to the selected one.
It is understood that when the device is first turned on, the customer will connect to the device, for example, from a smartphone, enter the admin area and configure its connection to the router.
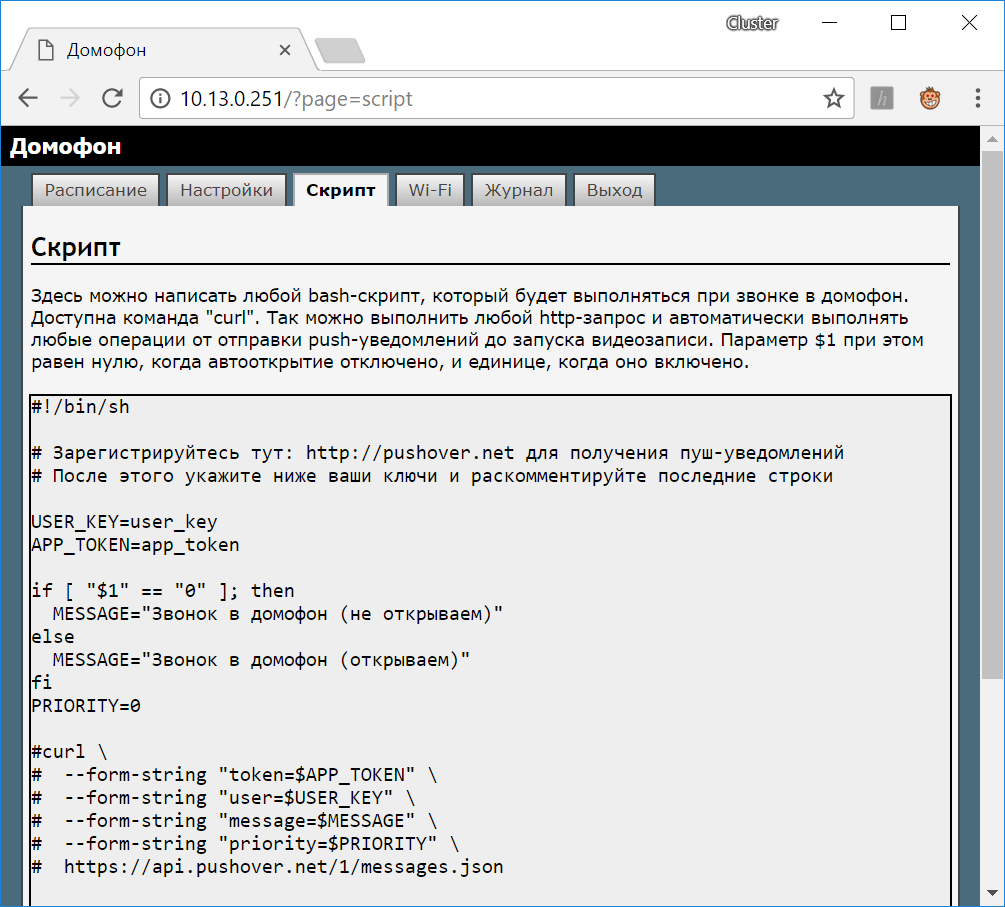
I also made a tab in the admin where you can write an arbitrary script that will be executed when someone calls the intercom. The customer did not ask for this, and for the average user is not particularly needed, but this way you can perform any actions when calling the intercom. For example, especially with the curl utility. For example, you can send push notifications to your phone. You can write for this your program for a smartphone, but I prefer to use the service pushover.net (not advertising). For the customer, I have already written a script template, it remains only to substitute my own keys, which you get on the service website. So he can almost instantly find out if someone rang the intercom.
At this stage, everything is ready. It remains only to print the case on a 3D printer.
It looks somewhat handicraft, but its functionality performs perfectly.
But this development is not over. What happened was what I feared the most. I checked everything on my intercom, but it didn’t work on the customer’s intercom. He is there of another company and apparently works a little differently. The problem was that the device thought that someone was ringing the intercom when it didn't actually happen. In this case, the customer lives far away, I could not come and see. However, I told you that Linux greatly simplifies device maintenance. The customer sent me an SSH port on the router, I connected remotely and figured out what was wrong. Just in the intercom line, he had short-term interference, which can be easily filtered by refining the script. It is necessary to react only if there is a signal in the line for some time. It's great that this can be easily corrected. Only had to force the customer to run to the entrance for testing.
Conclusion
I hope, on this simple example, I showed how Omega2 is convenient, and how Linux makes it easier to create such devices. If you like the article, I will continue to talk about how I use Omega2, and I will try to do it in more detail. I still have a lot of projects with it, both simpler and more complex.
Source: https://habr.com/ru/post/374405/
All Articles