Smart home control system on the knee: Tarantool
The Internet of Things breaks into our lives. Somewhere completely unnoticeable, somewhere stuffing existing orders with the grace of a locomotive. More and more devices are connecting to the network, and more and more there are different applications, web-panels, control systems that are tied to a specific manufacturer, or, even worse, to a specific device.
But what should those who do not want to put up with such a state, and wantone ring one interface to rule by all? Of course, write it yourself!
')
I will show how using Tarantool to quickly make even non-visualization, but a complete control system, with a database, control buttons and graphs. With its help, it is possible to control the devices of a smart home, collect and display data from sensors.
What is Tarantool? This is a bunch of "application server - database." You can use it as a database with stored procedures, or you can as an application server with a built-in database. All internal logic, whether user-defined or stored, is written in Lua. Thanks to the use of LuaJIT, and not the usual interpreter, it is not much slower than the native code in speed.
Another important factor is Tarantool is a noSQL database. This means that instead of traditional queries like “SELECT ... WHERE”, you manage data directly: write a procedure that iterates through all the data (or part of it) and gives you it. In version 2.x, SQL query support was added, but they are not a panacea - for high performance, it is often important to understand exactly how a particular query is executed, and not to give it to the developers.
In the article, I will show an example of use when all the application logic is written inside Tarantool, including communication with external APIs, data processing and output.
Go!
Disclaimer 1:
My understanding of web development at the time of the beginning of this article was frozen somewhere in 2010 (or even earlier), so take the frontend code as an example of “how not to do”.
Disclaimer 2:
Let's immediately agree that the hypothetical device of the smart home is available through MQTT. This is a fairly universal and common protocol, so that they do not accuse me of artificiality of the example. The implementation of other protocols, though simple, is clearly beyond the scope of the article in which I want to show an example of working with Tarantool, and not the process of writing a driver for some Chinese light bulb.
The protocol works according to the publisher-subscriber model: this means that someone (for example, a device) can publish messages, and you, if you subscribe to an address (in MQTT this is called a topic, for example, "/ data / voltage / " ), you will receive these messages.
Client-server protocol - it should always have a server, without which two clients cannot exchange data. This is done in order to maximally facilitate the client part and the protocol. Clients simply send messages “I want to subscribe”, “I want to unsubscribe”, “I want to publish”, and the server is engaged in routing between them.
We will manage at least a squeaker on it. To enable it, we need to connect via MQTT to WirenBoard and send "1" to the topic " / devices / buzzer / controls / enabled / on ". To disable - you must send the same "0".
Install the http-server package, create a new file, give it rights to execute and say that it should be executed in the Tarantool interpreter, and not just in Lua:
Now you can open the file in your favorite editor, and literally through a few lines of code we will have a small but very proud HTTP server:
Now, having started our service ( ./iot_scada.lua ), we can open the localhost : 8080 / page in the browser and see there something like
This means that our server is working and is able to communicate with the outside world. Yes, so far exclusively in JSON format, but it is easy to fix. In order not to bother with the interface, we take for this purpose Twitter Bootstrap .

Next to our script, create public folders and templates. The first one will contain static content, and the second is intended for HTML templates (they do not belong to static, because Tarantool can execute lua-scripts in these templates).
In the public folder, we put all sorts of bootstrap.min.css, bootstrap.min.js, jquery-slim.min.js, and so on (I found these files in the archive with Bootstrap, you can find it in the same place or here ), and in the templates we'll throw The file dashboard.html is an example of a page from the same standard delivery. We'll talk about him a little later.
Now, change our service a bit:
What did we do here? First, they described two more endpoints - "/ action", which will be used for API requests, and "/ dashboard", which will give the contents of the dashboard.html file. We installed and described the functions that will be called when the browser requests these addresses: when you request "/", the http_server_root_handler function will be called, which redirects the browser to the / dashboard address, and when the / action request is, the http_server_action_handler function will generate JSON from the Lua object and will give it to the client.
Now, as promised, let's do the dashboard.html file. I will not give it all, you can look here , it is almost a copy of the example from Bootstrap. I will show only the functional parts:
Here we describe two buttons, "On buzzer" and "Off buzzer". Add to them the attribute " action-button ", which describes the function of the button, and the class " mqtt-buttons ", which we will catch in JS. And here it is, by the way (yes, right in the body of the page, do not do that, so be it).
Easier to read from the bottom up. We set the function send_to_mqtt as a handler for all buttons with the class mqtt-buttons ( $ ('. Mqtt-buttons'). On ('click', send_to_mqtt); ). In this function, we make a POST request of the form / action? Type = mqtt_send & action = on , with the last value obtained from the action-button attribute of the pressed button. Well, let's paint the button yellow ( .addClass (“btn-warning”) ), showing that the request went to the server.
The request is asynchronous, so we install and process the data that the server will return to us in response to the request ( button_xhr.onreadystatechange = mqtt_result ). In the handler, we check whether the response came, whether it came with code 200, and whether it is valid JSON data with the parameter mqtt_result = true . If he is like that, then we paint the button back to green, and if not, then to red ( .addClass (“btn-danger”) ): “chef, everything is lost”.
Now, if you start the service and open localhost : 8080 / in the browser, we will see the following page:

When you click on the buttons it seems that their color does not change, but this is only because the request comes and goes too quickly. If you stop the service running in the console, then pressing the button will repaint it red: there is no one to answer.
Buttons work, but do nothing: there is no logic on the server side. Let's add it.
First you need to install the mqtt library. By default, there is no tarantula in its delivery, so you need to install: sudo tarantoolctl rocks install mqtt . Run this command in the folder containing iot_scada.lua , since the library will be installed locally in the .rocks folder.
Now you can write code:
We connect the library, determine the server’s address and port, as well as the client’s name (usually, authorization is still required, but it is turned off by default on WB. You can read about how to use authorization and other library functions on its page ).
After connecting the library, create a new mqtt object and connect to the server. Now we can use " mqtt.wb: publish " to send MQTT messages to different topics.
Let's do the http_server_action_handler function. She must, firstly, obtain information about what kind of request she sent to the button on the page, and secondly, execute it. With the first, everything is very simple. This construction will pull out the type and action arguments from the address:
The type argument will be equal to “mqtt_send”, and the action can be “on” or “off”. At the first value, we need to send to the MQTT topic "1", and at the second - "2". We implement:
Notice the result variable — the mqtt.wb: publish function returns the request status (true or false), which is then packaged in JSON and sent to the browser.
Now the buttons are not only pressed, but also work. See for yourself:
All code related to this step can be found here . Or get yourself on the disk with this command:
Step one and a half: playing the imperial march
Let's add the third button, or what? If we have a speaker, let him play the imperial march!
What is great, on the page we need to add only the button itself, defining some other action-button attribute to it:
All the magic will occur in the file with the code. Add a new parameter handler:
Now, we need to think about how we will play the melody. In an article on Wikipedia about the imperial march there were good timings for the melody, but now they were cut out from there. I had to find others in the format frequency / time:
True, over time there is something not quite right, and there is no pause length, but what can we do. On WirenBoard, you can change the frequency of the speaker by sending the value of the new frequency in Hertz to the topic " / devices / buzzer / controls / frequency / on ", but you cannot set the duration of the sound. So, we will count the duration on the application side.
Since we are designing the “right” service, then despite any actions, the responsiveness of the service should not deteriorate: we will have to make it asynchronous and multi-threaded.
For this we use fibers (fibers) - this is the implementation of separate streams for Tarantool. Documentation can be found here . In the simplest version, launching another stream within your program requires only a few lines:
First we connect the library, then we define the function that will be launched in a separate thread, and then we create a new fiber, passing it the name of the function. There is also monitoring of running processes, synchronization tools and messages between running threads, but we will not dive into it yet. We use only the delay function, which is called fiber.sleep . By the way, Faybers are cooperative multitasking, so the call to fiber.sleep is not just waiting, but giving control to the task manager so that other processes can work, for example, writing to the database. It should be remembered that in heavy cycles it is sometimes necessary to transfer control to other flows so that they do not stop for long.
Everything else is simple: we need to bypass the array in a loop, getting the frequency and duration of each element, adjusting the frequency through the MQTT, and then starting the delays for the note and pause, and also turning on / off the sound.
View the full code here , or in diff-form .
Hurray, it works!
The clarity of the melody floats a little because of unpredictable network delays, but the melody is quite clear and recognizable. Colleagues rejoice (in fact, no, for the tenth time they were zadolbalo).
As usual, the code relating to this step can be found here . Or get yourself on the disk with such a command (it is assumed that you have already cloned the repository, and you are inside its directory):

As the documentation promises, we will not need to do anything else, the data from the sensors will appear in the MQTT themselves.
The minimum task in this step is to make on the page a real-time updated display of information from the sensors. There are several of them, and the composition may change, so we will not hardcore the serial numbers of the sensors, and automate all actions, including determining and displaying information from new sensors. Let's start with the server.
Backend
The first thing we need to do is create a function that should be called when the MQTT message is received with temperature, then tell the library that we should call it, and subscribe to the message topic. The documentation states that the topic looks like this: " / devices / wb-w1 / controls / 28-43276f64 ". 28-43276f64 - this is the serial number of the sensor. So, a subscription to the data from all possible sensors will look like this: " / devices / wb-w1 / controls / + ".
Now we will understand in more detail what we do in the callback function. To find the serial number in the address bar, we use the so-called patterns (regular expressions for Lua-shnogo spill). The function string.find accepts a string and a pattern in which the brackets indicate what should be captured from this string. In this case, “ % S + ” means “1 or more characters that are not spaces” - so the function will capture everything after “..controls /” before the first space encountered. And since we do not have spaces in the sensor number, and the subscription address allows messages only from " / devices / wb-w1 / controls / sensor address ", but not from " / devices / wb-w1 / controls / sensor address / something else ", then in the variable sensor_address we will always have the address (serial number) of the sensor.
Please note that the strings '/ devices / wb-w1 / controls / +' and "/ devices / wb% -w1 / controls / (% S +)" are similar, but different: the first line is wildcard mqtt- a subscription, and the second is a string argument for the Lua-shny function string.find , which uses a subset of regular expressions in the Lua format (there, for example, "-" must be escaped, so it is written as "wb% -w1")
In the next lines we create and fill in the sensor_values table, in which we will have records corresponding to the sensors: the key will be the serial number, and the value will be the temperature from the sensor.
The table will contain the last temperature value received and stored only in memory. In fact, you should not do this, global tables accessible to all are evil. If the application were slightly larger than the demo, it would be worth creating two functions: a getter and a setter, the first of which would produce a table, and the second would preserve. In addition to the obvious advantages, such as validation of stored data and data output in different formats, it would be much easier to track who changes the data and when than with a table that is available to everyone in a row.
The next thing we have to do is somehow give this table to the frontend. Therefore, we write this function: first, it will turn the key-value label into an array, which will be easier to display on the page, and secondly, it will be packed in JSON and given to the one who asks:
Of course, you can immediately form the correct table in the mqtt-callback, but choosing where to convert depends on what happens more often - saving or issuing: saving to the table by key is much faster than going through the table looking for the right sensor name for each value. Thus, if we show the values, on average, every minute, and they are saved every second, then it is more advantageous to save by key, and then format it on request. If, on the contrary, for example, we have a dozen customers who look at the table, and the temperature is updated infrequently, then it is better to keep the finished table.
But again, this all matters only if these operations begin to occupy at least some tangible share of resources.
Finally, we install this function as an endpoint-a / data
Checking:

Works!
And we write two functions that will turn the JS object into a table:
Now it remains only to start updating this label in a loop:
As you can see, the table is deleted and re-created each time, which could have a bad effect on the execution speed if the label did not consist of two values. The correct approach is to take a framework that can use reactivity and virtual dom, but this is clearly beyond the scope of this article.
Well, what did we do?
The code related to this step can be viewed here , or by making git checkout e387430efed44598efe827016f903cc3c17634a8 . Or DIFF- view.
Changes, in fact, will be quite a bit. First, we initialize the database engine and create a space (this is an analogue of a table in some SQL):
Now let's take a closer look at the challenges: we are beginning to dive into the very essence of Tarantool - in working with the database.
box.cfg () is initialization. We pass the logging level parameter to it, indicating which logs of what importance we want to see, and which one is not. But in general, she has many parameters .
You may notice that the function call box.cfg is kind of strange: instead of round braces it is curly. This is because in Lua, when passing a function, one argument of the bracket can be omitted. And since {} is a table, one argument is passed to the table. Simply put, box.cfg ({log_level = 4}) is the same as box.cfg {log_level = 4} .
With the box.schema.user.grant function , we give the guest user without a password ( nil ) rights to read, write and execute ( read, write, execute ) in the entire space of the current Tarantool ( universe ) instance. The last argument ( if_not_exists = true ) allows the system to do nothing if the user already has these rights (more precisely, only allows them to give rights if the user does not have them).
Now we need to create some kind of storage. This is the function box.schema.space.create . We transfer to it the name of the repository, the if_not_exists instruction already known to us and the format - in fact, the names of the fields and the types of data stored in them, which are defined by a couple of lines above. This piece is optional, you can not transfer the format and still work with the database, just access to the fields will not be by name, but by numbers (but you can add new fields in the process).
This function returns the created storage object. : : box.space.space_name ( box.space.storage , ). storage:create_index box.space.storage:create_index .
, , , , . create_index , , — ( ), . , serial, , " serial " ( , , 1).
, — Tarantool .
, , . :
— storage:upsert({serial, timestamp, value}, {{"=", 2, timestamp}, {"=", 3, value}}) .
Upsert — update insert : , insert , — update . , insert ( : serial , timestamp , value ), — update .
: serial , timestamp value , . , . : , serial , — timestamp , value . format (. ).
: ( , ), , .
" {"=", 2, timestamp} " , , =). . , , XOR/AND, .
— , (mqtt , value number , ), .
, :
. pairs() for , .
table , print() , . Those. :
key , . , : 1,2,3.
Tarantool pairs (), :
(), () . , , , tuple[1] , format, : tuple[«name»] . , ( tuple[«serial»] ), ( tuple[«value»] ) ( tuple[«timestamp»] ).
— ( (. key ), , ).
. .
- : . , . :
It became:
.
:
!
, , , git checkout bf26c3aea21e68cd184594beec2e34f3413c2776 . DIFF -.
. :
It became:
? , — . , , — . , .
, , . . , , .
T++ Conference .
insert upsert: , , , , .
, , , , — .
clock,
get_values :
storage:pairs() , , , :
: (pairs) storage, serial , serial. , .
, , , , , , .
: , :

, . : .
, , : JSON c , , , , . , 3 .
, , , -, , :
HTTP, , — :
:
, .
, , , git checkout 10ed490333bead9e8aeaa851dc52070050aac68c . DIFF -.
, Tarantool , . , .
Tarantool — , , , , .
But what should those who do not want to put up with such a state, and want
')
I will show how using Tarantool to quickly make even non-visualization, but a complete control system, with a database, control buttons and graphs. With its help, it is possible to control the devices of a smart home, collect and display data from sensors.
What is Tarantool? This is a bunch of "application server - database." You can use it as a database with stored procedures, or you can as an application server with a built-in database. All internal logic, whether user-defined or stored, is written in Lua. Thanks to the use of LuaJIT, and not the usual interpreter, it is not much slower than the native code in speed.
Another important factor is Tarantool is a noSQL database. This means that instead of traditional queries like “SELECT ... WHERE”, you manage data directly: write a procedure that iterates through all the data (or part of it) and gives you it. In version 2.x, SQL query support was added, but they are not a panacea - for high performance, it is often important to understand exactly how a particular query is executed, and not to give it to the developers.
In the article, I will show an example of use when all the application logic is written inside Tarantool, including communication with external APIs, data processing and output.
Go!
Introduction
We define the system requirements. This should be a service that implements the user interface for some smart home device. In the web interface, there should be buttons that send commands to the device, and visualization of data from this device. A little blurry, but enough to start.Disclaimer 1:
My understanding of web development at the time of the beginning of this article was frozen somewhere in 2010 (or even earlier), so take the frontend code as an example of “how not to do”.
Disclaimer 2:
Let's immediately agree that the hypothetical device of the smart home is available through MQTT. This is a fairly universal and common protocol, so that they do not accuse me of artificiality of the example. The implementation of other protocols, though simple, is clearly beyond the scope of the article in which I want to show an example of working with Tarantool, and not the process of writing a driver for some Chinese light bulb.
What is MQTT?
MQTT, as Google tells us, is a network protocol used mainly for M2M interaction .The protocol works according to the publisher-subscriber model: this means that someone (for example, a device) can publish messages, and you, if you subscribe to an address (in MQTT this is called a topic, for example, "/ data / voltage / " ), you will receive these messages.
Client-server protocol - it should always have a server, without which two clients cannot exchange data. This is done in order to maximally facilitate the client part and the protocol. Clients simply send messages “I want to subscribe”, “I want to unsubscribe”, “I want to publish”, and the server is engaged in routing between them.
A little bit more
You can subscribe not only to a specific topic, but also using wildcards in the address. So, subscribing to " / data / + " will allow you to receive messages from any topics of the form " / data / whatever / ", for example, " / data / temperature / " and " / data / stat ", and subscribing to " / data / # "- from the topics of the form" / data / whatever / whatever / whatever / ... ", i.e. not only from " / data / temperature / and" / data / stat ", but also from" / data / stat / today "and" / data / stat / today / user / ivan ".
The names of topics are not standardized, so the way you shove your data on them is your business. Statistics for the user for the current day can be either in " / stat / today / user / ivan " or in " / user / ivan / stat / today " or in " / today / ivan / stat ". In the first case, you can subscribe to all statistics notifications (" / stat / # "), and in the second, all notifications from an individual user (" / user / ivan / # "). However, in the second case, you can also subscribe to statistics for the current day for all users (" / user / + / stat / today ").
The protocol has QOS, which determines how much effort the sender must make to deliver the message to the recipient. When QOS 0 does not attach them at all (sends a message and forgets), with QOS 1, it waits for at least one confirmation (but sometimes the recipient may receive several duplicate messages, take this into account when commands are always changing the current state), while QOS 2 only one confirmation (more than one message will not come).
Another message can be marked with the flag «Retain». In this case, the server will remember the last message value in this topic, and will send it to all reconnected clients.
This is convenient if the client needs to know about the current state, such as light, but he just connected, and can not know what happened an hour ago. And if you mark messages about changes in light with this flag, the server will store the latest changes and send them immediately when new clients are connected.
Step one: form with buttons
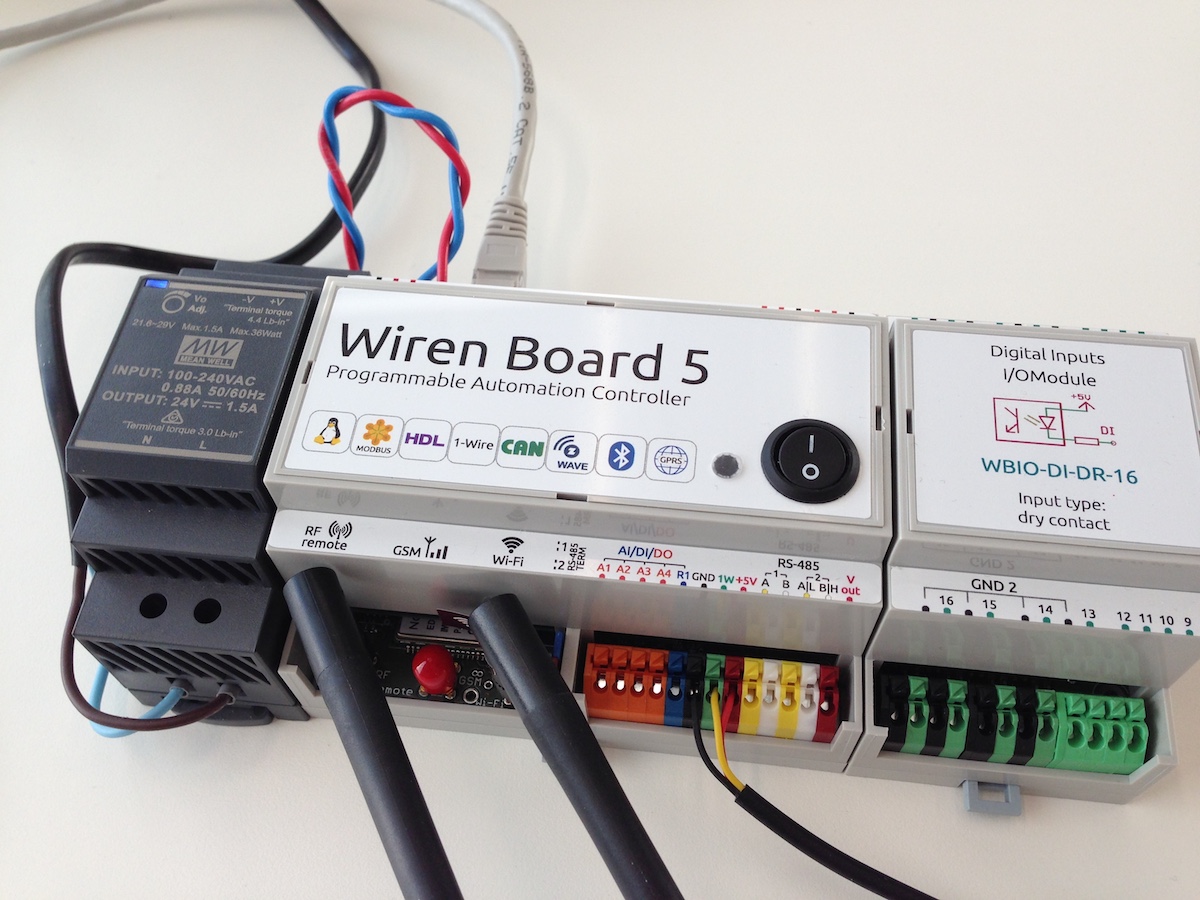
So, our minimum functionality is the ability to send some command to a hypothetical device. Although why a hypothetical? Let's take the Wiren Board .We will manage at least a squeaker on it. To enable it, we need to connect via MQTT to WirenBoard and send "1" to the topic " / devices / buzzer / controls / enabled / on ". To disable - you must send the same "0".
Install the http-server package, create a new file, give it rights to execute and say that it should be executed in the Tarantool interpreter, and not just in Lua:
tarantoolctl rocks install http echo '#!/usr/bin/env tarantool' > iot_scada.lua chmod +x iot_scada.lua Now you can open the file in your favorite editor, and literally through a few lines of code we will have a small but very proud HTTP server:
local config = {} config.HTTP_PORT = 8080 local function http_server_root_handler(req) return req:render{ json = { server_status = "ok" } } end local http_server = require('http.server').new(nil, config.HTTP_PORT, {charset = "application/json"}) http_server:route({ path = '/' }, http_server_root_handler) http_server:start() Now, having started our service ( ./iot_scada.lua ), we can open the localhost : 8080 / page in the browser and see there something like
{"server_status":"ok"} This means that our server is working and is able to communicate with the outside world. Yes, so far exclusively in JSON format, but it is easy to fix. In order not to bother with the interface, we take for this purpose Twitter Bootstrap .
Next to our script, create public folders and templates. The first one will contain static content, and the second is intended for HTML templates (they do not belong to static, because Tarantool can execute lua-scripts in these templates).
In the public folder, we put all sorts of bootstrap.min.css, bootstrap.min.js, jquery-slim.min.js, and so on (I found these files in the archive with Bootstrap, you can find it in the same place or here ), and in the templates we'll throw The file dashboard.html is an example of a page from the same standard delivery. We'll talk about him a little later.
Now, change our service a bit:
--...-- local function http_server_action_handler(req) -- endpoint-a /action return req:render{ json = { mqtt_result = true } } -- JSON end local function http_server_root_handler(req) -- endpoint-a / return req:redirect_to('/dashboard') -- /dashboard end --...-- http_server:route({ path = '/action' }, http_server_action_handler) http_server:route({ path = '/' }, http_server_root_handler) http_server:route({ path = '/dashboard', file = 'dashboard.html' }) --...-- What did we do here? First, they described two more endpoints - "/ action", which will be used for API requests, and "/ dashboard", which will give the contents of the dashboard.html file. We installed and described the functions that will be called when the browser requests these addresses: when you request "/", the http_server_root_handler function will be called, which redirects the browser to the / dashboard address, and when the / action request is, the http_server_action_handler function will generate JSON from the Lua object and will give it to the client.
Now, as promised, let's do the dashboard.html file. I will not give it all, you can look here , it is almost a copy of the example from Bootstrap. I will show only the functional parts:
<div class="row input-group"> <div class="col-md-3 mb-1"> <button type="button" action-button="on" class="btn btn-success mqtt-buttons">On buzzer</button> <button type="button" action-button="off" class="btn btn-success mqtt-buttons">Off buzzer</button> </div> </div> Here we describe two buttons, "On buzzer" and "Off buzzer". Add to them the attribute " action-button ", which describes the function of the button, and the class " mqtt-buttons ", which we will catch in JS. And here it is, by the way (yes, right in the body of the page, do not do that, so be it).
<script> var button_xhr = new XMLHttpRequest(); var last_button_object; function mqtt_result() { if (button_xhr.readyState == 4) { if (button_xhr.status == 200) { var json_data = JSON.parse(button_xhr.responseText); console.log(json_data, button_xhr.responseText) if (json_data.mqtt_result == true) last_button_object.removeClass("btn-warning").removeClass("btn-danger").addClass("btn-success"); else last_button_object.removeClass("btn-warning").removeClass("btn-success").addClass("btn-danger"); } else { last_button_object.removeClass("btn-warning").removeClass("btn-success").addClass("btn-danger"); } } } function send_to_mqtt() { button_xhr.open('POST', 'action?type=mqtt_send&action=' + $(this).attr('action-button'), true); button_xhr.send() last_button_object = $(this) $(this).removeClass("btn-success").removeClass("btn-danger").addClass("btn-warning"); } $('.mqtt-buttons').on('click', send_to_mqtt); button_xhr.onreadystatechange = mqtt_result </script> Easier to read from the bottom up. We set the function send_to_mqtt as a handler for all buttons with the class mqtt-buttons ( $ ('. Mqtt-buttons'). On ('click', send_to_mqtt); ). In this function, we make a POST request of the form / action? Type = mqtt_send & action = on , with the last value obtained from the action-button attribute of the pressed button. Well, let's paint the button yellow ( .addClass (“btn-warning”) ), showing that the request went to the server.
The request is asynchronous, so we install and process the data that the server will return to us in response to the request ( button_xhr.onreadystatechange = mqtt_result ). In the handler, we check whether the response came, whether it came with code 200, and whether it is valid JSON data with the parameter mqtt_result = true . If he is like that, then we paint the button back to green, and if not, then to red ( .addClass (“btn-danger”) ): “chef, everything is lost”.
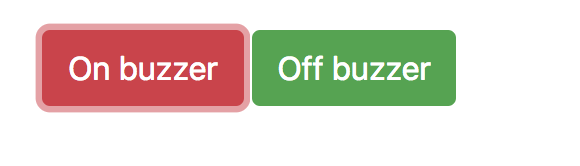
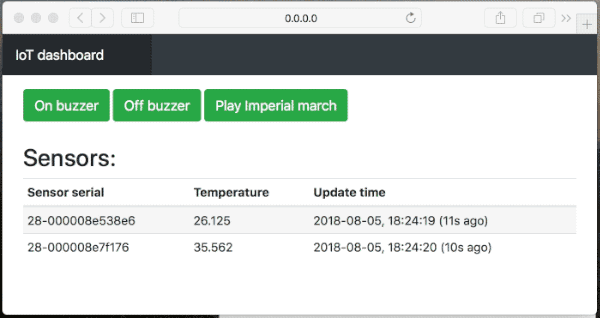
Now, if you start the service and open localhost : 8080 / in the browser, we will see the following page:
When you click on the buttons it seems that their color does not change, but this is only because the request comes and goes too quickly. If you stop the service running in the console, then pressing the button will repaint it red: there is no one to answer.
Buttons work, but do nothing: there is no logic on the server side. Let's add it.
First you need to install the mqtt library. By default, there is no tarantula in its delivery, so you need to install: sudo tarantoolctl rocks install mqtt . Run this command in the folder containing iot_scada.lua , since the library will be installed locally in the .rocks folder.
Now you can write code:
--...-- local mqtt = require 'mqtt' config.MQTT_WIRENBOARD_HOST = "192.168.1.59" config.MQTT_WIRENBOARD_PORT = 1883 config.MQTT_WIRENBOARD_ID = "tarantool_iot_scada" --...-- mqtt.wb = mqtt.new(config.MQTT_WIRENBOARD_ID, true) local mqtt_ok, mqtt_err = mqtt.wb:connect({host=config.MQTT_WIRENBOARD_HOST,port=config.MQTT_WIRENBOARD_PORT,keepalive=60,log_mask=mqtt.LOG_ALL}) if (mqtt_ok ~= true) then print ("Error mqtt: "..(mqtt_err or "No error")) os.exit() end --...-- We connect the library, determine the server’s address and port, as well as the client’s name (usually, authorization is still required, but it is turned off by default on WB. You can read about how to use authorization and other library functions on its page ).
After connecting the library, create a new mqtt object and connect to the server. Now we can use " mqtt.wb: publish " to send MQTT messages to different topics.
Let's do the http_server_action_handler function. She must, firstly, obtain information about what kind of request she sent to the button on the page, and secondly, execute it. With the first, everything is very simple. This construction will pull out the type and action arguments from the address:
local type_param, action_param = req:param("type"), req:param("action") if (type_param ~= nil and action_param ~= nil) then --body-- end The type argument will be equal to “mqtt_send”, and the action can be “on” or “off”. At the first value, we need to send to the MQTT topic "1", and at the second - "2". We implement:
local function http_server_action_handler(req) local type_param, action_param = req:param("type"), req:param("action") if (type_param ~= nil and action_param ~= nil) then if (type_param == "mqtt_send") then local command = "0" if (action_param == "on") then command = "1" elseif (action_param == "off") then command = "0" end local result = mqtt.wb:publish("/devices/buzzer/controls/enabled/on", command, mqtt.QOS_1, mqtt.NON_RETAIN) return req:render{ json = { mqtt_result = result } } end end end Notice the result variable — the mqtt.wb: publish function returns the request status (true or false), which is then packaged in JSON and sent to the browser.
Now the buttons are not only pressed, but also work. See for yourself:
All code related to this step can be found here . Or get yourself on the disk with this command:
git clone https://github.com/vvzvlad/tarantool-iotscada-mailru-gt.git cd tarantool-iotscada-mailru-gt git checkout a2f55792019145ca2355012a65167ca7eae3154d Step one and a half: playing the imperial march
Let's add the third button, or what? If we have a speaker, let him play the imperial march!What is great, on the page we need to add only the button itself, defining some other action-button attribute to it:
<button type="button" action-button="sw" class="btn btn-success mqtt-buttons">Play Imperial march</button> All the magic will occur in the file with the code. Add a new parameter handler:
--...-- local function play_star_wars() end --...-- elseif (action_param == "sw") then play_star_wars() --...-- Now, we need to think about how we will play the melody. In an article on Wikipedia about the imperial march there were good timings for the melody, but now they were cut out from there. I had to find others in the format frequency / time:
local imperial_march = {{392, 350}, {392, 350}, {392, 350}, {311, 250}, {466, 100}, {392, 350}, {311, 250}, {466, 100}, {392, 700}, {392, 350}, {392, 350}, {392, 350}, {311, 250}, {466, 100}, {392, 350}, {311, 250}, {466, 100}, {392, 700}, {784, 350}, {392, 250}, {392, 100}, {784, 350}, {739, 250}, {698, 100}, {659, 100}, {622, 100}, {659, 450}, {415, 150}, {554, 350}, {523, 250}, {493, 100}, {466, 100}, {440, 100}, {466, 450}, {311, 150}, {369, 350}, {311, 250}, {466, 100}, {392, 750}} True, over time there is something not quite right, and there is no pause length, but what can we do. On WirenBoard, you can change the frequency of the speaker by sending the value of the new frequency in Hertz to the topic " / devices / buzzer / controls / frequency / on ", but you cannot set the duration of the sound. So, we will count the duration on the application side.
Since we are designing the “right” service, then despite any actions, the responsiveness of the service should not deteriorate: we will have to make it asynchronous and multi-threaded.
For this we use fibers (fibers) - this is the implementation of separate streams for Tarantool. Documentation can be found here . In the simplest version, launching another stream within your program requires only a few lines:
local fiber = require 'fiber' local function fiber_func() print("fiber ok") end fiber.create(fiber_func) First we connect the library, then we define the function that will be launched in a separate thread, and then we create a new fiber, passing it the name of the function. There is also monitoring of running processes, synchronization tools and messages between running threads, but we will not dive into it yet. We use only the delay function, which is called fiber.sleep . By the way, Faybers are cooperative multitasking, so the call to fiber.sleep is not just waiting, but giving control to the task manager so that other processes can work, for example, writing to the database. It should be remembered that in heavy cycles it is sometimes necessary to transfer control to other flows so that they do not stop for long.
Everything else is simple: we need to bypass the array in a loop, getting the frequency and duration of each element, adjusting the frequency through the MQTT, and then starting the delays for the note and pause, and also turning on / off the sound.
--...-- for i = 1, #imperial_march do local freq = imperial_march[i][1] local delay = imperial_march[i][2] mqtt.wb:publish("/devices/buzzer/controls/frequency/on", freq, mqtt.QOS_0, mqtt.NON_RETAIN) mqtt.wb:publish("/devices/buzzer/controls/enabled/on", 1, mqtt.QOS_0, mqtt.NON_RETAIN) fiber.sleep(delay/1000*2) mqtt.wb:publish("/devices/buzzer/controls/enabled/on", 0, mqtt.QOS_0, mqtt.NON_RETAIN) fiber.sleep(delay/1000/3) end --...-- View the full code here , or in diff-form .
Hurray, it works!
The clarity of the melody floats a little because of unpredictable network delays, but the melody is quite clear and recognizable. Colleagues rejoice (in fact, no, for the tenth time they were zadolbalo).
As usual, the code relating to this step can be found here . Or get yourself on the disk with such a command (it is assumed that you have already cloned the repository, and you are inside its directory):
git checkout 10364cea7f3e1490ac3eb916b4f4b4c095bec705 Step Three: Temperature on the webpage
And now let's do something more close to reality. The imperial march sounds funny, but it has very little to do with the Internet of things. Take, for example, two temperature sensors and connect them:As the documentation promises, we will not need to do anything else, the data from the sensors will appear in the MQTT themselves.
The minimum task in this step is to make on the page a real-time updated display of information from the sensors. There are several of them, and the composition may change, so we will not hardcore the serial numbers of the sensors, and automate all actions, including determining and displaying information from new sensors. Let's start with the server.
Backend
The first thing we need to do is create a function that should be called when the MQTT message is received with temperature, then tell the library that we should call it, and subscribe to the message topic. The documentation states that the topic looks like this: " / devices / wb-w1 / controls / 28-43276f64 ". 28-43276f64 - this is the serial number of the sensor. So, a subscription to the data from all possible sensors will look like this: " / devices / wb-w1 / controls / + ". local sensor_values = {} --...-- local function mqtt_callback(message_id, topic, payload, gos, retain) local topic_pattern = "/devices/wb%-w1/controls/(%S+)" local _, _, sensor_address = string.find(topic, topic_pattern) if (sensor_address ~= nil) then sensor_values[sensor_address] = tonumber(payload) end end --...-- mqtt.wb:on_message(mqtt_callback) mqtt.wb:subscribe('/devices/wb-w1/controls/+', 0) Now we will understand in more detail what we do in the callback function. To find the serial number in the address bar, we use the so-called patterns (regular expressions for Lua-shnogo spill). The function string.find accepts a string and a pattern in which the brackets indicate what should be captured from this string. In this case, “ % S + ” means “1 or more characters that are not spaces” - so the function will capture everything after “..controls /” before the first space encountered. And since we do not have spaces in the sensor number, and the subscription address allows messages only from " / devices / wb-w1 / controls / sensor address ", but not from " / devices / wb-w1 / controls / sensor address / something else ", then in the variable sensor_address we will always have the address (serial number) of the sensor.
Please note that the strings '/ devices / wb-w1 / controls / +' and "/ devices / wb% -w1 / controls / (% S +)" are similar, but different: the first line is wildcard mqtt- a subscription, and the second is a string argument for the Lua-shny function string.find , which uses a subset of regular expressions in the Lua format (there, for example, "-" must be escaped, so it is written as "wb% -w1")
In the next lines we create and fill in the sensor_values table, in which we will have records corresponding to the sensors: the key will be the serial number, and the value will be the temperature from the sensor.
local sensor_values = {} --...-- sensor_values[sensor_address] = tonumber(payload) The table will contain the last temperature value received and stored only in memory. In fact, you should not do this, global tables accessible to all are evil. If the application were slightly larger than the demo, it would be worth creating two functions: a getter and a setter, the first of which would produce a table, and the second would preserve. In addition to the obvious advantages, such as validation of stored data and data output in different formats, it would be much easier to track who changes the data and when than with a table that is available to everyone in a row.
The next thing we have to do is somehow give this table to the frontend. Therefore, we write this function: first, it will turn the key-value label into an array, which will be easier to display on the page, and secondly, it will be packed in JSON and given to the one who asks:
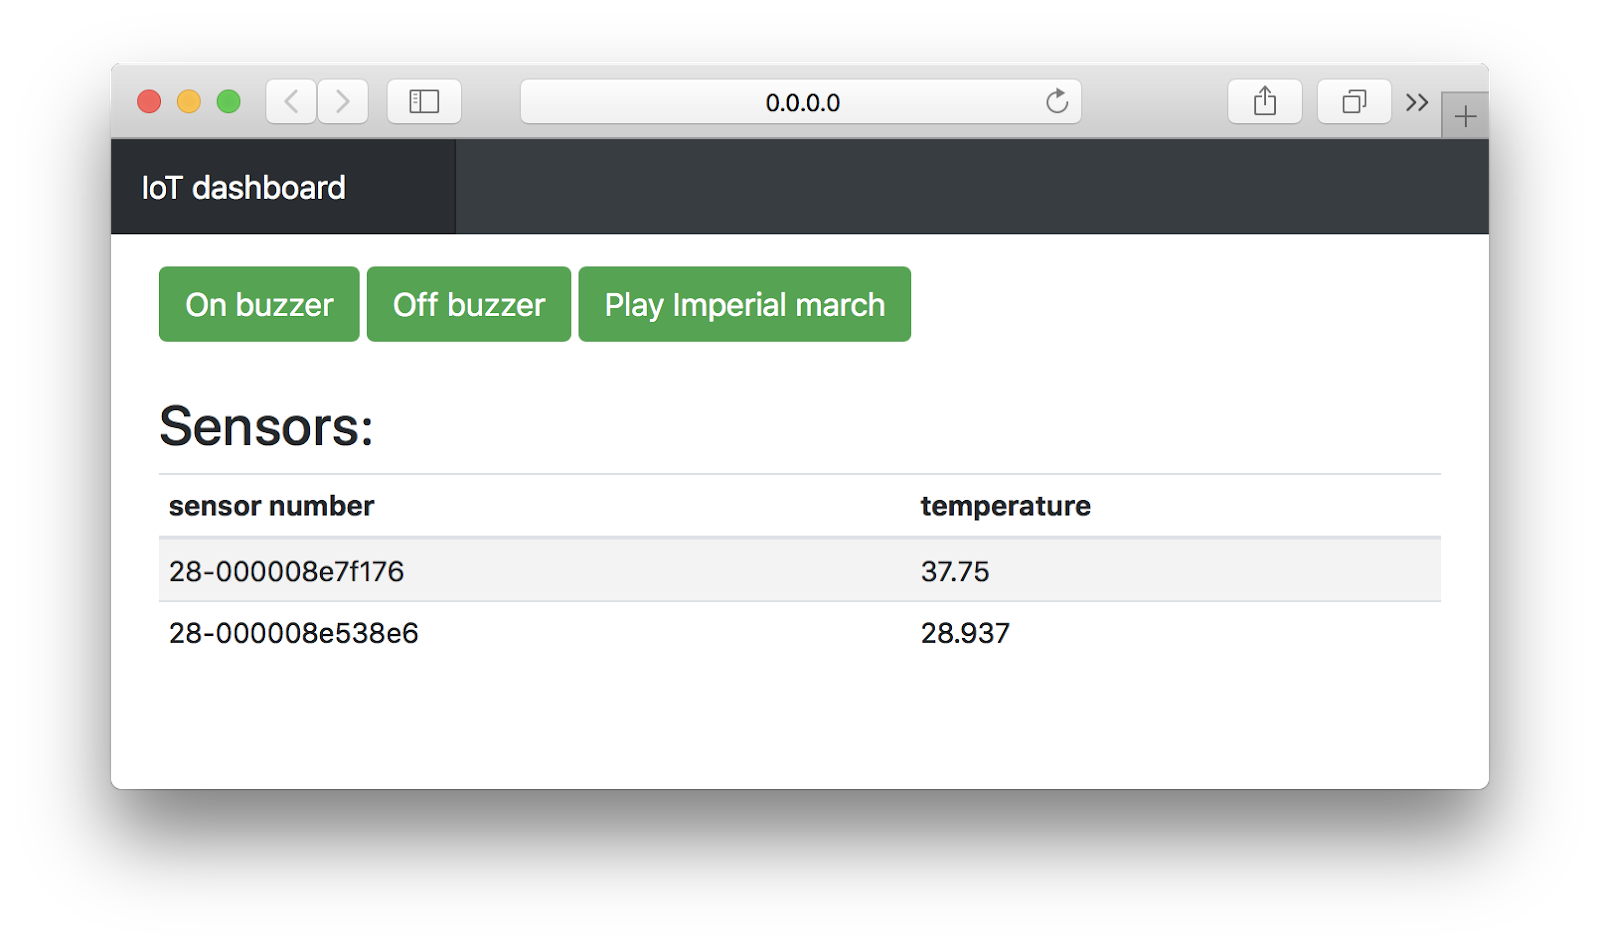
local function http_server_data_handler(req) local type_param = req:param("type") if (type_param ~= nil) then if (type_param == "temperature") then if (sensor_values ~= nil) then local temperature_data_object, i = {}, 0 for key, value in pairs(sensor_values) do i = i + 1 temperature_data_object[i] = {} temperature_data_object[i].sensor = key temperature_data_object[i].temperature = value end return req:render{ json = { temperature_data_object } } end end end return req:render{ json = { none_data = "true" } } end Of course, you can immediately form the correct table in the mqtt-callback, but choosing where to convert depends on what happens more often - saving or issuing: saving to the table by key is much faster than going through the table looking for the right sensor name for each value. Thus, if we show the values, on average, every minute, and they are saved every second, then it is more advantageous to save by key, and then format it on request. If, on the contrary, for example, we have a dozen customers who look at the table, and the temperature is updated infrequently, then it is better to keep the finished table.
But again, this all matters only if these operations begin to occupy at least some tangible share of resources.
Finally, we install this function as an endpoint-a / data
http_server:route({ path = '/data' }, http_server_data_handler) : http_server:route({ path = '/data' }, http_server_data_handler) .Checking:
Works!
Frontend
Now you need to draw a sign. Create a preset: <h3>Sensors:</h3> <div class="table-responsive"> <table class="table table-striped table-sm" id="table_values_temp"></table> </div> And we write two functions that will turn the JS object into a table:
function add_row_table(table_name, type, table_data) { var table_current_row; if (type == "head") table_current_row = document.getElementById(table_name).createTHead().insertRow(-1); else { if (document.getElementById(table_name).tBodies.length == 0) table_current_row = document.getElementById(table_name).createTBody().insertRow(-1); else table_current_row = document.getElementById(table_name).tBodies[0].insertRow(-1); } for (var j = 0; j < table_data.length; j++) table_current_row.insertCell(-1).innerHTML = table_data[j]; } function clear_table(table_name) { document.getElementById(table_name).innerHTML = ""; } Now it remains only to start updating this label in a loop:
var xhr_tmr = new XMLHttpRequest(); function update_table_callback() { if (xhr_tmr.readyState == 4 && xhr_tmr.status == 200) { var json_data = JSON.parse(xhr_tmr.responseText); if (json_data.none_data != "true") { clear_table("table_values_temp") add_row_table("table_values_temp", "head", ["Sensor serial", "Temperature"]) for (let index = 0; index < json_data[0].length; index++) { add_row_table("table_values_temp", "body", [json_data[0][index].sensor, json_data[0][index].temperature]) } } } } function timer_update_field() { xhr_tmr.onreadystatechange = update_table_callback xhr_tmr.open('POST', 'data?type=temperature', true); xhr_tmr.send() } setInterval(timer_update_field, 1000); As you can see, the table is deleted and re-created each time, which could have a bad effect on the execution speed if the label did not consist of two values. The correct approach is to take a framework that can use reactivity and virtual dom, but this is clearly beyond the scope of this article.
Well, what did we do?
The code related to this step can be viewed here , or by making git checkout e387430efed44598efe827016f903cc3c17634a8 . Or DIFF- view.
Step Four: Database Temperature
And now let's do the same, but with the database! In the end, Tarantool - a database or not? :)Changes, in fact, will be quite a bit. First, we initialize the database engine and create a space (this is an analogue of a table in some SQL):
local function database_init() box.cfg { log_level = 4 } box.schema.user.grant('guest', 'read,write,execute', 'universe', nil, {if_not_exists = true}) local format = { {name='serial', type='string'}, --1 {name='timestamp', type='number'}, --2 {name='value', type='number'}, --3 } storage = box.schema.space.create('storage', {if_not_exists = true, format = format}) storage:create_index('serial', {parts = {'serial'}, if_not_exists = true}) end Now let's take a closer look at the challenges: we are beginning to dive into the very essence of Tarantool - in working with the database.
box.cfg () is initialization. We pass the logging level parameter to it, indicating which logs of what importance we want to see, and which one is not. But in general, she has many parameters .
You may notice that the function call box.cfg is kind of strange: instead of round braces it is curly. This is because in Lua, when passing a function, one argument of the bracket can be omitted. And since {} is a table, one argument is passed to the table. Simply put, box.cfg ({log_level = 4}) is the same as box.cfg {log_level = 4} .
With the box.schema.user.grant function , we give the guest user without a password ( nil ) rights to read, write and execute ( read, write, execute ) in the entire space of the current Tarantool ( universe ) instance. The last argument ( if_not_exists = true ) allows the system to do nothing if the user already has these rights (more precisely, only allows them to give rights if the user does not have them).
Now we need to create some kind of storage. This is the function box.schema.space.create . We transfer to it the name of the repository, the if_not_exists instruction already known to us and the format - in fact, the names of the fields and the types of data stored in them, which are defined by a couple of lines above. This piece is optional, you can not transfer the format and still work with the database, just access to the fields will not be by name, but by numbers (but you can add new fields in the process).
This function returns the created storage object. : : box.space.space_name ( box.space.storage , ). storage:create_index box.space.storage:create_index .
, , , , . create_index , , — ( ), . , serial, , " serial " ( , , 1).
, — Tarantool .
, , . :
local function save_value(serial, value) local timestamp = os.time() value = tonumber(value) if (value ~= nil and serial ~= nil) then storage:upsert({serial, timestamp, value}, {{"=", 2, timestamp} , {"=", 3, value}}) return true end return false end — storage:upsert({serial, timestamp, value}, {{"=", 2, timestamp}, {"=", 3, value}}) .
Upsert — update insert : , insert , — update . , insert ( : serial , timestamp , value ), — update .
: serial , timestamp value , . , . : , serial , — timestamp , value . format (. ).
: ( , ), , .
" {"=", 2, timestamp} " , , =). . , , XOR/AND, .
— , (mqtt , value number , ), .
, :
local function get_values() local temperature_data_object, i = {}, 0 for _, tuple in storage:pairs() do i = i + 1 local absolute_time_text = os.date("%Y-%m-%d, %H:%M:%S", tuple["timestamp"]) local relative_time_text = (os.time() - tuple["timestamp"]).."s ago" temperature_data_object[i] = {} temperature_data_object[i].sensor = tuple["serial"] temperature_data_object[i].temperature = tuple["value"] temperature_data_object[i].update_time_epoch = tuple["timestamp"] temperature_data_object[i].update_time_text = absolute_time_text.." ("..relative_time_text..")" end return temperature_data_object end . pairs() for , .
local table = {"test_1","test_2","test_3"} for key, value in pairs(table) do print(value) end table , print() , . Those. :
local table = {"test_1","test_2","test_3"} print(table[1]) print(table[2]) print(table[3]) key , . , : 1,2,3.
Tarantool pairs (), :
for _, tuple in box.space.storage:pairs() do -- for body end (), () . , , , tuple[1] , format, : tuple[«name»] . , ( tuple[«serial»] ), ( tuple[«value»] ) ( tuple[«timestamp»] ).
— ( (. key ), , ).
. .
- : . , . :
add_row_table("table_values_temp", "head", ["Sensor serial", "Temperature"]) for (let index = 0; index < json_data[0].length; index++) { add_row_table("table_values_temp", "body", [json_data[0][index].sensor, json_data[0][index].temperature) } It became:
add_row_table("table_values_temp", "head", ["Sensor serial", "Temperature", "Update time"]) for (let index = 0; index < json_data[0].length; index++) { add_row_table("table_values_temp", "body", [json_data[0][index].sensor, json_data[0][index].temperature, json_data[0][index].update_time_text]) } .
:
!
, , , git checkout bf26c3aea21e68cd184594beec2e34f3413c2776 . DIFF -.
:
, . , .. :
storage:create_index('serial', {parts = {'serial'}, if_not_exists = true}) It became:
storage:create_index('timestamp', {parts = {'timestamp'}, if_not_exists = true}) storage:create_index('serial', {parts = {'serial'}, unique = false, if_not_exists = true}) ? , — . , , — . , .
, , . . , , .
T++ Conference .
local function gen_id() local new_id = clock.realtime()*10000 while storage.index.timestamp:get(new_id) do new_id = new_id + 1 end return new_id end local function save_value(serial, value) value = tonumber(value) if (value ~= nil and serial ~= nil) then storage:insert({serial, gen_id(), value}) return true end return false end insert upsert: , , , , .
, , , , — .
clock,
local clock = require 'clock' get_values :
local function get_values_for_table(serial) local temperature_data_object, i = {}, 0 for _, tuple in storage.index.serial:pairs(serial) do i = i + 1 local time_in_sec = math.ceil(tuple["timestamp"]/10000) local absolute_time_text = os.date("%Y-%m-%d, %H:%M:%S", time_in_sec) temperature_data_object[i] = {} temperature_data_object[i].serial = tuple["serial"] temperature_data_object[i].temperature = tuple["value"] temperature_data_object[i].time_epoch = tuple["timestamp"] temperature_data_object[i].time_text = absolute_time_text end return temperature_data_object end storage:pairs() , , , :
storage.index.serial:pairs(serial) : (pairs) storage, serial , serial. , .
, , , , , , .
: , :
, . : .
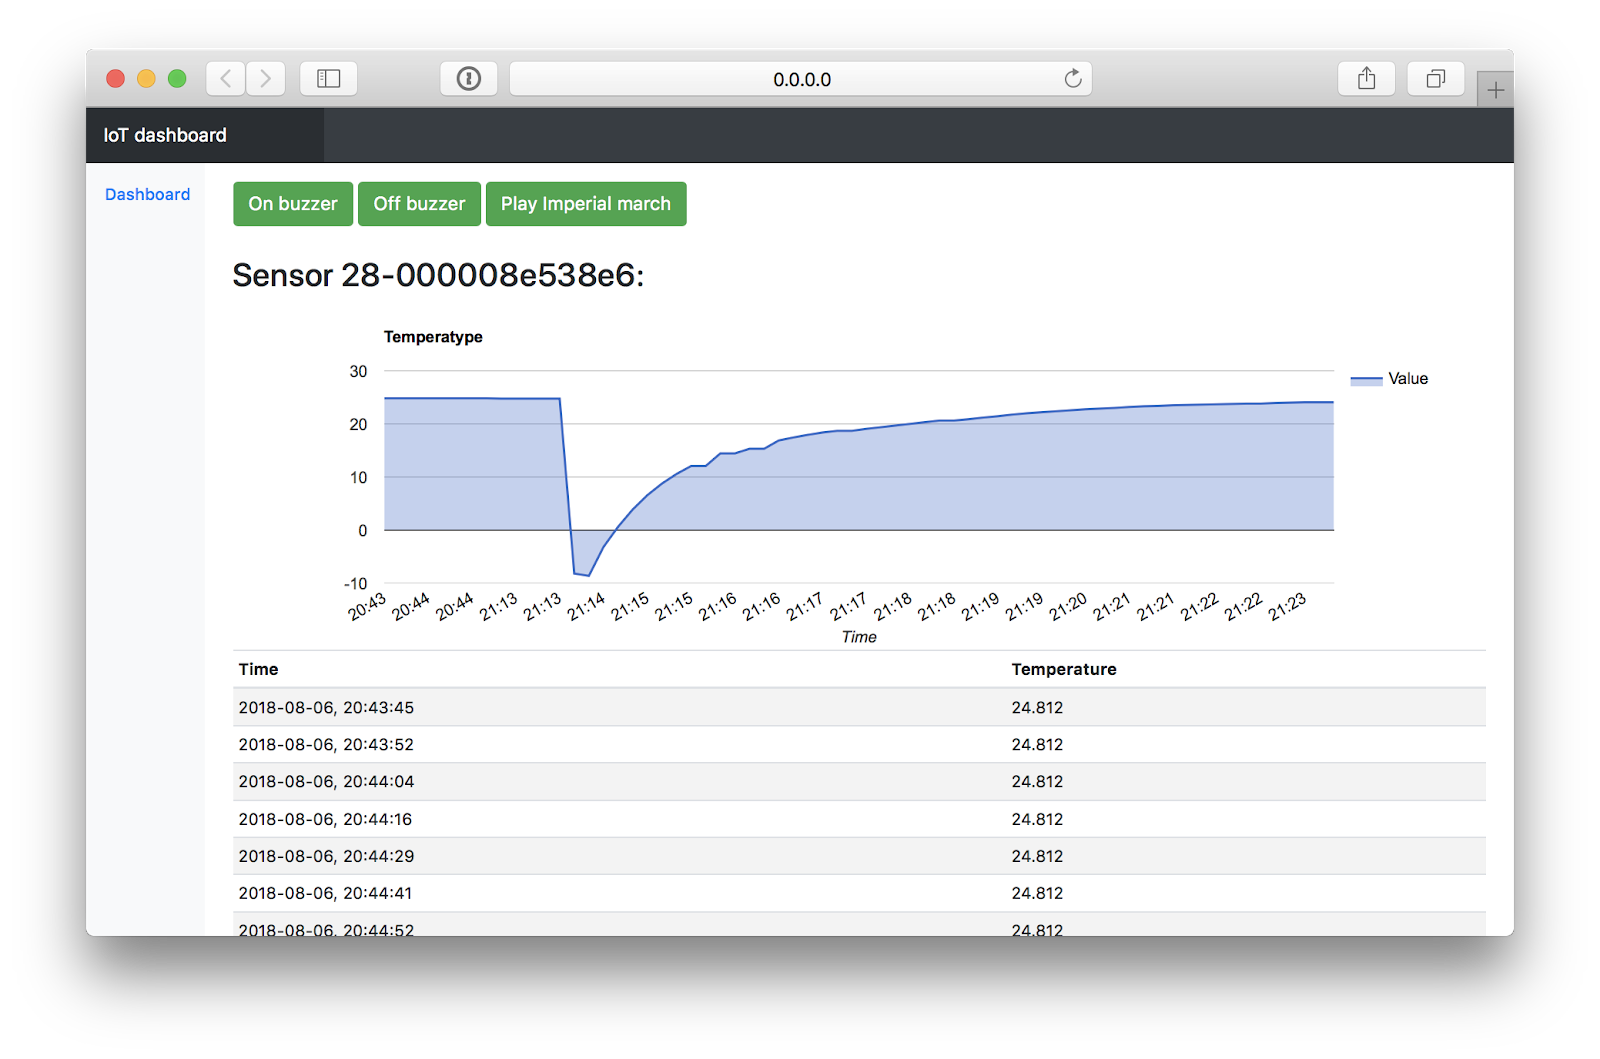
<script type="text/javascript" src="https://www.gstatic.com/charts/loader.js"></script> <script type="text/javascript"> google.charts.load('current', { 'packages': ['corechart'] }); google.charts.setOnLoadCallback(timer_update_graph); function update_graph_callback() { let data_b = JSON.parse(xhr_graph.responseText); var data = google.visualization.arrayToDataTable(data_b[0]); var options = { title: 'Temperatype', hAxis: { title: 'Time', titleTextStyle: { color: '#333' } }, }; var chart = new google.visualization.AreaChart(document.getElementById('chart_div')); chart.draw(data, options); } var xhr_graph = new XMLHttpRequest(); function timer_update_graph() { xhr_graph.onreadystatechange = update_graph_callback xhr_graph.open('POST', 'data?data=graph&serial=28-000008e538e6', true); xhr_graph.send() setTimeout(timer_update_graph, 3000); } </script> <div id="chart_div" style="width: 100%; height: 300px;"></div> , , : JSON c , , , , . , 3 .
, , , -, , :
local function get_values_for_graph(serial) local temperature_data_object, i = {}, 1 temperature_data_object[1] = {"Time", "Value"} for _, tuple in storage.index.serial:pairs(serial) do i = i + 1 local time_in_sec = math.ceil(tuple["timestamp"]/10000) temperature_data_object[i] = {os.date("%H:%M", time_in_sec), tuple["value"]} end return temperature_data_object end HTTP, , — :
local function http_server_data_handler(req) local params = req:param() if (params["data"] == "table") then local values = get_values_for_table(params["serial"]) return req:render{ json = { values } } elseif (params["data"] == "graph") then local values = get_values_for_graph(params["serial"]) return req:render{ json = { values } } end :
, .
, , , git checkout 10ed490333bead9e8aeaa851dc52070050aac68c . DIFF -.
Conclusion
, , Tarantool, // . , , . , , . , TSDB, - — Vue., Tarantool , . , .
Tarantool — , , , , .
Source: https://habr.com/ru/post/374399/
All Articles