Creating 3D Models with DJI and Agisoft Photoscan Drone
This guide is written for beginners, but I will try to share all the tips and tricks that I have learned over the past 5 years of flying and photo modeling.
My name is Matthew Brennam, I am a graduate student in computer science at Indiana University. I have experience in architecture design, but I worked as an archaeologist and multimedia designer.
')
I worked on a number of projects that required digitization and viewing of small, medium and large landscapes - from a small structure or destruction on a hill to a complete terracing of the archaeological site or mountain peak. Previously, you might have to inspect the place manually or rely on topographic maps — these methods provide relatively little data with varying accuracy, depending on the skill, rigor, and desire of the surveyor.
The recent consumer availability of modern unmanned aerial vehicles (UAV / UAS) in combination with light cameras with high resolution and increased computational power for photo modeling means that now we are able to create high-precision models for a fraction of the time and money that it once occupied. large structures and landscapes that can be used for AR and VR applications, and also displayed in real time on the Internet.
This tutorial will tell you (almost) everything you need to know about creating an accurate 3D model of an object or landscape and using a UAV at the consumer level.
We will review the following:
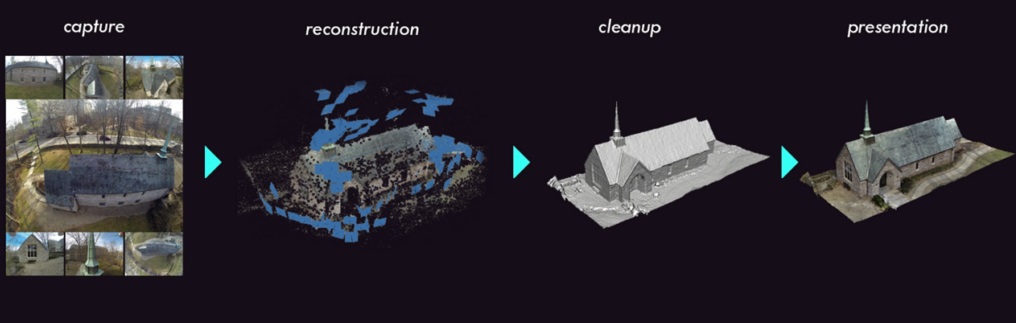
The figure shows the steps that we will consider:
In fact - this tutorial will give you the basic knowledge that you will need at every step, from making an informed decision when purchasing, on how best to edit and share everything the created 3D model. If you already have experience using UAVs for shooting and modeling, you probably won't learn anything fundamentally new here - this tutorial is written for beginners, but I will try to share all the tips and tricks I learned during the last 5 years of flying and photo modeling.
Before we go any further, here are a few examples of object models at different scales, all of which were photographed from a drone, created and fully edited in Photoscan, and uploaded to Sketchfab:
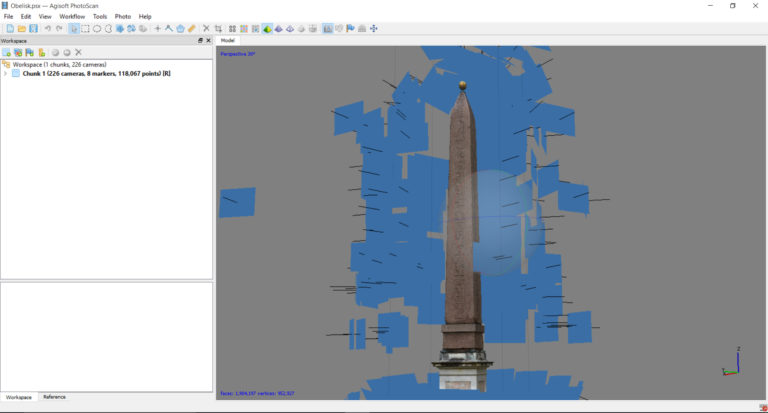
Small scale : Ancient Obelisk, Boboli Gardens, Florence, Italy (POI).
Medium scale : First Christian Church and Monroe County Library, Columbus, Indiana (photos of orthography and POI).
Large scale : the archaeological site of Spit, Tuscany, Italy (orthographic photographs only)
Unmanned aerial vehicles and vehicles, or UAS and UAV for short, are usually called drones. This is not particularly accurate, since many UAVs at the consumer level are not autonomous. In other words, they require the pilot to contribute - they do not fly and do not make decisions on their own. Most consumer-level UAVs are quadcopters, which means they use 4 propellers for flight. High-performance systems can have from 6 to 8 propellers, which allows them to carry large cameras.
Currently, there are several relatively inexpensive “flying cameras” for consumers, but not all of them are suitable for photo modeling and shooting. The key factors to consider when choosing a UAV for this purpose are the camera resolution (if the drone is sold with it), the presence of a cardan (to stabilize and orient the camera) and / or the UAV payload (the maximum weight in the camera / lens that the drone can to transport and still fly safely).
DJI Phantom 3 Professional 4k - the most advanced Phantom model of the third series. Equipped with a 12 megapixel camera and gimbal. This is a basic quadcopter that offers live streaming through a DJI app on a smartphone or tablet.

Key points for DJI Phantom 3 Professional 4k :

Key points for DJI Phantom 4 Advanced :
Key points for DJI Mavic Pro :
Some of the main points to consider when using a UAV for photo modeling are that the size of the camera's sensor, lens, and ability of the camera can be remotely launched or set to the timeline mode. All the above systems meet these requirements. Timelapse mode and / or the camera’s remote shutter release is perhaps the most important aspect of the camera used on the drone.
Cameras available on the DJI Phantom 4 and Mavic Pro offer more traditional lenses for the camera - they are wide-angle, but not ultra-wide or fisheye, which means little distortion. For photo modeling it is sometimes better, although you can be limited by how close to an object you can fly, while keeping everything in the frame.
Photogrammetry or photo modeling is a technology by which a three-dimensional digital surface can be recovered from a series of photographs. It is often used to create highly accurate 3D models of real-world objects, such as this ancient Greek bronze sculpture:
The best way to think about the photo-modeling of an object or landscape with the help of a UAV is to imagine how you would approach the object if it was very small, and you could photograph it with a pocket camera. For example, in the diagram below, which illustrates photography for photo modeling, photographs are taken with different heights and angles in 360-degree coverage.
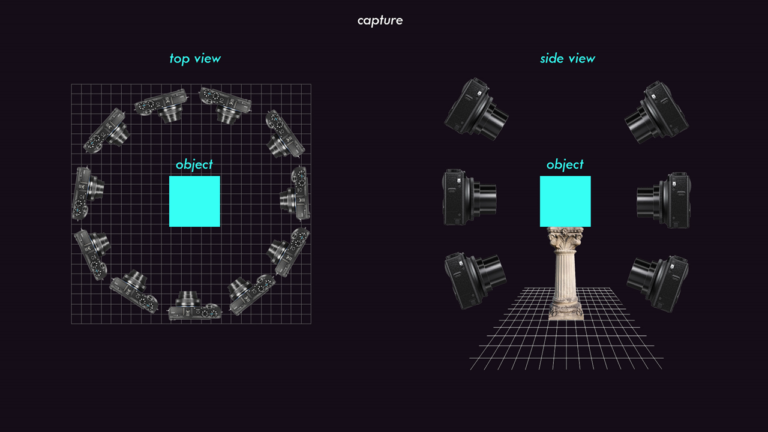
Photographing for photo modeling object.
Capturing images from a drone works in almost the same way. The camera must be set to a time mode (the photo is taken every 2 or 5 seconds) or remotely launched via the UAV controller (when shooting a photo, the pilot presses the capture button). If you scan one “object”, for example, a building or a column, POI photos work best, that is, the camera points to the object of interest, and the surrounding landscape is ignored.
However, if you are interested in capturing a terrain or geographic function, it is best to use orthographic images . Orthographic photographs are where the camera points directly to the ground, and the drone (unmanned aerial vehicle) flies over the grid in the area of interest. You can combine POI photos, orthographic photos, and even pocket photos in one project for the best possible model:

Combine aerophotographic, POI and pocket photos.
POI Photos of the obelisk.
UAVs listed above can fly from 15 to 30 minutes, which is usually enough to collect at least 200 - 400 photos of the object or landscape in which you flew. Of course, if you have multiple batteries, you can combine photos with multiple overlapping flights so that even very large areas or objects can be scanned.
So, we just made about 400 photos of the building, now how to turn them into a 3D model that we can put on the Internet? In this tutorial, we will use Agysoft's Photoscan, an affordable, inexpensive and well-supported piece of photogrammetry software. Photoscan is available on Mac, Windows and Linux operating systems and is available in two versions: Standard and Pro. The Pro version includes several features, such as the use of markers, geo-referencing and export of orthographic photos, which will be especially useful for those who use it for land management. Agisoft also offers discounts for educational institutions on its software, which makes it especially popular in universities where they study geography, archeology and anthropology!
We will not understand the various settings available in Photoscan. Instead, I will describe the basic workflow for the project, which includes settings that I thought were best suited for aerial photographs.
All the steps necessary to reconstruct the 3D model from the photos are collected in the Workflow menu tab, as shown below:
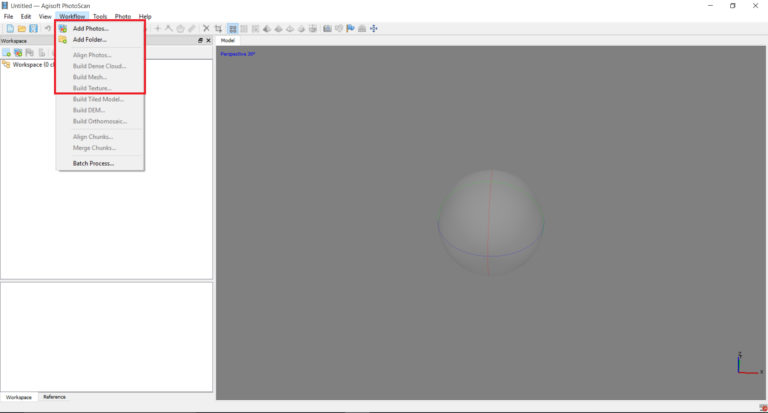
In order: 1) Adding photos to the project, 2) Align photos, 3) Build a dense cloud of points, 4) Build a three-dimensional polygonal model from a cloud of points and 5) Create textures. This process is, of course, greatly simplified: there are a number of actions you can take to get the best result and optimize your model.
Let's take a look at the steps in more detail:
1) Add photos. To add the photos you want to use to create a 3D model, you can use the “Add Photos ...” button on the Workflow menu to open a file overview where you can select photos, or you can simply select photos and drag them to Workspace panel in the lower left corner. When you add photos, Photoscan will create a “Chunk” and display the number of photos you added.
2) Photo alignment: choosing “Align Photos ...” brings up a dialog box with options for alignment. I always use “Highest” to adjust accuracy and “Generic” pair selection. Aerial photography has many useful functions - software for photo modeling loves photos of grass, earth, roads and other "organic" non-repeating surfaces. For “Key point limit” and “Tie point limit” in the “Advanced” tab, I usually set up 40,000 points and 10,000 projections, respectively.
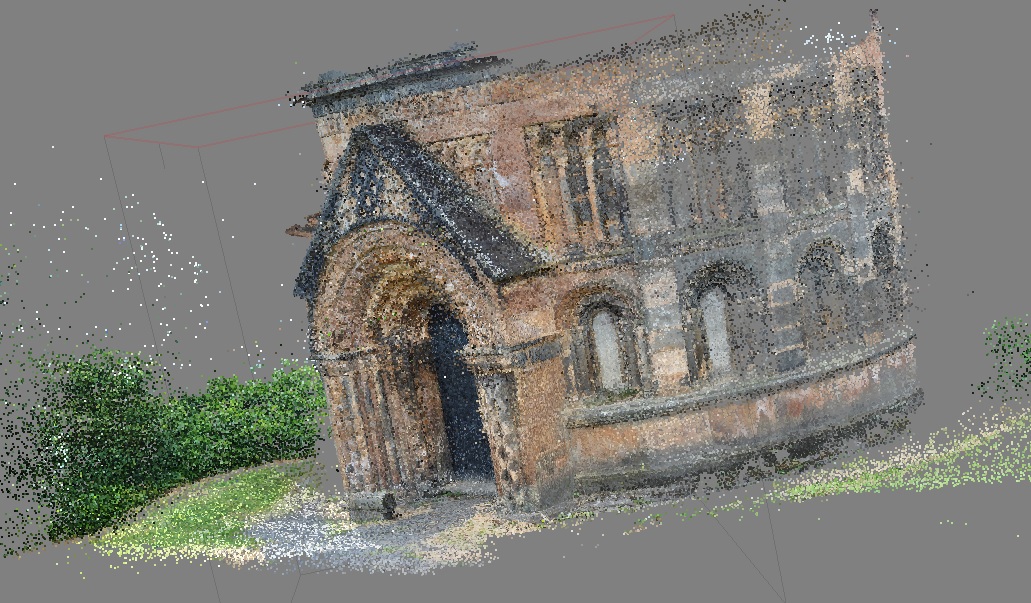
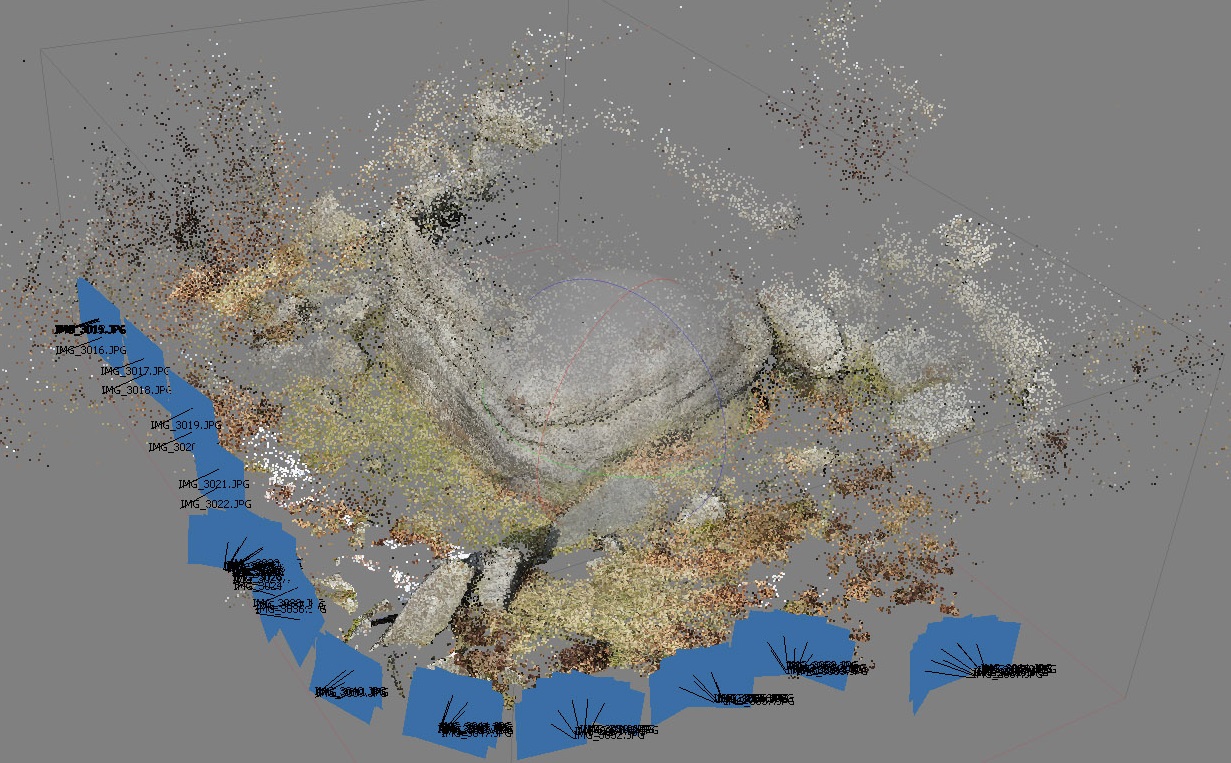
When you click “OK” in the “Align Photos” dialog box, Photoscan will find similar points in all your photos and restore the camera's position in three-dimensional space. It also creates a “sparse point cloud”, which will consist of 50,000–200,000 or so points, depending on your settings and the number of photos:
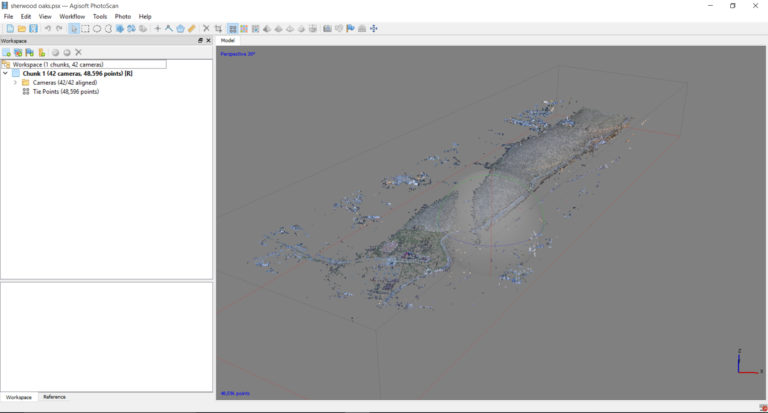
“Sparse” point cloud in Photoscan after image alignment.
At first, everything seems incomprehensible, but if you use a “gizmo” twist (a transparent sphere with red, green and blue lines on it), in order to rotate the image a little, you will probably begin to understand where it is up and where it is. If your UAV does not put photos with GPS data into EXIF, the model will not have its own orientation.
Now is the best time to install the bounding box, so as not to waste time on parts that are not interesting. This can be done using the “Resize Region” and “Rotate Region” buttons. I usually set “Region” to cover the part of the point cloud that contains the object or area in which I want to create a model. This saves processing time and reduces the amount of manual editing work that may be needed later.
3) Build Dense Cloud: This is arguably the most intense computing part of the processing. In the “Dense Cloud” dialog box, you can select quality and depth options. If your computer has less than 32 GB of RAM, I would not recommend switching to Medium quality. I believe that the average quality, as a rule, has sufficient resolution for most of my needs: High and Ultra-quality takes much longer, sometimes up to 2-3 days of processing for projects with hundreds of 36-megapixel photos.
Warning: as soon as you click "OK" in this dialog box, Photoscan will use almost all the RAM of your computer, which makes it very difficult to work on anything else. I usually leave the process overnight, or when I know that I will not need to use a computer.
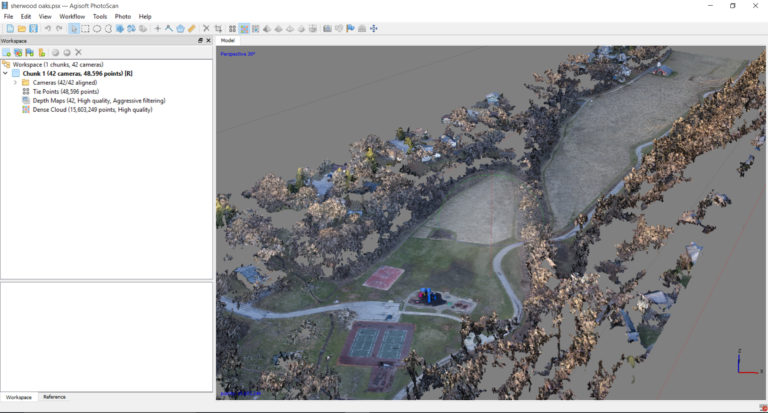
The resulting dense point cloud.
4) Build Mesh: if you have a dense cloud of points, possibly numbering millions of points, you can build a three-dimensional polygonal model. I always make sure that this dialog box is marked “interpolation enabled”. Depending on the size of the cloud, building a polygonal model can take from 10 minutes to several hours.
The result will be a three-dimensional model with the designation of vertices obtained from photographs. Before creating the texture, you can use the selection tools to trim any unnecessary parts of the model, also use Close Holes to fill any small holes in the model, use Gradual Selection to remove small accumulations of extraneous geometry and use the Decimate Mesh function, to reduce the polygonal model to a valid size for loading into Sketchfab.
Here are the important steps that make your model presentable and easy to use, so I’ll consider each of them:
5) Build Texture: Now that we have cleared our model a bit and reduced its size, we are ready to texture it. Textures are where heavily reduced models get a lot of detail. Textures are based on the photos you took, so the resulting model will have the shadows that were there when you took the pictures. Use "Build Texture ..." in the "Workflow" section to access the dialog box. Here you can set the size of the texture and the number of textures you want to generate. Usually I set the size to 2048, 4096 or 8192 and select from 1 to 10 textures, depending on the number of photos in the project.
Now we are ready to export our model and upload it to Sketchfab! Photoscan has the ability to upload models in one click on Sketchfab. This option can be found in the section “File -> Upload Model ...”. In addition, you can simply export the model as OBJ, FBX, or another format and upload it to Sketchfab.
To add the ultimate brilliance and presentation of your model in the Sketchfab viewer, go to “Settings” -> “3D Settings” (see below) to adjust the orientation, material and lighting.
In this brief tutorial, we hope to give you the knowledge you need to create 3D models using UAVs. Before flying to the site, be sure to familiarize yourself with local laws and regulations. If you are interested in more detailed information on any aspect of this process, from combining several models, checking accuracy in Photoscan and outputting an orthographic photo or a geo-referenced model, Agisoft is a great place to start.
And here are some examples of 3D models on SketchFab.
Introduction
My name is Matthew Brennam, I am a graduate student in computer science at Indiana University. I have experience in architecture design, but I worked as an archaeologist and multimedia designer.
')
I worked on a number of projects that required digitization and viewing of small, medium and large landscapes - from a small structure or destruction on a hill to a complete terracing of the archaeological site or mountain peak. Previously, you might have to inspect the place manually or rely on topographic maps — these methods provide relatively little data with varying accuracy, depending on the skill, rigor, and desire of the surveyor.
The recent consumer availability of modern unmanned aerial vehicles (UAV / UAS) in combination with light cameras with high resolution and increased computational power for photo modeling means that now we are able to create high-precision models for a fraction of the time and money that it once occupied. large structures and landscapes that can be used for AR and VR applications, and also displayed in real time on the Internet.
purpose
This tutorial will tell you (almost) everything you need to know about creating an accurate 3D model of an object or landscape and using a UAV at the consumer level.
We will review the following:
- Available drones for aerial photography.
- Fundamentals of flight UAV for shooting and photo modeling.
- Photo processing in Agisoft Photoscas to create a 3D model and the use of some additional functions in Photoscan Pro to create orthographic photos.
- Editing a model in Photoscan and optimizing it for uploading to Sketchfab.
The figure shows the steps that we will consider:
In fact - this tutorial will give you the basic knowledge that you will need at every step, from making an informed decision when purchasing, on how best to edit and share everything the created 3D model. If you already have experience using UAVs for shooting and modeling, you probably won't learn anything fundamentally new here - this tutorial is written for beginners, but I will try to share all the tips and tricks I learned during the last 5 years of flying and photo modeling.
Before we go any further, here are a few examples of object models at different scales, all of which were photographed from a drone, created and fully edited in Photoscan, and uploaded to Sketchfab:
Small scale : Ancient Obelisk, Boboli Gardens, Florence, Italy (POI).
Medium scale : First Christian Church and Monroe County Library, Columbus, Indiana (photos of orthography and POI).
Large scale : the archaeological site of Spit, Tuscany, Italy (orthographic photographs only)
Unmanned aerial vehicles and vehicles (UAS / UAV)
Unmanned aerial vehicles and vehicles, or UAS and UAV for short, are usually called drones. This is not particularly accurate, since many UAVs at the consumer level are not autonomous. In other words, they require the pilot to contribute - they do not fly and do not make decisions on their own. Most consumer-level UAVs are quadcopters, which means they use 4 propellers for flight. High-performance systems can have from 6 to 8 propellers, which allows them to carry large cameras.
Currently, there are several relatively inexpensive “flying cameras” for consumers, but not all of them are suitable for photo modeling and shooting. The key factors to consider when choosing a UAV for this purpose are the camera resolution (if the drone is sold with it), the presence of a cardan (to stabilize and orient the camera) and / or the UAV payload (the maximum weight in the camera / lens that the drone can to transport and still fly safely).
DJI Phantom 3 Professional 4k
DJI Phantom 3 Professional 4k - the most advanced Phantom model of the third series. Equipped with a 12 megapixel camera and gimbal. This is a basic quadcopter that offers live streaming through a DJI app on a smartphone or tablet.
Key points for DJI Phantom 3 Professional 4k :
- 12 megapixel lens without FishEye
- Camera and suspension included
Quadcopter DJI Phantom 4 Advanced
Key points for DJI Phantom 4 Advanced :
- 12 megapixel lens without FishEye
- Camera and suspension included
- Flight time up to 30 minutes
- Sensors to detect obstacles ahead
- Broadcast video on a tablet or smartphone, as well as the ability to control camera settings
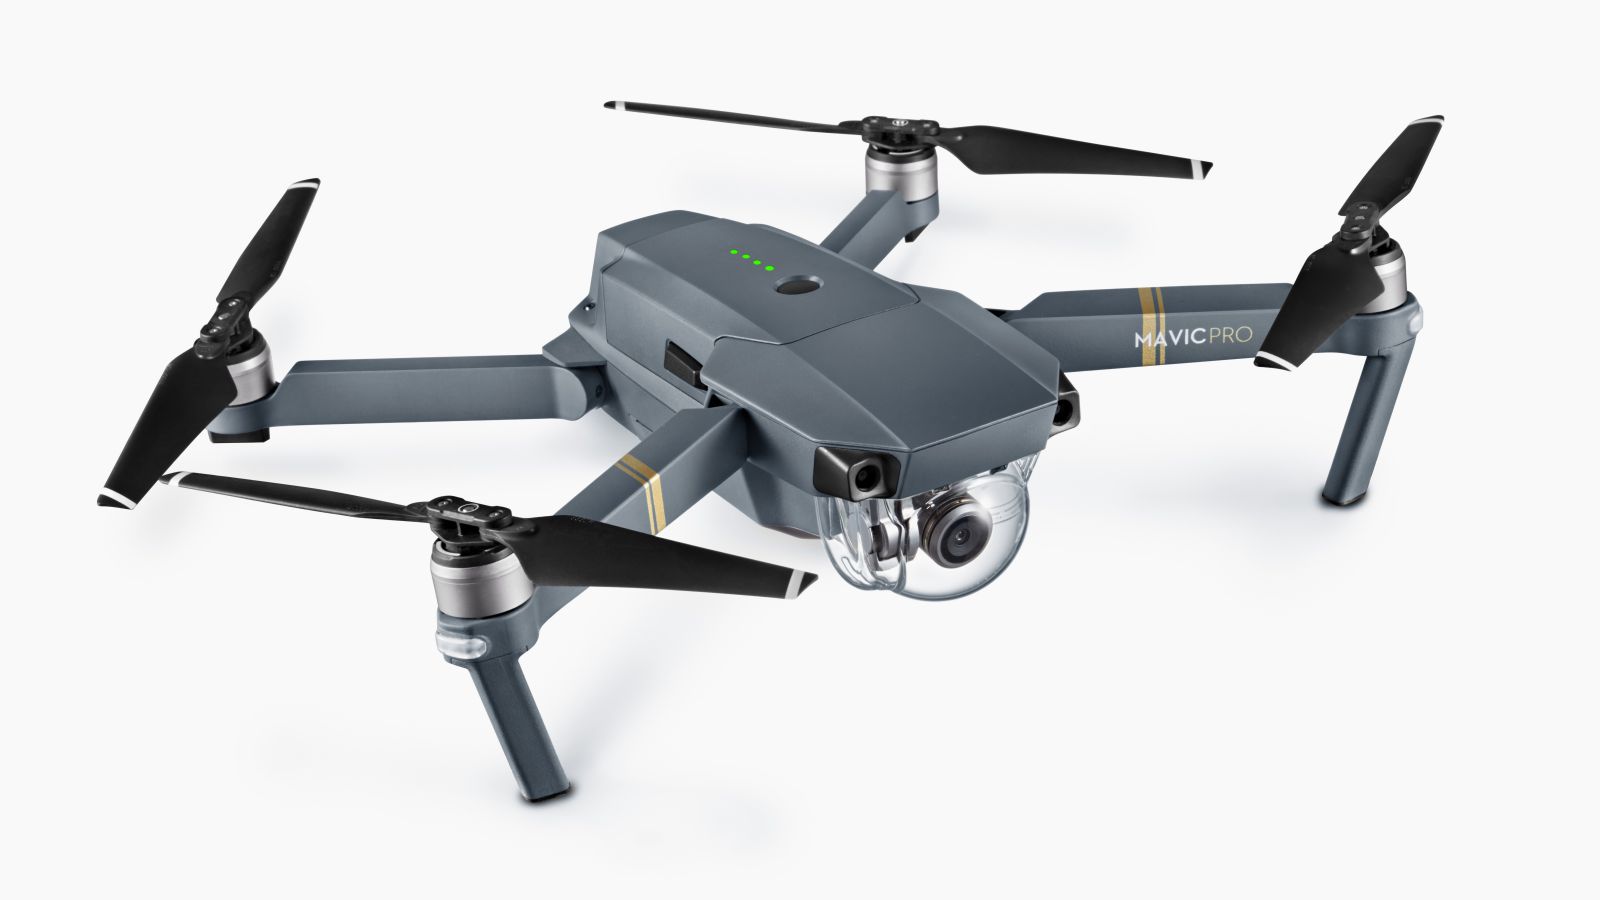
DJI Mavic Pro
Key points for DJI Mavic Pro :
- 12 megapixel lens without FishEye
- Camera and suspension included
- Obstacle detection sensors
- Broadcast video on a tablet or smartphone, as well as the ability to control camera settings
- Foldable compact design provides a conveniently portable system.
Some of the main points to consider when using a UAV for photo modeling are that the size of the camera's sensor, lens, and ability of the camera can be remotely launched or set to the timeline mode. All the above systems meet these requirements. Timelapse mode and / or the camera’s remote shutter release is perhaps the most important aspect of the camera used on the drone.
Cameras available on the DJI Phantom 4 and Mavic Pro offer more traditional lenses for the camera - they are wide-angle, but not ultra-wide or fisheye, which means little distortion. For photo modeling it is sometimes better, although you can be limited by how close to an object you can fly, while keeping everything in the frame.
Basics of using UAV for photo modeling
Photogrammetry or photo modeling is a technology by which a three-dimensional digital surface can be recovered from a series of photographs. It is often used to create highly accurate 3D models of real-world objects, such as this ancient Greek bronze sculpture:
The best way to think about the photo-modeling of an object or landscape with the help of a UAV is to imagine how you would approach the object if it was very small, and you could photograph it with a pocket camera. For example, in the diagram below, which illustrates photography for photo modeling, photographs are taken with different heights and angles in 360-degree coverage.
Photographing for photo modeling object.
Capturing images from a drone works in almost the same way. The camera must be set to a time mode (the photo is taken every 2 or 5 seconds) or remotely launched via the UAV controller (when shooting a photo, the pilot presses the capture button). If you scan one “object”, for example, a building or a column, POI photos work best, that is, the camera points to the object of interest, and the surrounding landscape is ignored.
However, if you are interested in capturing a terrain or geographic function, it is best to use orthographic images . Orthographic photographs are where the camera points directly to the ground, and the drone (unmanned aerial vehicle) flies over the grid in the area of interest. You can combine POI photos, orthographic photos, and even pocket photos in one project for the best possible model:
Combine aerophotographic, POI and pocket photos.
POI Photos of the obelisk.
UAVs listed above can fly from 15 to 30 minutes, which is usually enough to collect at least 200 - 400 photos of the object or landscape in which you flew. Of course, if you have multiple batteries, you can combine photos with multiple overlapping flights so that even very large areas or objects can be scanned.
Creating 3D models from photos using Agisoft Photoscan
So, we just made about 400 photos of the building, now how to turn them into a 3D model that we can put on the Internet? In this tutorial, we will use Agysoft's Photoscan, an affordable, inexpensive and well-supported piece of photogrammetry software. Photoscan is available on Mac, Windows and Linux operating systems and is available in two versions: Standard and Pro. The Pro version includes several features, such as the use of markers, geo-referencing and export of orthographic photos, which will be especially useful for those who use it for land management. Agisoft also offers discounts for educational institutions on its software, which makes it especially popular in universities where they study geography, archeology and anthropology!
We will not understand the various settings available in Photoscan. Instead, I will describe the basic workflow for the project, which includes settings that I thought were best suited for aerial photographs.
Interface
All the steps necessary to reconstruct the 3D model from the photos are collected in the Workflow menu tab, as shown below:
In order: 1) Adding photos to the project, 2) Align photos, 3) Build a dense cloud of points, 4) Build a three-dimensional polygonal model from a cloud of points and 5) Create textures. This process is, of course, greatly simplified: there are a number of actions you can take to get the best result and optimize your model.
Let's take a look at the steps in more detail:
1) Add photos. To add the photos you want to use to create a 3D model, you can use the “Add Photos ...” button on the Workflow menu to open a file overview where you can select photos, or you can simply select photos and drag them to Workspace panel in the lower left corner. When you add photos, Photoscan will create a “Chunk” and display the number of photos you added.
2) Photo alignment: choosing “Align Photos ...” brings up a dialog box with options for alignment. I always use “Highest” to adjust accuracy and “Generic” pair selection. Aerial photography has many useful functions - software for photo modeling loves photos of grass, earth, roads and other "organic" non-repeating surfaces. For “Key point limit” and “Tie point limit” in the “Advanced” tab, I usually set up 40,000 points and 10,000 projections, respectively.
When you click “OK” in the “Align Photos” dialog box, Photoscan will find similar points in all your photos and restore the camera's position in three-dimensional space. It also creates a “sparse point cloud”, which will consist of 50,000–200,000 or so points, depending on your settings and the number of photos:
“Sparse” point cloud in Photoscan after image alignment.
At first, everything seems incomprehensible, but if you use a “gizmo” twist (a transparent sphere with red, green and blue lines on it), in order to rotate the image a little, you will probably begin to understand where it is up and where it is. If your UAV does not put photos with GPS data into EXIF, the model will not have its own orientation.
Now is the best time to install the bounding box, so as not to waste time on parts that are not interesting. This can be done using the “Resize Region” and “Rotate Region” buttons. I usually set “Region” to cover the part of the point cloud that contains the object or area in which I want to create a model. This saves processing time and reduces the amount of manual editing work that may be needed later.
3) Build Dense Cloud: This is arguably the most intense computing part of the processing. In the “Dense Cloud” dialog box, you can select quality and depth options. If your computer has less than 32 GB of RAM, I would not recommend switching to Medium quality. I believe that the average quality, as a rule, has sufficient resolution for most of my needs: High and Ultra-quality takes much longer, sometimes up to 2-3 days of processing for projects with hundreds of 36-megapixel photos.
Warning: as soon as you click "OK" in this dialog box, Photoscan will use almost all the RAM of your computer, which makes it very difficult to work on anything else. I usually leave the process overnight, or when I know that I will not need to use a computer.
The resulting dense point cloud.
4) Build Mesh: if you have a dense cloud of points, possibly numbering millions of points, you can build a three-dimensional polygonal model. I always make sure that this dialog box is marked “interpolation enabled”. Depending on the size of the cloud, building a polygonal model can take from 10 minutes to several hours.
The result will be a three-dimensional model with the designation of vertices obtained from photographs. Before creating the texture, you can use the selection tools to trim any unnecessary parts of the model, also use Close Holes to fill any small holes in the model, use Gradual Selection to remove small accumulations of extraneous geometry and use the Decimate Mesh function, to reduce the polygonal model to a valid size for loading into Sketchfab.
Here are the important steps that make your model presentable and easy to use, so I’ll consider each of them:
- Photoscan has a rectangular selection area and a lasso tool for selecting and deleting parts of a polygonal model (either a dense cloud or a sparse cloud). You can use them to give the model smooth edges or to remove any areas that are not needed using the "Delete" button.
- “Close Holes” is located in the section “Tools -> Mesh -> Close Holes ...”. Here you can use the slider to close small holes, middle holes or all holes in a polygon. Rarely do I use the option at 100%.
- You can remove extraneous geometry using "Gradual Selection ...", which is located in "Edit-> Gradual Selection ...". Adjust the slider until the red points of extraneous geometries located around the main polygon are selected, and then delete them.
- You can reduce the size of the poly mesh to easily load it onto Sketchfab and easily view your model on mobile devices using the Decimate Mesh feature. Here you can reduce the number of polygons in the model from 2-3 million to 300-400 000. This can be found in "Tools -> Mesh -> Decimate Mesh ..."
5) Build Texture: Now that we have cleared our model a bit and reduced its size, we are ready to texture it. Textures are where heavily reduced models get a lot of detail. Textures are based on the photos you took, so the resulting model will have the shadows that were there when you took the pictures. Use "Build Texture ..." in the "Workflow" section to access the dialog box. Here you can set the size of the texture and the number of textures you want to generate. Usually I set the size to 2048, 4096 or 8192 and select from 1 to 10 textures, depending on the number of photos in the project.
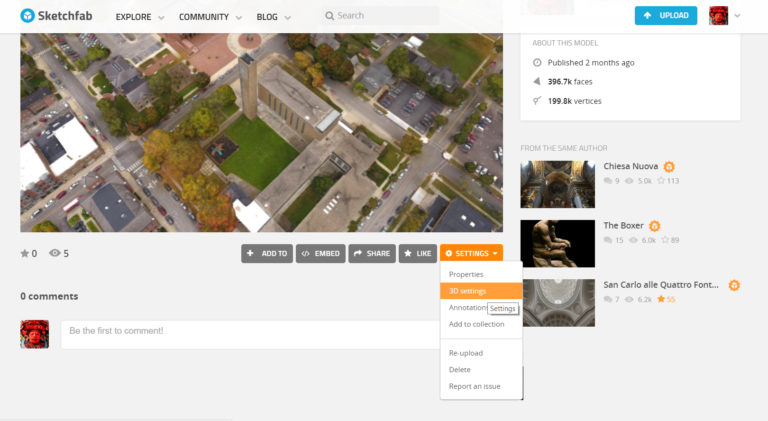
Now we are ready to export our model and upload it to Sketchfab! Photoscan has the ability to upload models in one click on Sketchfab. This option can be found in the section “File -> Upload Model ...”. In addition, you can simply export the model as OBJ, FBX, or another format and upload it to Sketchfab.
To add the ultimate brilliance and presentation of your model in the Sketchfab viewer, go to “Settings” -> “3D Settings” (see below) to adjust the orientation, material and lighting.
Conclusion
In this brief tutorial, we hope to give you the knowledge you need to create 3D models using UAVs. Before flying to the site, be sure to familiarize yourself with local laws and regulations. If you are interested in more detailed information on any aspect of this process, from combining several models, checking accuracy in Photoscan and outputting an orthographic photo or a geo-referenced model, Agisoft is a great place to start.
And here are some examples of 3D models on SketchFab.
Source: https://habr.com/ru/post/373911/
All Articles