3D Printer 3D Start - SLIC3R slicer setup for Repetier-Host
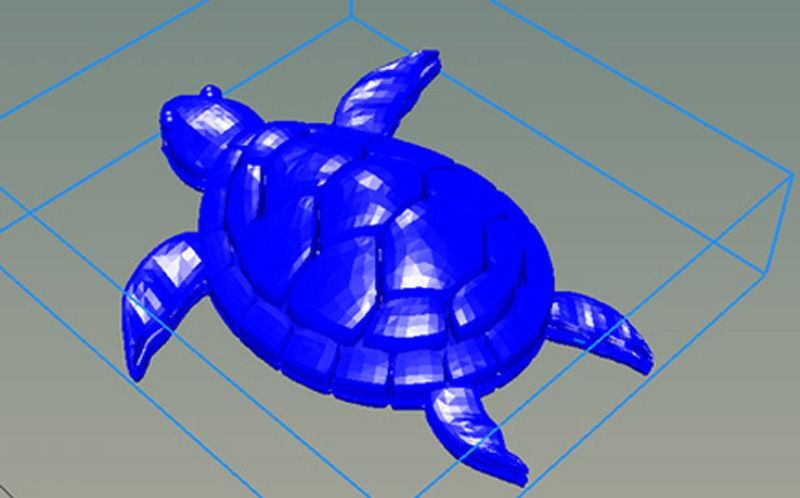
In this article we will talk about the settings that improve the quality of printing 3D printer 3D Start . We will customize the slicer. We will use Slic3r - today it is one of the most powerful and modified modules for the formation of the G-code needed to display a 3D model for printing by a 3D printer. All settings will have to pick their own. For different models in different ways. I will show a little on the turtle and other models. The first model with standard settings turned out without detail at all. Curve like a pedal. If you need very good detail, for example, for bas-reliefs or icons, you need to change the nozzle to 0.1.
The video shows the setting of the link.
')
Setting the link
Video clip
If the user has such a window, go back to the editor (I like ZBRUSH) and begin to edit. Many download models from the Internet, but not the fact that all of them have been successfully printed. So I make my models for the most part.

Tab "Print Settings" - "Print Settings". Layers and perimeter s- Layers and strokes

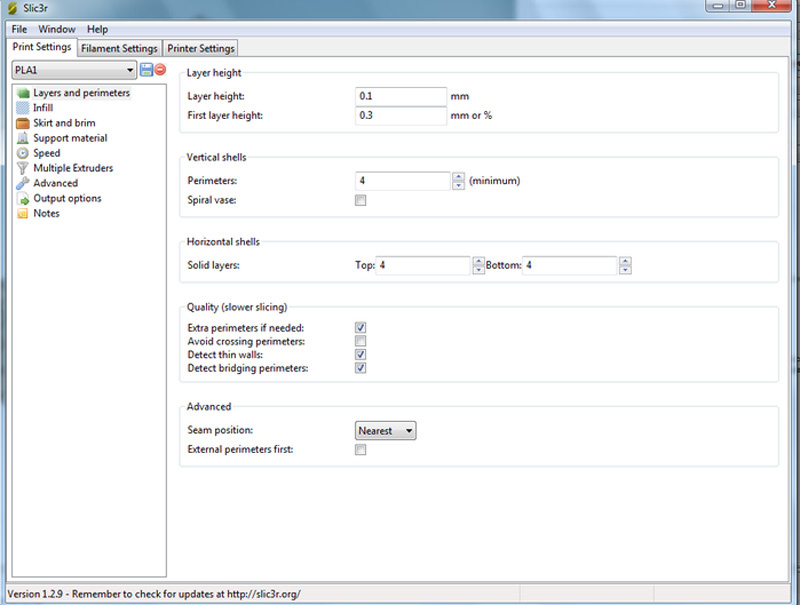
Layer height is one of the most important parameters affecting print quality. When installing it, it is necessary to focus on the geometry of the printed model and the time during which it is planned to print the finished product. The smaller the value of the layer height parameter, the longer it will print. Layer height can vary from 0.05 to 0.25 for a nozzle with a diameter of 0.3 mm. The main rule when setting this parameter: it cannot exceed the thickness of the nozzle used (it is advisable to set no more than ¾ of this thickness).
First layer height. As a rule, a little more is specified for the Layer height parameter to better fix the model on the table.
Perimeters (minimum). The number of layers of the model contour (or the number of layers of the model wall). First, the extruder delineates the outline of the layer. It then fills it with a specific filling density. So, this figure is equal to the number of contours that the extruder will do before you start filling. The larger this parameter, the stronger the outer surface of the part. But with the increase of the layers, there is a parasitic effect - twisting (bending) of the part. The smaller the number, the smaller the wall thickness of the model, which means that the model will be more fragile.
At least 1, the optimum minimum is 3-4 pcs.
Advanced - we recommend not to touch this parameter.
Seam position - the beginning of the construction layer. It has three options.
Random - random.
Nearest is the closest one.
Aligned - aligned mid-edge.
Generate extra perimeters when needed - printing additional strokes if necessary.
Solid layers - the number of layers from the top (top) and bottom (bottom) of the closing planes of the model (4 recommended for the bottom and top).
Practical experience 1.
If you need to close a hollow model, the internal filling of which is zero (there are only external walls), you must set the solid layers top parameter to at least 4: for example, the threads of the first layer sag, the threads of the second layer fall more evenly, the third layer is printed flat and the fourth is completely closes the surface of the model in an even layer.
Avoid crossing perimeters - contour layers will not intersect with each other; the nozzle will go around the perimeter of the printed model without the risk of hitting the already printed layers. This parameter is designed to optimize the print head movement path to increase print quality, but it also reduces print speed.
External perimeters first - first, the outer contour layer is printed, then the inner one, for example, if the contour consists of three layers, then by turning on this option, printing will go in the following order: first the outer, then the middle layer, then the inner layer.
Practical experience 2.
Practice shows that it is better to turn off the external perimeters first parameter and print the inner layer first and then the outer one. In some cases, the risk of excess or lack of supply of plastic will fall on the inner layers, and is completely leveled by the beginning of the printing of the outer layer.
Spiral vase – model is printed without fill and supports, along the contour, without transitions. Suitable for spiral and hollow, as well as thin-walled models. When this option is enabled, the horizontal plane cannot be printed - horizontal layers without support will sag.
Infill is the fill of the space inside the model.
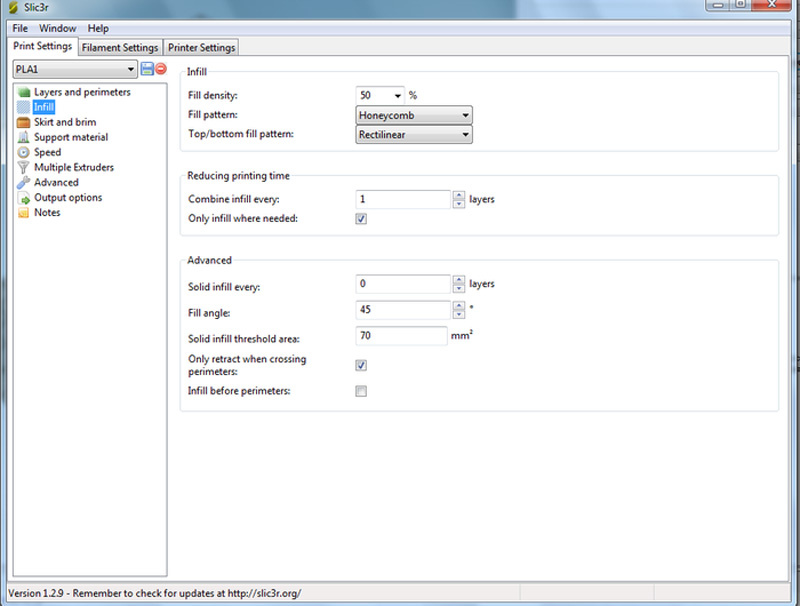
Fill density - filling density. Shows how hollow the part will be. For conventional 3D printing used in robotics, for home products and other similar applications, we recommend setting this parameter to 15-20%. If you want to print a very strong part, then you will be enough to deliver 80%. Recall that this parameter greatly affects the printing time!
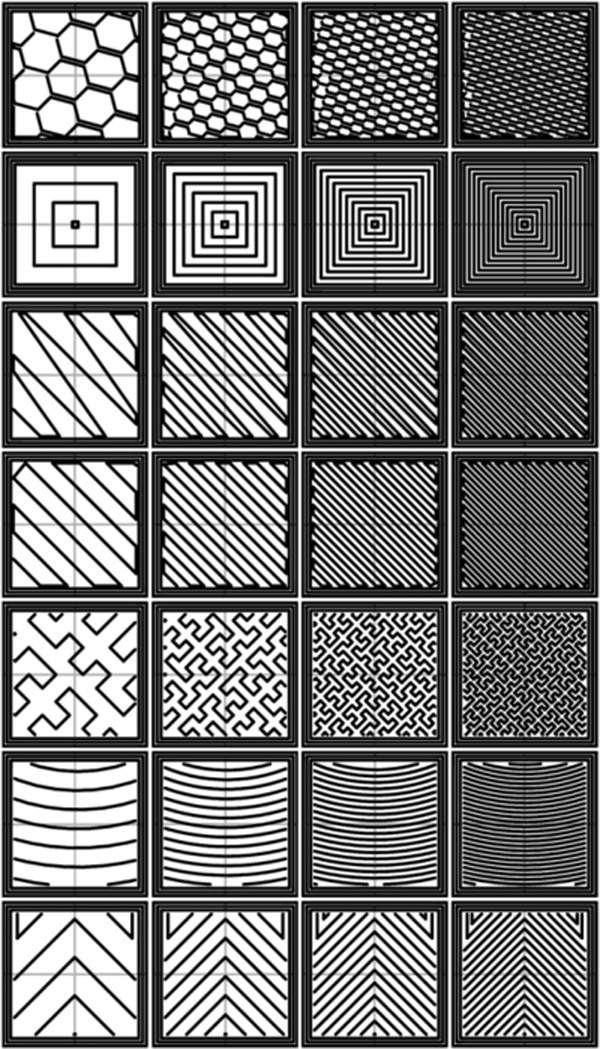
Fill pattern ("Fill type (grid) model"). To increase print speed while maintaining moderate hardness, just select rectilinear. To increase the strength of the model while reducing its weight, you can choose honeycomb (honeycomb).
Top / bottom fill pattern. Mesh type, which closes the upper and lower layers.
Combine Infill every - the parameter that determines the layers on which the fill will occur. For example, if the unit is set, then all layers will be filled, if 2, then only every second layer will be filled. Due to the fact that the printer in this case will skip the layer in the fill, the model will be printed more roughly and less rigidly.
Only infill where needed - filling at the discretion of the program only where needed; in some places, the volume of parts of the printed product is small; in such cases, the program will assume that there is no need to fill such volume.
Solid infill every - fill a solid layer inside the fill through the specified number of layers.
Fill angle — the print angle of the fill grid compared to the vertical axis. For example, if this parameter is zero, then the filling walls will grow vertically perpendicular to the surface of the platform. For hardening the fill angle, it is recommended to set about 45 °.
Solid infill threshold area - the area less than the specified one will be filled with one hundred percent fill. For example, for small voids, there is no point in building “honeycombs” (honeycomb) - they will turn out to be too small and will not give proper strength.
Only retract when crossing perimeters - retraction only when there is a perimeter bypass; when the parameter is on, the retraction process is activated when the nozzle is outside the outer contour. This is a very useful tool, as when moving an extruder, it pulls the thin plastic threads along with it, creating a web inside the model. This leads to a strong loss of quality.
Retraction in 3D printing - the process of movement of the plastic thread in the direction opposite to the feed side.
An example of retraction: two objects are printed simultaneously in two different parts of the platform. Building up the levels of printed objects is as follows: first, the layer of the first object is filled, then the layer of the second object is filled. When the print head moves to the print location of the second object after the printing of the first object is completed, a drop of material flows out of the nozzle as it moves. In order for this drop not to leave a mark on the surface of the second printed object, the program gives the command to retract the plastic thread back into the extruder to the prescribed length, and while continuing to print the second object, again pull the drawn plastic into the nozzle.
Solid infill threshold area - the area less than the specified will be filled with 100% filling. Recommends 40-70.
Infill before perimeters - the filling is printed first, and then the perimeter layers are printed. We recommend not to use this option.
Print density
The figure shows the print density from left to right: 20%, 40%, 60%, 80%.
Top-down fill patterns: Honeycomb, Concentric, Line, Rectilinear, Hilbert Curve, Archimedian Chords, Octagram Spiral.
Total
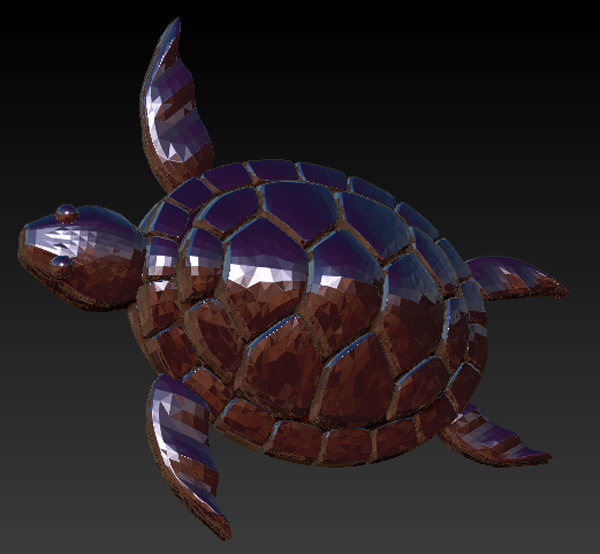
Turtle drawn on the above recommendations.
MO-3D - promotional code for a 10% bonus when you buy a 3D 3D printer START and plastic for printing .
Author: Elena Zaitseva, Samara
Source: https://habr.com/ru/post/373623/
All Articles