Kettle path to astrophoto. Part 1 - Equipment
Without exaggeration, we can say that astrophotography is one of the most technically complex sections of photography. The difficulties are not only in some remoteness of the objects of observation, but also in various points of an organizational nature.
Astronomy as a hobby interested me for a long time, and finally there was a practical opportunity to try myself in this business. The number of rakes on this path can be counted in a dozen, and perhaps such an article will save newcomers from unnecessary spending.
"How it works," details under the cut.
Speaking very simplistic, telescopes come in 3 varieties, depending on the type of mount used. After all, how long ago it was said by Galileo, after all, the Earth is spinning, and the telescope should turn after the stars in the sky. Therefore, the mount is no less important part of the telescope than the actual optical tube.
So, there are 3 types of mounts:
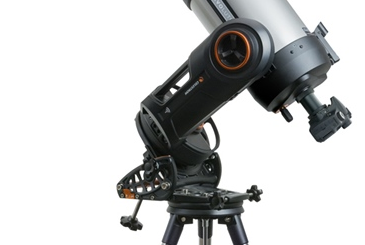
- Equatorial mount
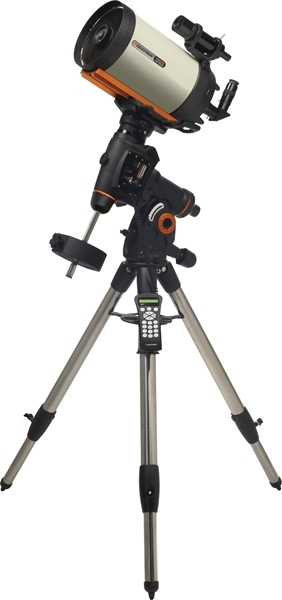
The most correct type of mount for astrophoto. The mount axis is directed in the direction of the Polar Star (the axis of rotation of the earth), so ideally the telescope rotates synchronously with the sky. "Ideally," because in reality, the mechanics are not ideal, and pointing to the polar star, too, in general, the N1 rake is buried here, which are solved first, by buying a good mount (about $ 1000) and optionally, an additional guiding camera, which more precisely keeps the star in the center (200 $ 300). You may also need all sorts of fasteners and other pieces of iron, which are not included with the telescope, but are very well worth it.
')
Rake N2 - as you can see from the photo, the mount is quite cumbersome and heavy, in addition to the telescope there are also counterweights, the total weight of the structure can be 20-30 kg.
- Alt-azimuth mount
This type of mount is easier and simpler, requires less space and is generally quite good. However, as it is not difficult to guess, the observer loses in quality, in particular due to the fact that the axis of the telescope rotates asynchronously with the axis of the earth, the so-called “field rotation” takes place, due to which long exposures are impossible. This is the N3 rake.
However, for short exposures this is not so critical, but if you wish, you can purchase the so-called “equatorial wedge”. With the help of it, the azimuth mount turns into equatorial, and the telescope will standlike this:

The price of this wedge is about $ 300, that there is a N4 rake, so IMHO it is not worth it - if you aim to make high-quality photos, it is easier to buy an equatorial mount immediately than to make such a dubious upgrade.
In my case, everything was decided for me - the equatorial mount simply does not fit on my balcony, so there was no choice in general, I had to take the alt-azimuth.
- Mount Dobson
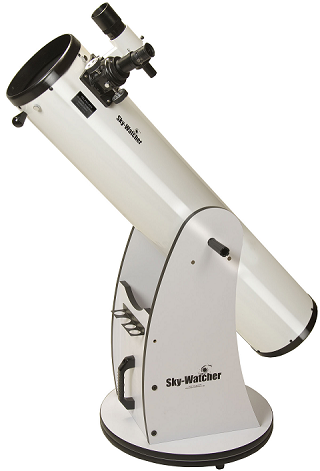
The easiest and cheapest type of mount. For astrophoto by and large it does not fit at all, except for the Moon and the planets. Now there are computerized Dobson pods with electric motors, but their price is quite considerable, and there is no point in this for astrophoto in general.
However, plus the Dobson mount in its cheapness - for example, for the same price you can buy a 125mm telescope with electronics, or a 200mm telescope on the Dobson mount. Obviously, the second will show much more. In general, if the money is not enough, then this, too, might be thought of.
By and large, the aperture is not so critical for astrophotography - the camera can accumulate light, unlike the eye. But you also want to look through a telescope, so this parameter is very important. It all depends solely on the price and financial capabilities of the buyer. Approximately, you can select several options:
- up to 120mm: in fact, more than a toy, in which something can be viewed, but the choice of objects will be very limited. Issue price up to $ 600.
- 120-160mm: medium level, quite suitable both for the beginning and for further “growth”. Issue price of 600-1200 $.
- 200mm and higher: for highly advanced amateurs, there are already questions as to price and size.
In general, there is a rake N5 - this is the mass and dimensions of the telescope. You can buy just an excellent telescope weighing 30 kg, and the desire to carry it out into the street will disappear for the 3rd time observation. A telescope with a diameter of 5-8 "is quite a good compromise for a start, allowing, on the one hand, a lot of things to see, on the other hand, it is not so stressful in terms of size and price.
Of course, there are other parameters, such as optical design, luminosity, focal length, but in general can not be described in one article.
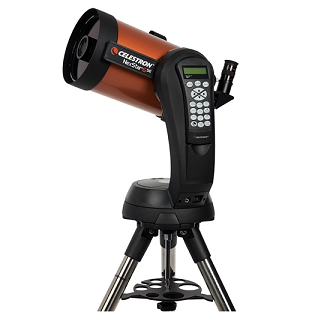
In my case, based on the requirement of compactness, the Celestron Nexstar 6 telescope was purchased. "
Once upon a time, about 5-10 years ago, astronomy lovers put digital cameras on telescopes through adapters and reworked webcams. Now it has become irrelevant, there are more or less ready-made solutions, the main manufacturers of amateur cameras are two: QHY and ZWO. The camera is connected to the telescope instead of an eyepiece, using USB2 or USB3 as the interface.
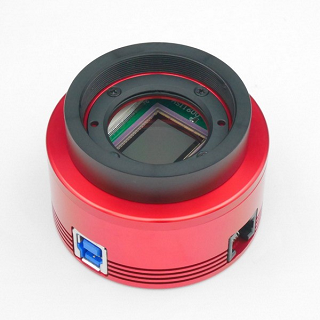
As in any other photo equipment, the price here depends on the size of the matrix and the number of megapixels. More cameras are monochrome and color models with and without cooling. The approximate price of the issue is from $ 200 to $ 2000, a more or less average price for an amateur can be considered $ 400-500: for this money you can buy a camera with a resolution of 2-6 MPks and exposures up to 1000s. More in principle, and not necessary, even such parameters will not provide a telescope of the average price range.
If there is a DSLR camera with interchangeable optics, you can use it by purchasing the appropriate adapter.
As mentioned above, astronomical cameras are mostly connected via USB. The camera sends an uncompressed video stream to the computer (compression is inappropriate here, because we want to consider the details of the objects and not the mpeg artifacts). So a laptop with USB3.0 and sufficient disk space is desirable (1 minute of uncompressed video takes about a gigabyte).
For all amateur astronomy, this is the most difficult moment. By and large, weak stars in cities have not been seen for a long time, as they wrote here on geektimes, a generation of people who have not seen the Milky Way has grown (I myself saw it for the first time at 25 years old). In general, this is the N6 rake - in the city the telescope will show on the strength of 10% of its capabilities. Ideally, in order to see a dark sky, in the case of Moscow or St. Petersburg, you need to drive about 80 kilometers. You can find out more precisely by looking at your location on the site www.lightpollutionmap.info . Of course, no one will dangle every clear night for 80km, so it remains to accept the fact that there is, and choose from the available options. Happy owners of a personal house can be seen in the backyard, this is the best option, for the rest either a summer residence or a balcony (extreme type of equipment removal with a total price of $ 2,500 to a street courtyard I do not consider).
In the case of observations on the balcony, the N7 rake takes place - these are heat flows from the building. In the cold season, the warm air from the windows rises up, and noticeably “soaps” the image. This is not visible to the eye, but with an increase of 100-200x, the atmosphere already critically affects the quality.
At high magnification, a star can be seen like this:
What as you can see, is very different from the image of the star in Stellarium. Fortunately, for a photo it is not so critical, because The software allows you to select the best shots from a long series.
In total, the following objects are available for astronomical observations / photographs:
- Moon and Sun (required with filter)
- planets
- nebulae and galaxies
If we talk about observations from the city, then the observer is essentially accessible, the first 2 points (of the nebulae, only the brightest are visible). On this basis, in my case, the choice was made in favor of the "planetary" telescope, with a high magnification but a small luminosity.
On this brief overview of the "iron" needed for astrophoto, you can finish. As you can see, not everything is simple, and there are many nuances here, both for the wallet and for the “what to choose” questions, as well as for organizational issues.
About the software for photographing and processing the results will be discussed in the next section.
PS: Immediately I want to answer the question that will surely follow - "why is this necessary." In general, the answer is simple - just because it's interesting. Of course, the majority of amateur observations and photographs do not have any scientific, universal or highly artistic value. Even with a 14 "telescope, not getting a photo better than a professional observatory in Chile does. However, as a hobby, it is no worse than diving, skiing or collecting stamps. In addition, the study of image processing technologies is also very interesting, and may be useful in other areas.
“Nothing fascinates me like the starry sky overhead and the moral law in me,” Immanuel Kant wrote. Astronomy and astrophotography is one of the ways to get to know the sky more closely, although it must be admitted that with the modern development of civilization, seeing the sky is more and more difficult
Astronomy as a hobby interested me for a long time, and finally there was a practical opportunity to try myself in this business. The number of rakes on this path can be counted in a dozen, and perhaps such an article will save newcomers from unnecessary spending.
"How it works," details under the cut.
Telescope selection
Mount
Speaking very simplistic, telescopes come in 3 varieties, depending on the type of mount used. After all, how long ago it was said by Galileo, after all, the Earth is spinning, and the telescope should turn after the stars in the sky. Therefore, the mount is no less important part of the telescope than the actual optical tube.
So, there are 3 types of mounts:
- Equatorial mount
The most correct type of mount for astrophoto. The mount axis is directed in the direction of the Polar Star (the axis of rotation of the earth), so ideally the telescope rotates synchronously with the sky. "Ideally," because in reality, the mechanics are not ideal, and pointing to the polar star, too, in general, the N1 rake is buried here, which are solved first, by buying a good mount (about $ 1000) and optionally, an additional guiding camera, which more precisely keeps the star in the center (200 $ 300). You may also need all sorts of fasteners and other pieces of iron, which are not included with the telescope, but are very well worth it.
')
Rake N2 - as you can see from the photo, the mount is quite cumbersome and heavy, in addition to the telescope there are also counterweights, the total weight of the structure can be 20-30 kg.
- Alt-azimuth mount
This type of mount is easier and simpler, requires less space and is generally quite good. However, as it is not difficult to guess, the observer loses in quality, in particular due to the fact that the axis of the telescope rotates asynchronously with the axis of the earth, the so-called “field rotation” takes place, due to which long exposures are impossible. This is the N3 rake.
However, for short exposures this is not so critical, but if you wish, you can purchase the so-called “equatorial wedge”. With the help of it, the azimuth mount turns into equatorial, and the telescope will stand
The price of this wedge is about $ 300, that there is a N4 rake, so IMHO it is not worth it - if you aim to make high-quality photos, it is easier to buy an equatorial mount immediately than to make such a dubious upgrade.
In my case, everything was decided for me - the equatorial mount simply does not fit on my balcony, so there was no choice in general, I had to take the alt-azimuth.
- Mount Dobson
The easiest and cheapest type of mount. For astrophoto by and large it does not fit at all, except for the Moon and the planets. Now there are computerized Dobson pods with electric motors, but their price is quite considerable, and there is no point in this for astrophoto in general.
However, plus the Dobson mount in its cheapness - for example, for the same price you can buy a 125mm telescope with electronics, or a 200mm telescope on the Dobson mount. Obviously, the second will show much more. In general, if the money is not enough, then this, too, might be thought of.
Aperture (lens diameter)
By and large, the aperture is not so critical for astrophotography - the camera can accumulate light, unlike the eye. But you also want to look through a telescope, so this parameter is very important. It all depends solely on the price and financial capabilities of the buyer. Approximately, you can select several options:
- up to 120mm: in fact, more than a toy, in which something can be viewed, but the choice of objects will be very limited. Issue price up to $ 600.
- 120-160mm: medium level, quite suitable both for the beginning and for further “growth”. Issue price of 600-1200 $.
- 200mm and higher: for highly advanced amateurs, there are already questions as to price and size.
In general, there is a rake N5 - this is the mass and dimensions of the telescope. You can buy just an excellent telescope weighing 30 kg, and the desire to carry it out into the street will disappear for the 3rd time observation. A telescope with a diameter of 5-8 "is quite a good compromise for a start, allowing, on the one hand, a lot of things to see, on the other hand, it is not so stressful in terms of size and price.
Of course, there are other parameters, such as optical design, luminosity, focal length, but in general can not be described in one article.
In my case, based on the requirement of compactness, the Celestron Nexstar 6 telescope was purchased. "
Camera selection
Once upon a time, about 5-10 years ago, astronomy lovers put digital cameras on telescopes through adapters and reworked webcams. Now it has become irrelevant, there are more or less ready-made solutions, the main manufacturers of amateur cameras are two: QHY and ZWO. The camera is connected to the telescope instead of an eyepiece, using USB2 or USB3 as the interface.
As in any other photo equipment, the price here depends on the size of the matrix and the number of megapixels. More cameras are monochrome and color models with and without cooling. The approximate price of the issue is from $ 200 to $ 2000, a more or less average price for an amateur can be considered $ 400-500: for this money you can buy a camera with a resolution of 2-6 MPks and exposures up to 1000s. More in principle, and not necessary, even such parameters will not provide a telescope of the average price range.
If there is a DSLR camera with interchangeable optics, you can use it by purchasing the appropriate adapter.
Laptop selection
As mentioned above, astronomical cameras are mostly connected via USB. The camera sends an uncompressed video stream to the computer (compression is inappropriate here, because we want to consider the details of the objects and not the mpeg artifacts). So a laptop with USB3.0 and sufficient disk space is desirable (1 minute of uncompressed video takes about a gigabyte).
Selection of the location of observations
For all amateur astronomy, this is the most difficult moment. By and large, weak stars in cities have not been seen for a long time, as they wrote here on geektimes, a generation of people who have not seen the Milky Way has grown (I myself saw it for the first time at 25 years old). In general, this is the N6 rake - in the city the telescope will show on the strength of 10% of its capabilities. Ideally, in order to see a dark sky, in the case of Moscow or St. Petersburg, you need to drive about 80 kilometers. You can find out more precisely by looking at your location on the site www.lightpollutionmap.info . Of course, no one will dangle every clear night for 80km, so it remains to accept the fact that there is, and choose from the available options. Happy owners of a personal house can be seen in the backyard, this is the best option, for the rest either a summer residence or a balcony (extreme type of equipment removal with a total price of $ 2,500 to a street courtyard I do not consider).
In the case of observations on the balcony, the N7 rake takes place - these are heat flows from the building. In the cold season, the warm air from the windows rises up, and noticeably “soaps” the image. This is not visible to the eye, but with an increase of 100-200x, the atmosphere already critically affects the quality.
At high magnification, a star can be seen like this:
Youtube video
What as you can see, is very different from the image of the star in Stellarium. Fortunately, for a photo it is not so critical, because The software allows you to select the best shots from a long series.
What to watch?
In total, the following objects are available for astronomical observations / photographs:
- Moon and Sun (required with filter)
- planets
- nebulae and galaxies
If we talk about observations from the city, then the observer is essentially accessible, the first 2 points (of the nebulae, only the brightest are visible). On this basis, in my case, the choice was made in favor of the "planetary" telescope, with a high magnification but a small luminosity.
Conclusion
On this brief overview of the "iron" needed for astrophoto, you can finish. As you can see, not everything is simple, and there are many nuances here, both for the wallet and for the “what to choose” questions, as well as for organizational issues.
About the software for photographing and processing the results will be discussed in the next section.
PS: Immediately I want to answer the question that will surely follow - "why is this necessary." In general, the answer is simple - just because it's interesting. Of course, the majority of amateur observations and photographs do not have any scientific, universal or highly artistic value. Even with a 14 "telescope, not getting a photo better than a professional observatory in Chile does. However, as a hobby, it is no worse than diving, skiing or collecting stamps. In addition, the study of image processing technologies is also very interesting, and may be useful in other areas.
“Nothing fascinates me like the starry sky overhead and the moral law in me,” Immanuel Kant wrote. Astronomy and astrophotography is one of the ways to get to know the sky more closely, although it must be admitted that with the modern development of civilization, seeing the sky is more and more difficult
Source: https://habr.com/ru/post/372917/
All Articles