Home theater do it yourself. Part 1. Premises and equipment
The idea of creating a home theater (hereinafter referred to as the DC) has been interested in me for quite some time. Previously, these were bundles of old PCs, on which XBMC and TV were spinning in the living room. Of course, with such a bundle, there was a catastrophic lack of image size and normal sound, and the configuration of the room did not allow connecting a full 5.1 system.

In the midst of the next repair, it was decided to implement this idea. Who cares what came out of it, please under the cat.
What did you want (TK):
')
- Separate room;
- Large image;
- Good sound 5.1;
- Your room design;
- Opacity;
- Comfortable fit.
What happened:
- room 4,5m by 7m, which is practically not used;
- a team of brave guys from Ukraine, making repairs in another part of the apartment, ready for "every whim for your shekels";
- Inspiration and desire (without this nowhere).
After discussion with the builders, it was decided to divide the room strictly in half. The result was 2 rooms 4.5m by 3.5m. List of building materials:
- 10 cm gas unit;
- The door frame and the door (they took the old wall after the demolition);
- Carpet;
- Paint;
- plaster;
- wiring and sockets.
While the construction work was going on, I took up the design of the room and the selection of equipment. Possessing the skill of working in the Cinema 4D 3D editor, I modeled from standard models an approximate vision of how it all will look. Having decided on the design, began diligent smoking of manuals and reviews about the speakers, receivers and projectors.
Having made a list of equipment, I went to the “Gorbushka” (a large Moscow electronics shopping center).
Projector OPTOMA HD25-LV:

Projector TTX:
- DLP
- 1080p
- 3D
- contrast 20,000: 1
- The ratio of distance to image size 1.5: 1 - 1.8: 1
The store had its own cinema, in which they connected projectors for testing: you can make sure that the projector was chosen correctly.
I was lucky and I took the last one, since it is no longer produced and now Optoma HD131X is in its place.
Audio Wharfedale Obsidian 600 5.0:
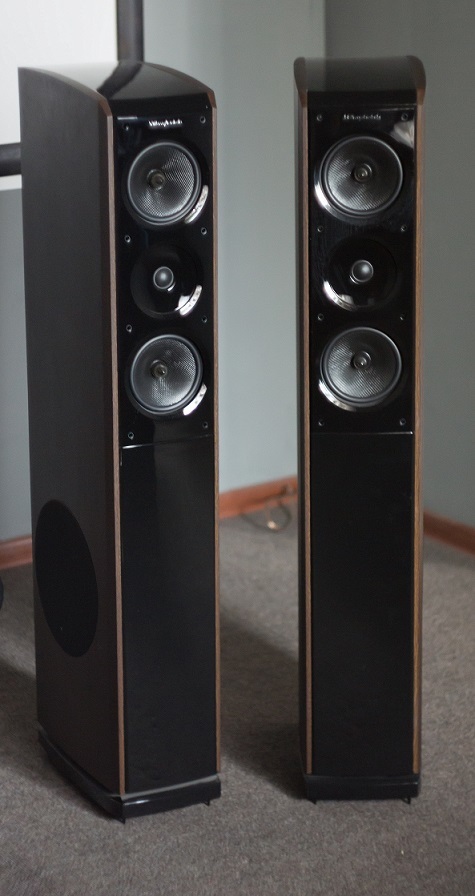
Left and right channel: 3-way (1 LF, 2 MF, 1 HF). Since there is a rather large woofer in the speakers, it was decided to leave the purchase of the subwoofer for later.

Central and rear 2-way.
Pioneer VSX-527 receiver:

Standard 5.1 receiver to 130W per channel. Nothing magical.
The source of the signal will be a proven old PHILIPS player and 1TB external disk:

Excellent even the thickest bitrate movies. So far, the scheme is not very convenient. You connect a hard drive to your PC, download a movie to it, carry it to DC and are already setting it up. Now there is an idea to return to the HTPC, the benefit is there is a suitable piece of hardware from under this case.
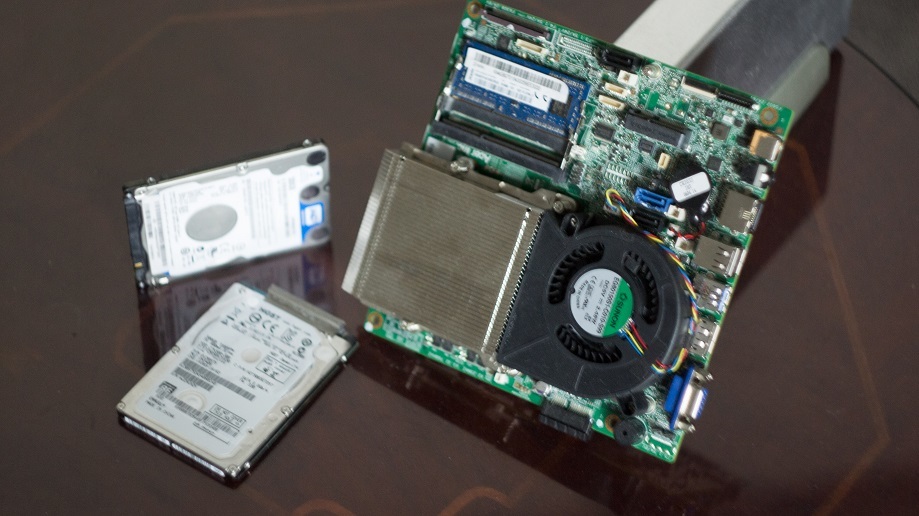
- i3 third generation
- 4Gb memory + free slot
- 500GB HDD
Buying equipment, I began to finish the room, as the workers left just white walls and carpet. The walls and ceiling were painted in dark gray to eliminate spurious reflections back to the screen and increase the contrast of the image. During the painting of the ceiling, thebrush of the “artist's” roller could not help but pervert and apply a couple of logos to the ceiling in front of the projector so that it would not look so lonely.
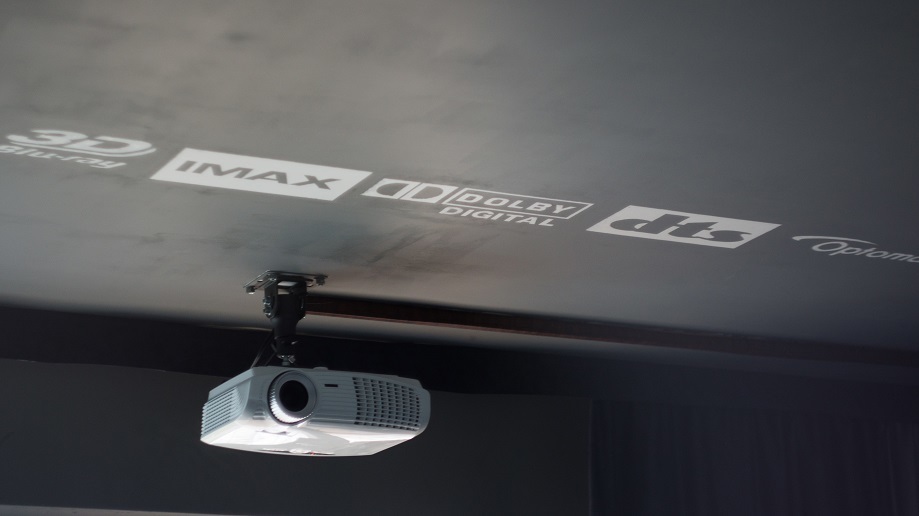
The projector is mounted on a universal bracket with a ball joint.
The next step was to lay out the screen on the wall. Since the funds came to zero, I didn’t want to spend money on the screen at all. It was decided as always in the style of DIY. Bought boards, black paint and fasteners. On the wall was marked the area on the size of the image, and the paint did not get there. Cut the boards, made a frame, painted and mounted on the wall - that's it. The wall is made of drywall and has a perfectly flat surface, so the picture on it is very clear.
Along the way, I brought a sofa on which to sit and, if desired, expand it - you will have a full bed.

The problem of light from the window was decided by ordering blackout curtains. Made me out of 3 layers:
1 - “aluminum” color tulle;
2 - green dense material (given away as residues);
3 - the main gray thick curtain.

Since the side is not sunny, then with the curtains closed - even during the day - even your hands are not visible.
After placing the wiring in the baseboards, all system components were assembled and the image was adjusted and the sound was calibrated. Of course, it is impossible to speak about any normal sound in such a box with bare walls, but we will fix this later.

There are no curbstones yet, because it will also be DIY, it will include: a subwoofer, shelves for equipment and a cabinet for HTPC.

Below is a video of how it all works.
The results of the works impressed and gave strength to further work in this direction. It turned out a great system where you can watch a movie / play with friends at any time of the day.
What is planned:
- acoustic panels
- light (smart)
- HTPC
- bollard
- subwoofer
For each of these items will be a separate article.
PS When I went to throw out the boxes, I came across a lone sistemnik. A quick inspection showed that everything is in place. I brought it home, turned it on - it works. True, the system is blocked by a virus that claims that the user watched gay porn for 3 hours and now you need to throw 500r to the phone number.
By hardware: dual-core AMD Athlon 64 / 2Gb RAM / Nvidia GT7600 / 2HDD 250Gb. Having collected all my old hard drives, I received a mini ubuntu server for 3TB. Most likely, I will keep all the films there until I collect a normal NAS. I put it on the balcony so that you can not hear the hard.
In the midst of the next repair, it was decided to implement this idea. Who cares what came out of it, please under the cat.
What did you want (TK):
')
- Separate room;
- Large image;
- Good sound 5.1;
- Your room design;
- Opacity;
- Comfortable fit.
What happened:
- room 4,5m by 7m, which is practically not used;
- a team of brave guys from Ukraine, making repairs in another part of the apartment, ready for "every whim for your shekels";
- Inspiration and desire (without this nowhere).
After discussion with the builders, it was decided to divide the room strictly in half. The result was 2 rooms 4.5m by 3.5m. List of building materials:
- 10 cm gas unit;
- The door frame and the door (they took the old wall after the demolition);
- Carpet;
- Paint;
- plaster;
- wiring and sockets.
While the construction work was going on, I took up the design of the room and the selection of equipment. Possessing the skill of working in the Cinema 4D 3D editor, I modeled from standard models an approximate vision of how it all will look. Having decided on the design, began diligent smoking of manuals and reviews about the speakers, receivers and projectors.
Having made a list of equipment, I went to the “Gorbushka” (a large Moscow electronics shopping center).
Projector OPTOMA HD25-LV:
Projector TTX:
- DLP
- 1080p
- 3D
- contrast 20,000: 1
- The ratio of distance to image size 1.5: 1 - 1.8: 1
The store had its own cinema, in which they connected projectors for testing: you can make sure that the projector was chosen correctly.
I was lucky and I took the last one, since it is no longer produced and now Optoma HD131X is in its place.
Audio Wharfedale Obsidian 600 5.0:
Left and right channel: 3-way (1 LF, 2 MF, 1 HF). Since there is a rather large woofer in the speakers, it was decided to leave the purchase of the subwoofer for later.
Central and rear 2-way.
Pioneer VSX-527 receiver:
Standard 5.1 receiver to 130W per channel. Nothing magical.
The source of the signal will be a proven old PHILIPS player and 1TB external disk:
Excellent even the thickest bitrate movies. So far, the scheme is not very convenient. You connect a hard drive to your PC, download a movie to it, carry it to DC and are already setting it up. Now there is an idea to return to the HTPC, the benefit is there is a suitable piece of hardware from under this case.
- i3 third generation
- 4Gb memory + free slot
- 500GB HDD
Buying equipment, I began to finish the room, as the workers left just white walls and carpet. The walls and ceiling were painted in dark gray to eliminate spurious reflections back to the screen and increase the contrast of the image. During the painting of the ceiling, the
The projector is mounted on a universal bracket with a ball joint.
The next step was to lay out the screen on the wall. Since the funds came to zero, I didn’t want to spend money on the screen at all. It was decided as always in the style of DIY. Bought boards, black paint and fasteners. On the wall was marked the area on the size of the image, and the paint did not get there. Cut the boards, made a frame, painted and mounted on the wall - that's it. The wall is made of drywall and has a perfectly flat surface, so the picture on it is very clear.
Along the way, I brought a sofa on which to sit and, if desired, expand it - you will have a full bed.
The problem of light from the window was decided by ordering blackout curtains. Made me out of 3 layers:
1 - “aluminum” color tulle;
2 - green dense material (given away as residues);
3 - the main gray thick curtain.
Since the side is not sunny, then with the curtains closed - even during the day - even your hands are not visible.
After placing the wiring in the baseboards, all system components were assembled and the image was adjusted and the sound was calibrated. Of course, it is impossible to speak about any normal sound in such a box with bare walls, but we will fix this later.
There are no curbstones yet, because it will also be DIY, it will include: a subwoofer, shelves for equipment and a cabinet for HTPC.
Below is a video of how it all works.
Total
The results of the works impressed and gave strength to further work in this direction. It turned out a great system where you can watch a movie / play with friends at any time of the day.
What is planned:
- acoustic panels
- light (smart)
- HTPC
- bollard
- subwoofer
For each of these items will be a separate article.
PS When I went to throw out the boxes, I came across a lone sistemnik. A quick inspection showed that everything is in place. I brought it home, turned it on - it works. True, the system is blocked by a virus that claims that the user watched gay porn for 3 hours and now you need to throw 500r to the phone number.
By hardware: dual-core AMD Athlon 64 / 2Gb RAM / Nvidia GT7600 / 2HDD 250Gb. Having collected all my old hard drives, I received a mini ubuntu server for 3TB. Most likely, I will keep all the films there until I collect a normal NAS. I put it on the balcony so that you can not hear the hard.
Source: https://habr.com/ru/post/372399/
All Articles