What does installing SSD in Mac mini?
Hi, Geektimes! If you suddenly stumbled on a Mac mini 2011 or 2012 release (and maybe you still use it as the main one), do not rush to send this “baby” to rest prematurely. The most affordable computer in the Apple lineup is pretty good upgradeable, and with an SSD you can give it a second life.
In general, the most common ways to make Mac mini work faster is to install more RAM or a solid-state drive. And if the “RAM” you have already pumped the computer to the maximum, it's time to look away, albeit a difficult, but no less effective solution. And there it will be possible to set up Fusion Drive, since such a topic has gone. But more on that later.
So, you matured and decided to install an additional drive in Mac mini. If buying a Server version costs a pretty penny, then an independent storage upgrade using an SSD is the most budget-friendly way. In addition, your hands are untied here: you can put any suitable drive that you like, and any capacity, and not be led by the manufacturer.
')
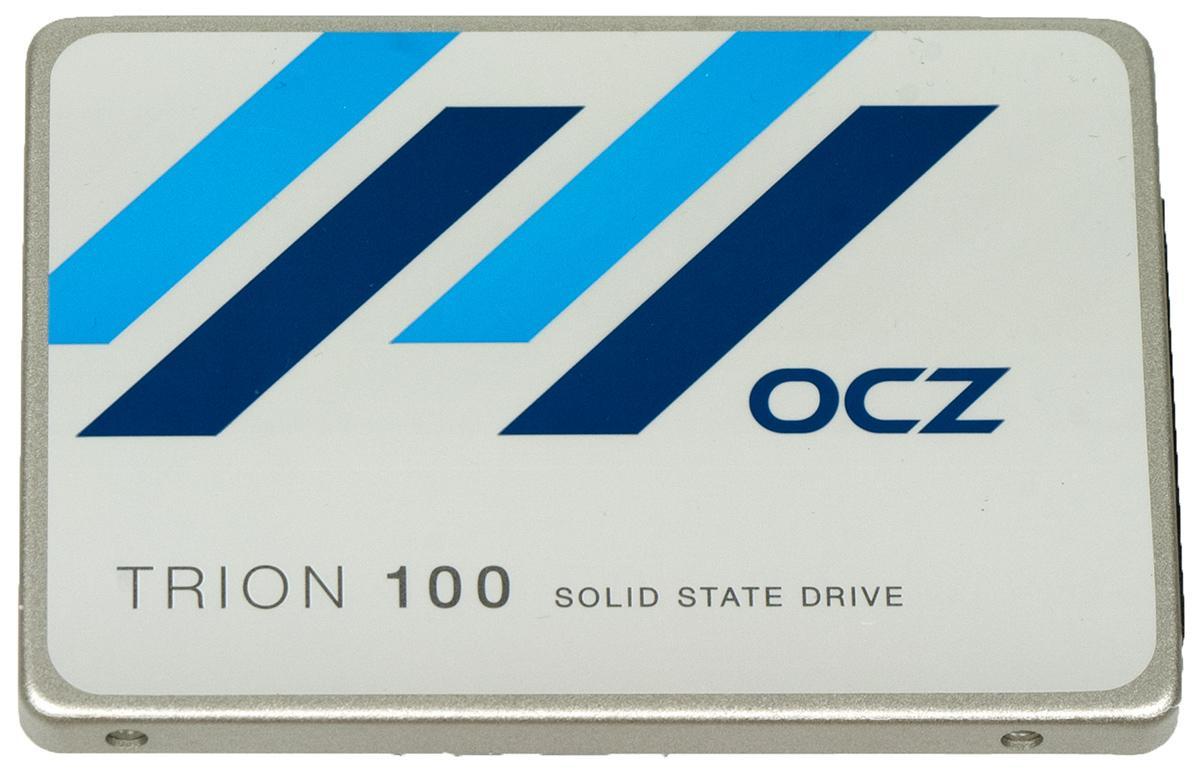
As you guessed, we still recommend looking towards the SSD line from OCZ , and not at all because this is our blog. Firstly, you can find a drive for almost any taste and need in our range, and secondly, many of them are suitable for installation as a second drive for Mac mini.
The only one who “flies away” right away is the RevoDrive 350. But not at all because of its performance - it delivers well 1800 MB / s for reading and 1700 MB / s for writing. It's all about the form factor and interface - FH / HL and PCIe Gen. 2 x 8 well, we do not fit. But do not be upset, decent drives, believe me, enough.
In general, we have already introduced you to the SSD line from OCZ, so let's go over the main points that may be useful for our particular case. Many people install an SSD in Mac mini to configure Fusion Drive or simply transfer the system to a solid-state drive. There will be plenty of 120 GB / 240 GB versions here, and Apple itself uses SSDs in a minimal configuration (albeit, largely because of the savings). But it's not about that. It is important to determine for what purpose the SSD will be used to pick it up correctly. For the task described above, Trion 150 and ARC 100 are easily suited, the Trion 150 will have even more speed. Both drives have good performance, endurance up to 219 GB / day, and even three years warranty for ShieldPlus are included.
If you want to run games on your computer (yes, there are already a lot of games on a Mac, and quite high-quality ones), and also work with the corresponding applications (same Final Cut Pro or Logic Pro), pay attention to Vertex 460A and Radeon R7. The latter has a maximum random read and write rate of 100,000 IOPS and 95,000 IOPS, has a 4 year warranty on ShieldPlus and a Barefoot 3 M00 controller.
Hardcore users, of course, will be delighted with the 960 GB terabyte HDD and SSD bundle, which will work like a clock with a Vector 180. Such a symbiosis and highly demanding games will draw, and programs for working with heavy graphics. The decision, of course, is an amateur - rather for those who are used to squeezing all the juice out of their computer.
Why do you need SSD in Mac mini, you ask? Well, let's start with the fact that now this computer in a similar configuration will cost almost 80 thousand rubles instead of 6-10 thousand rubles for SSD. A standard 500 GB HDD with a rotational speed of 5400 rpm (Apple puts such discs even on new computers, what a horror) will produce on average such indicators as in the screenshot below.

So here it is, as you see, a vital necessity. Therefore, rather choose the drive according to your needs, and let's proceed to the installation itself - the most interesting and complex process.
First we need a special kit for installing SSD - as a rule, it consists of screwdrivers with special nozzles, rubber bushings, a cable, a dielectric blade and other elements that may be useful in the process. Such a kit can be found in many places on the web, for example, iFixit . The price of the issue is about two thousand rubles. Compared to buying a new computer or Mac with Fusion Drive out of the box, it’s just a laugh.
With this kit you can already begin to install. After you open the cover, you need to unscrew the two screws (11.3 mm Torx T6) that hold the fan.

Turning off the fan and get it - we will not need it yet. After that, unscrew one screw (3.5 mm Torx T6) from the plate, lift it and pull it out.

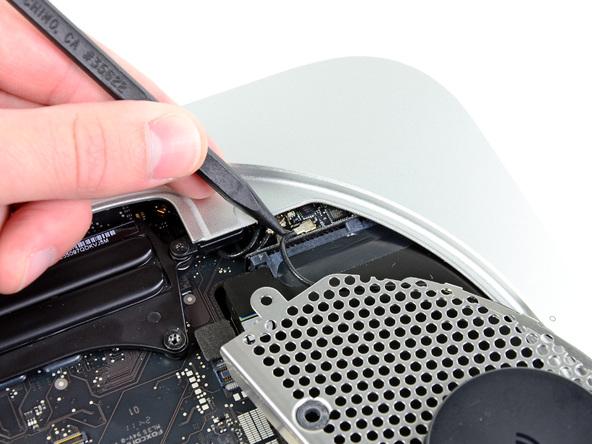
It's time to turn off the Wi-Fi module. You will need to unscrew the two screws (6.6 mm Torx T8) and a couple more (5.0 mm Torx T8). After this, the main thing is to disconnect the Wi-Fi module antenna from the AirPort board using a dielectric blade.

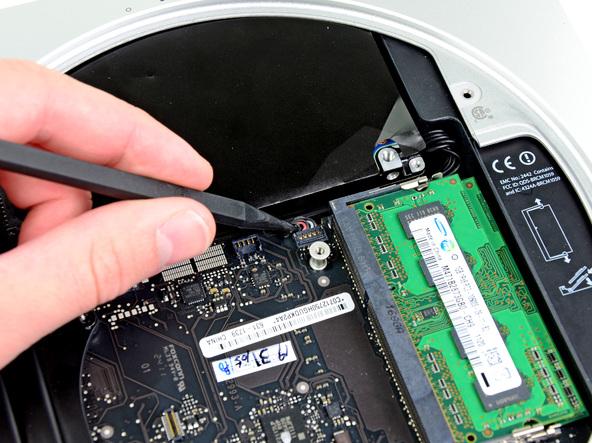
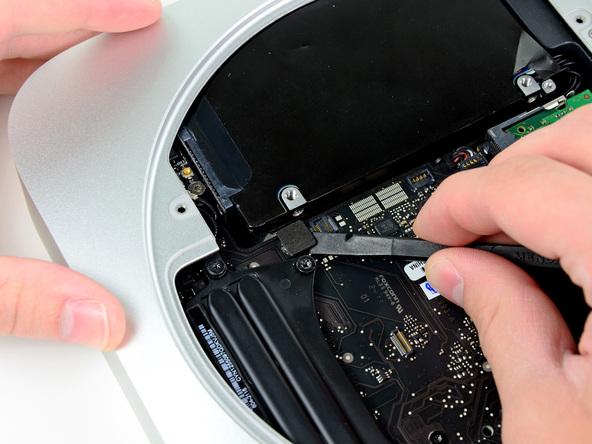
Then disconnect the hard drive connector from the motherboard - again, using a special paddle, as well as an infrared sensor.
We unscrew the three screws, as in the figure below - they fix the motherboard. These screws are unscrewed using: 5.0 mm (Torx T8), 16.2 mm (Torx T6) and 26 mm (Torx T6).

Disconnect the power supply cables and the motherboard, and then remove it. After that, you can do the extraction of the hard drive and power supply. To install a solid-state drive, you also need to remove the tray itself, which was a hard drive.

Insert four rubber bushes into this tray.

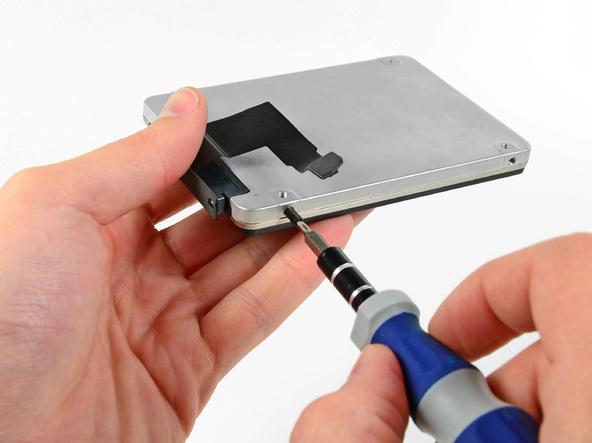
We connect the cable to the drive, bend it, as in the figure, and then twist the two set screws (use Torx T6).
Finally, install the SSD, securing it in the tray. After that, you can proceed to the assembly, but strictly in the same manner. We advise you to connect the hard drive after the motherboard - it is placed directly on the SSD and connected by a loop.

In general, the procedure takes about an hour - newcomers, respectively, will need more time, and professionals can cope in 30-40 minutes. We advise you not to hurry so that you don’t have to redo everything.
Many experts assign an SSD installation in Mac mini to one of the highest categories of complexity and no wonder: in fact, you completely disassemble a computer. But it is made so logical and correct that the process of disassembly / assembly itself is even able to give pleasure. If you are not confident in your abilities, it is better, of course, to contact the master, but with your SSD, which you have chosen several stages earlier.
So, we got two whole drives - one HDD, another SSD. Immediately after turning on the computer, OS X will display both drives: in general, you can already start using the bundle. However, there will be no special sense from it if you leave everything as it is. You must either rearrange the system on the SSD, or even configure the Fusion Drive. The latest technology, however, an amateur, but many Mac users who have it right out of the box, have not yet complained.
If we start a new life, then do it from scratch. To install the Fusion Drive, we need a bootable USB flash drive and some patience.
Turn on Mac mini with the Option key pressed and select the SSD as the boot disk. Then we open the terminal and see which numbers are assigned to our drives - enter the diskutil list command. As a rule, these are disk0 and disk1, but in some cases the numbers may vary.
After that we create a single volume group using the CoreStorage parameter. This command will help:
Write the name of the combined volume group (Logical Volume Group) as 12AF7FVB-1440-E3F4-NV4F-AX86DVQW and then format everything into the HFS + format using the command below:
That's it, now you have a Fusion Drive, and not just a bunch of HDD + SSD. Install the system and enjoy its fast work. Yes, even faster than when you just got your Mac mini out of the box.
There is one “but” - with FD you can lose a little in speed, but even if it is available, the drive performance will pleasantly surprise you. By the way, on OS X El Capitan, the bundle works more stably, keep in mind, if for some reason they have not yet been updated, otherwise in June a new version is on the way.

Do not be afraid to experiment and give your old computers a new life, because SSD can be installed not only in Mac mini, MacBook Pro or iMac, but also computers on Windows. The main thing - to observe the utmost attentiveness at each stage. And then for you all will make solid-state drives from OCZ - you want to put the system on them or just use to store important information.
In general, the most common ways to make Mac mini work faster is to install more RAM or a solid-state drive. And if the “RAM” you have already pumped the computer to the maximum, it's time to look away, albeit a difficult, but no less effective solution. And there it will be possible to set up Fusion Drive, since such a topic has gone. But more on that later.
So, you matured and decided to install an additional drive in Mac mini. If buying a Server version costs a pretty penny, then an independent storage upgrade using an SSD is the most budget-friendly way. In addition, your hands are untied here: you can put any suitable drive that you like, and any capacity, and not be led by the manufacturer.
')
As you guessed, we still recommend looking towards the SSD line from OCZ , and not at all because this is our blog. Firstly, you can find a drive for almost any taste and need in our range, and secondly, many of them are suitable for installation as a second drive for Mac mini.
The only one who “flies away” right away is the RevoDrive 350. But not at all because of its performance - it delivers well 1800 MB / s for reading and 1700 MB / s for writing. It's all about the form factor and interface - FH / HL and PCIe Gen. 2 x 8 well, we do not fit. But do not be upset, decent drives, believe me, enough.
In general, we have already introduced you to the SSD line from OCZ, so let's go over the main points that may be useful for our particular case. Many people install an SSD in Mac mini to configure Fusion Drive or simply transfer the system to a solid-state drive. There will be plenty of 120 GB / 240 GB versions here, and Apple itself uses SSDs in a minimal configuration (albeit, largely because of the savings). But it's not about that. It is important to determine for what purpose the SSD will be used to pick it up correctly. For the task described above, Trion 150 and ARC 100 are easily suited, the Trion 150 will have even more speed. Both drives have good performance, endurance up to 219 GB / day, and even three years warranty for ShieldPlus are included.
If you want to run games on your computer (yes, there are already a lot of games on a Mac, and quite high-quality ones), and also work with the corresponding applications (same Final Cut Pro or Logic Pro), pay attention to Vertex 460A and Radeon R7. The latter has a maximum random read and write rate of 100,000 IOPS and 95,000 IOPS, has a 4 year warranty on ShieldPlus and a Barefoot 3 M00 controller.
Hardcore users, of course, will be delighted with the 960 GB terabyte HDD and SSD bundle, which will work like a clock with a Vector 180. Such a symbiosis and highly demanding games will draw, and programs for working with heavy graphics. The decision, of course, is an amateur - rather for those who are used to squeezing all the juice out of their computer.
Why do you need SSD in Mac mini, you ask? Well, let's start with the fact that now this computer in a similar configuration will cost almost 80 thousand rubles instead of 6-10 thousand rubles for SSD. A standard 500 GB HDD with a rotational speed of 5400 rpm (Apple puts such discs even on new computers, what a horror) will produce on average such indicators as in the screenshot below.
So here it is, as you see, a vital necessity. Therefore, rather choose the drive according to your needs, and let's proceed to the installation itself - the most interesting and complex process.
First we need a special kit for installing SSD - as a rule, it consists of screwdrivers with special nozzles, rubber bushings, a cable, a dielectric blade and other elements that may be useful in the process. Such a kit can be found in many places on the web, for example, iFixit . The price of the issue is about two thousand rubles. Compared to buying a new computer or Mac with Fusion Drive out of the box, it’s just a laugh.
With this kit you can already begin to install. After you open the cover, you need to unscrew the two screws (11.3 mm Torx T6) that hold the fan.
Turning off the fan and get it - we will not need it yet. After that, unscrew one screw (3.5 mm Torx T6) from the plate, lift it and pull it out.
It's time to turn off the Wi-Fi module. You will need to unscrew the two screws (6.6 mm Torx T8) and a couple more (5.0 mm Torx T8). After this, the main thing is to disconnect the Wi-Fi module antenna from the AirPort board using a dielectric blade.
Then disconnect the hard drive connector from the motherboard - again, using a special paddle, as well as an infrared sensor.
We unscrew the three screws, as in the figure below - they fix the motherboard. These screws are unscrewed using: 5.0 mm (Torx T8), 16.2 mm (Torx T6) and 26 mm (Torx T6).
Disconnect the power supply cables and the motherboard, and then remove it. After that, you can do the extraction of the hard drive and power supply. To install a solid-state drive, you also need to remove the tray itself, which was a hard drive.
Insert four rubber bushes into this tray.
We connect the cable to the drive, bend it, as in the figure, and then twist the two set screws (use Torx T6).
Finally, install the SSD, securing it in the tray. After that, you can proceed to the assembly, but strictly in the same manner. We advise you to connect the hard drive after the motherboard - it is placed directly on the SSD and connected by a loop.
In general, the procedure takes about an hour - newcomers, respectively, will need more time, and professionals can cope in 30-40 minutes. We advise you not to hurry so that you don’t have to redo everything.
Many experts assign an SSD installation in Mac mini to one of the highest categories of complexity and no wonder: in fact, you completely disassemble a computer. But it is made so logical and correct that the process of disassembly / assembly itself is even able to give pleasure. If you are not confident in your abilities, it is better, of course, to contact the master, but with your SSD, which you have chosen several stages earlier.
So, we got two whole drives - one HDD, another SSD. Immediately after turning on the computer, OS X will display both drives: in general, you can already start using the bundle. However, there will be no special sense from it if you leave everything as it is. You must either rearrange the system on the SSD, or even configure the Fusion Drive. The latest technology, however, an amateur, but many Mac users who have it right out of the box, have not yet complained.
If we start a new life, then do it from scratch. To install the Fusion Drive, we need a bootable USB flash drive and some patience.
Turn on Mac mini with the Option key pressed and select the SSD as the boot disk. Then we open the terminal and see which numbers are assigned to our drives - enter the diskutil list command. As a rule, these are disk0 and disk1, but in some cases the numbers may vary.
After that we create a single volume group using the CoreStorage parameter. This command will help:
diskutil cs create Fusion disk0 disk1 Write the name of the combined volume group (Logical Volume Group) as 12AF7FVB-1440-E3F4-NV4F-AX86DVQW and then format everything into the HFS + format using the command below:
diskutil cs createVolume 12AF7FVB-1440-E3F4-NV4F-AX86DVQW jhfs+ Fusion 100% That's it, now you have a Fusion Drive, and not just a bunch of HDD + SSD. Install the system and enjoy its fast work. Yes, even faster than when you just got your Mac mini out of the box.
There is one “but” - with FD you can lose a little in speed, but even if it is available, the drive performance will pleasantly surprise you. By the way, on OS X El Capitan, the bundle works more stably, keep in mind, if for some reason they have not yet been updated, otherwise in June a new version is on the way.
Do not be afraid to experiment and give your old computers a new life, because SSD can be installed not only in Mac mini, MacBook Pro or iMac, but also computers on Windows. The main thing - to observe the utmost attentiveness at each stage. And then for you all will make solid-state drives from OCZ - you want to put the system on them or just use to store important information.
Source: https://habr.com/ru/post/371947/
All Articles