How I made a game under AVR
It has long been the desire to write an article on some crafts. But day after day, reading another article about the next "smart home" or "smart weather station on Ar ..." less and less wanted to write exactly the same thing, but from a different angle, and so I had not much. And then one day ...
Attention! Under the cut curve code, a couple of images and a lot of water.
It all started with the fact that once I noticed my soul mate playing a game about the once popular Internet meme "Nyan Cat", I liked it so much that I uncontrollably wanted to make a game with it! A quick search for similar articles on GT and H gave zero results. In principle, it is not surprising, few people today will bother and do something like this (I know that there is a GameBuino, but on GT and H there is not a single mention). Well, once empty, then fill this emptiness!
')
Do something retro style, something simple ... And of course! Immediately comes to mind the classics of the genre - Space Invaders. What could be easier than making your clone?
We make a cat that shoots (no matter what) at the invaders, simultaneously dodging return fire. It turned out not so simple. More precisely, I made myself not easy.
Atmel AVR ATmega328P microcontroller at 16 MHz (Arduino Nano board). Screen ILI9341 SPI TFT 2.4 ”320x240 and resistive touch screen on driver XPT2046 (Chinese clone ADS7846). The screen with Ali was ordered (intended for an oscilloscope on an STM32), which I regretted first, since there are almost no normally working libraries for a touch screen driver. Subsequently, this was a profit in the form of a workable library, albeit assembled from pieces.
Unfortunately, due to its titanic laziness, the Arduino IDE was used at first. Then, because of the expanded project, it became crowded there, and I switched to Sublime Text 2 and then screwed on the Arduino IDE (libraries, compiler — too hard to refuse). In the end, for the sake of sporting interest and optimization, I collected everything in Atmel Studio (Someone would say that they needed to write there right away! As I already wrote: just laziness). As a result, he left everything under the Arduino IDE, based on the considerations that not everyone has the desire to install and understand Atmel Studio.
Since the resources of the controller are very modest, then some ideas were later abandoned (for example, the background became monochrome, although there was texture in the plans). Moreover, I had to re-read a bunch of articles on NES, it was from them that I learned some optimization tricks.
The first problem began with the images, namely because of their size. Places just not enough. The screen accepts colors of 16 bits per pixel, i.e. we draw pictures in RGB565. Reading images via SPI from an SD card without DMA is very expensive and time consuming.
For example, the picture below takes up at a size of 51x20 - 1360 bytes, but for normal animation, these need 6!
We proceed to thecurvature of the compression space of the image. The first solution that was found instantly is to use duplicate elements.
For example, a rainbow can be made from two pictures, which is four less! Next is the body. This is the same body in all 6 frames! Instead of 6 we use one! Identical with the head. The rest does not contain repetitions (or can be neglected).
It all comes together on the screen, because it does not clear the image, but stores it in the internal buffer, which also imposes certain restrictions. For example, if you first draw the head, and then the body, then it will look like this:
After a set of individual images remains, they still occupy a lot (5504 bytes instead of 8160).
I will continue with the rainbow. If you use only the colors of the rainbow instead of the entire image and draw a rainbow code.
The size of the rainbow will decrease from 2016 bytes to 16 bytes + approximately 200 bytes per code. At the same time, a little lost in performance.
Subtotal number 1.
Approximately 1,800 bytes were freed up (the whole cat occupies 3,704). Can you do less? Of course! Instead of huge arrays with colors, use two arrays: one color table with the uint16_t type, the second image, but instead of colors, the indices of the desired color in the color table. For this, uint8_t is quite suitable (for 255 colors, that’s enough, hi GIF).
Sub-total number 2.
1944 bytes were released (the whole cat now occupies 1760). Can you do less? Can! Carefully look at the arrays and see colossal sequences of the same type! We run to read about RLE compression (a funny coincidence, after a while, when a coder and a decoder were already done, several articles on RLE appeared on H, as I did not have enough of them a little earlier).
If there were no problems with the decoder, I clearly knew what I would have at the entrance and what I would do with all this, then with the coder just the opposite ...
The decoder goes to:
- coordinates on the screen where we display the image;
- height and width in pixels;
- a table with color indices;
- color table;
- the size of the compressed image.
The encoderwrote as smog on Qt (collected the Qt 4.8.6 statics under OS X). The essence of the encoder: compress identical sequences in image files and place the result in header files.
He came out very fastidious to the input images. It is necessary to remove the alpha channel and export as raw data RGB565, well, at least in the Gimp this is done easily. Usage: we place in the folder with the program * .data image files, run, and the output header files.
Subtotal number 3.
The place became the most for 229 bytes (all together it takes 1531). Why so little? Do not forget that because of some problems with drawing (incorrect color overlay), only the body was compressed by RLE. Also, I did not consider the images of Invaders and gift, which were also compressed by RLE and reduced their size from 3456 bytes to 722 bytes.
Further, most likely, there will be a much greater drop in performance on unpacking or a lack of memory (depending on the algorithm), so I’ll stop on this.
The second problem came with an increase in the number of tasks. In the beginning, there were few tasks and everything was performed sequentially, quite quickly - 20-28 frames per second. Over time, the growth in the number of tasks led to a drop of up to 7-10 frames per second! At first I was thinking about the banal lack of resources of the CPU, I had already planned to switch to a more serious MC. But it dawned on me! After all, I do actions that, in fact, do not require constant execution in each cycle! It is necessary to smear tasks in time, to make something like multitasking!
The first thing that came to mind: FreeRTOS ... Unfortunately, at 16 (17 if the output is debug info) tasks, this turned out to be beyond the capabilities of this AVR.
The search for a solution led mainly to the DIHALT articles. After studying them, I made mybike task manager. What is:
- adding a task (as without it);
- delete all or one task;
- replace one task with another;
- The number of tasks to 254 (in fact, how much memory is enough);
- 9 bytes per task (less possible).
- use timer 0 as the system timer;
- Task call timeout (for the sake of it all was done);
- flag of the need to perform the task;
- Stupid protection against non-allocation of blue screen memory;
- pointers, many pointers;
- ???;
- PROFIT !!!
And some little else that I needed for my task managerbike . Principle of operation:
- create a structure (in it a pointer to an array and the number of current tasks);
- we indicate that this is our main array of tasks;
- add all the tasks you need;
- call the runTasks () function and don't return from there anymore.
In the main loop, the whole array of tasks is sorted. Tasks are performed only by timeout and if the flag is executed in truth.
I won’t say anything about the effectiveness of the decision, I’ll just write that it’s much better! Even this implementation curve has unloaded the CPU and the drop in the frame rate has disappeared completely from the word.
In the original, the cat flies in space past the stars (judging by the blue background flies on near-light), it does not matter that we will fasten the stars and we will move them!
Remember that memory is not as much as we would like. Therefore, after adding the necessary tasks and only after that, if there is enough free space, stars are created.
But the stars on the screen can fit a lot, do you really have to write coordinates for each? No, we assign pseudo-random values. Let's take the temperature value from the 8th ADMUX channel (we don't care for accuracy, the more accurate the better) and load it into the srand (if the temperature is always the same, then the rand will be identical).
If at least one star was created, then we apply the parameters for each:
They are. There are five of them (it fits so well in a row) and they are like a terminator (they come back all the time).
After transferring to Atmel Studio (pulling out what you need from Arduino), where you could easily get an asm listing and understand something that I did, I began to rewrite the used libraries and some code constructs (some will notice that I did not understand the unknown garbage, and will be right).
What did it do? It freed up about 6 Kbytes of ROM, reduced the amount of RAM used, and increased the speed of data transmission over SPI (having sacrificed some features).
Although the game is primitive, it works quite well and can take some time. Moreover, 10 KB of free RAM and about 1 KB of RAM remain.
What are the plans:
- Adding sound. Without it, it's boring to press the stylus on the screen.
- Add more different animations for a more lively game.
- Win minor bugs.
- Transfer to a more serious MK and the addition of new buns, or those that did not fit.
Archive with the game.
Archive with coder.
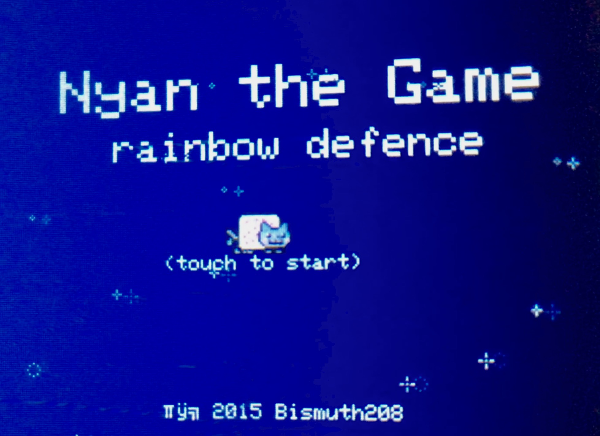
Actually, the game looks like:
Attention! Under the cut curve code, a couple of images and a lot of water.
It all started with the fact that once I noticed my soul mate playing a game about the once popular Internet meme "Nyan Cat", I liked it so much that I uncontrollably wanted to make a game with it! A quick search for similar articles on GT and H gave zero results. In principle, it is not surprising, few people today will bother and do something like this (I know that there is a GameBuino, but on GT and H there is not a single mention). Well, once empty, then fill this emptiness!
')
The essence
Do something retro style, something simple ... And of course! Immediately comes to mind the classics of the genre - Space Invaders. What could be easier than making your clone?
We make a cat that shoots (no matter what) at the invaders, simultaneously dodging return fire. It turned out not so simple. More precisely, I made myself not easy.
Iron
Atmel AVR ATmega328P microcontroller at 16 MHz (Arduino Nano board). Screen ILI9341 SPI TFT 2.4 ”320x240 and resistive touch screen on driver XPT2046 (Chinese clone ADS7846). The screen with Ali was ordered (intended for an oscilloscope on an STM32), which I regretted first, since there are almost no normally working libraries for a touch screen driver. Subsequently, this was a profit in the form of a workable library, albeit assembled from pieces.
Soft
Unfortunately, due to its titanic laziness, the Arduino IDE was used at first. Then, because of the expanded project, it became crowded there, and I switched to Sublime Text 2 and then screwed on the Arduino IDE (libraries, compiler — too hard to refuse). In the end, for the sake of sporting interest and optimization, I collected everything in Atmel Studio (Someone would say that they needed to write there right away! As I already wrote: just laziness). As a result, he left everything under the Arduino IDE, based on the considerations that not everyone has the desire to install and understand Atmel Studio.
Images
Since the resources of the controller are very modest, then some ideas were later abandoned (for example, the background became monochrome, although there was texture in the plans). Moreover, I had to re-read a bunch of articles on NES, it was from them that I learned some optimization tricks.
The first problem began with the images, namely because of their size. Places just not enough. The screen accepts colors of 16 bits per pixel, i.e. we draw pictures in RGB565. Reading images via SPI from an SD card without DMA is very expensive and time consuming.
For example, the picture below takes up at a size of 51x20 - 1360 bytes, but for normal animation, these need 6!
One of 6 frames
We proceed to the
For example, a rainbow can be made from two pictures, which is four less! Next is the body. This is the same body in all 6 frames! Instead of 6 we use one! Identical with the head. The rest does not contain repetitions (or can be neglected).
It all comes together on the screen, because it does not clear the image, but stores it in the internal buffer, which also imposes certain restrictions. For example, if you first draw the head, and then the body, then it will look like this:
Not to look nervous!
After a set of individual images remains, they still occupy a lot (5504 bytes instead of 8160).
I will continue with the rainbow. If you use only the colors of the rainbow instead of the entire image and draw a rainbow code.
So:
void drawRainbow() { // rainbow size: 24x21 (WxH) uint8_t countRainbow; // count of colors uint8_t rbElementY = 0; // pos of small block in Y uint8_t rbElementX = 0; // position of each block in X uint8_t rbElementNum = 2; // first up, after down blocks uint16_t color; rainbowState = !rainbowState; // invert rainbow // Full rainbow consist of 4 blocks: 2 blocks up, 2 blocks down while(rbElementNum--) { // 6 colors + 2 color of background; just overdraw colors for(countRainbow=0; countRainbow <= 7; countRainbow++) { color = PGRW_U16(pCatsRainbow, countRainbow); // 6 - width; 3 - heigth tftFillRect(rbElementX, rbElementY + nyan.base.posY + (rainbowState ? 1 : 0), 6, 3, color); tftFillRect(rbElementX+6, rbElementY + nyan.base.posY + (rainbowState ? 0 : 1), 6, 3, color); rbElementY += 3; } rbElementY = 0; // reset position rbElementX += 12; // now second - up or down bloks } } The size of the rainbow will decrease from 2016 bytes to 16 bytes + approximately 200 bytes per code. At the same time, a little lost in performance.
Subtotal number 1.
Approximately 1,800 bytes were freed up (the whole cat occupies 3,704). Can you do less? Of course! Instead of huge arrays with colors, use two arrays: one color table with the uint16_t type, the second image, but instead of colors, the indices of the desired color in the color table. For this, uint8_t is quite suitable (for 255 colors, that’s enough, hi GIF).
Sub-total number 2.
1944 bytes were released (the whole cat now occupies 1760). Can you do less? Can! Carefully look at the arrays and see colossal sequences of the same type! We run to read about RLE compression (a funny coincidence, after a while, when a coder and a decoder were already done, several articles on RLE appeared on H, as I did not have enough of them a little earlier).
If there were no problems with the decoder, I clearly knew what I would have at the entrance and what I would do with all this, then with the coder just the opposite ...
The decoder goes to:
- coordinates on the screen where we display the image;
- height and width in pixels;
- a table with color indices;
- color table;
- the size of the compressed image.
Decoder
void drawBMP_RLE_PGR(int16_t x, int16_t y, uint8_t w, uint8_t h, const uint8_t *colorInd, const uint16_t *colorTable, uint16_t sizePic) { // This is used when need maximum pic compression, // and you can waste some CPU resources for it; // It use very simple RLE compression; // Also draw background color; uint16_t count = 0; uint16_t repeatColor; uint8_t tmpInd, repeatTimes; // for big pics need uin16_t tftSetAddrWindow(x, y, x+w-1, y+h-1); while(count < sizePic ) { // compressed pic size! // get color index or repeat times tmpInd = pgm_read_byte(colorInd + count ); if(~tmpInd & 0x80) { // is it color index? repeatTimes = 1; } else { // nope, just repeat color repeatTimes = tmpInd - 0x80; // get previous color index to repeat tmpInd = pgm_read_byte(colorInd + (count - 1)); } // get color from colorTable by tmpInd color index repeatColor = PGRW_U16(colorTable, tmpInd); do { --repeatTimes; tftPushColor(repeatColor); } while (repeatTimes); ++count; } } The encoder
He came out very fastidious to the input images. It is necessary to remove the alpha channel and export as raw data RGB565, well, at least in the Gimp this is done easily. Usage: we place in the folder with the program * .data image files, run, and the output header files.
Subtotal number 3.
The place became the most for 229 bytes (all together it takes 1531). Why so little? Do not forget that because of some problems with drawing (incorrect color overlay), only the body was compressed by RLE. Also, I did not consider the images of Invaders and gift, which were also compressed by RLE and reduced their size from 3456 bytes to 722 bytes.
Further, most likely, there will be a much greater drop in performance on unpacking or a lack of memory (depending on the algorithm), so I’ll stop on this.
Multitasking
The second problem came with an increase in the number of tasks. In the beginning, there were few tasks and everything was performed sequentially, quite quickly - 20-28 frames per second. Over time, the growth in the number of tasks led to a drop of up to 7-10 frames per second! At first I was thinking about the banal lack of resources of the CPU, I had already planned to switch to a more serious MC. But it dawned on me! After all, I do actions that, in fact, do not require constant execution in each cycle! It is necessary to smear tasks in time, to make something like multitasking!
The first thing that came to mind: FreeRTOS ... Unfortunately, at 16 (17 if the output is debug info) tasks, this turned out to be beyond the capabilities of this AVR.
The search for a solution led mainly to the DIHALT articles. After studying them, I made my
- adding a task (as without it);
- delete all or one task;
- replace one task with another;
- The number of tasks to 254 (in fact, how much memory is enough);
- 9 bytes per task (less possible).
- use timer 0 as the system timer;
- Task call timeout (for the sake of it all was done);
- flag of the need to perform the task;
And some little else that I needed for my task manager
- create a structure (in it a pointer to an array and the number of current tasks);
- we indicate that this is our main array of tasks;
- add all the tasks you need;
- call the runTasks () function and don't return from there anymore.
Thanks to this, the main loop began to look like this:
void runTasks() { uint32_t currentMillis; volatile uint8_t count; for(;;) { for(count=0; count < pCurrentArrTasks->tasksCount; count++) { // Have func and need execute? if(pCurrentArrTasks->pArr[count].pTaskFunc && pCurrentArrTasks->pArr[count].execute) { currentMillis = TIMER_FUNC; // check timeout if((currentMillis - pCurrentArrTasks->pArr[count].previousMillis) > pCurrentArrTasks->pArr[count].timeToRunTask) { pCurrentArrTasks->pArr[count].previousMillis = currentMillis; pCurrentArrTasks->pArr[count].pTaskFunc(); } } } } } In the main loop, the whole array of tasks is sorted. Tasks are performed only by timeout and if the flag is executed in truth.
I won’t say anything about the effectiveness of the decision, I’ll just write that it’s much better! Even this implementation curve has unloaded the CPU and the drop in the frame rate has disappeared completely from the word.
A space flight
In the original, the cat flies in space past the stars (judging by the blue background flies on near-light), it does not matter that we will fasten the stars and we will move them!
Remember that memory is not as much as we would like. Therefore, after adding the necessary tasks and only after that, if there is enough free space, stars are created.
We create as follows:
while((maxStars > 0) && (starStruct == NULL)) { // if we cant make so much stars if((starStruct = (tStarType*) malloc(sizeof(tStarType) * maxStars)) == NULL) --maxStars; // we try to make for one less } But the stars on the screen can fit a lot, do you really have to write coordinates for each? No, we assign pseudo-random values. Let's take the temperature value from the 8th ADMUX channel (we don't care for accuracy, the more accurate the better) and load it into the srand (if the temperature is always the same, then the rand will be identical).
Measure the temperature:
uint16_t getTemp(void) { // The internal temperature has to be used // with the internal reference of 1.1V. // Set the internal reference and mux. ADMUX = ((1<<REFS1) | (1<<REFS0) | (1<<MUX3)); ADCSRA |= (1<<ADEN); // enable the ADC ADCSRA |= (1<<ADSC); // Start the ADC // Detect end-of-conversion while(ADCSRA & (1<<ADSC)); return ADC; } If at least one star was created, then we apply the parameters for each:
pseudorandom:
if(maxStars) { for(uint8_t count =0; count < maxStars; count++) { starStruct[count].state = randNum() % STAR_STEP; starStruct[count].posX = randNum() % TFT_W + 22; starStruct[count].posY = randNum() % TFT_H + 22; } } Invaders
They are. There are five of them (it fits so well in a row) and they are like a terminator (they come back all the time).
Optimization
After transferring to Atmel Studio (pulling out what you need from Arduino), where you could easily get an asm listing and understand something that I did, I began to rewrite the used libraries and some code constructs (some will notice that I did not understand the unknown garbage, and will be right).
What did it do? It freed up about 6 Kbytes of ROM, reduced the amount of RAM used, and increased the speed of data transmission over SPI (having sacrificed some features).
Total
Although the game is primitive, it works quite well and can take some time. Moreover, 10 KB of free RAM and about 1 KB of RAM remain.
What are the plans:
- Adding sound. Without it, it's boring to press the stylus on the screen.
- Add more different animations for a more lively game.
- Transfer to a more serious MK and the addition of new buns, or those that did not fit.
Archive with the game.
Archive with coder.
Actually, the game looks like:
Source: https://habr.com/ru/post/371713/
All Articles