New software on the old hardware (from the life of a necromancer-masochist)
The story of the "resuscitation" of the Asus EEE PC 4G (701) netbook, by installing a modern Linux man, is very superficially familiar with this system. You can use this article as an instruction for installing a minimal configuration of Linux by a person who did not work with this OS, but who would like to study it further. You can put on any PC or laptop.
Important note: the purpose of the article is to help install Linux, without going into chewing commands. For this there is a mass of literature and sites. After installation you will have a machine for experiments and you will be able to study this OS yourself. But for installation we need a second PC. For downloading software, recording images and searching the Internet. Such are the "crutches".
There are two main types of people in the world: techies and users. But the world is not monochromatic and there are many gradations (degrees of confusion). The most ardent techies are obsessed with the idea of trying out, modernizing and squeezing all the juices from the new technology. Completed users buy equipment, actively exploit it, and then replace it with a new one, mercilessly throwing outdated equipment into the dustbin of history.
')
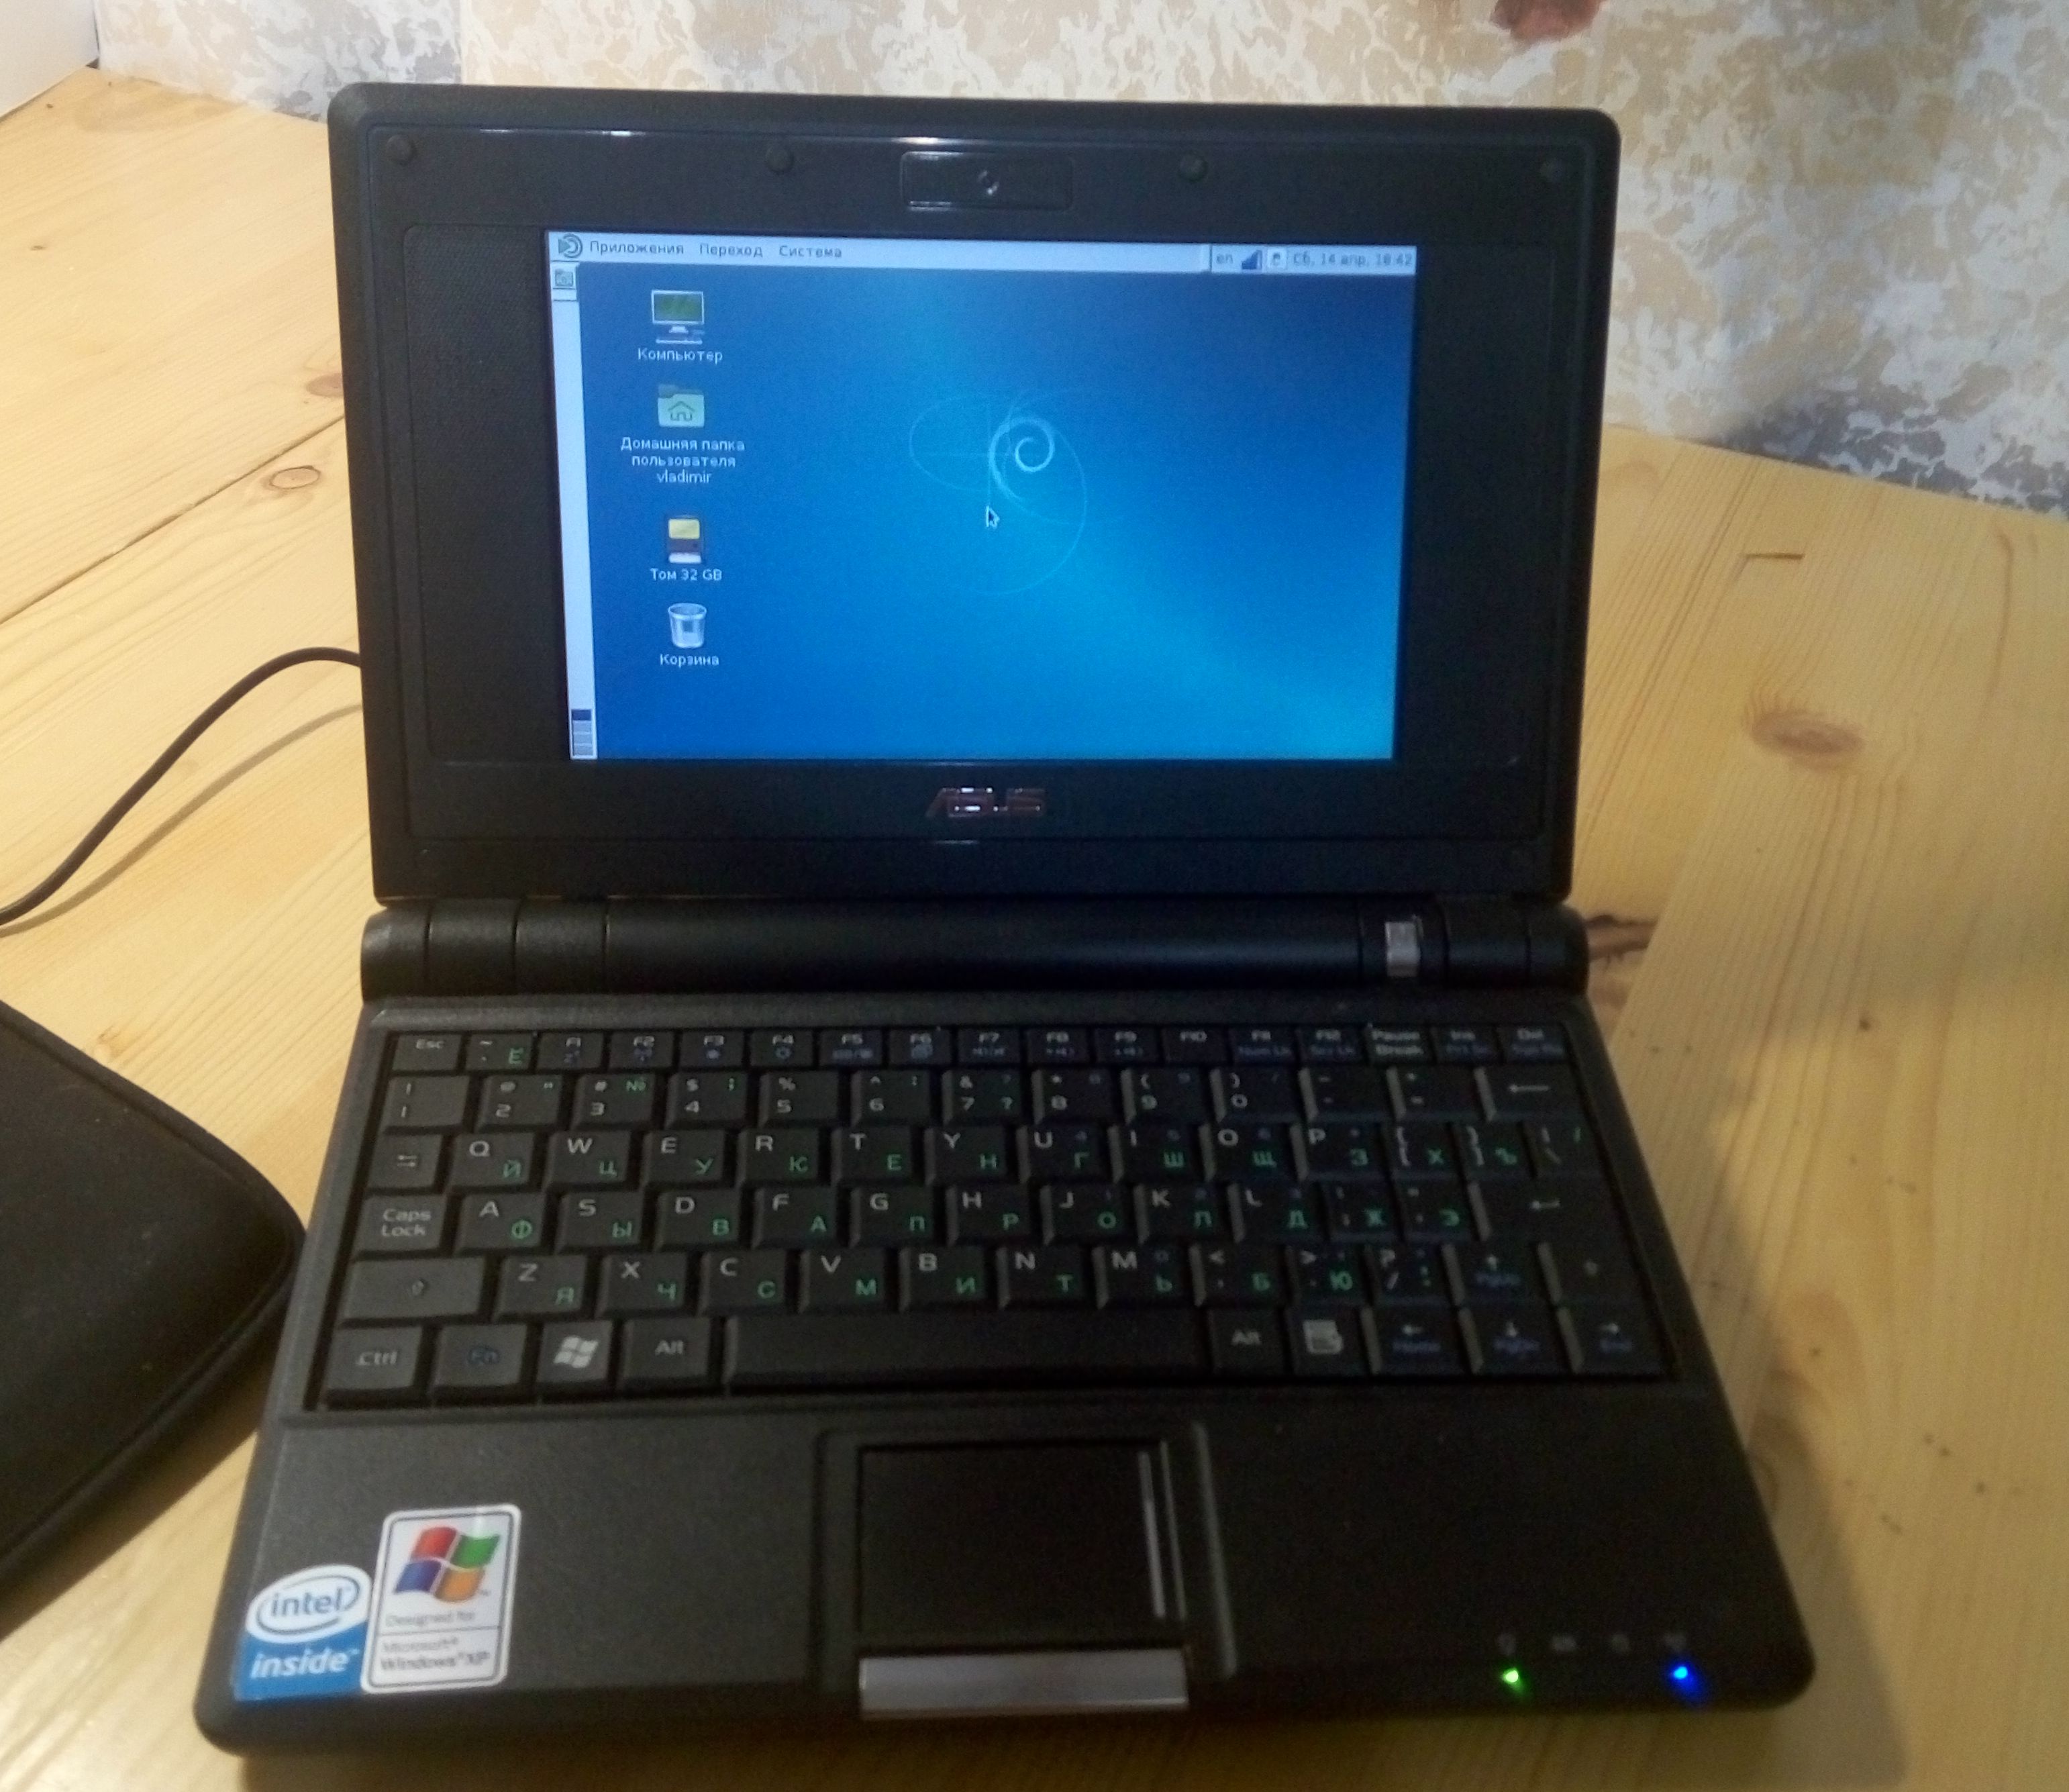
I have a few old laptops in my house. Everything is in good physical condition, working, but Windows XP installed on them no longer pulls. Especially a pity Asus EEE PC 4G (701) - a beautiful, neat netbook. At the time of its acquisition (2008) it was quite a working machine for business trips. Documents were printed on it in MS Office, negotiations were conducted on Skype, Internet spaces were plowed and even programs for microcontrollers were written (there was MPLAB IDE). But the more Windows was updated, the less space remained on the disk and the slower everything worked. So far, figuratively speaking, did not get a stake.
Very brief information about Asus EEE PC 4G (701)
Model: Asus EEE PC.
Start of production - October 2007. In Russia since 2008.
Memory: 512 Mb (DDR2 SO-DIMM), expands to 2 Gb (one slot!). SSD: 4Gb, hard soldered on the board.
Processor: Intel Celeron M, 900 MHz.
Screen: 7 inches, resolution 800x480.
Start of production - October 2007. In Russia since 2008.
Memory: 512 Mb (DDR2 SO-DIMM), expands to 2 Gb (one slot!). SSD: 4Gb, hard soldered on the board.
Processor: Intel Celeron M, 900 MHz.
Screen: 7 inches, resolution 800x480.
Particularly keen interest in the netbook came after the son began to show an interest in programming and he was acquired by Arduino. It was inconvenient to study for general stationary PCs (machine time was actively shared between family members), and the future programmer quietly and quickly (within half an hour) installed Steam on the ThinkPad which was temporarily issued to the child, after which Arduino safely receded into the background. The ThinkPad was removed and a decision was made to reanimate the EEE PC with the ability to work with the Arduini IDE.
The choice of distribution
There are a huge number of Linux distributions: Debian, Ubuntu (Kubuntu, Lubuntu, Xubuntu, Linux Mint), Red Hat, CentOS, Fedora, openSUSE, Mandrake, ALT Linux, Arch Linux, Gentoo, etc. etc. Everyone praises his own as “the most-most”, describes advantages over others and promises “paradise trees”. For old low-power machines, Lubuntu and Xubuntu are actively promoting, with a “lightweight” GUI (graphical user interface). But any attempt to put these modern distros on our retiree is doomed to failure at the very beginning of the journey: the installer will report a shortage of hard disk space. There are tips on circumventing this problem in the network, but we will go our own way, through thorns to the stars. Systems without a graphical interface (“bare” Debian, Ubuntu Server) are installed without problems. At home, a server is running on the mini-ITX board for personal needs: a NAS network, a Torrent-rocking Transmission with remote control from a smartphone and a home PC, the issue of deploying personal cloud storage is being worked out. For a long time, the EEE PC was used as a testing ground for debugging server functions, prior to their implementation on a home server.
After trying, browsing the Internet and thinking, it was decided to put a bunch of Debian + MATE. Important note: at the end of the installation, Debian will be prompted to install a GUI choice. Among the options are MATE and "light" Xfce and LXDE. But if you choose this installation option, we will get the full desktop environment: FireFox, LibreOffice, etc. etc. And we also do not have enough space, or will be just enough. Therefore, we will deal with masochism (in view of the initial level of knowledge of Linux) and put the “bare” Debian (used Debian 8.x). After from the terminal, we will configure the Wi-Fi and set the minimum version of MATE (MATE-core).
How many wonderful discoveries are to us ...
Features of bootable media
I installed the OS from an external DVD-drive. It is theoretically possible to install from a USB flash drive, but there are a few nuances:
1. Go to the BIOS (F2) and in the Boot section, select the Boot Device Priority item. In it we do the first boot device Removable Dev. All this we do to calm the conscience, because I personally have not booted from a USB flash drive in this version.
2. We insert our flash drive and after switching on we start hysterically pressing the ESC button. This will cause the boot selection menu to pop up. In it, the cursor select our flash drive and try to install the system. Another ma-a-a-scarlet nuance: I have a flash drive, as a download source, is determined only if it is inserted on the right side of the netbook (on the side of the SD card, where there are two USB connectors).
3. When installing, I experimented with different systems: Debian 8, Debian 9, Lubuntu, Android x86. For the experiments used the same flash drive. Capturing images was done by UNetbootin for Windows. And at some point the installation errors simply began to pop up. (At the end of the netbook's torture, I tried to create a bootable USB flash drive with the Rufus program. I liked it, but the OS was already on the machine and did not want to experiment with a new one.)
Reading and translating error messages was frankly lazy and I switched to installing from a DVD.
Installing naked Debian.
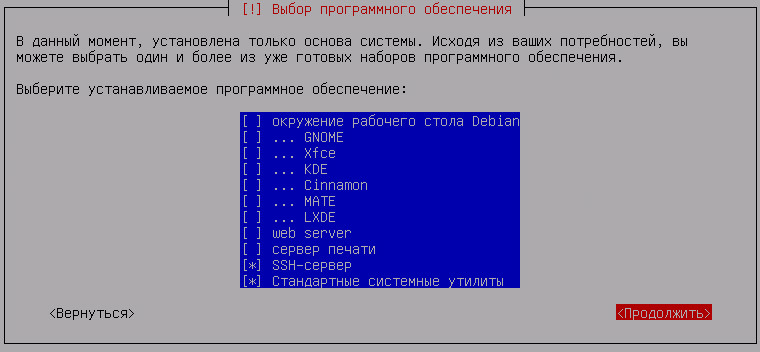
There are many instructions / examples for installing Debian on the net. I myself used them during installation and in this article it makes no sense to give them. To install, you need an internet connection. If there is no cable connection, the installer will offer to select the network interface (wlan0), select the network from the list and enter the password. Then everything goes on the thumb. It must be remembered that when installing Debian you will be asked to enter a password for root and separately for the user. In Ubuntu distributions, the user entered during the installation of the system has root-permissions by default. There is nothing difficult in the installation process. The only difference is that after disk layout, when you are prompted to finish the markup and write the changes to the disk, you need to move the cursor to our primary department, press Enter and change the file system type to ext2 (In the screenshot below, underline the necessary section. Move the cursor to it, press Enter and change ext4 to ext2.). This is not a journaling file system and is actively advised to choose for SSD disks in order to avoid their premature failure.

At the last stage you will be offered to choose the software. Leave the “Standard system utilities” and click “Continue” (if you wish, you can check the “SSH server” and “web server”, but we don’t need them much and you can always install them later).
Pre-system configuration (network and sudo)
During installation, if there is no wired connection to the Internet, you will be asked to select a network card and connect to the found Wi-Fi networks. After installation, you will need to set up a new wireless network. Until we connect to the network, we will not install anything from the software (or from external drives). You can search the Internet for ways to connect, but I will give them here in brief:
After downloading you will see the classic: Linux - console. For Windows users it is very unusual, but over time comes addictive. The console is really convenient to work with.
The greeting is:
< > login: Enter your name (set during installation), press Enter and you will be prompted to enter a password. When entering a password, the screen does not display the entered characters, not even "asterisks", the enemy does not recognize the length of the password. After logging in, the screen displays:
< >@< >:~$ The ~ (tilde) icon means that you are in the user's folder, the $ icon means that you are logged in as a user. The user has no rights to install programs or make settings in the system. To edit the system, you must have root-rights. Therefore, we type on the keyboard su and press Enter. After entering the administrator password. The invitation will look like:
root@< >:< ># (Alternatively, you could immediately enter the username root and enter the corresponding password). A characteristic sign of work under root-rights is the # symbol. Everywhere, in books, on the Internet, describing Linux commands, you need to carefully look under what rights the command is executed:
$<>- the command is executed under the login and with user rights;#<>- the command is executed under the login and as root;$ sudo <>- the command is executed under the user login, but with root rights (if the user is included in the administrators group).
Therefore, we move to the administrator account and begin to configure the network. To begin with, we look at the command-line network interfaces available on board:
# ifconfig -a The result of the command is the display of the interface name and its characteristics: the MAC address, the assigned IP address (if there is a connection), received / transmitted packets, etc. For our Asus, we will see the following interfaces:
eth0 - wired network card;
lo - local interface (IP 127.0.0.1);
wlan0 - Wi-Fi-card (IP not assigned).
After installation, Wi-Fi is turned off by default. We include it with the command:
# ifconfig wlan0 up Now we will scan the air for the presence of wireless networks. Enter the command:
# iwlist wlan0 scan | grep -i essid We see a list of available networks, check the presence of "our" and begin to connect to it. Network interface settings are stored in the / etc / network / interfaces file (the file itself is the last one on this line, before it is the file path; this is the standard description in all instructions). There are several editors in the installed distribution, I use nano. You can use any other, if you know how. We open the file we need with the command:
# nano /etc/network/interfaces Here the first is the command to start the editor (nano), then the path to the file being edited. In the file that opens, we register our access point (the # character is placed before the comment):
# Wi-Fi auto wlan0 iface wlan0 inet dhcp wpa-ssid "< >" wpa-psk "<>" To save changes, press CTRL + O, to exit the editor - CTRL + X. After editing the file, you must restart the service by entering the command:
# /etc/init.d/networking restart After the message about restarting the service, enter the command again:
# ifconfig -a In the displayed list of our interfaces, we should see that our Wi-Fi connection is assigned an IP (inet addr), gateway and mask, as well as the number of transmitted / received packets. Everything is great, we are online! Now we have access to the repositories to install all the necessary software.
The next step is to install the sudo package and enable our account in the admin group. This will allow us to install the software and edit the configuration from under our account by entering the word sudo before the executable command and confirming the actions with our password. Somewhat dreary, but less chance to rashly crash the system. Enter the command:
# apt-get install sudo After the installation is completed, we add our account to the group of administrators with the command:
# adduser < > sudo Now we reboot our computer with the command:
# reboot After rebooting, we log in as our username and install Midnight Commander, a console file manager for Linux. Enter commands:
$ sudo apt-get update (update data from repositories)Enter for confirmation user password!
$ sudo apt-get install mc After installation, enter the command:
$ mc After executing the command, we see ... a painfully familiar Norton Commander. (After logging in as a user, we will not be able to create / edit files / directories. For full-fledged work, you must start the MC with the
$ sudo mc )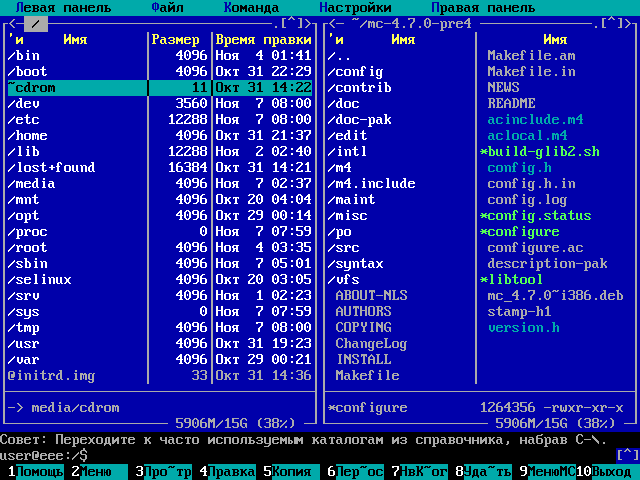
In this form, we can use our netbook for a lot of interesting experiments: learn to work in the console, mount USB-drives, deploy Samba to create a NAS-drive, create a web-server, etc. etc. But we will go further and we will put a lightweight graphical interface in a minimal configuration. Adventure continues!
GUI installation
Debian has a good wiki page, it is recommended to be constantly studied. As a desktop are offered: GNOME, Plasma, Xfce, LXDE and MATE. Xfce and LXDE are considered lightweight, but I wanted to try MATE in the minimal version. We briefly look at the Wiki-page dedicated to the installation of MATE and at the end we see the installation instructions in the minimum version (the same actions are described on the official MATE website). We valiantly repeat the proposed actions:
$ sudo apt-get update $ sudo apt-get install mate-desktop-environment-core After installation we try to start the graphical shell, enter:
$ mate-session and nothing happens (except for error messages in the system). Attempts to reboot, entering commands from under root do not lead to anything. Pechalka ... We must read the literature!
Install the X server (X Window System).
The study of documentation on the Internet provides us with the following knowledge: a graphical interface communicates with the Linux kernel through an intermediary layer. We need to install the X-Window-System. So gradually, we begin to comprehend the features of the system. Enter the command:
$ sudo apt-get install x-window-system and after installation we try to enter:
$ mate-session Earned!
But after rebooting the system, we again get to the console. True, from it we can run our graphical shell, but this is not an option. Climb back to the reference books ...
DM installation (Display Manager)
A careful, this time, study of the Debian Wiki page devoted to installing MATE hooks the following sentence:
If you need to install a display manager such as GDM or LightDM.
In it, for fools and hastily (like me), black in English says about the need to install the Display Manager! Study the mat.part, read the instructions !!!
Since we are trying to create a light version, we install LightDM and then reboot:
$ sudo apt-get install lightdm $ sudo reboot Now it’s working !!!
But as it turned out, we are somewhere in the middle of our path. We have a graphical shell with a minimal set of software: the file manager Caja, installed by us Midnight Commander, the terminal of MATE, Reportbug. But there is no internet browser and some useful programs.
Asus EEE PC 4G Screen Issues
Linux has always been positioned as a system that is individually customized for a specific machine and user. We start to be adjusted. A feature of Asus EEE PC 4G (701) is a non-standard display resolution of 800x480. Most of the system settings window is cut off at the bottom edge, all confirmation buttons are cut. In Windows XP, there was a combination that allows you to see the "bottom" edge of the screen. I have not yet found such a program for Linux and have not found the possibility of resizing windows. Still ahead. But for now we can move the panel from the bottom edge to the side. This is done as in Windows: right-click on the panel and click in the "Properties". Clicking on the right mouse button on the top panel, select "Add to panel ..." and add the "Disable" icon (this is not necessary, each customizes the interface for you). Going to the “System” tab - “Parameters” in the top panel, we can play around with the rest of the configuration options.
And we don’t see the most important thing: managing our network connections. Of course, theoretically, in each new place we can connect to the new Wi-Fi network via the terminal, editing our / etc / network / interfaces file, like a cool unshaven admin in a sweater, but ... I am a masochist at times, but not so much. Therefore, the next thing we put Network Manager . In our minimal configuration, there is no package manager (for now), so we continue to work in the terminal. You can go to "Applications" - "System" - "Terminal environment MATE" , but since we are simultaneously studying Linux, we study it in its entirety. By default, there are 6 text consoles (tty1-tty6), starting with the 7th and later used to start the X-server (graphical shell). The transition between consoles is carried out by Ctrl + Alt + Fn, where the n-number of the desired console. You can log in to any of the existing consoles - under one user or under different (existing in the system). You can also run multiple X servers, and each will have its own environment.
Press Ctrl + Alt + F1 and go to the console. Enter your username / password. Next, type:
$ sudo apt-get install network-manager-gnome --no-install-recommends After that in the nano open the file / etc / network / interfaces and comment out all our lines. Reboot (
$ sudo reboot ).Now we can find and connect to Wi-Fi-networks in graphical mode.
Again we go to the console (you can put everything right before the reboot, but I worked according to the “changed / added - reboot / check” principle) and install the Synaptic package manager :
$ sudo aptitude install synaptic GDebi Package Installer :
$ sudo apt-get install gdebi Archive Manager Engrampa :
$ sudo apt-get install engrampa Optionally, you can add standard for MATE, not not included in the minimum kernel, the text editor Pluma :
$ sudo apt-get pluma and Atril document viewer :
$ sudo apt-get install atril We exit from the console into the graphics mode with the Ctrl + Alt + F7 combination and observe the appearance of new programs in the tabs of the top panel (it is better to reboot). For complete happiness, it remains to install an Internet browser.
A little more, a little more ...
Installing a web browser
For a full netbook life, it remains to install a web browser that is not in our minimum version. Earlier we installed the package manager Synaptic. Why - a difficult question. Real Linux users do everything in the terminal (I notice for myself a growing attachment to it), but first of all it is convenient for novice users to install everything from under the graphical interface. If we try to search the web browser in Synaptic, we will see standard Firefox and its “competitor” Chromium. These are all well-working programs, but they weigh ... In an attempt to find something easier, I paid attention to Midori. Information on the network promises an "easy and fast browser." A visit to the official site describes a simple installation from the standard repository for Debian. The legend is fresh, but (now) is hard to believe. When trying to follow the instructions from the official site, we see a message that the software is in the testing phase and is waiting for inclusion in the repository. (Debian is positioned as the “most stable” distribution. In the repositories there are only time-tested packages. Everything works without failures. This is achieved by the fact that there are no newer versions in the repositories. There may be no previous ones. But there are previous ones. Remember this . All new software has to be put with pens.) Therefore, we download the installation * .deb file and install everything with “pens”. Go to the console (Ctrl + Alt + F1), log in to enter the command:
$ wget http//midori-browser.org/downloads/midori_0.5.11-0_i386_.deb After downloading the file, go to our graphical interface (Ctrl + Alt + F7) and go to the user's home folder. There we are happy to see our downloaded file. We click on it with the right mouse button and select the menu item “Open in the GDebi Package Installer” (people who are confident can install in the terminal, like real Linux users, you can read a lot about this on the Internet).
The finish!!!
After all our machinations, dances with a tambourine and ritual sacrifices (nervous eating cookies and sandwiches), we got an experimental netbook with Debian at our disposal and even about 1 GB of free space on our SSD disk. And even with working function buttons (I did not check everything, but the volume and brightness are adjustable). For what further purposes you will use it - your business. Personally, I now sit in a secluded corner hugging a netbook and learn Linux ...
PS Arduino IDE (the initiator of the whole epic) is installed, started and running (port settings can be found on the Internet), but ... After installation, less than 500 MB of free space remains on the disk, so the possibility of launching programs from the SD card (formatting in ext file system, mount, etc.). Research continues, life does not stand still.
PS Internet radio
Just sitting in the corner is boring, so I decided to put Internet radio on my netbook. We put the Internet radio RadioTray . For convenience, we use the Synaptic package manager. The installation process is simple and there is no need to describe it. The main question that arises among users is where to get the list of radio stations? There are a lot of articles in the network, how to find a link by analyzing traffic through special programs. I suggest two ways, for the first one, a third-party PC is needed, but we also needed it during the installation process:
1. We put VLC. Select “View” - “Playlist” and open the Icecast Radio Directory item in the “Internet” section. Download a list of Internet radio stations. Choose the one you like and right click on it. Select "Properties". At the bottom of the window we see the desired URL.
2. Go to the site “Radio Vodnik” (link in the list of sources) and download the playlist for Winamp. Open the file with a text editor and see a list of radio stations and URLs.
Links
ru.wikipedia.org/wiki/List_distributive_Linux
ru.wikipedia.org/wiki/Midnight_Commander
www.debian.org
wiki.debian.org/ru/FrontPage?action=show&redirect=HomePage
mate-desktop.org
wiki.mate-desktop.org/download
midori-browser.org
radio.vodnik.xyz
Source: https://habr.com/ru/post/371443/
All Articles