A little bit of everything: car, cloud, Raspberry Pi and CAN
Entertainment center (in-vehicle infotainment, IVI) has become an integral part of the modern car. If earlier it was just a radio receiver, then a cassette recorder, then you could listen to music simply from a flash drive, and now there is barely enough two 10.25-inch displays for the dashboard and entertainment center in the new Mercedes A-class. By the way, IVI is already not only music, but also navigation, access to the Internet and many other possibilities inside the vehicle, which slowly start the embodiment of the “Connected Car” concept. Perhaps, motor transport is also very close to the implementation of the concept of the Internet of Things (IoT). And all this is achieved thanks to the "assimilation" of the computer and the car.
In the continuation of the previous article “ Automobile, Internet of Things and other technologies ”, I would like to consider ideas for implementing a car computer at the level of open projects and to slightly touch on modern trends in this vein.
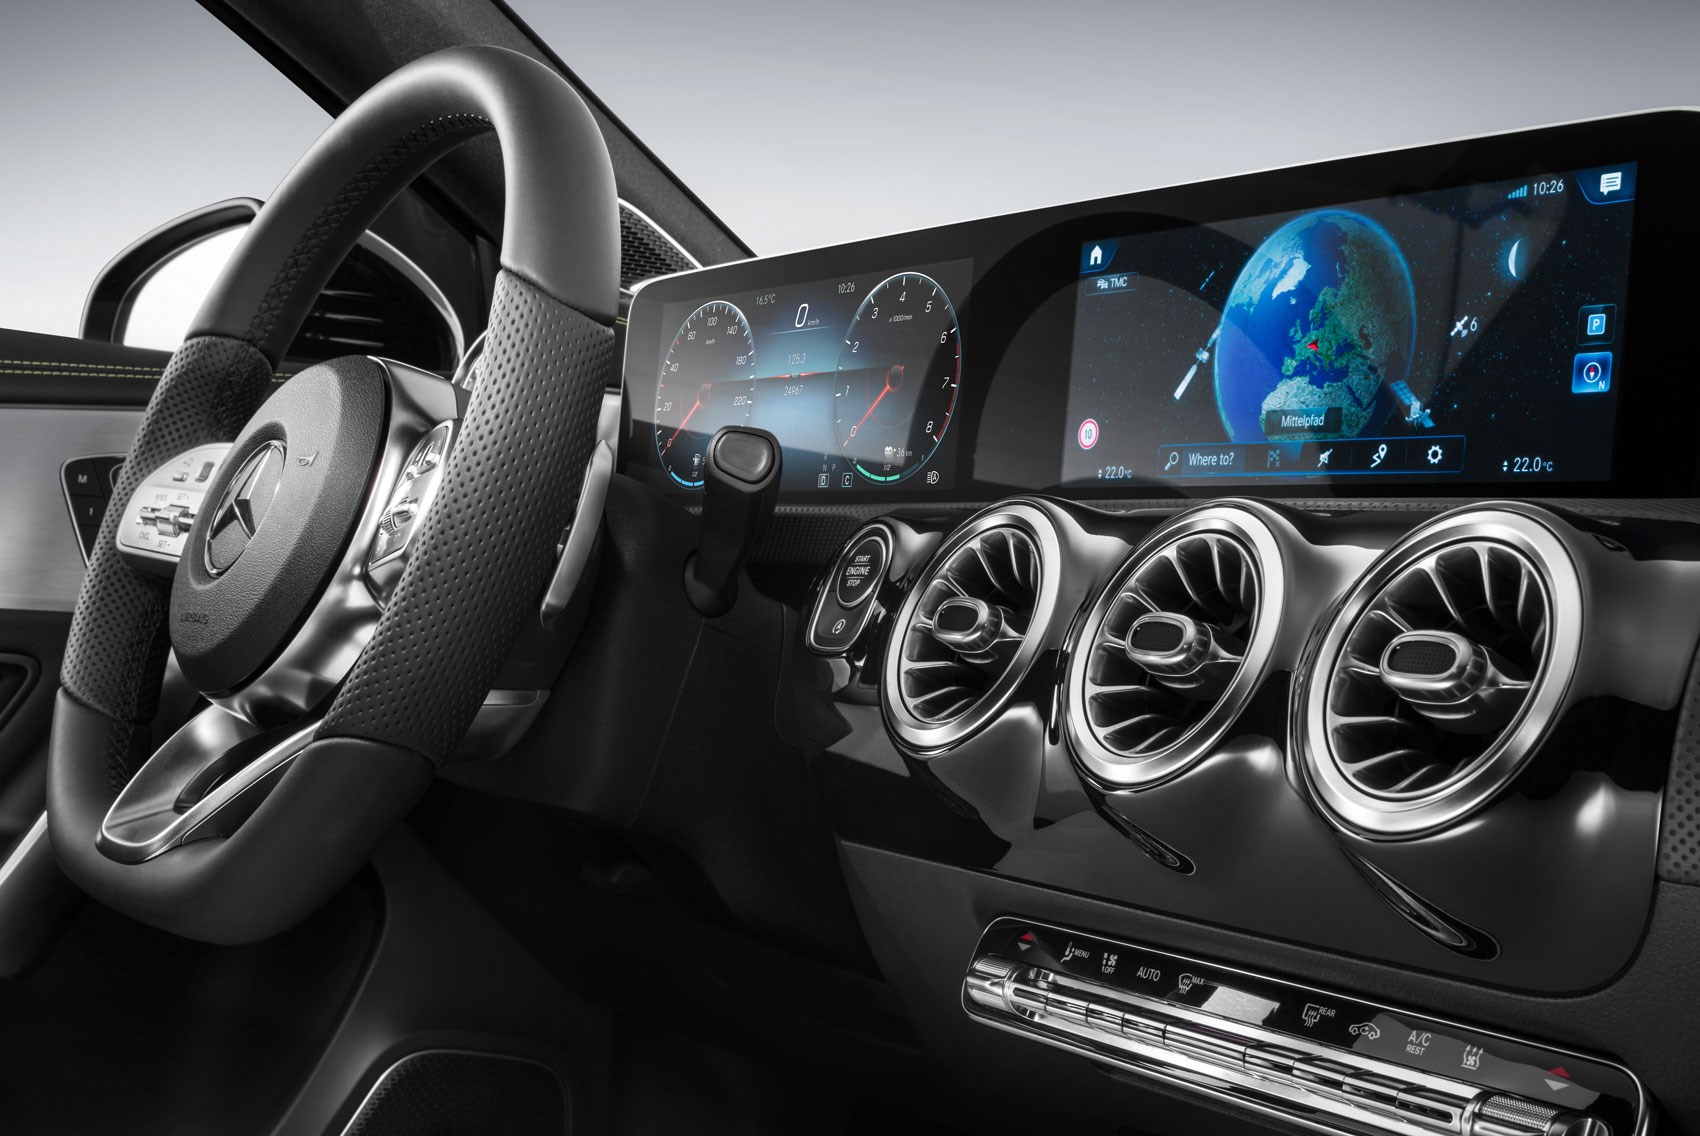
Image: Bringing its game: new 2018 Mercedes A-class hatch revealed - CAR Magazine
The Internet of things is not a ghost of the distant future, but a fully realizable concept of the present. Starting from light bulbs and ending with home voice assistants, all these devices already have access to the Internet and can interact with each other. Yes, now for this you need to adjust a little, for example, the IFTTT service, etc., but the progress cannot be stopped. As a result, the computer begins to penetrate the car, as a basic component of the entertainment center. For the automotive industry there are well-founded restrictions that directly affect the speed of development of IVI - this is compliance with all safety measures. In any case, you can not neglect the safety of both their own and other road users. The car and the road is not a place for experimentation. Therefore, the projects of enthusiasts who would like to consider in this article are only ideas that may turn into future prototypes, but for commercial proposals. Of course, when it comes to security, you should trust certified products, which are followed by hours of development and testing.
')
Since we are talking about Connected Car and IVI, it becomes apparent that the use of cloud resources with IoT functions is implemented for the “top level” of the corresponding software and hardware architecture. For example, most universal cloud platforms, such as Amazon AWS, Microsoft Azure, IBM Watson, or others, contain almost universal services for building the Internet of things. Compared to take off, open solutions in this area will be interesting. The Kaa project is one such example.

Picture: Kaa Platform Web Interface
The developers are positioning Kaa as a multi-purpose middle-tier platform for IoT solutions, aimed at creating applications for connected devices and intelligent systems. The Kaa platform is an open, multifunctional toolkit for developing embedded systems and cloud solutions. The platform is released under the Apache Software License 2.0. For quick familiarization with the platform, you can download an image for VirtualBox or deploy the system in the AWS cloud.
The idea behind Kaa is that developers are provided with an SDK to create applications using the API of the platform in question, and related services in the cloud, including compiling low-level programs. The current version supports languages: C, C ++, Java, Objective-C, and Linux, Windows, Android, and iOS operating systems, and also supports multiple embedded hardware platforms, such as Raspberry Pi, Intel Edison.
Here you want to distract and notice that, like about a long time ago, in the early 2000s, Intel left the microcontroller market with its most interesting solution - MCS-51, and now, in fact, we are witnessing this - the completion of the development of Galileo systems, Joule and Edison, this is not left unnoticed by the community of developers and enthusiasts. Many ideas from previous systems will be the beginning for new devices and solutions. Of course, if for the i8051 (MCS-51) crystal, Intel continued to license its architecture, even after its withdrawal from the microcontroller market, now, perhaps, the position of the Raspberry Pi and Arduino (on the classic Atmel microcontroller platform) will be significantly strengthened. prototyping embedded devices. But do not forget that for IoT, developments on the basis of ESP8266 / ESP32 Espressif devices and similar systems with an integrated Wi-Fi interface on a chip are also interesting.
Returning to the Kaa project, it should be noted that there are a number of architectural features that make the development of IoT on this platform extremely quick and easy. Kaa solutions should not depend on the specific hardware platform and, thus, the project is compatible with almost any connected devices, sensors and gateways. Of course, this is achieved through the use of universal communication protocols and standardized interfaces between system components. Kaa also provides a clear structure of IoT functions and extensions for various types of applications. They can be used, almost by analogy of the plug-and-play technology, with minimal code, which the developer still needs to refine for their systems and devices. These capabilities, combined with analytics in the cloud, make Kaa an attractive enough platform for Connected Car and other solutions.
The Kaa project is successfully developing and improving, but there is another, one might say, inverse problem for building Connected Car solutions. Its essence lies in fulfilling the tasks of testing the software part of the cloud system and directly emulating the behavior of many cars connected to the cloud. For this task, interesting projects with open source, for example, AutoSIM company Automatski, which is developed with the support of two licenses: GPLv3 and commercial. This system uses the basic data transfer protocols, including MQTT, AMQP, CoAP, etc. The user, using the Rest / Json API, controls the operation of the server to simulate the required processes. AutoSIM theoretically allows you to simulate the flow of data from more than 100 million devices.
Kaa and AutoSIM are wonderful examples of open systems and, perhaps, solutions that will become very popular for the automotive industry. But now, at the bottom level of embedded systems for the car, there are many interesting open solutions that successfully interact with cloud services. For example, Google’s Android Auto platform. This solution is based on Android Automotive and is aimed at combining a smartphone and car media center into a single platform, expanding the functionality of IVI-systems.
Since in a modern car there are many blocks that directly interact with the media center, for example, using the Controller Area Network (CAN), Local Interconnect Network (LIN), Media Oriented Systems Transport (MOST), as well as more familiar Ethernet and protocols TCP / IP, then Android Automotive offers some abstraction - hardware abstraction layer (HAL) between the physical networks of the car and the functionality of the Android operating system, available to developers.
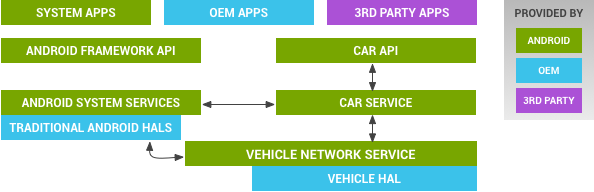
Figure: Vehicle HAL and Android automotive architecture
But, if Android is a completely predictable solution from Google, then using Linux as a platform for a car entertainment center has, perhaps, become a classic of the genre. And, as they say, someone definitely had to offer a project, for example, Automotive Grade Linux . It is an open-ended development that unites automakers, suppliers and technology companies under the auspices of The Linux Foundation . Of course, AGL is available as source code, and for an initial acquaintance, you can download a virtual machine image, for example, to run in VirtualBox, or it is possible to run the distribution system on Raspberry Pi . Docker is required to work with the AGL SDK .

Picture: Automotive Grade Linux - Getting Started
Development of applications for AGL is provided on HTML5, Qt OpenGL. The Linux car platform itself is focused on security. For example, the solution architecture involves the hypervisor and, of course, the isolation of critical applications, multimedia systems and entertainment. AGL applications and components are built on a modular basis with signal / event interfaces, which allows you to hide complex software implementations of low-level solutions, such as the implementation of a CAN bus interface, and provide a simple API for applications.

Figure: Upgraded Security Blueprint 2017. AGL security overview - Automotive Grade Linux Documentation
Interestingly, the developers of Automotive Grade Linux are looking at implementations of the level of architecture from other projects, however, which is typical for the entire movement of open systems. For example, an interesting solution in the OpenXC project is the principle of description in JSON format of all CAN signals that need to be processed. A software generator converts such a description to a file in C ++ language, which can be compiled, etc.
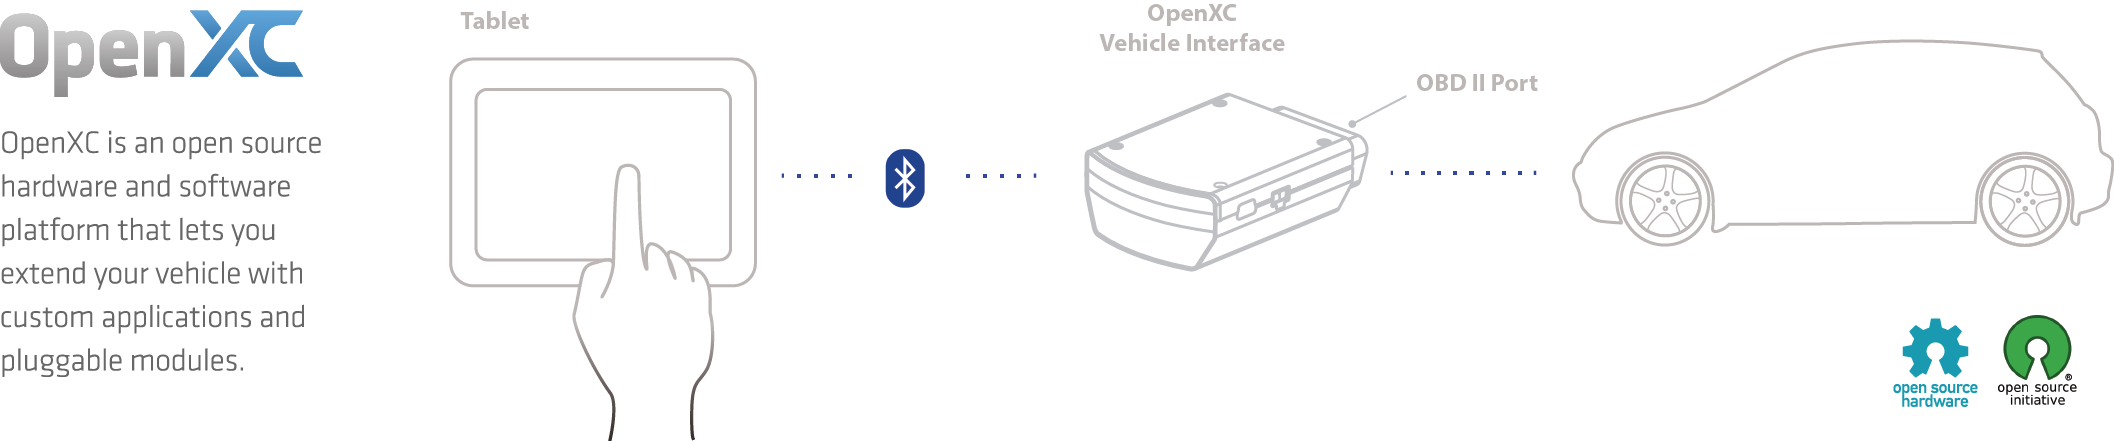
Figure: OpenXC is an open source, data-focused API for your car
If we talk about the project OpenXC, then it uses a combination of hardware and software with open source, which allows you to extend the functionality of the car with the help of special applications and plug-ins. The project is focused on getting data about the car and uses the standard OBD-II diagnostic connector interface. In fact, the project allows you to develop your mobile application for Android, iOS, or use Python for development, and Ford is chosen as the main automotive platform.
Returning to the project Automotive Grade Linux, it is worth noting that it uses the Raspberry Pi rather for demonstration and prototyping purposes, while specialized solutions are chosen for the industrial platform, for example, systems based on ARM SoCs (system-on-chip) from Renesas Electronics R-Car series Generation 3 and some others.
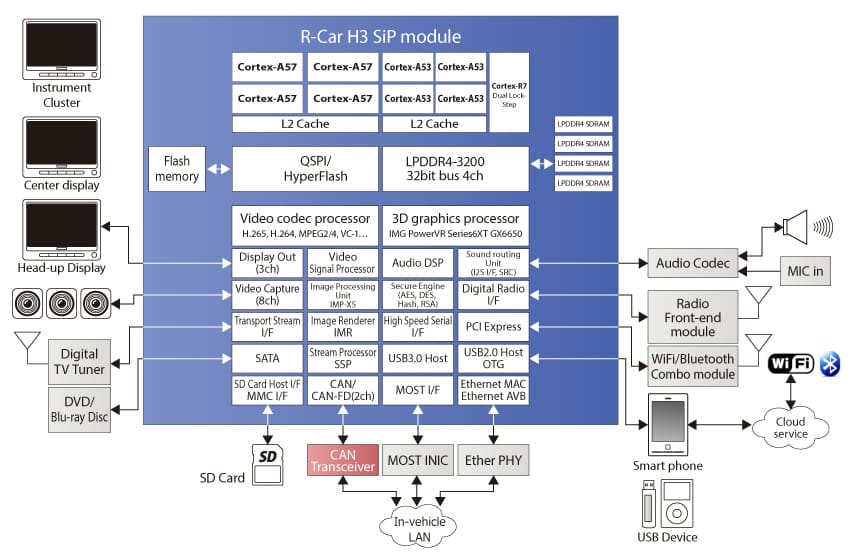
Figure: R-Car H3. System Block Diagram - Renesas Electronics
Since it is possible to continue to consider various platforms for building IVI systems, I would like to make a small conclusion about the examples already given. Everything suggests that the current, 2018, will be the year delivered to the user and application developer. After all, both in the Kaa cloud project and the solutions for the AGL operating system, the principle of providing a virtually finished application in the form of an SDK for a developer is used. Also widely used is an approach based on the description of the criteria of the developed system, for example, in the JSON format, and the generation of an application framework based on them. This is somewhat reminiscent of the ideas disclosed earlier in the publication: “ Rapid prototyping of the Internet of Things devices ”, where solutions were considered in which chip developers provide starter kits, etc. for quick familiarization with their components. Indeed, for a programmer who is developing a project for IoT, it will always be convenient to start developing not with a detailed acquaintance with an “certain” API, but with an already prepared application framework.
Let's turn our attention to a slightly different level of IVI, where such multifunctional systems as Renesas or others are not used. It is interesting to consider approaches based on the already traditional Raspberry Pi solution. It is clear that all of these are rather prototypes, since Raspberry Pi can hardly be compared with an industrial board specially designed for automotive applications, but enthusiast ideas and approaches are always interesting. So, one of the interesting solutions for the media center is the CarPC project, which is in fact the development and improvement of the graphical interface and additional functionality for the well-known cross-platform media player Kodi (formerly XBMC project).
Picture: CarPC-touch for Kodi
But Kodi or another media center will not allow receiving and displaying data from the vehicle’s on-board network. To do this, the easiest way to connect to the diagnostic connector of the car, as discussed in our previous publication: " Diagnostic connector OBD-II, as an interface for IoT ." And here is interesting project Carberry, which is an expansion card for the Raspberry Pi.
Picture: Carberry for RPi 3 - Paser
The Carberry fee of the Italian company Paser costs 123.83 € (Euro). It connects to the standard port expansion Raspberry Pi 3 and supports: CANBUS, GMLAN, infrared receiver and other functionality. The expansion card is an excellent addition to software solutions, for example, the already mentioned CarPC. It should be noted that the software and hardware project is constantly evolving in the direction of expanding the functional, etc.
Picture: What is AutoPi and What Does It Do? - AutoPi.io
The German startup AutoPi , which is a project of the automotive IoT platform, is also actively developing. Interesting in AutoPi is the hardware based on the Raspberry Pi Zero and the presence of an OBD-II interface, as well as: 3G / 4G, Bluetooth, WiFi, a GPS receiver and other components that fit in a rather small device.
Against the background of all the considered systems, the question directly arises: how to connect the OBD-II interface to the Raspberry Pi? The obvious answer would be to use a ready-made board, for example, PiCAN2 CAN-Bus Board for Raspberry Pi 2/3 at a price of £ 26.90 (in pounds without European VAT) or something similar. But it is very tempting to use the widely used CAN Bus module based on the MCP2515 / TJA1050, which is available on AliExpress from USD $ 1.36 and a bit more expensive. For example, such a module is much cheaper than expansion boards based on the MCP2515 for Arduino.
It is worth noting that the low price of the MCP2515 / TJA1050 module is due to its modest size and number of elements on the board. It is great for working with Arduino boards, but in this case, when programming, you should not forget that mainly on the MCP2515 / TJA1050 module, developers install a 8 MHz quartz crystal, rather than 16 MHz, which is usually present on most Arduino CAN-BUS Shield . Thus, the use of the MCP2515 / TJA1050 module to connect to the Raspberry Pi and work with the CAN bus, for example, with the OBD-II emulator, discussed in the same article “ OBD-II diagnostic connector as an interface for IoT ” or directly with ELM327 module, etc.
Picture: CAN Bus Module based on MCP2515 / TJA1050
But when working with electronic modules you should always be attentive to the supply voltage and restrictions on data transmission lines. When using the standard GPIO expansion interface of the Raspberry Pi, this is quite relevant. The fact is that the Raspberry Pi connector contains voltages of 5V and 3.3V, which can power external circuits, however, the I / O lines of the board only work with levels up to 3.3V. Accordingly, the MCP2515 / TJA1050 module board, designed for 5V only, should not be immediately connected to the Raspberry Pi.
Schematic: CAN bus on raspberry pi with MCP2515 - Raspberry Pi Foundation Forum
The solution can be a simple two-way level converter 3.3V / 5.5V. There are plenty of ready-made modules for the SPI bus, but the MCP2515 has an additional interrupt pin, indicating that the data is ready. Such a conclusion will allow the Raspberry Pi processor to perform its work and react to the data from the MCP2515 only at the required time points, without being constantly distracted by monitoring the SPI interface. Consequently, the ready interface module will not have an additional contact and you just need to make your own circuit.

Picture: Minor revision of the CAN Bus module based on the MCP2515 / TJA1050 to work with the Raspberry Pi
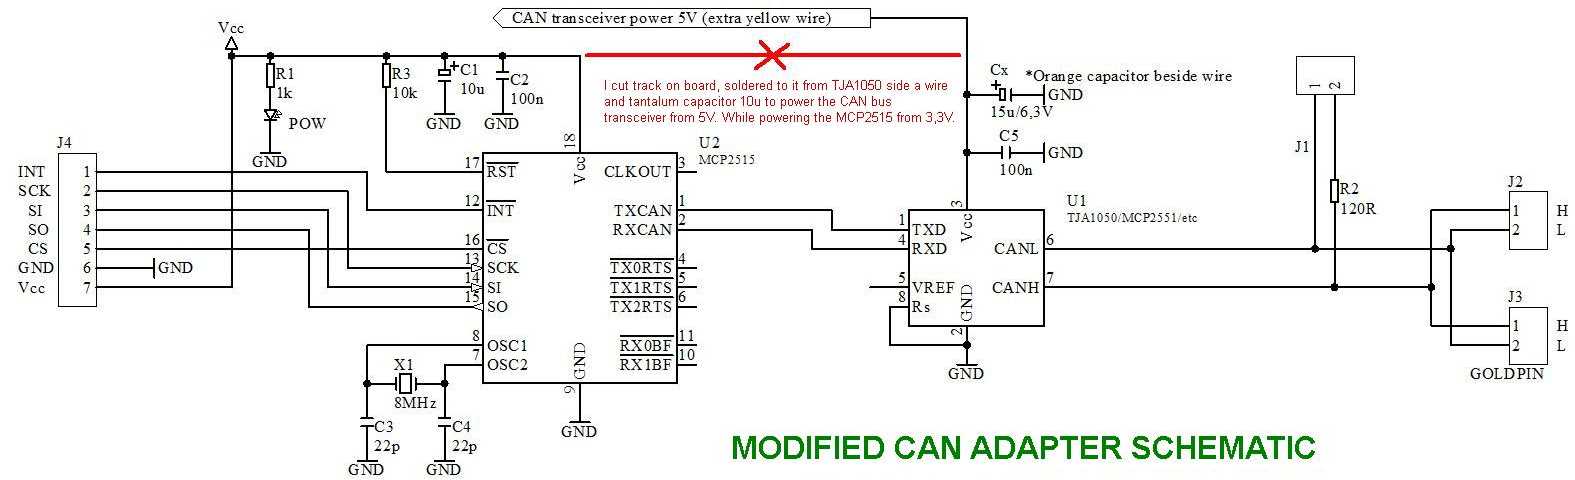
There is a completely simple solution, but certainly not the best. It is based on the fact that the MCP2515 chip is fully operational with a voltage level from 2.7V to 5.5V, which means it can be powered by 3.3V with the Raspberry Pi, and the SPI interface lines and the INT interrupt can be connected to the GPIO. For the TJA1050, you will need 5V power, which can be connected to all from the same GPIO connector, but on the MCP2515 / TJA1050 module, you will need to carefully cut the common power supply and solder to it.
As a proper improvement of this circuit, it is very reasonable to use a voltage divider to match the 5V levels of the TJA1050 transceiver chip, by the way, you can use the analog MCP2551 from Microchip or others, and the CAN controller MCP2515 with 3.3V power supply (see the figure). Also interesting is the CAN Simulator project based on the Raspberry Pi and, of course, the MCP2515. As a transceiver in the simulator, the TJA1049 chip is used, which, although it requires 5V power supply, but works without additional level matching components with 3-volt systems. If you choose the most interesting solution, then, perhaps, the CAN-Bus Interface with galvanic isolation project is the most interesting, since it proposes using the MCP2562 transceiver, which allows you to connect a controller with voltages in the range from 1.8V to 5V without any additional elements.

Schematic: CAN + Raspberry Pi
Having defined the hardware, you can proceed to work with the Raspberry Pi at the software level. As the operating system, we choose a fairly traditional solution Raspbian Stretch. And for working with CAN, support for the Linux kernel-level driver MCP2515.

Picture: Data transfer between Raspberry Pi and Arduino via CAN bus
For correct operation of the Raspberry Pi with the CAN interface card based on the MCP2515, you need to know the exact kernel version of the installed operating system. To do this, run the command:
In our case, this is Linux raspberrypi 4.9.59+. More detailed information about the distribution and the board itself can be found using the commands:
SPI MCP2515 /boot/config.txt :
, 16 , «16000000».
bcm2835 Linux kernel 4.4.x+
:
, , , Linux raspberrypi 4.9.59+ :
«» :
, , CAN Raspberry Pi , , , :
«» , /etc/network/interfaces ..
Screenshot: Raspberry Pi OBD-II Arduino
. MCP2515 , . Go , , , , Google. , , , , , CAN bus in Go . , Gobot – , , IoT .. , , .
Go , . Tizen, Automotive Grade Linux, – . , Samsung HARMAN CES 2018 , .
Interesting resources and links:
— Mercedes-Benz's new MBUX in-car assistant and smart UI rocks – TechCrunch
— Mercedes-Benz –
— Getting started. Kaa Sandbox – KaaIoT Technologies
— Intel Galileo, Joule Edison —
— OK Google, what is Android Auto? Here's everything you need to know about it – Digital Trends
— Android Auto – 3DNews
— Android : Google «» Audi Volvo –
— Toyota Camry , Automotive Grade Linux – OpenNET
— Raspberry PI 2 CarPC – Engineering(DIY)
— Arduino CAN Bus Module Pin Outs and Schematics – Henry's Bench
— MCP2515: CAN SPI – microsin.net —
— 5 3.3 – EasyElectronics.ru
— CAN – Geektimes
— Pin Numbering — Raspberry Pi Model B (Revision 2.0) – The Pi4J Project
— CAN-Bus with Raspberry Pi: HowTo/Quickstart MCP2515 Kernel 4.4.x+ – vimtut0r's blog
— CAN On the Raspberry Pi – Harrison's Sandbox
— MyPi CAN-BUS Card Configuration – Embedded Micro Technology
— CAN BUS Shield for Raspberry CanBerryDual V2.1 – Industrialberry
— Libre Solar CAN interface for Raspberry Pi (Zero W) – GitHub
— OBD-Pi – Instructables
— SocketCAN userspace utilities and tools – GitHub
— CAN Bus – Embedded Linux Wiki
— Go on Raspberry Pi — @NET
— Need to Create Synergy Korean Connected Car Developers Alleged to Need More Collaboration – Korea's Premier Business Portal
— CES 2018: ? – Geektimes
In the continuation of the previous article “ Automobile, Internet of Things and other technologies ”, I would like to consider ideas for implementing a car computer at the level of open projects and to slightly touch on modern trends in this vein.
Image: Bringing its game: new 2018 Mercedes A-class hatch revealed - CAR Magazine
The Internet of things is not a ghost of the distant future, but a fully realizable concept of the present. Starting from light bulbs and ending with home voice assistants, all these devices already have access to the Internet and can interact with each other. Yes, now for this you need to adjust a little, for example, the IFTTT service, etc., but the progress cannot be stopped. As a result, the computer begins to penetrate the car, as a basic component of the entertainment center. For the automotive industry there are well-founded restrictions that directly affect the speed of development of IVI - this is compliance with all safety measures. In any case, you can not neglect the safety of both their own and other road users. The car and the road is not a place for experimentation. Therefore, the projects of enthusiasts who would like to consider in this article are only ideas that may turn into future prototypes, but for commercial proposals. Of course, when it comes to security, you should trust certified products, which are followed by hours of development and testing.
')
Since we are talking about Connected Car and IVI, it becomes apparent that the use of cloud resources with IoT functions is implemented for the “top level” of the corresponding software and hardware architecture. For example, most universal cloud platforms, such as Amazon AWS, Microsoft Azure, IBM Watson, or others, contain almost universal services for building the Internet of things. Compared to take off, open solutions in this area will be interesting. The Kaa project is one such example.
Picture: Kaa Platform Web Interface
The developers are positioning Kaa as a multi-purpose middle-tier platform for IoT solutions, aimed at creating applications for connected devices and intelligent systems. The Kaa platform is an open, multifunctional toolkit for developing embedded systems and cloud solutions. The platform is released under the Apache Software License 2.0. For quick familiarization with the platform, you can download an image for VirtualBox or deploy the system in the AWS cloud.
The idea behind Kaa is that developers are provided with an SDK to create applications using the API of the platform in question, and related services in the cloud, including compiling low-level programs. The current version supports languages: C, C ++, Java, Objective-C, and Linux, Windows, Android, and iOS operating systems, and also supports multiple embedded hardware platforms, such as Raspberry Pi, Intel Edison.
Here you want to distract and notice that, like about a long time ago, in the early 2000s, Intel left the microcontroller market with its most interesting solution - MCS-51, and now, in fact, we are witnessing this - the completion of the development of Galileo systems, Joule and Edison, this is not left unnoticed by the community of developers and enthusiasts. Many ideas from previous systems will be the beginning for new devices and solutions. Of course, if for the i8051 (MCS-51) crystal, Intel continued to license its architecture, even after its withdrawal from the microcontroller market, now, perhaps, the position of the Raspberry Pi and Arduino (on the classic Atmel microcontroller platform) will be significantly strengthened. prototyping embedded devices. But do not forget that for IoT, developments on the basis of ESP8266 / ESP32 Espressif devices and similar systems with an integrated Wi-Fi interface on a chip are also interesting.
Returning to the Kaa project, it should be noted that there are a number of architectural features that make the development of IoT on this platform extremely quick and easy. Kaa solutions should not depend on the specific hardware platform and, thus, the project is compatible with almost any connected devices, sensors and gateways. Of course, this is achieved through the use of universal communication protocols and standardized interfaces between system components. Kaa also provides a clear structure of IoT functions and extensions for various types of applications. They can be used, almost by analogy of the plug-and-play technology, with minimal code, which the developer still needs to refine for their systems and devices. These capabilities, combined with analytics in the cloud, make Kaa an attractive enough platform for Connected Car and other solutions.
The Kaa project is successfully developing and improving, but there is another, one might say, inverse problem for building Connected Car solutions. Its essence lies in fulfilling the tasks of testing the software part of the cloud system and directly emulating the behavior of many cars connected to the cloud. For this task, interesting projects with open source, for example, AutoSIM company Automatski, which is developed with the support of two licenses: GPLv3 and commercial. This system uses the basic data transfer protocols, including MQTT, AMQP, CoAP, etc. The user, using the Rest / Json API, controls the operation of the server to simulate the required processes. AutoSIM theoretically allows you to simulate the flow of data from more than 100 million devices.
Kaa and AutoSIM are wonderful examples of open systems and, perhaps, solutions that will become very popular for the automotive industry. But now, at the bottom level of embedded systems for the car, there are many interesting open solutions that successfully interact with cloud services. For example, Google’s Android Auto platform. This solution is based on Android Automotive and is aimed at combining a smartphone and car media center into a single platform, expanding the functionality of IVI-systems.
Since in a modern car there are many blocks that directly interact with the media center, for example, using the Controller Area Network (CAN), Local Interconnect Network (LIN), Media Oriented Systems Transport (MOST), as well as more familiar Ethernet and protocols TCP / IP, then Android Automotive offers some abstraction - hardware abstraction layer (HAL) between the physical networks of the car and the functionality of the Android operating system, available to developers.
Figure: Vehicle HAL and Android automotive architecture
But, if Android is a completely predictable solution from Google, then using Linux as a platform for a car entertainment center has, perhaps, become a classic of the genre. And, as they say, someone definitely had to offer a project, for example, Automotive Grade Linux . It is an open-ended development that unites automakers, suppliers and technology companies under the auspices of The Linux Foundation . Of course, AGL is available as source code, and for an initial acquaintance, you can download a virtual machine image, for example, to run in VirtualBox, or it is possible to run the distribution system on Raspberry Pi . Docker is required to work with the AGL SDK .
Picture: Automotive Grade Linux - Getting Started
Development of applications for AGL is provided on HTML5, Qt OpenGL. The Linux car platform itself is focused on security. For example, the solution architecture involves the hypervisor and, of course, the isolation of critical applications, multimedia systems and entertainment. AGL applications and components are built on a modular basis with signal / event interfaces, which allows you to hide complex software implementations of low-level solutions, such as the implementation of a CAN bus interface, and provide a simple API for applications.
Figure: Upgraded Security Blueprint 2017. AGL security overview - Automotive Grade Linux Documentation
Interestingly, the developers of Automotive Grade Linux are looking at implementations of the level of architecture from other projects, however, which is typical for the entire movement of open systems. For example, an interesting solution in the OpenXC project is the principle of description in JSON format of all CAN signals that need to be processed. A software generator converts such a description to a file in C ++ language, which can be compiled, etc.
Figure: OpenXC is an open source, data-focused API for your car
If we talk about the project OpenXC, then it uses a combination of hardware and software with open source, which allows you to extend the functionality of the car with the help of special applications and plug-ins. The project is focused on getting data about the car and uses the standard OBD-II diagnostic connector interface. In fact, the project allows you to develop your mobile application for Android, iOS, or use Python for development, and Ford is chosen as the main automotive platform.
Returning to the project Automotive Grade Linux, it is worth noting that it uses the Raspberry Pi rather for demonstration and prototyping purposes, while specialized solutions are chosen for the industrial platform, for example, systems based on ARM SoCs (system-on-chip) from Renesas Electronics R-Car series Generation 3 and some others.
Figure: R-Car H3. System Block Diagram - Renesas Electronics
Since it is possible to continue to consider various platforms for building IVI systems, I would like to make a small conclusion about the examples already given. Everything suggests that the current, 2018, will be the year delivered to the user and application developer. After all, both in the Kaa cloud project and the solutions for the AGL operating system, the principle of providing a virtually finished application in the form of an SDK for a developer is used. Also widely used is an approach based on the description of the criteria of the developed system, for example, in the JSON format, and the generation of an application framework based on them. This is somewhat reminiscent of the ideas disclosed earlier in the publication: “ Rapid prototyping of the Internet of Things devices ”, where solutions were considered in which chip developers provide starter kits, etc. for quick familiarization with their components. Indeed, for a programmer who is developing a project for IoT, it will always be convenient to start developing not with a detailed acquaintance with an “certain” API, but with an already prepared application framework.
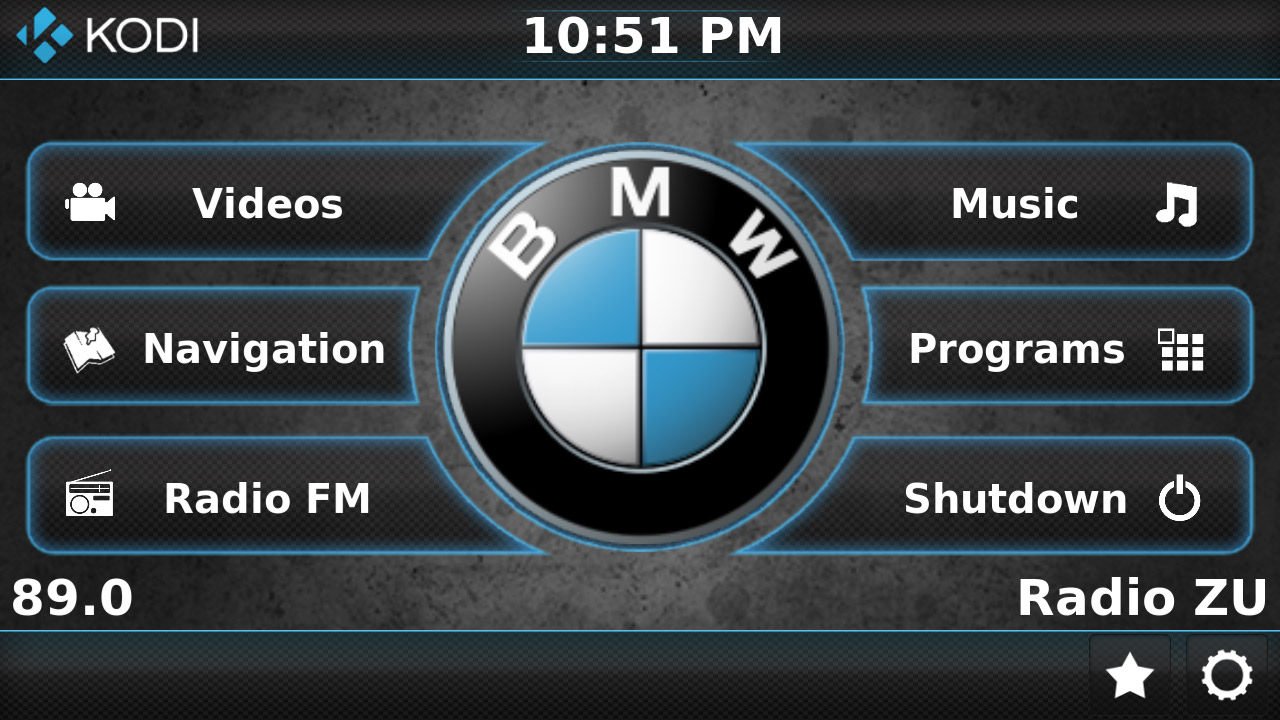
Let's turn our attention to a slightly different level of IVI, where such multifunctional systems as Renesas or others are not used. It is interesting to consider approaches based on the already traditional Raspberry Pi solution. It is clear that all of these are rather prototypes, since Raspberry Pi can hardly be compared with an industrial board specially designed for automotive applications, but enthusiast ideas and approaches are always interesting. So, one of the interesting solutions for the media center is the CarPC project, which is in fact the development and improvement of the graphical interface and additional functionality for the well-known cross-platform media player Kodi (formerly XBMC project).
Picture: CarPC-touch for Kodi
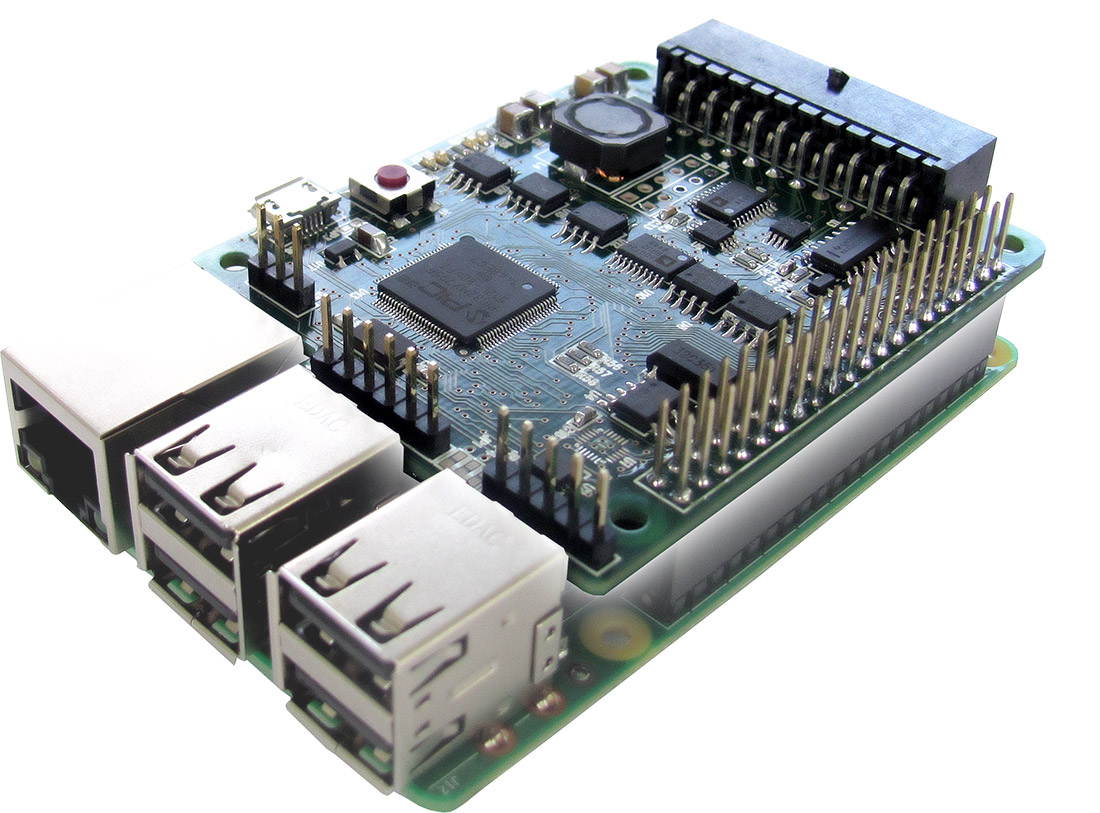
But Kodi or another media center will not allow receiving and displaying data from the vehicle’s on-board network. To do this, the easiest way to connect to the diagnostic connector of the car, as discussed in our previous publication: " Diagnostic connector OBD-II, as an interface for IoT ." And here is interesting project Carberry, which is an expansion card for the Raspberry Pi.
Picture: Carberry for RPi 3 - Paser
The Carberry fee of the Italian company Paser costs 123.83 € (Euro). It connects to the standard port expansion Raspberry Pi 3 and supports: CANBUS, GMLAN, infrared receiver and other functionality. The expansion card is an excellent addition to software solutions, for example, the already mentioned CarPC. It should be noted that the software and hardware project is constantly evolving in the direction of expanding the functional, etc.
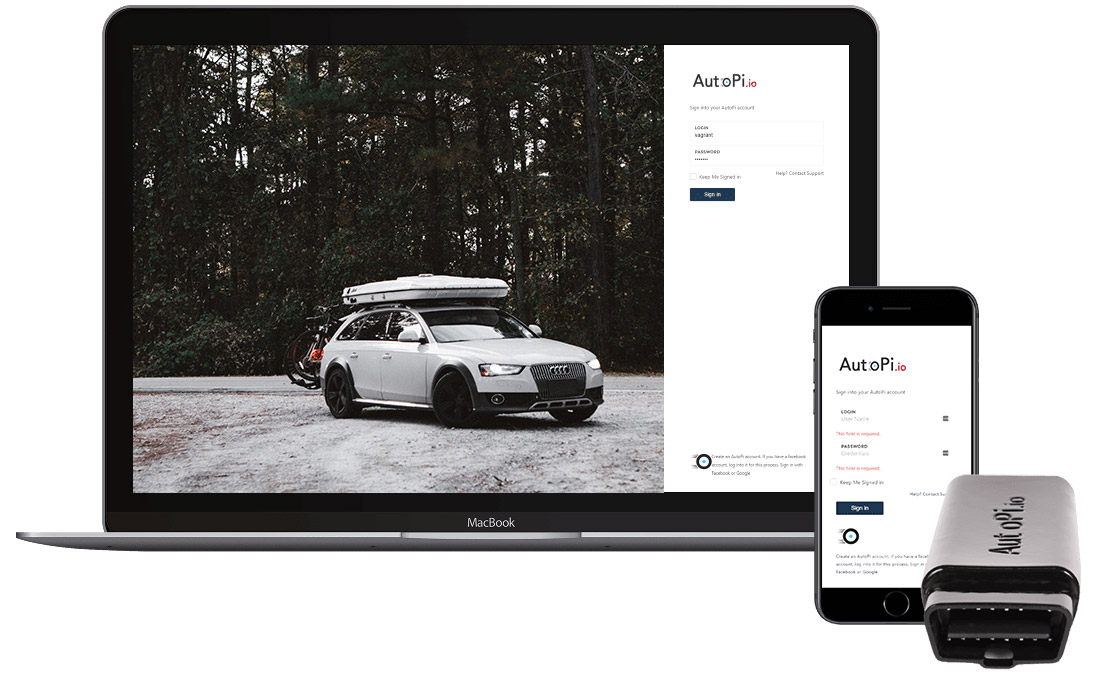
Picture: What is AutoPi and What Does It Do? - AutoPi.io
The German startup AutoPi , which is a project of the automotive IoT platform, is also actively developing. Interesting in AutoPi is the hardware based on the Raspberry Pi Zero and the presence of an OBD-II interface, as well as: 3G / 4G, Bluetooth, WiFi, a GPS receiver and other components that fit in a rather small device.
Against the background of all the considered systems, the question directly arises: how to connect the OBD-II interface to the Raspberry Pi? The obvious answer would be to use a ready-made board, for example, PiCAN2 CAN-Bus Board for Raspberry Pi 2/3 at a price of £ 26.90 (in pounds without European VAT) or something similar. But it is very tempting to use the widely used CAN Bus module based on the MCP2515 / TJA1050, which is available on AliExpress from USD $ 1.36 and a bit more expensive. For example, such a module is much cheaper than expansion boards based on the MCP2515 for Arduino.
It is worth noting that the low price of the MCP2515 / TJA1050 module is due to its modest size and number of elements on the board. It is great for working with Arduino boards, but in this case, when programming, you should not forget that mainly on the MCP2515 / TJA1050 module, developers install a 8 MHz quartz crystal, rather than 16 MHz, which is usually present on most Arduino CAN-BUS Shield . Thus, the use of the MCP2515 / TJA1050 module to connect to the Raspberry Pi and work with the CAN bus, for example, with the OBD-II emulator, discussed in the same article “ OBD-II diagnostic connector as an interface for IoT ” or directly with ELM327 module, etc.
Picture: CAN Bus Module based on MCP2515 / TJA1050
But when working with electronic modules you should always be attentive to the supply voltage and restrictions on data transmission lines. When using the standard GPIO expansion interface of the Raspberry Pi, this is quite relevant. The fact is that the Raspberry Pi connector contains voltages of 5V and 3.3V, which can power external circuits, however, the I / O lines of the board only work with levels up to 3.3V. Accordingly, the MCP2515 / TJA1050 module board, designed for 5V only, should not be immediately connected to the Raspberry Pi.
Schematic: CAN bus on raspberry pi with MCP2515 - Raspberry Pi Foundation Forum
The solution can be a simple two-way level converter 3.3V / 5.5V. There are plenty of ready-made modules for the SPI bus, but the MCP2515 has an additional interrupt pin, indicating that the data is ready. Such a conclusion will allow the Raspberry Pi processor to perform its work and react to the data from the MCP2515 only at the required time points, without being constantly distracted by monitoring the SPI interface. Consequently, the ready interface module will not have an additional contact and you just need to make your own circuit.
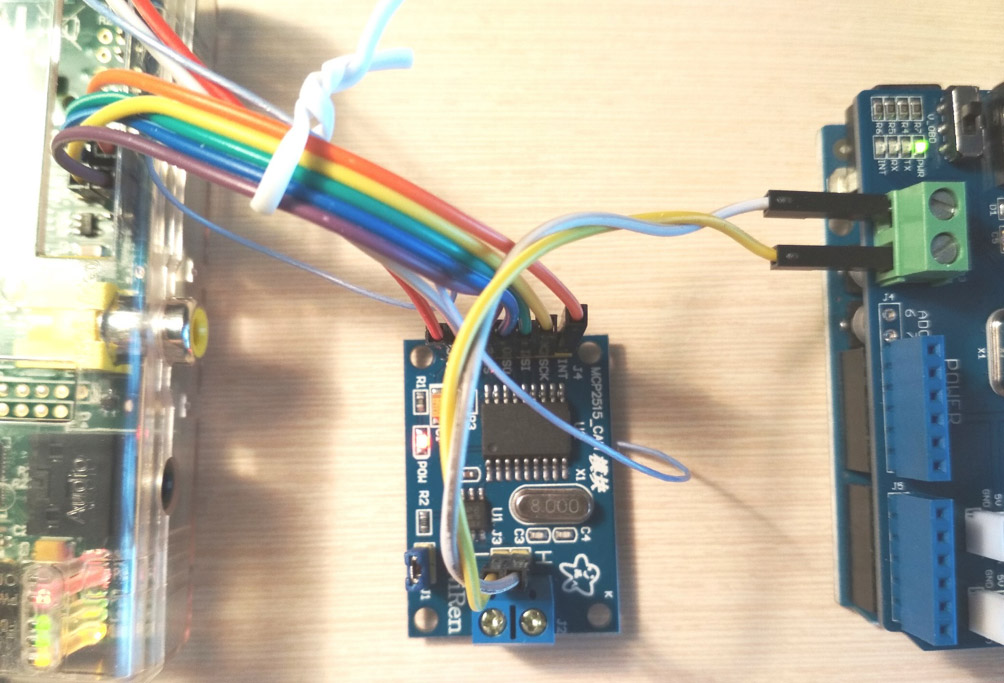
Picture: Minor revision of the CAN Bus module based on the MCP2515 / TJA1050 to work with the Raspberry Pi
There is a completely simple solution, but certainly not the best. It is based on the fact that the MCP2515 chip is fully operational with a voltage level from 2.7V to 5.5V, which means it can be powered by 3.3V with the Raspberry Pi, and the SPI interface lines and the INT interrupt can be connected to the GPIO. For the TJA1050, you will need 5V power, which can be connected to all from the same GPIO connector, but on the MCP2515 / TJA1050 module, you will need to carefully cut the common power supply and solder to it.
As a proper improvement of this circuit, it is very reasonable to use a voltage divider to match the 5V levels of the TJA1050 transceiver chip, by the way, you can use the analog MCP2551 from Microchip or others, and the CAN controller MCP2515 with 3.3V power supply (see the figure). Also interesting is the CAN Simulator project based on the Raspberry Pi and, of course, the MCP2515. As a transceiver in the simulator, the TJA1049 chip is used, which, although it requires 5V power supply, but works without additional level matching components with 3-volt systems. If you choose the most interesting solution, then, perhaps, the CAN-Bus Interface with galvanic isolation project is the most interesting, since it proposes using the MCP2562 transceiver, which allows you to connect a controller with voltages in the range from 1.8V to 5V without any additional elements.
Schematic: CAN + Raspberry Pi
Having defined the hardware, you can proceed to work with the Raspberry Pi at the software level. As the operating system, we choose a fairly traditional solution Raspbian Stretch. And for working with CAN, support for the Linux kernel-level driver MCP2515.
Picture: Data transfer between Raspberry Pi and Arduino via CAN bus
For correct operation of the Raspberry Pi with the CAN interface card based on the MCP2515, you need to know the exact kernel version of the installed operating system. To do this, run the command:
$ uname -aIn our case, this is Linux raspberrypi 4.9.59+. More detailed information about the distribution and the board itself can be found using the commands:
$ cat /etc/debian_version - the version of the base Debian distribution;$ cat /etc/os-release - $ cat /etc/os-release features;$ cat /proc/cpuinfo - the version of the hardware platform (details can be found in the article: " How to Check the Raspberry Pi ").SPI MCP2515 /boot/config.txt :
# Uncomment some or all of these to enable the optional hardware interfaces
dtparam=spi=on
dtoverlay=mcp2515-can0, oscillator=8000000, interrupt=25
, 16 , «16000000».
# dtoverlay=spi-bcm2835-overlaybcm2835 Linux kernel 4.4.x+
:
# dtoverlay=spi1-1cs, , , Linux raspberrypi 4.9.59+ :
dtoverlay=spi0-hw-cs«» :
$ sudo ip link set can0 up type can bitrate 500000, , CAN Raspberry Pi , , , :
$ cansend can0 127#DEADBEEF
$ candump can0
$ ip -details -statistics link show can0
«» , /etc/network/interfaces ..
Screenshot: Raspberry Pi OBD-II Arduino
. MCP2515 , . Go , , , , Google. , , , , , CAN bus in Go . , Gobot – , , IoT .. , , .
Go , . Tizen, Automotive Grade Linux, – . , Samsung HARMAN CES 2018 , .
Interesting resources and links:
— Mercedes-Benz's new MBUX in-car assistant and smart UI rocks – TechCrunch
— Mercedes-Benz –
— Getting started. Kaa Sandbox – KaaIoT Technologies
— Intel Galileo, Joule Edison —
— OK Google, what is Android Auto? Here's everything you need to know about it – Digital Trends
— Android Auto – 3DNews
— Android : Google «» Audi Volvo –
— Toyota Camry , Automotive Grade Linux – OpenNET
— Raspberry PI 2 CarPC – Engineering(DIY)
— Arduino CAN Bus Module Pin Outs and Schematics – Henry's Bench
— MCP2515: CAN SPI – microsin.net —
— 5 3.3 – EasyElectronics.ru
— CAN – Geektimes
— Pin Numbering — Raspberry Pi Model B (Revision 2.0) – The Pi4J Project
— CAN-Bus with Raspberry Pi: HowTo/Quickstart MCP2515 Kernel 4.4.x+ – vimtut0r's blog
— CAN On the Raspberry Pi – Harrison's Sandbox
— MyPi CAN-BUS Card Configuration – Embedded Micro Technology
— CAN BUS Shield for Raspberry CanBerryDual V2.1 – Industrialberry
— Libre Solar CAN interface for Raspberry Pi (Zero W) – GitHub
— OBD-Pi – Instructables
— SocketCAN userspace utilities and tools – GitHub
— CAN Bus – Embedded Linux Wiki
— Go on Raspberry Pi — @NET
— Need to Create Synergy Korean Connected Car Developers Alleged to Need More Collaboration – Korea's Premier Business Portal
— CES 2018: ? – Geektimes
Source: https://habr.com/ru/post/371293/
All Articles