The history of creating a home cloud. Part 1. Setting up a Debian environment for everyday use.
Once upon a time, in 2011, I came to Habr with the article “ Debian Server for a Newbie,” which was the systematization of various information and its presentation in a current and workable form. This article is also positioned as a reference material for a newbie or a regular Linux user, which is my small contribution to the popularization of Linux. In fact, all I’m going to write about is a kind of detailed instruction for installing and configuring the Nextcloud home cloud service from scratch.
The created virtual machine with Nextcloud worked since March 2017 almost without failures and in the fall of 2017 I thought about the article. I have a lot of notes and comments in terms of solving various problems and nuances, I have long had an idea to put it all in order and publish it and the New Year holidays in 2018 helped me with this. I must say that the article was at least half a year late, but I think that installing and configuring the current versions of Debian and Nextcloud, by analogy with the information below, is not difficult, although, as you know, the devil is in the details.
Below, the reader will get acquainted with the prerequisites for creating his own cloud and get working instructions on how to set up Debian, easy tuning the Gnome3 environment, compile, build and install packages for Debian, install and configure Apache, SQL and PHP services and start working with them, generating and connecting a self-signed SSL certificate for Apache virtual host, installation and configuration of Nextcloud. I did not design this article as a technical manual or tutorial with a long string of commands, and decided to try to write an article as a story, but without prejudice to the technical component. Experienced Linux users are unlikely to find something new here, but they may be able to read it as a thematic story in a moment of their free time.
Part 1. Setting up a Debian environment for everyday use.
Part 2. Creating a server - setting LAMP in Debian
Part 3. Creating a personal cloud - installing and configuring Nextcloud
Part 4. Update 2018 - Debian 9 and Nextcloud 13
')
Foreword
Formulation of the problem
Creation and basic setup of the virtual machine
Setup in the control panel
BASH setting
Setting up repositories
Operating system update
Software installation
Software setup
Gnome setup
Network configuration
Firewall setup
Installing vmware-tools 10.0.10 in a Debian 8.7.1 environment
Build, install and configure notepadqq
Build and install Double Commander
Our story begins at the end of 2015, when I purchased a new smartphone. The Motorola Droid Turbo turned out to be a powerful device, with a large memory, a QHD display with an acceptable (relatively small) diagonal, a capacious battery and a virtually clean Android on board, which in my eyes has always been a definite plus. Finishing the back panel with a ballistic nylon gives it a peculiar style, standing out against the background of the devices of the era of "remnant". For a long time, the usual gestures of turning on a flashlight by shaking or a camera by quickly waving the phone already seem to surprise no one, but Motorola will remain forever in history as a pioneer with a flawless implementation of such functionality - I am so used to gestures that I don’t even know where the camera icon is. In general, you have already understood that I like the phone all right and I am delighted with it so far, except for one annoying moment - the entire memory of the phone is soldered inside it. And in order to lose our precious 64 gigabytes (user data is actually less), you just need to stumble so that the phone falls out of your hands and “successfully” falls. Although some day he may simply not turn on. Or once it can be banal steal.
All users of computer equipment are divided into two groups - those who make backups and those who still do not make them. I moved from the second group in the first fifteen years ago. At least on the first phone, the reservation was thought out as follows. All applications with their settings were automatically backed up daily via Titanium Backup to an SD card. SambaDroid was installed on the phone, which was configured to share the phone's SD card only when it was connected to a network with a specific SSID. As you might guess, this happened only when the phone was connected to the Wi-Fi router in my home. BitTorrent Sync was periodically launched on the computer, which, just in case, was locked through a firewall on the local network (only local addresses were allowed), and when a shared card was detected, it synchronized its contents with the folder on the computer. In the event of a phone breakdown, you could simply pull out the SD card with the data. In any other case - there is always a backup of the memory card on the computer. If the computer breaks down on the same day, there is a cold backup of the data disk located in another house. Sleep is calm, healthy, strong, so hands do not shake due to tension and, as a result, the phone never falls.
And what to do with this new phone? Applications are also backed up via Titanium Backup. But the SD card is not pulled out, and SambaDroid, which worked perfectly on Android 2.x on the 4/5/6 line, behaves unstably, and after a while I refused BitTorrent Sync. Surely it would be possible to find a similar solution, but I caught fire with a universal cloud solution. It would seem that the conclusion is self-evident and obvious - there is Google Drive and a bunch of applications that synchronize the specified data with the cloud, providing (in theory) End-to-End encryption. But ... with this approach, this article would never have been written! Moreover, in 2018, the author is not even going to connect a google account to the phone, much less think about synchronizing photos of her cats with some other services. Yes, I have paranoia, distrust of corporations, the desire to keep personal data under control, the desire for independence from the work of another service (which may close) and I do not want to pay for scanty gigabytes in the cloud.
While I was thinking about the need to do something in terms of correcting this situation, the whole of 2016 passed by and I realized that now, we should really attend to this problem right now. I wanted to do everything beautifully, with an eye to the future, to universality, reliability and, of course, automatism. Since I actively do not accept too much and intrusive participation of corporations in my personal life, it was decided to try to make my personal cloud in the local network using my ownCloud.
Quote from wikipedia:
In terms of functionality, we see a full-fledged cloud that can spin on ... yes, that computer! With strong paranoia, service activity can be locked inside the local network via a firewall.
I have already saved some links to the material on installing and configuring my ownCloud, but when I started to deal with it, I discovered that in 2016, the main developer of ownCloud (Frank Karlichek) left the company and announced the creation of a fork - Nextcloud. Unlike ownCloud, which is paid for under certain conditions, Nextcloud is completely free. Considering that the work on the new fork was headed by Frank Karlichek, who has a lot of experience in similar development, I decided to choose Nextcloud. At the beginning of 2017, the current version of Nextcloud was version 11.0.2 and its installation and configuration will be described below. As of January 2018, the current version is 12.0.4, but, I think, there should be no fundamental differences in installation and configuration.
At first, everything seemed simple and I could not even imagine that it would take two or two and a half interesting months to sit for a couple of days off. He often reddened his eyes at night and asked clever and not-so-great questions on thematic forums. My advice to beginners - if you want to do something, do not be afraid of the amount of work and do it. The main thing is to get at least something for the first time. The way it even works is crooked. You can do without understanding how a monkey, to copy a long train of commands, often reaching a place where something fails and nothing happens. Maybe a mistake was made earlier, maybe a typo in the command, maybe the author in his manual missed a line of code / command, maybe in the example the OS release is different and yours won't work, maybe the libraries are not the same - what else can it be ! But when you succeed in something you will say: “Damn it - it worked!” This is worth it and will be the beginning of the emergence of excitement, a stimulus to understand further and confidence in what happens: if you succeed once, it means you will succeed in the next one, you just have to figure it out.
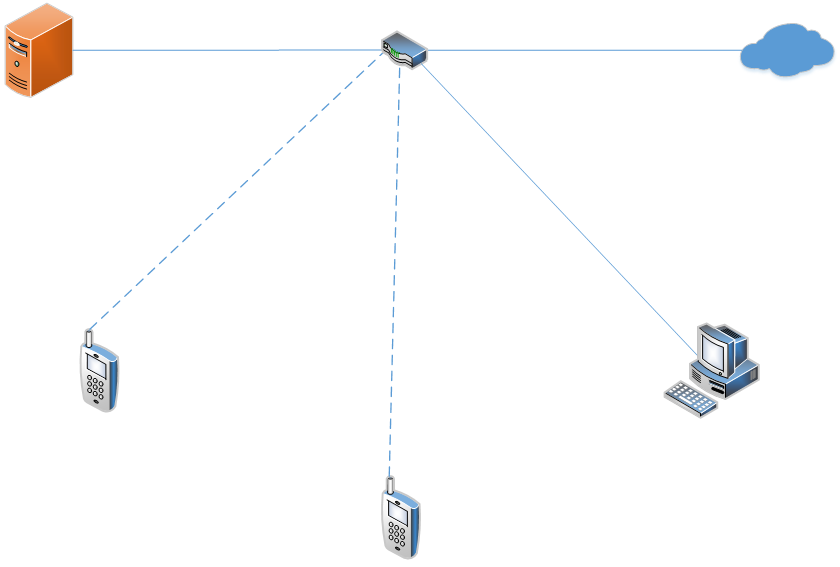
So, you need to decide what to do. There are a couple of phones that need to connect to the cloud. In addition, I would also like to connect a computer to it - the amount of disk space in the cloud now depends only on my desire and I do not need to constantly pay extra for 10/20/30 gigabyte - I can just buy a hard disk for a couple of terabytes. The central element in the home network is the Wi-Fi router - it is connected to the phone via Wi-Fi, a computer and another computer that performs the role of an unintentional "server": the computer was originally built for the tasks of the failed HTPC , and now it just runs the software virtualization from VMWare. VMWare Workstation has its own virtual router, to which so far only one virtual machine with an FTP server is connected. The decision suggests itself - to create and connect another virtual machine, through the VMWare network settings, forwarding ports 80 (HTTP) or 443 (HTTPS) to it. The solution is modular and elegant in the sense that an absolutely hardware-independent and once-configured virtual machine can be easily deployed anywhere, on any ordinary computer.
Nextcloud - quite roughly speaking, this is a website that runs on a web server. As a web server, I chose LAMP = Linux + Apache + MySQL + PHP. This means that all this needs to be installed and configured. And so that it works correctly, you need to understand what to install and how to configure it.
I only encounter Linux periodically and this is more of a hobby than a necessity. But since I swung versatility, then this time I decided to break the whole work into three logical parts, each of which should end with a well-defined and universal result. First you need to make yourself a comfortable environment for work, that is, not just to install the system on a virtual machine, but to customize it for yourself, bring it closer to the kind that is more convenient and familiar to me. The second stage is bringing this machine to a functioning web server. The third is to turn a web server into a cloud.
Debian 8.7.1 was chosen as the operating system. In VMWare Workstation, a virtual machine is created, which is allocated one dual-thread processor, two gigabytes of RAM, and a hard disk of 120 gigabytes. Network card operating mode - NAT. Download the ISO image of the operating system for the amd64 architecture . After downloading, connect the image to the virtual drive and start the virtual machine. The installation of the operating system is rather trivial and can be done even without the murtilators, which are abundant on the Internet. Gnome3 was selected as the graphical environment, and the Standard system utilities and Print Server were installed. The hard disk during the installation process is divided into two sections - a general partition (/, / home, / usr, etc.) and swap. The newly created user was called neutral “user”.
Immediately after installation, the user is shown an empty desktop. The nautilus file manager, such as Windows Explorer, never understood why it was used. The application menu does not shine its structuring. NumLock after boot is always disabled. From text editors nano or vi, the beginner Linux user generally becomes depressed. Something needs to be fixed. The following description of the system "by itself". There is no argument about tastes: someone will like it, someone will not. I note that without overcoming the difficulties of professional growth will not be and the more you dig into something - the more you understand how it works.
I used to switch the keyboard layout with the CTRL and SHIFT buttons. Perhaps the driver of the keyboard is to blame since the days of MS DOS 6.22, but what to do now is a second nature habit. In addition, I do not want the virtual machine to fall asleep or extinguish the screen and do not want to enter a password after each launch.
An elementary initial environment setup is done in the control panel:
- Language and region → Add Russian to input sources.
- Keyboard → Keyboard Shortcuts → Enter → Key modifier switches input sources → Assign a language switch button Ctrl + Shift (if you cannot install such a combination, skip this step, configure it in the “gnome Setup” section below).
- Keyboard → Keyboard shortcuts → Additional combinations → Add a new item called “Terminal” and the “x-terminal-emulator” command. After adding, click on the label "Off" and enter the combination of two keys: Super (Win) + t.
- Monitors → Set the screen resolution to the current display, as the default setting is uncomfortable 800x600.
- Power supply → OFF Turns off the display.
- Details → Removable media → OFF autorun when connecting media.
- Users → ON automatic access for user user.
The next important step is setting up the terminal. With the command line will have to work very much. Moreover, some, if not many, things in Linux are easier and more convenient to do through the terminal, and that is why in the previous paragraph we made a key combination to quickly call the terminal. Bash is a command language interpreter that executes commands from the keyboard. Bash can highlight files, folders, network folders, files with different access rights in different colors. With the backlight it becomes somewhat easier and more fun to navigate.
Important note. Lines of commands starting with the $ symbol will indicate that the command must be entered on behalf of the user - you just need to open the terminal (it is searched in the application menu or simply press the Super + T combination) and enter the command. If the line starts with a # character, this means that input must be made on behalf of the superuser (root). To do this, open the user terminal and enter the command:
$ su
After that, enter the superuser password that was set during the installation of the system.
So, how do I color the terminal? To do this, run the command:
$ nano /home/user/.bashrc
This command opens the bashrc configuration file in the nano text editor. In this file you need to find and uncomment the line “force_color_prompt = yes”. Below, we look for a line of the following form (below the condition if ["$ color_prompt" = yes]; then):
and copy it (Shift + Ctrl + C), after which the editor can be closed (Ctrl + X) with saving the changes made.
Next, run the following command:
# nano /root/.bashrc
Again, the configuration file is opened, but for the superuser. Below the commented out line "# PS1 = ..." you need to insert (Shift + Ctrl + V) the copied line with a slight change (with the replacement of the number 32 by 31):
This small change will change the color of the Bash prompt: the user @ user debian user prompt will be highlighted in green and the super user root @ debian in red. This will help from inadvertent confusion, when by mistake commands are entered from the wrong user.
The repository is a database of packages available for installation. It is important to keep this database up to date. Immediately after installation, we have registered a basic repository and a link to the installation DVD, which contains a number of popular packages. To work with repositories, you can use the synaptic program with a graphical interface. But it is much easier to edit the list manually through a plain text editor:
# nano /etc/apt/sources.list
Check the list of repositories for compliance with the list below.
The Backports repository is registered but disabled. Strictly speaking, it is possible and not to register it, but if you register it right away, then it will be easier to disconnect or connect this repository - you just need to comment out or uncomment the required lines. Why is he even needed? The fact is that, along with the fact that Debian is one of the most stable distributions, as a result, software in its repositories is often decently outdated. Connecting Backports is an easy way to get a much newer version of some kind of software (even newer than in the testing Debian branch). But you need to be very careful, because if you install some kind of program, other packages may pull up on dependencies that may break the system due to the incompatibility of the old software with the new packages. Backports - this is the case when you know exactly why you are doing this.
After any changes in the contents of the sources.list file, it is necessary to synchronize with the repositories:
# apt-get update
Be sure to look at the log - no errors should be. Otherwise, you need to check the correctness of the contents of the sources.list file.
To find out the current version of the system, run the command:
$ cat / etc / debian_version
If the system is installed from the image at the link above, then its number will be 8.7.
To upgrade the system, there are two commands: apt-get upgrade and apt-get dist-upgrade. The first command will only update installed packages, but there may be conflicts and unmet dependencies. This is a kind of safe update, in which the old programs do not deteriorate exactly, but the new ones may not work. The second command will remove old packages, resolve conflicts, deliver necessary dependencies, and deliver new packages, if required. If conflicts arise, it will attempt to update the most important packages at the expense of less important ones. That smarter update.
Update the system:
# apt-get dist-upgrade
After updating the system, we check the log for errors, check the new current version of the system and make sure that everything is as expected.
Install the following packages:
# apt-get install mc
# apt-get install gksu
# apt-get install numlockx
# apt-get install libcanberra-gtk-module
# apt-get install libqt5webkit5 libqt5svg5 coreutils
# apt-get install doublecmd-gtk
# apt-get install galculator
# apt-get install samba smbclient cifs-utils
# apt-get install jigdo-file
# apt-get install audacious
# apt-get install smplayer
# apt-get install firefox-esr
# apt-get install gufw
mc is the good old Notron Commander only in Linux. Forget about the commands ls, cd, mkdir, rm and others.
gksu - allows you to run programs with a graphical interface on behalf of the superuser, as well as add a superuser terminal to the application menu, which can be launched immediately, rather than performing the sequence “terminal → $ su → entering the superuser password”.
numlockx - will help solve the problem with the numlock mode after booting the system, since by default it is always turned off.
The libcanberra-gtk-module packages, libqt5webkit5, libqt5svg5 coreutils are needed for the operation of the two-paneled Double Commander manager and the text editor Notepadqq, which we will install later.
doublecmd-gtk is an analogue of Total Commander for Linux.
galculator - just a calculator that can switch to the engineering view.
samba smbclient cifs-utils — packages needed to support networking: folder sharing, access to shared folders, mounting network resources.
jigdo-file is a tool for downloading and updating CD, DVD, BD images. For example, if you ever want to create a fully autonomous and complete official repository from Blu-Ray discs of the Debian distribution, then this particular “torrent” will be needed, since Blu-Ray discs are distributed primarily through jigdo.
audacious - audio player.
smplayer - video player.
firefox-esr - the browser does not need to be presented.
gufw is the GUI for the firewall configuration utility.
The above programs will somewhat complement the basic software package of the installed system, which is considerable if a standard set of utilities was chosen during the installation of the system. MS Office functions are performed by the LibreOffice software package, there is a GIMP image editor, Transmission for torrents, an Evolution mail client, a photo viewer, a simple text editor gedit, and other software. Audio and video players in the standard set is also there, but audacious and smplayer will be more functional and convenient programs.
numlockx solves the problem with the numlock mode after booting the system. After installing the package, simply execute the command:
# numlockx on
And now after loading the operating system NumLock will always be included.
I brought the file manager to Double Commander to a more minimalist view by performing the following actions in its menu:
- View → Short (run on both panels)
- Settings → Parameters → Tools → Terminal → Register “x-terminal-emulator” in the section “Terminal start command”, leave the parameter field empty
- Settings → Parameters → Fonts → all fonts = 11, font “Viewer (“ Book “mode)” = 14
- Settings → Options → View files → Select sorting method “Natural sorting: alphanumeric”
- Settings → Options → View files → Set the option "Show system and hidden files"
- Settings → Options → Window view → Set trail only. options:
- Main menu
- Toolbar + Flat
- Disc list button
- A line of free disk space + Short
- Current path
- Tab Headers
- Status bar
- Function key buttons
- Flat interface
- The panel of background operations
The SMPlayer video player was also configured a bit through the menu item “Settings”:
- Panels → OFF Main panel and Language panel
- Settings → General: OFF “Memorize settings of all files”
- Settings → Appearance: Automatically resize - ON when it is needed
- Settings → Appearance: OFF “Remember position and size”
- Settings → Updates: OFF “Check for updates” and OFF “Open page with information after update”
Of the minimum extensions for firefox, Ghostery is worth mentioning, with which you can block many tracking bugs and ads, and friGate, which expands the browser's ability to configure a proxy (we do not need a proxy, of course, but it is always at hand) .I note that it is worthwhile to install friGate version 2.2.1.1 (from archives), since the 3.x branch demonstrates the complete victory of the “effective” management and marketing over common sense.
What should I do if I need the Flash Player in my browser? On the Adobe Flash Player download page, select .tar.gz for Linux and download the proposed file. From the archive you need to “get” libflashplayer.so and copy it to /home/user/.mozilla/plugins. All actions can be done through Double Commander - he knows how to enter the archives as folders. Below I gave how to do this through commands in the terminal:
[ This text was written specifically for the site geektimes.ru by AlexanderS .
Reference to the source is optional, but its mention is highly desirable! ]
$ cd / home / user / downloads
$ mkdir flash
$ tar xzf flash_player_npapi_linux.x86_64.tar.gz -C flash
$ mv flash / libflashplayer.so /home/user/.mozilla/plugins
After you restart firefox and allow the flash plugin to work on sites should earn. But in some cases it may not be enough or tasks require running the flash locally from some application. Then you can install the Flash Player in the system, although it seems to me that this is far from the best idea (actually, just like allowing flash in the browser). To do this, we need to convert the resulting archive into a DEB package, which we then install using the package manager. Actually it's easy.
Install the converter and compiler:
# apt-get install alien make gcc
Convert the resulting archive:
# alien --to-deb flash_player_npapi_linux.x86_64.tar.gz See
what package we got, say flash-player-npapi-linux.x86-64_1-2_all.deb, and install it:
# dpkg --install flash-player -npapi-linux.x86-64_1-2_all.deb
It is time to make changes in accordance with their own ideas about how the graphical environment should look. After all, one of the most remarkable features in Linux is that there are a lot of things you can customize without being a programmer in the full sense of this meaning.
With the installation of Double Commander, you can say: "Down with the command line!" But what if you need to wander in folders from the superuser? Every time to go to the superuser terminal and type doublecmd? It can be easier! Create a shortcut in the menu for Double Commander, which will run it in the root session:
# doublecmd / usr / share / applications
You need to make a copy of the doublecmd.desktop file and name the new doublecmd-root.desktop file. You can use the usual keyboard shortcut Ctrl + C and Ctrl + V. Next, you need to open the doublecmd-root.desktop file (press the usual F4 button to launch the text editor built into the file manager) and adjust the corresponding lines to the following view:
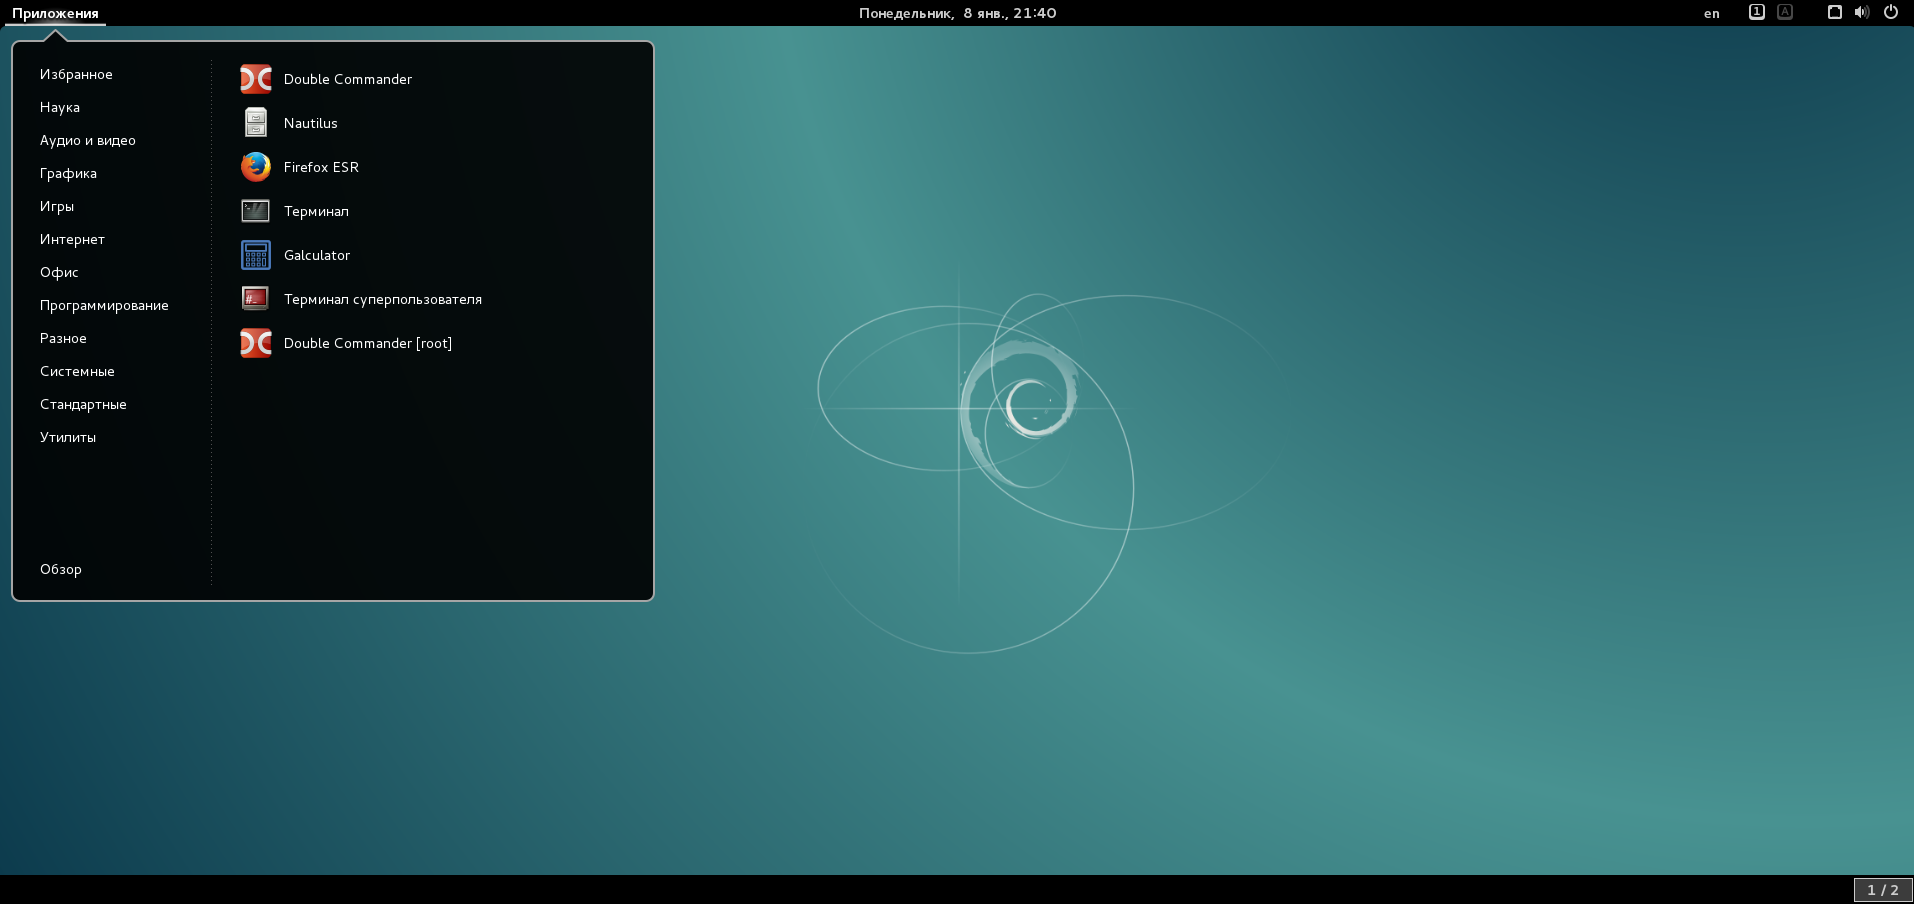
Then we close all open programs and go to the "Applications" menu, in which we delete all the icons from the favorites (left vertical column with program icons). Then from the program menu we add (drag and drop) to favorites icons in the following order: Double Commander → Nautilus → Firefox → Terminal → Galculator → Superuser Terminal → Double Commander [root].
After these changes, restart the graphical shell: press Alt + F2 and enter the command r.
Now let's get down to fine-tuning the shell. There is a special software for this:
$ gnome-tweal-tool
I note that you need to run the command only on behalf of the user, and not the superuser. I ran it for some time from under the superuser and could not understand why I didn’t work at all. After launch, a menu appears in which I made the following changes:
- Top panel → ON display date
- Windows → ON maximize and minimize windows
- Desktop → ON display icons on the desktop, DISABLE system icons (Network, Trash, etc.) d.)
- Extensions → ON extensions Applications Menu, Window List
- Power supply → turn off the computer when you press the power button (select Shutdown)
If at the “Settings in the control panel” stage it was not possible to configure the keyboard layout switching by Ctrl + Shift, then make the change with the following item:
- Keyboard → in the “Switch to another layout” item, select the Ctrl + Shift key combination
In the “Extensions” option below There is a link to download additional extensions, when you click on it, the browser will open a site with additions for gnome. Through the search, we find the Lock keys and Remove dropdown arrows extensions and install them. Be careful - before searching for extensions, you must enable the temporary execution of the Gnome Shell Integration plugin in your browser. When you open a page with an extension at the top there is a ON / OFF dvizhkovaya button, by clicking on which you will be prompted to add an extension. The first extension will add the indicator of the Caps Lock and Num Lock buttons (I have a wireless keyboard, on which there are no corresponding indicators). The second is to remove the drop arrows at the application menu, taskbar windows and language bar.
As a result of such uncomplicated tuning, the graphics environment at us approached a more practical form.
How it was:
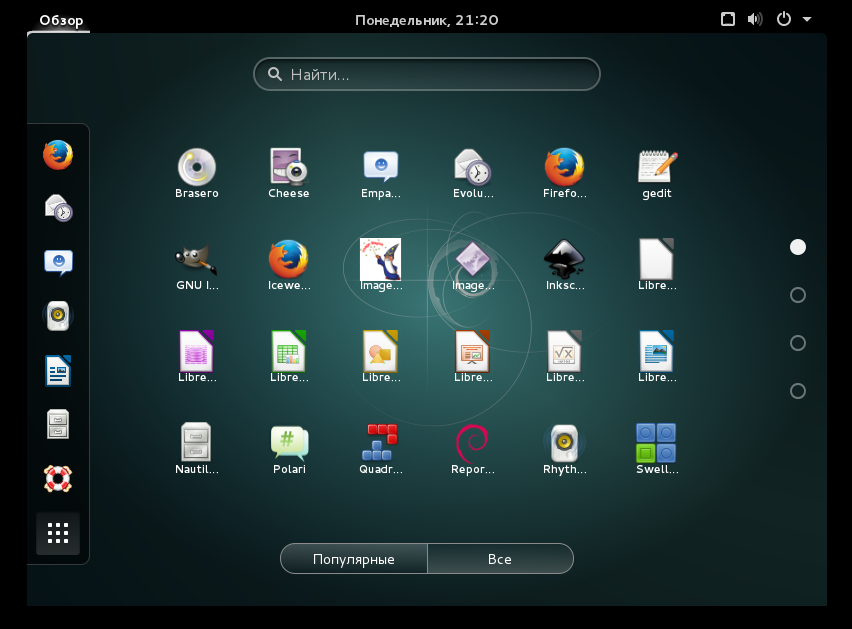
As it became (the screen resolution, unfortunately, is already different):
There may be some differences at first glance compared to the number of actions that have been done, but now it’s clear how and what to do and where to go if necessary. As our lecturer in quantum physics once said: “You are not required to understand quantum physics right now, you are required to understand which section of the textbook to open when this becomes necessary.”
For networking with your virtual machine, create a folder and give everyone the rights to change it:
$ mkdir / home / user / Net
$ chmod 777 / home / user / Net
Now we need to expand this folder. In Linux, this makes it very simple:
# mcedit /etc/samba/smb.conf
At the end of the opened file, you need to add a new section by writing the following text:
After all these actions, you need to restart the service to apply the new config:
# service smbd restart
No operating system reboots are required - the Net folder within the guest virtual machine will immediately be available from the host operating system.
Linux has a powerful IPTables tool to configure firewall. Unfortunately, once it does not immediately plunge into it, especially for a beginner, and if you do not use it periodically, then it is quite easy to lose the experience of setting Therefore, we will use a special utility for configuring iptables rules - Uncomplicated Firewall (ufw). Rules can be created via a graphical interface, for which gufw was installed, but, as I said, initially this is easier to do through the terminal.
Enable firewall logging and configure its rules - we prohibit all incoming:
# ufw logging on
# ufw default deny incoming
# ufw default allow out out Allow
connections for the network environment and file access:
# ufw allow 138 / udp
# ufw allow 139 / udp
# ufw allow 139 / tcp
# ufw allow 445 / tcp We
allow connections for the functioning of mail clients:
# ufw allow 25
# ufw allow 465
# ufw allow 110
# ufw allow 143
# ufw allow 993
Enable protection:
# ufw enable
In addition to drivers for virtual equipment (for example, a video card or a chipset), vmware-tools will enable you to connect any folders from the host system to the virtual machine, as well as include a shared clipboard between the host and the guest systems.
It just so happened that my history of working with vmware-tools in Linux is the history of periodic walking around the rake . At one time I even used open-vm-tools, but there were problems with mounting the hgfs folder (it is there that the connected folders appear in the Shared Folders section of the virtual machine settings).
In early 2017, I had VMWare Workstation 12.1.0, which was bundled with a set of ISO images of vmware-tools version 10.0.10. Oddly enough, everything went unexpectedly smooth, quiet and peaceful.
To install vmware-tools, we will need to install a compiler and, of course, headers, without which vmware-tools are normal, at least not before, in principle, they were not going to:
# apt-get install linux-headers - $ (uname -r) make gcc
This time I did not place the linux.iso image into a virtual drive, but copied it to a network folder (we already have the network) and then mounted it in Linux and unpacked the required archive:
# mkdir / mnt / iso
# chmod 777 / mnt / iso
# mount -o loop -t iso9660 /home/user/Net/linux.iso/mnt/iso
$ tar xvzf /mnt/iso/ VMwareTools-10.0.10-4301679.tar.gz -C / home / user / Net
Now you can run a script that will compile and install vmware-tools:
$ cd / h ome / user / Net / vmware-tools-distrib
# ./vmware-install.pl
The first question of the script must be answered in the affirmative, all subsequent questions must be answered with default values (just press Enter everywhere). During the compilation process, warnings may appear, but there should be no errors.
After installation, delete unnecessary files and reboot:
# umount / mnt / iso
$ rm -rf / home / user / Net / vmware-tools-distrib
$ rm / home / user / Net / linux.iso
# reboot
After reboot, you should go and check the presence of the folder / mnt / ngfs - if it exists, then the installation went well. In addition, the resolution scaling inside the virtual system to the size of the VMWare window should start working normally and the joint clipboard should turn on.
I have long been accustomed to the Total Commander + Notepad ++ bundle and, naturally, I was looking for an alternative in Linux. The role of Total Commander is a good substitute for Double Commander, although there is nothing to completely replace Total. There was also an analogue of Notepad ++, which is called Notepadqq, which also does not completely replace Notepad ++, but is better than the built-in editor Double Commander or the same nano. At least syntax highlighting in Notepadqq is there and it works fine.
Suddenly, there was only one problem - there was no package in the repositories. I found the compatible deb package for installation, but the version was irrelevant and the software was frankly and godlessly buggy. There were no options - you had to build the package yourself from the available sources.
After downloading the archive with the source code, the file README.md was found inside, in which the instructions for building and installing the package were found using the make utility. However, I wanted to have a full-fledged package, which I could install and remove without serious consequences, which in principle is impossible by installing it through make install. In general, on Habré there is a good article on this topic. So I built the package via checkinstall.
First you need to install the packages needed to run:
# the apt-the get the install the git-by qmake Qt5 the checkinstall
# the apt-the get the install libqt5webkit5 libqt5svg5 coreutils
# the apt-libqt5webkit5 the get the install-dev-dev libqt5svg5 qttools5-dev-tools
# the apt-the get the install libcanberra- gtk-module
Download the source code (as of the beginning of 2017, the current version was 1.0.1) and start the fakeroot session:
$ git clone github.com/notepadqq/notepadqq.git
$ cd notepadqq
$ fakeroot
Fakeroot runs programs in a special environment that emulates a super-user session . Elevated permissions may be required for the make utility to work.
Now you need to configure the environment for the project depending on the processor architecture (in my case - the first option, x86_64):
$ ./configure --prefix / usr --qmake / usr / lib / x86_64-linux-gnu / qt5 / bin / qmake
or
$ ./configure --prefix / usr --qmake / usr / lib / i386-linux-gnu / qt5 / bin / qmake
or
$ ./configure --prefix / usr --qmake / usr / lib / arm-linux-gnueabihf / qt5 / bin / qmake
And compile the program, watching what is happening in the terminal:
$ make
After successful compilation, you can build a package with information about him:
$ checkinstall -D --install = no
If you run checkinstall without the “--install = no” directive, then the assembled package will be automatically installed into the system, and the package file will be immediately deleted. It categorically did not suit me, because for the assembly I use a separate virtual machine (you should not trash the target machine with different compilers, IDE and other software that will never be used there) and as a result I needed to get a normal DEB package that I can transfer to the desired virtual machine and install there. The "--install = no" directive is needed in order to only create a package and not install it.
During the build process, we will be asked a question about the package description. I wrote the following: "Notepadqq 1.0.1 amd64 build 20170326". After entering the description, I would recommend to fill in the Maintainer field (package builder, its attendant) - press the 0 (zero) button and enter your nickname or at least something, but do not leave it empty.
After the package is built, we exit the fakeroot session:
$ exit
If everything went well and without errors, then we have a file in our working folder that looks like notepadqq_20170326-1_amd64.deb. Now you can install it using the normal package manager:
# dpkg –i notepadqq_20170326-1_amd64.deb
Launch Double Commander and connect notepadqq as the default editor:
Settings → Editor → Enable the option "Use external program", as a way to register: notepadqq The
version 1.0.1 I assembled has proven itself very well and I have worked with it for a whole year. Now we know how to properly build packages from source - it’s not hard at all!
In the established Double Commander there were several troubles. It was buggy when working with network folders and editing long file names. In addition, sometimes it is crookedly closed from under the superuser. Version 0.5.x was originally installed from the repository, while 0.7.8 was available on the project site, which did not hurt with these problems. An attempt to get a DEB package brought to the resource launchpad.net/ubuntu, where it was proposed to download several assembled packages of version 0.6.x and install them in some combination. Why a few packages? And the version is not new at all. An attempt to recklessly install a new version from Backports led to a system crash, it was not possible to fix it, and I simply deleted the virtual machine, pulling up the carefully saved backup image file of the hard disk.
However, what problems can there be if there is source code? I can now compile and build the package myself! At first everything went as usual. Getting the source code, the trial that there and where and attempts to somehow compile them, not understanding the logic of their actions. Then I was still honored to read the documentation from which it followed that no make would help to compile - a full IDE is needed, in which the project is being developed. Well ... why not put an IDE? And I quickly went over the rake, not assuming that this will take about a week.
To work, we need to install the already familiar packages:
# apt-get install make gcc checkinstall subversion
For a normal IDE (Lazarus) installation, the following packages must be delivered:
# apt-get install libdbus-1-dev libglib2.0-dev libncurses5-dev libx11-dev libgtk2.0-dev libcanberra-gtk-module
A very important note: on the wiki development page of the project there is a list of necessary packages, which contains the libgtk-2.0-dev package, which actually does not exist - instead you need to install libgtk2.0-dev (without a hyphen!).
Now we need to install the IDE itself. Lazarus is an open source Pascal software development environment for the Free Pascal compiler. That is, in addition to the IDE, you must also install the compiler. First, I cheerfully found and downloaded the necessary files, of course the latest version, installed them and for a long time could not understand the reason why the project is not compiling hard. Of course, given that I did everything for the first time on a software that I had never seen before, I made magical mistakes and illogical actions. But the truth turned out to be bitter - in conjunction with the problem of an extra hyphen in libgtk-2.0-dev, it turned out that Double Commander 0.7.8 recommended using lazarus 1.6.2, and not 1.6.4, which I installed.
To install the development environment, you need to open the Lazarus project site and select Lazarus Linux amd64 DEB or Lazarus Linux i386 DEB, depending on the processor architecture. After that, select the IDE version (for Double Commander 0.7.8 - 1.6.2) and download the lazarus-project, fpc, fpc-src packages.
Install packages
# dpkg -i fpc_3.0.0-151205_amd64.deb
# dpkg -i fpc-src_3.0.0-151205_amd64.deb
# dpkg -i lazarus-project_1.6.2-1_amd64.deb
After installation, run the development environment, ignoring the warning about the inaccessibility of the debugger:
$ startlazarus
In the “Service” settings, select rebuilding (recompiling) lazarus (according to the Normal IDE profile). The IDE should re-arrange normally - otherwise it is impossible to continue working with it and it’s necessary to figure out why it never happened, but, it happened again. There have been cases that it was easier to take a new virtual machine and do it all over again, because during the installation / uninstall process of lazarus, something was not installed or removed somewhere, and the system was irreversibly littered.
After all the resolved issues with the IDE, we get the source code. You can get the source code from svn (release 0.7):
$ svn co svn.code.sf.net/p/doublecmd/code/branches/0.7 doublecmd
You can get the source code of the current project with svn:
$ svn co svn.code.sf.net/p/doublecmd/code/trunk doublecmd
You can simply download the source code from the project site and unzip the file:
$ tar xzf doublecmd-0.7.8-src.tar.gz
Suppose we got a folder with the source code and it is located on the path / home / user / work / doublecmd.
Next you need to compile the project. Run the IDE in the fakeroot session:
$ fakeroot
$ startlazarus
In accordance with the doublecmd \ doc \ INSTALL.txt file (for the current version, specify the packages on the project development page in the “Building from source” section) you need to connect or compile the packages to lazarus, and after connecting the last package, reassemble lazarus. This is done as follows: follow the menu Package → Open package file (.lpk) → Select the required file and open it → In the new window that opens, press the “Use” button and then select “Install”, if “Install” is not available, then just click on the button "Compile". All components are located in the components folder of the source code. We need to connect the following components:
After connecting the last component, you need to affirmatively answer the question about rebuilding IDE or start rebuilding yourself via the “Service” menu.
If the rebuilding is successfully completed, you can try to compile the project by opening the doublecmd / src / doublecmd.lpi file through Lazarus and running the compilation (F9 button). After successful compilation (warnings can be shown in the process, but nothing terrible - the main thing is that there should not be fatal errors) Double Commander should open up. If this does not happen, then, with a high degree of probability, an error occurred during the compilation process and you need to figure out what to do with it and how to live on. You can try to solve the problem logically, but in the absence of experience there are very few chances, of course. Therefore, gently pick up the text of the error in the clipboard and go with it directly to the unknown distance of the Internet.
After successful compilation of the project we close the IDE.
So, we got a doublecmd binary file in the source folder that runs. Everything is good, but ... and how to make a normal package? Here daddy install will help us. If you carefully watch the code of the create_packages.sh file, the very name of which is very encouraging, you can draw far-reaching conclusions about what we need in terms of the parameters that need to be written when the script is run. There may even be some documentation on the application of this script, but I had a logical understanding of the code. One just launching the execution of this file didn’t give me anything, as the process constantly crashed and stopped on errors, as a rule, the lack of the necessary paths. To successfully build a package, you need to tweak the create_packages.sh script.
We search for a line in the code and comment or delete it:
Below we write:
We search for a line in the code and comment or delete it:
If the code is received from svn, then these two changes can be not made, but when downloading the code as a separate archive without these edits, the package could not be made.
Next, look for the line and comment / delete again:
Instead, we prescribe ourselves:
Next, look for the line and comment / delete again:
Below we write the same thing, but with a slight change, which will make it possible not to install it automatically into the system after the package is assembled and will save the assembled package:
We start the generation of the package for Debian in the fakeroot session from which we did not leave:
$ ./create_packages.sh -D --ws = gtk2 --cpu = x86_64
Watching magic in the console - so much is happening there! After successfully building the package, we exit the fakeroot session:
$ exit
The resulting package, for example, doublecmd_0.7.8-1.gtk2_amd64.deb, will be in / doublecmd / install / linux / release / from where it can be installed with the usual command:
# dpkg -i doublecmd_0.7.8-1.gtk2_amd64.deb
Return to the beginning, to the table of contents .
The history of creating a home cloud. Part 1. Setting up a Debian environment for everyday use.
Text version: 1.1.0.
Date of the first publication: 10.01.2018.
Last edited on: 01/10/2018.
The created virtual machine with Nextcloud worked since March 2017 almost without failures and in the fall of 2017 I thought about the article. I have a lot of notes and comments in terms of solving various problems and nuances, I have long had an idea to put it all in order and publish it and the New Year holidays in 2018 helped me with this. I must say that the article was at least half a year late, but I think that installing and configuring the current versions of Debian and Nextcloud, by analogy with the information below, is not difficult, although, as you know, the devil is in the details.
Below, the reader will get acquainted with the prerequisites for creating his own cloud and get working instructions on how to set up Debian, easy tuning the Gnome3 environment, compile, build and install packages for Debian, install and configure Apache, SQL and PHP services and start working with them, generating and connecting a self-signed SSL certificate for Apache virtual host, installation and configuration of Nextcloud. I did not design this article as a technical manual or tutorial with a long string of commands, and decided to try to write an article as a story, but without prejudice to the technical component. Experienced Linux users are unlikely to find something new here, but they may be able to read it as a thematic story in a moment of their free time.
Table of contents
Part 1. Setting up a Debian environment for everyday use.
Part 2. Creating a server - setting LAMP in Debian
Part 3. Creating a personal cloud - installing and configuring Nextcloud
Part 4. Update 2018 - Debian 9 and Nextcloud 13
')
Quick chapter navigation
Foreword
Formulation of the problem
Creation and basic setup of the virtual machine
Setup in the control panel
BASH setting
Setting up repositories
Operating system update
Software installation
Software setup
Gnome setup
Network configuration
Firewall setup
Installing vmware-tools 10.0.10 in a Debian 8.7.1 environment
Build, install and configure notepadqq
Build and install Double Commander
Foreword
Our story begins at the end of 2015, when I purchased a new smartphone. The Motorola Droid Turbo turned out to be a powerful device, with a large memory, a QHD display with an acceptable (relatively small) diagonal, a capacious battery and a virtually clean Android on board, which in my eyes has always been a definite plus. Finishing the back panel with a ballistic nylon gives it a peculiar style, standing out against the background of the devices of the era of "remnant". For a long time, the usual gestures of turning on a flashlight by shaking or a camera by quickly waving the phone already seem to surprise no one, but Motorola will remain forever in history as a pioneer with a flawless implementation of such functionality - I am so used to gestures that I don’t even know where the camera icon is. In general, you have already understood that I like the phone all right and I am delighted with it so far, except for one annoying moment - the entire memory of the phone is soldered inside it. And in order to lose our precious 64 gigabytes (user data is actually less), you just need to stumble so that the phone falls out of your hands and “successfully” falls. Although some day he may simply not turn on. Or once it can be banal steal.
All users of computer equipment are divided into two groups - those who make backups and those who still do not make them. I moved from the second group in the first fifteen years ago. At least on the first phone, the reservation was thought out as follows. All applications with their settings were automatically backed up daily via Titanium Backup to an SD card. SambaDroid was installed on the phone, which was configured to share the phone's SD card only when it was connected to a network with a specific SSID. As you might guess, this happened only when the phone was connected to the Wi-Fi router in my home. BitTorrent Sync was periodically launched on the computer, which, just in case, was locked through a firewall on the local network (only local addresses were allowed), and when a shared card was detected, it synchronized its contents with the folder on the computer. In the event of a phone breakdown, you could simply pull out the SD card with the data. In any other case - there is always a backup of the memory card on the computer. If the computer breaks down on the same day, there is a cold backup of the data disk located in another house. Sleep is calm, healthy, strong, so hands do not shake due to tension and, as a result, the phone never falls.
And what to do with this new phone? Applications are also backed up via Titanium Backup. But the SD card is not pulled out, and SambaDroid, which worked perfectly on Android 2.x on the 4/5/6 line, behaves unstably, and after a while I refused BitTorrent Sync. Surely it would be possible to find a similar solution, but I caught fire with a universal cloud solution. It would seem that the conclusion is self-evident and obvious - there is Google Drive and a bunch of applications that synchronize the specified data with the cloud, providing (in theory) End-to-End encryption. But ... with this approach, this article would never have been written! Moreover, in 2018, the author is not even going to connect a google account to the phone, much less think about synchronizing photos of her cats with some other services. Yes, I have paranoia, distrust of corporations, the desire to keep personal data under control, the desire for independence from the work of another service (which may close) and I do not want to pay for scanty gigabytes in the cloud.
While I was thinking about the need to do something in terms of correcting this situation, the whole of 2016 passed by and I realized that now, we should really attend to this problem right now. I wanted to do everything beautifully, with an eye to the future, to universality, reliability and, of course, automatism. Since I actively do not accept too much and intrusive participation of corporations in my personal life, it was decided to try to make my personal cloud in the local network using my ownCloud.
Quote from wikipedia:
ownCloud is a Free and open web application for data synchronization, file sharing and remote storage of documents in the "cloud". ownCloud is written in PHP and JavaScript programming languages. ownCloud works with SQLite, MariaDB, MySQL, Oracle Database and PostgreSQL databases, and runs on servers running Linux, including Raspberry Pi. Development of ownCloud was started by one of the KDE developers, Frank Carlitschek, in January 2010. He sought to create a free alternative to commercial cloud storage services. In contrast, ownCloud can be installed on your own server at no additional cost.
Opportunities:
- File storage using conventional directory structures, or using WebDAV
- Cryptography
- Synchronization between clients running Windows (Windows XP, Vista, 7 and 8), Mac OS X (10.6 and later) or Linux
- Calendar (also like CalDAV)
- Task Manager
- Address book (also like CardDAV)
- Streaming media (using Ampache)
- Administration of users and groups (using OpenID or LDAP)
- Sharing content between groups or using public URLs
- Online text editor with syntax highlighting and folding. Announced support for online versions of LibreOffice editors.
- Bookmarks
- URL shortening mechanism
- Photo Gallery
- PDF viewer (using PDF.js)
- ODF file viewer (.odt, .odp, .ods)
- Logging module
In terms of functionality, we see a full-fledged cloud that can spin on ... yes, that computer! With strong paranoia, service activity can be locked inside the local network via a firewall.
I have already saved some links to the material on installing and configuring my ownCloud, but when I started to deal with it, I discovered that in 2016, the main developer of ownCloud (Frank Karlichek) left the company and announced the creation of a fork - Nextcloud. Unlike ownCloud, which is paid for under certain conditions, Nextcloud is completely free. Considering that the work on the new fork was headed by Frank Karlichek, who has a lot of experience in similar development, I decided to choose Nextcloud. At the beginning of 2017, the current version of Nextcloud was version 11.0.2 and its installation and configuration will be described below. As of January 2018, the current version is 12.0.4, but, I think, there should be no fundamental differences in installation and configuration.
Formulation of the problem
At first, everything seemed simple and I could not even imagine that it would take two or two and a half interesting months to sit for a couple of days off. He often reddened his eyes at night and asked clever and not-so-great questions on thematic forums. My advice to beginners - if you want to do something, do not be afraid of the amount of work and do it. The main thing is to get at least something for the first time. The way it even works is crooked. You can do without understanding how a monkey, to copy a long train of commands, often reaching a place where something fails and nothing happens. Maybe a mistake was made earlier, maybe a typo in the command, maybe the author in his manual missed a line of code / command, maybe in the example the OS release is different and yours won't work, maybe the libraries are not the same - what else can it be ! But when you succeed in something you will say: “Damn it - it worked!” This is worth it and will be the beginning of the emergence of excitement, a stimulus to understand further and confidence in what happens: if you succeed once, it means you will succeed in the next one, you just have to figure it out.
So, you need to decide what to do. There are a couple of phones that need to connect to the cloud. In addition, I would also like to connect a computer to it - the amount of disk space in the cloud now depends only on my desire and I do not need to constantly pay extra for 10/20/30 gigabyte - I can just buy a hard disk for a couple of terabytes. The central element in the home network is the Wi-Fi router - it is connected to the phone via Wi-Fi, a computer and another computer that performs the role of an unintentional "server": the computer was originally built for the tasks of the failed HTPC , and now it just runs the software virtualization from VMWare. VMWare Workstation has its own virtual router, to which so far only one virtual machine with an FTP server is connected. The decision suggests itself - to create and connect another virtual machine, through the VMWare network settings, forwarding ports 80 (HTTP) or 443 (HTTPS) to it. The solution is modular and elegant in the sense that an absolutely hardware-independent and once-configured virtual machine can be easily deployed anywhere, on any ordinary computer.
Creation and basic setup of the virtual machine
Nextcloud - quite roughly speaking, this is a website that runs on a web server. As a web server, I chose LAMP = Linux + Apache + MySQL + PHP. This means that all this needs to be installed and configured. And so that it works correctly, you need to understand what to install and how to configure it.
I only encounter Linux periodically and this is more of a hobby than a necessity. But since I swung versatility, then this time I decided to break the whole work into three logical parts, each of which should end with a well-defined and universal result. First you need to make yourself a comfortable environment for work, that is, not just to install the system on a virtual machine, but to customize it for yourself, bring it closer to the kind that is more convenient and familiar to me. The second stage is bringing this machine to a functioning web server. The third is to turn a web server into a cloud.
Debian 8.7.1 was chosen as the operating system. In VMWare Workstation, a virtual machine is created, which is allocated one dual-thread processor, two gigabytes of RAM, and a hard disk of 120 gigabytes. Network card operating mode - NAT. Download the ISO image of the operating system for the amd64 architecture . After downloading, connect the image to the virtual drive and start the virtual machine. The installation of the operating system is rather trivial and can be done even without the murtilators, which are abundant on the Internet. Gnome3 was selected as the graphical environment, and the Standard system utilities and Print Server were installed. The hard disk during the installation process is divided into two sections - a general partition (/, / home, / usr, etc.) and swap. The newly created user was called neutral “user”.
Immediately after installation, the user is shown an empty desktop. The nautilus file manager, such as Windows Explorer, never understood why it was used. The application menu does not shine its structuring. NumLock after boot is always disabled. From text editors nano or vi, the beginner Linux user generally becomes depressed. Something needs to be fixed. The following description of the system "by itself". There is no argument about tastes: someone will like it, someone will not. I note that without overcoming the difficulties of professional growth will not be and the more you dig into something - the more you understand how it works.
Setup in the control panel
I used to switch the keyboard layout with the CTRL and SHIFT buttons. Perhaps the driver of the keyboard is to blame since the days of MS DOS 6.22, but what to do now is a second nature habit. In addition, I do not want the virtual machine to fall asleep or extinguish the screen and do not want to enter a password after each launch.
An elementary initial environment setup is done in the control panel:
- Language and region → Add Russian to input sources.
- Keyboard → Keyboard Shortcuts → Enter → Key modifier switches input sources → Assign a language switch button Ctrl + Shift (if you cannot install such a combination, skip this step, configure it in the “gnome Setup” section below).
- Keyboard → Keyboard shortcuts → Additional combinations → Add a new item called “Terminal” and the “x-terminal-emulator” command. After adding, click on the label "Off" and enter the combination of two keys: Super (Win) + t.
- Monitors → Set the screen resolution to the current display, as the default setting is uncomfortable 800x600.
- Power supply → OFF Turns off the display.
- Details → Removable media → OFF autorun when connecting media.
- Users → ON automatic access for user user.
BASH setting
The next important step is setting up the terminal. With the command line will have to work very much. Moreover, some, if not many, things in Linux are easier and more convenient to do through the terminal, and that is why in the previous paragraph we made a key combination to quickly call the terminal. Bash is a command language interpreter that executes commands from the keyboard. Bash can highlight files, folders, network folders, files with different access rights in different colors. With the backlight it becomes somewhat easier and more fun to navigate.
Important note. Lines of commands starting with the $ symbol will indicate that the command must be entered on behalf of the user - you just need to open the terminal (it is searched in the application menu or simply press the Super + T combination) and enter the command. If the line starts with a # character, this means that input must be made on behalf of the superuser (root). To do this, open the user terminal and enter the command:
$ su
After that, enter the superuser password that was set during the installation of the system.
So, how do I color the terminal? To do this, run the command:
$ nano /home/user/.bashrc
This command opens the bashrc configuration file in the nano text editor. In this file you need to find and uncomment the line “force_color_prompt = yes”. Below, we look for a line of the following form (below the condition if ["$ color_prompt" = yes]; then):
PS1 = '$ {debian_chroot: + ($ debian_chroot)} \ [\ 033 [01; 32m \] \ u @ \ h \ [\ 033 [00m \]: \ [\ 033 [01; 34m \] \ w \ [\ 033 [00m \] \ $ '
and copy it (Shift + Ctrl + C), after which the editor can be closed (Ctrl + X) with saving the changes made.
Next, run the following command:
# nano /root/.bashrc
Again, the configuration file is opened, but for the superuser. Below the commented out line "# PS1 = ..." you need to insert (Shift + Ctrl + V) the copied line with a slight change (with the replacement of the number 32 by 31):
PS1 = '$ {debian_chroot: + ($ debian_chroot)} \ [\ 033 [01; 31m \] \ u @ \ h \ [\ 033 [00m \]: \ [\ 033 [01; 34m \] \ w \ [\ 033 [00m \] \ $ '
This small change will change the color of the Bash prompt: the user @ user debian user prompt will be highlighted in green and the super user root @ debian in red. This will help from inadvertent confusion, when by mistake commands are entered from the wrong user.
Setting up repositories
The repository is a database of packages available for installation. It is important to keep this database up to date. Immediately after installation, we have registered a basic repository and a link to the installation DVD, which contains a number of popular packages. To work with repositories, you can use the synaptic program with a graphical interface. But it is much easier to edit the list manually through a plain text editor:
# nano /etc/apt/sources.list
Check the list of repositories for compliance with the list below.
# security updates
deb security.debian.org jessie / updates main contrib non-free
deb-src security.debian.org jessie / updates main contrib non-free
# jessie-updates
deb httpredir.debian.org/debian jessie-updates main contrib non-free
deb-src httpredir.debian.org/debian jessie-updates main contrib non-free
# binary and source packages
deb httpredir.debian.org/debian jessie main contrib non-free
deb-src httpredir.debian.org/debian jessie main contrib non-free
# backports
# deb httpredir.debian.org/debian jessie-backports main contrib non-free
# deb-src httpredir.debian.org/debian jessie-backports main contrib non-free
The Backports repository is registered but disabled. Strictly speaking, it is possible and not to register it, but if you register it right away, then it will be easier to disconnect or connect this repository - you just need to comment out or uncomment the required lines. Why is he even needed? The fact is that, along with the fact that Debian is one of the most stable distributions, as a result, software in its repositories is often decently outdated. Connecting Backports is an easy way to get a much newer version of some kind of software (even newer than in the testing Debian branch). But you need to be very careful, because if you install some kind of program, other packages may pull up on dependencies that may break the system due to the incompatibility of the old software with the new packages. Backports - this is the case when you know exactly why you are doing this.
After any changes in the contents of the sources.list file, it is necessary to synchronize with the repositories:
# apt-get update
Be sure to look at the log - no errors should be. Otherwise, you need to check the correctness of the contents of the sources.list file.
Operating system update
To find out the current version of the system, run the command:
$ cat / etc / debian_version
If the system is installed from the image at the link above, then its number will be 8.7.
To upgrade the system, there are two commands: apt-get upgrade and apt-get dist-upgrade. The first command will only update installed packages, but there may be conflicts and unmet dependencies. This is a kind of safe update, in which the old programs do not deteriorate exactly, but the new ones may not work. The second command will remove old packages, resolve conflicts, deliver necessary dependencies, and deliver new packages, if required. If conflicts arise, it will attempt to update the most important packages at the expense of less important ones. That smarter update.
Update the system:
# apt-get dist-upgrade
After updating the system, we check the log for errors, check the new current version of the system and make sure that everything is as expected.
Software installation
Install the following packages:
# apt-get install mc
# apt-get install gksu
# apt-get install numlockx
# apt-get install libcanberra-gtk-module
# apt-get install libqt5webkit5 libqt5svg5 coreutils
# apt-get install doublecmd-gtk
# apt-get install galculator
# apt-get install samba smbclient cifs-utils
# apt-get install jigdo-file
# apt-get install audacious
# apt-get install smplayer
# apt-get install firefox-esr
# apt-get install gufw
mc is the good old Notron Commander only in Linux. Forget about the commands ls, cd, mkdir, rm and others.
gksu - allows you to run programs with a graphical interface on behalf of the superuser, as well as add a superuser terminal to the application menu, which can be launched immediately, rather than performing the sequence “terminal → $ su → entering the superuser password”.
numlockx - will help solve the problem with the numlock mode after booting the system, since by default it is always turned off.
The libcanberra-gtk-module packages, libqt5webkit5, libqt5svg5 coreutils are needed for the operation of the two-paneled Double Commander manager and the text editor Notepadqq, which we will install later.
doublecmd-gtk is an analogue of Total Commander for Linux.
galculator - just a calculator that can switch to the engineering view.
samba smbclient cifs-utils — packages needed to support networking: folder sharing, access to shared folders, mounting network resources.
jigdo-file is a tool for downloading and updating CD, DVD, BD images. For example, if you ever want to create a fully autonomous and complete official repository from Blu-Ray discs of the Debian distribution, then this particular “torrent” will be needed, since Blu-Ray discs are distributed primarily through jigdo.
audacious - audio player.
smplayer - video player.
firefox-esr - the browser does not need to be presented.
gufw is the GUI for the firewall configuration utility.
The above programs will somewhat complement the basic software package of the installed system, which is considerable if a standard set of utilities was chosen during the installation of the system. MS Office functions are performed by the LibreOffice software package, there is a GIMP image editor, Transmission for torrents, an Evolution mail client, a photo viewer, a simple text editor gedit, and other software. Audio and video players in the standard set is also there, but audacious and smplayer will be more functional and convenient programs.
Software setup
numlockx solves the problem with the numlock mode after booting the system. After installing the package, simply execute the command:
# numlockx on
And now after loading the operating system NumLock will always be included.
I brought the file manager to Double Commander to a more minimalist view by performing the following actions in its menu:
- View → Short (run on both panels)
- Settings → Parameters → Tools → Terminal → Register “x-terminal-emulator” in the section “Terminal start command”, leave the parameter field empty
- Settings → Parameters → Fonts → all fonts = 11, font “Viewer (“ Book “mode)” = 14
- Settings → Options → View files → Select sorting method “Natural sorting: alphanumeric”
- Settings → Options → View files → Set the option "Show system and hidden files"
- Settings → Options → Window view → Set trail only. options:
- Main menu
- Toolbar + Flat
- Disc list button
- A line of free disk space + Short
- Current path
- Tab Headers
- Status bar
- Function key buttons
- Flat interface
- The panel of background operations
The SMPlayer video player was also configured a bit through the menu item “Settings”:
- Panels → OFF Main panel and Language panel
- Settings → General: OFF “Memorize settings of all files”
- Settings → Appearance: Automatically resize - ON when it is needed
- Settings → Appearance: OFF “Remember position and size”
- Settings → Updates: OFF “Check for updates” and OFF “Open page with information after update”
Of the minimum extensions for firefox, Ghostery is worth mentioning, with which you can block many tracking bugs and ads, and friGate, which expands the browser's ability to configure a proxy (we do not need a proxy, of course, but it is always at hand) .I note that it is worthwhile to install friGate version 2.2.1.1 (from archives), since the 3.x branch demonstrates the complete victory of the “effective” management and marketing over common sense.
What should I do if I need the Flash Player in my browser? On the Adobe Flash Player download page, select .tar.gz for Linux and download the proposed file. From the archive you need to “get” libflashplayer.so and copy it to /home/user/.mozilla/plugins. All actions can be done through Double Commander - he knows how to enter the archives as folders. Below I gave how to do this through commands in the terminal:
[ This text was written specifically for the site geektimes.ru by AlexanderS .
Reference to the source is optional, but its mention is highly desirable! ]
$ cd / home / user / downloads
$ mkdir flash
$ tar xzf flash_player_npapi_linux.x86_64.tar.gz -C flash
$ mv flash / libflashplayer.so /home/user/.mozilla/plugins
After you restart firefox and allow the flash plugin to work on sites should earn. But in some cases it may not be enough or tasks require running the flash locally from some application. Then you can install the Flash Player in the system, although it seems to me that this is far from the best idea (actually, just like allowing flash in the browser). To do this, we need to convert the resulting archive into a DEB package, which we then install using the package manager. Actually it's easy.
Install the converter and compiler:
# apt-get install alien make gcc
Convert the resulting archive:
# alien --to-deb flash_player_npapi_linux.x86_64.tar.gz See
what package we got, say flash-player-npapi-linux.x86-64_1-2_all.deb, and install it:
# dpkg --install flash-player -npapi-linux.x86-64_1-2_all.deb
Gnome setup
It is time to make changes in accordance with their own ideas about how the graphical environment should look. After all, one of the most remarkable features in Linux is that there are a lot of things you can customize without being a programmer in the full sense of this meaning.
With the installation of Double Commander, you can say: "Down with the command line!" But what if you need to wander in folders from the superuser? Every time to go to the superuser terminal and type doublecmd? It can be easier! Create a shortcut in the menu for Double Commander, which will run it in the root session:
# doublecmd / usr / share / applications
You need to make a copy of the doublecmd.desktop file and name the new doublecmd-root.desktop file. You can use the usual keyboard shortcut Ctrl + C and Ctrl + V. Next, you need to open the doublecmd-root.desktop file (press the usual F4 button to launch the text editor built into the file manager) and adjust the corresponding lines to the following view:
Name = Double Commander [root]
Exec = gksu doublecmd
Then we close all open programs and go to the "Applications" menu, in which we delete all the icons from the favorites (left vertical column with program icons). Then from the program menu we add (drag and drop) to favorites icons in the following order: Double Commander → Nautilus → Firefox → Terminal → Galculator → Superuser Terminal → Double Commander [root].
After these changes, restart the graphical shell: press Alt + F2 and enter the command r.
Now let's get down to fine-tuning the shell. There is a special software for this:
$ gnome-tweal-tool
I note that you need to run the command only on behalf of the user, and not the superuser. I ran it for some time from under the superuser and could not understand why I didn’t work at all. After launch, a menu appears in which I made the following changes:
- Top panel → ON display date
- Windows → ON maximize and minimize windows
- Desktop → ON display icons on the desktop, DISABLE system icons (Network, Trash, etc.) d.)
- Extensions → ON extensions Applications Menu, Window List
- Power supply → turn off the computer when you press the power button (select Shutdown)
If at the “Settings in the control panel” stage it was not possible to configure the keyboard layout switching by Ctrl + Shift, then make the change with the following item:
- Keyboard → in the “Switch to another layout” item, select the Ctrl + Shift key combination
In the “Extensions” option below There is a link to download additional extensions, when you click on it, the browser will open a site with additions for gnome. Through the search, we find the Lock keys and Remove dropdown arrows extensions and install them. Be careful - before searching for extensions, you must enable the temporary execution of the Gnome Shell Integration plugin in your browser. When you open a page with an extension at the top there is a ON / OFF dvizhkovaya button, by clicking on which you will be prompted to add an extension. The first extension will add the indicator of the Caps Lock and Num Lock buttons (I have a wireless keyboard, on which there are no corresponding indicators). The second is to remove the drop arrows at the application menu, taskbar windows and language bar.
As a result of such uncomplicated tuning, the graphics environment at us approached a more practical form.
How it was:
As it became (the screen resolution, unfortunately, is already different):
There may be some differences at first glance compared to the number of actions that have been done, but now it’s clear how and what to do and where to go if necessary. As our lecturer in quantum physics once said: “You are not required to understand quantum physics right now, you are required to understand which section of the textbook to open when this becomes necessary.”
Network configuration
For networking with your virtual machine, create a folder and give everyone the rights to change it:
$ mkdir / home / user / Net
$ chmod 777 / home / user / Net
Now we need to expand this folder. In Linux, this makes it very simple:
# mcedit /etc/samba/smb.conf
At the end of the opened file, you need to add a new section by writing the following text:
[Net]
path = / home / user / Net /
comment = Net Folder
readonly = no
guest ok = yes
After all these actions, you need to restart the service to apply the new config:
# service smbd restart
No operating system reboots are required - the Net folder within the guest virtual machine will immediately be available from the host operating system.
Firewall setup
Linux has a powerful IPTables tool to configure firewall. Unfortunately, once it does not immediately plunge into it, especially for a beginner, and if you do not use it periodically, then it is quite easy to lose the experience of setting Therefore, we will use a special utility for configuring iptables rules - Uncomplicated Firewall (ufw). Rules can be created via a graphical interface, for which gufw was installed, but, as I said, initially this is easier to do through the terminal.
Enable firewall logging and configure its rules - we prohibit all incoming:
# ufw logging on
# ufw default deny incoming
# ufw default allow out out Allow
connections for the network environment and file access:
# ufw allow 138 / udp
# ufw allow 139 / udp
# ufw allow 139 / tcp
# ufw allow 445 / tcp We
allow connections for the functioning of mail clients:
# ufw allow 25
# ufw allow 465
# ufw allow 110
# ufw allow 143
# ufw allow 993
Enable protection:
# ufw enable
Installing vmware-tools 10.0.10 in a Debian 8.7.1 environment
In addition to drivers for virtual equipment (for example, a video card or a chipset), vmware-tools will enable you to connect any folders from the host system to the virtual machine, as well as include a shared clipboard between the host and the guest systems.
It just so happened that my history of working with vmware-tools in Linux is the history of periodic walking around the rake . At one time I even used open-vm-tools, but there were problems with mounting the hgfs folder (it is there that the connected folders appear in the Shared Folders section of the virtual machine settings).
In early 2017, I had VMWare Workstation 12.1.0, which was bundled with a set of ISO images of vmware-tools version 10.0.10. Oddly enough, everything went unexpectedly smooth, quiet and peaceful.
To install vmware-tools, we will need to install a compiler and, of course, headers, without which vmware-tools are normal, at least not before, in principle, they were not going to:
# apt-get install linux-headers - $ (uname -r) make gcc
This time I did not place the linux.iso image into a virtual drive, but copied it to a network folder (we already have the network) and then mounted it in Linux and unpacked the required archive:
# mkdir / mnt / iso
# chmod 777 / mnt / iso
# mount -o loop -t iso9660 /home/user/Net/linux.iso/mnt/iso
$ tar xvzf /mnt/iso/ VMwareTools-10.0.10-4301679.tar.gz -C / home / user / Net
Now you can run a script that will compile and install vmware-tools:
$ cd / h ome / user / Net / vmware-tools-distrib
# ./vmware-install.pl
The first question of the script must be answered in the affirmative, all subsequent questions must be answered with default values (just press Enter everywhere). During the compilation process, warnings may appear, but there should be no errors.
After installation, delete unnecessary files and reboot:
# umount / mnt / iso
$ rm -rf / home / user / Net / vmware-tools-distrib
$ rm / home / user / Net / linux.iso
# reboot
After reboot, you should go and check the presence of the folder / mnt / ngfs - if it exists, then the installation went well. In addition, the resolution scaling inside the virtual system to the size of the VMWare window should start working normally and the joint clipboard should turn on.
Build, install and configure notepadqq
I have long been accustomed to the Total Commander + Notepad ++ bundle and, naturally, I was looking for an alternative in Linux. The role of Total Commander is a good substitute for Double Commander, although there is nothing to completely replace Total. There was also an analogue of Notepad ++, which is called Notepadqq, which also does not completely replace Notepad ++, but is better than the built-in editor Double Commander or the same nano. At least syntax highlighting in Notepadqq is there and it works fine.
Suddenly, there was only one problem - there was no package in the repositories. I found the compatible deb package for installation, but the version was irrelevant and the software was frankly and godlessly buggy. There were no options - you had to build the package yourself from the available sources.
After downloading the archive with the source code, the file README.md was found inside, in which the instructions for building and installing the package were found using the make utility. However, I wanted to have a full-fledged package, which I could install and remove without serious consequences, which in principle is impossible by installing it through make install. In general, on Habré there is a good article on this topic. So I built the package via checkinstall.
First you need to install the packages needed to run:
# the apt-the get the install the git-by qmake Qt5 the checkinstall
# the apt-the get the install libqt5webkit5 libqt5svg5 coreutils
# the apt-libqt5webkit5 the get the install-dev-dev libqt5svg5 qttools5-dev-tools
# the apt-the get the install libcanberra- gtk-module
Download the source code (as of the beginning of 2017, the current version was 1.0.1) and start the fakeroot session:
$ git clone github.com/notepadqq/notepadqq.git
$ cd notepadqq
$ fakeroot
Fakeroot runs programs in a special environment that emulates a super-user session . Elevated permissions may be required for the make utility to work.
Now you need to configure the environment for the project depending on the processor architecture (in my case - the first option, x86_64):
$ ./configure --prefix / usr --qmake / usr / lib / x86_64-linux-gnu / qt5 / bin / qmake
or
$ ./configure --prefix / usr --qmake / usr / lib / i386-linux-gnu / qt5 / bin / qmake
or
$ ./configure --prefix / usr --qmake / usr / lib / arm-linux-gnueabihf / qt5 / bin / qmake
And compile the program, watching what is happening in the terminal:
$ make
After successful compilation, you can build a package with information about him:
$ checkinstall -D --install = no
If you run checkinstall without the “--install = no” directive, then the assembled package will be automatically installed into the system, and the package file will be immediately deleted. It categorically did not suit me, because for the assembly I use a separate virtual machine (you should not trash the target machine with different compilers, IDE and other software that will never be used there) and as a result I needed to get a normal DEB package that I can transfer to the desired virtual machine and install there. The "--install = no" directive is needed in order to only create a package and not install it.
During the build process, we will be asked a question about the package description. I wrote the following: "Notepadqq 1.0.1 amd64 build 20170326". After entering the description, I would recommend to fill in the Maintainer field (package builder, its attendant) - press the 0 (zero) button and enter your nickname or at least something, but do not leave it empty.
After the package is built, we exit the fakeroot session:
$ exit
If everything went well and without errors, then we have a file in our working folder that looks like notepadqq_20170326-1_amd64.deb. Now you can install it using the normal package manager:
# dpkg –i notepadqq_20170326-1_amd64.deb
Launch Double Commander and connect notepadqq as the default editor:
Settings → Editor → Enable the option "Use external program", as a way to register: notepadqq The
version 1.0.1 I assembled has proven itself very well and I have worked with it for a whole year. Now we know how to properly build packages from source - it’s not hard at all!
Build and install Double Commander
In the established Double Commander there were several troubles. It was buggy when working with network folders and editing long file names. In addition, sometimes it is crookedly closed from under the superuser. Version 0.5.x was originally installed from the repository, while 0.7.8 was available on the project site, which did not hurt with these problems. An attempt to get a DEB package brought to the resource launchpad.net/ubuntu, where it was proposed to download several assembled packages of version 0.6.x and install them in some combination. Why a few packages? And the version is not new at all. An attempt to recklessly install a new version from Backports led to a system crash, it was not possible to fix it, and I simply deleted the virtual machine, pulling up the carefully saved backup image file of the hard disk.
However, what problems can there be if there is source code? I can now compile and build the package myself! At first everything went as usual. Getting the source code, the trial that there and where and attempts to somehow compile them, not understanding the logic of their actions. Then I was still honored to read the documentation from which it followed that no make would help to compile - a full IDE is needed, in which the project is being developed. Well ... why not put an IDE? And I quickly went over the rake, not assuming that this will take about a week.
To work, we need to install the already familiar packages:
# apt-get install make gcc checkinstall subversion
For a normal IDE (Lazarus) installation, the following packages must be delivered:
# apt-get install libdbus-1-dev libglib2.0-dev libncurses5-dev libx11-dev libgtk2.0-dev libcanberra-gtk-module
A very important note: on the wiki development page of the project there is a list of necessary packages, which contains the libgtk-2.0-dev package, which actually does not exist - instead you need to install libgtk2.0-dev (without a hyphen!).
Now we need to install the IDE itself. Lazarus is an open source Pascal software development environment for the Free Pascal compiler. That is, in addition to the IDE, you must also install the compiler. First, I cheerfully found and downloaded the necessary files, of course the latest version, installed them and for a long time could not understand the reason why the project is not compiling hard. Of course, given that I did everything for the first time on a software that I had never seen before, I made magical mistakes and illogical actions. But the truth turned out to be bitter - in conjunction with the problem of an extra hyphen in libgtk-2.0-dev, it turned out that Double Commander 0.7.8 recommended using lazarus 1.6.2, and not 1.6.4, which I installed.
To install the development environment, you need to open the Lazarus project site and select Lazarus Linux amd64 DEB or Lazarus Linux i386 DEB, depending on the processor architecture. After that, select the IDE version (for Double Commander 0.7.8 - 1.6.2) and download the lazarus-project, fpc, fpc-src packages.
Install packages
# dpkg -i fpc_3.0.0-151205_amd64.deb
# dpkg -i fpc-src_3.0.0-151205_amd64.deb
# dpkg -i lazarus-project_1.6.2-1_amd64.deb
After installation, run the development environment, ignoring the warning about the inaccessibility of the debugger:
$ startlazarus
In the “Service” settings, select rebuilding (recompiling) lazarus (according to the Normal IDE profile). The IDE should re-arrange normally - otherwise it is impossible to continue working with it and it’s necessary to figure out why it never happened, but, it happened again. There have been cases that it was easier to take a new virtual machine and do it all over again, because during the installation / uninstall process of lazarus, something was not installed or removed somewhere, and the system was irreversibly littered.
After all the resolved issues with the IDE, we get the source code. You can get the source code from svn (release 0.7):
$ svn co svn.code.sf.net/p/doublecmd/code/branches/0.7 doublecmd
You can get the source code of the current project with svn:
$ svn co svn.code.sf.net/p/doublecmd/code/trunk doublecmd
You can simply download the source code from the project site and unzip the file:
$ tar xzf doublecmd-0.7.8-src.tar.gz
Suppose we got a folder with the source code and it is located on the path / home / user / work / doublecmd.
Next you need to compile the project. Run the IDE in the fakeroot session:
$ fakeroot
$ startlazarus
In accordance with the doublecmd \ doc \ INSTALL.txt file (for the current version, specify the packages on the project development page in the “Building from source” section) you need to connect or compile the packages to lazarus, and after connecting the last package, reassemble lazarus. This is done as follows: follow the menu Package → Open package file (.lpk) → Select the required file and open it → In the new window that opens, press the “Use” button and then select “Install”, if “Install” is not available, then just click on the button "Compile". All components are located in the components folder of the source code. We need to connect the following components:
- chsdet / chsdet.lpk
- CmdLine / cmdbox.lpk
- multithreadprocs / multithreadprocslaz.lpk
- dcpcrypt / dcpcrypt.lpk
- doublecmd / doublecmd_common.lpk
- KASToolBar / kascomp.lpk
- gifanim / pkg_gifanim.lpk
- viewer / viewerpackage.lpk
After connecting the last component, you need to affirmatively answer the question about rebuilding IDE or start rebuilding yourself via the “Service” menu.
If the rebuilding is successfully completed, you can try to compile the project by opening the doublecmd / src / doublecmd.lpi file through Lazarus and running the compilation (F9 button). After successful compilation (warnings can be shown in the process, but nothing terrible - the main thing is that there should not be fatal errors) Double Commander should open up. If this does not happen, then, with a high degree of probability, an error occurred during the compilation process and you need to figure out what to do with it and how to live on. You can try to solve the problem logically, but in the absence of experience there are very few chances, of course. Therefore, gently pick up the text of the error in the clipboard and go with it directly to the unknown distance of the Internet.
After successful compilation of the project we close the IDE.
So, we got a doublecmd binary file in the source folder that runs. Everything is good, but ... and how to make a normal package? Here daddy install will help us. If you carefully watch the code of the create_packages.sh file, the very name of which is very encouraging, you can draw far-reaching conclusions about what we need in terms of the parameters that need to be written when the script is run. There may even be some documentation on the application of this script, but I had a logical understanding of the code. One just launching the execution of this file didn’t give me anything, as the process constantly crashed and stopped on errors, as a rule, the lack of the necessary paths. To successfully build a package, you need to tweak the create_packages.sh script.
We search for a line in the code and comment or delete it:
svn export ../ $ BUILD_DC_TMP_DIR
Below we write:
cp -vR / home / user / work / doublecmd / $ BUILD_DC_TMP_DIR
We search for a line in the code and comment or delete it:
linux / update-revision.sh ../ $ BUILD_DC_TMP_DIR
If the code is received from svn, then these two changes can be not made, but when downloading the code as a separate archive without these edits, the package could not be made.
Next, look for the line and comment / delete again:
export MAINTAINER = "Alexander Koblov <Alexx2000@mail.ru>"
Instead, we prescribe ourselves:
export MAINTAINER = "Vlastelin Mira"
Next, look for the line and comment / delete again:
checkinstall -D --default --pkgname = doublecmd --pkgversion = $ DC_VER --pkgarch = $ DEB_ARCH --pkgrelease = 1. $ lcl --pkglicense = GPL --pkggroup = contrib / misc --requires = libx11-6 --nodoc --pakdir = $ PACK_DIR $ BUILD_DC_TMP_DIR / install / linux / install.sh
Below we write the same thing, but with a slight change, which will make it possible not to install it automatically into the system after the package is assembled and will save the assembled package:
checkinstall -D --install = no --default --pkgname = doublecmd --pkgversion = $ DC_VER --pkgarch = $ DEB_ARCH --pkgrelease = 1. $ lcl --pkglicense = GPL --pkggroup = contrib / misc - requires = libx11-6 --nodoc --pakdir = $ PACK_DIR $ BUILD_DC_TMP_DIR / install / linux / install.sh
We start the generation of the package for Debian in the fakeroot session from which we did not leave:
$ ./create_packages.sh -D --ws = gtk2 --cpu = x86_64
Watching magic in the console - so much is happening there! After successfully building the package, we exit the fakeroot session:
$ exit
The resulting package, for example, doublecmd_0.7.8-1.gtk2_amd64.deb, will be in / doublecmd / install / linux / release / from where it can be installed with the usual command:
# dpkg -i doublecmd_0.7.8-1.gtk2_amd64.deb
Return to the beginning, to the table of contents .
The history of creating a home cloud. Part 1. Setting up a Debian environment for everyday use.
Text version: 1.1.0.
Date of the first publication: 10.01.2018.
Last edited on: 01/10/2018.
Update log
1.1.0 [10-01-2018]
The article title is added.
1.0.0 [01/10/2018]
First version.
Describes how to set up a Debian 8.7.x environment and build from source of the packages Notepadqq 1.0.1 and Double Commander 0.7.8.
The article title is added.
1.0.0 [01/10/2018]
First version.
Describes how to set up a Debian 8.7.x environment and build from source of the packages Notepadqq 1.0.1 and Double Commander 0.7.8.
Source: https://habr.com/ru/post/371159/
All Articles