Arduino Programming from Atmel Studio 7
Hi Giktayms !!! New Year's holidays are coming to an end, all salads have been eaten, champagne is drunk, and life is slowly beginning to return to its normal course. And this is good. But it's not about that.
The fact of the matter is this: many of us, starting our way of programming microcontrollers from the Arduino board, finally came to the point
when in the native Arduino IDE environment it became cramped, and cool development environments like Atmel Studio , Keil , Microsoft VS were frightened by an abundance of settings and tools.
For example, I find it very convenient to work with the Arduino IDE tabs mechanism when developing large projects, this is purely my preference - in fact, it takes a lot of time to transfer code, functions and variables to header files and classes. But in fact, there are more weighty arguments in favor of the transition from the Arduino IDE to more serious development tools. This is primarily the presence of a debugger . For beginner programmers of microcontrollers, this seems insignificant, but when time goes on, and the complexity of the programs increases, the requirements for performance and functionality of the MK code increase. And just then there is a need to understand and see how your code works on the microcontroller. Even if you didn’t get a jtag device , it’s very pleasant to watch, even in the simulator, how the necessary values fall into the necessary registers while the program is running. And of course, if you seriously decided to study the programming of microcontrollers and the architecture of the AVR , then you simply cannot do without a debugger. I am already silent about the hidden work of wiring - the Arduino IDE preprocessor, which allows you to write simpler programs using the functionality of the Arduino libraries, and which adds a lot of garbage to the program, which occupies the controller's program memory, and uses the MC resources. Also an important factor is the modesty of the source editor of the Arduino IDE. And how to be found in the world, real hardcore developers of embedded systems and automatics write only on C and assembler , relying on their own intelligence and experience, and not on the development of Italian students (against whom I have nothing bad, and I will not throw stones at them) .
If you agree with the above, then you have already tried, or are just going to install and use Atmel Studio 7 . I myself am a beginner programmer, it can be said that programming was taught a long time ago at school, it was interpreted by BASIC on MSX machines. And only a couple of years ago I had, as they say, on duty to begin the study and development of C and C ++ . Therefore, from a small height of the bell tower of my own experience, I want to recommend AVR Studio , namely Atmel Studio 7 . In fact, this environment gave me quite a bit of hassle with installing and running it (I use “windows” exclusively for work and fun, and this is Win 7 SP1 64 ), there were several attempts to install it with a run, but it ended with a file until I didn’t install the “Windows6.1-KB3033929-x64.msu” update, after which all my efforts were rewarded and the environment started up. After that, much was said about not literary words and expressions, until the medium began to work more or less adequately ( Atmel Studio 7 I was terribly slowed down at first, on a machine with a good Core i7 and 8 gigabytes of fast DDR4 RAM, I don’t understand what happened later Is the environment somehow mysteriously prokashirovalsya in the system, or I'm used to, but now everything works well). I also want to note that this environment was somehow developed and released by the developers of Atmel AVR and ARM controllers, and therefore supports all of its controllers, and provides all the necessary libraries for working with s / s ++. A huge plus, and I suppose the integral part is the presence of an assembler for the platforms described above. Also in the seventh version of the program appeared support for converting Arduino sketches into the program code for the controller in the C language. This option works so far that it is imperfect, and is unable to transform sketches with several tabs, because of which it loses so far a certain relevance.
')
But this environment has a certain disadvantage: it does not support the most popular and cheapest USBaSP programmer, and does not support the possibility of programming directly (using the USB port) Arduino boards from the box. And therefore, in this article I want to share a certain life hacking, and I hope that this will be really useful for someone.
So let's get started. What we need to have: a PC with Atmel Studio 7 installed, an Arduino IDE preferably the latest version, and drivers for your Arduino board, and of course, the “patient” itself. We connect the controller to the PC, the drivers are installed further, and after that you have to perform several manipulations, but this will need to be done once for different Arduino boards.
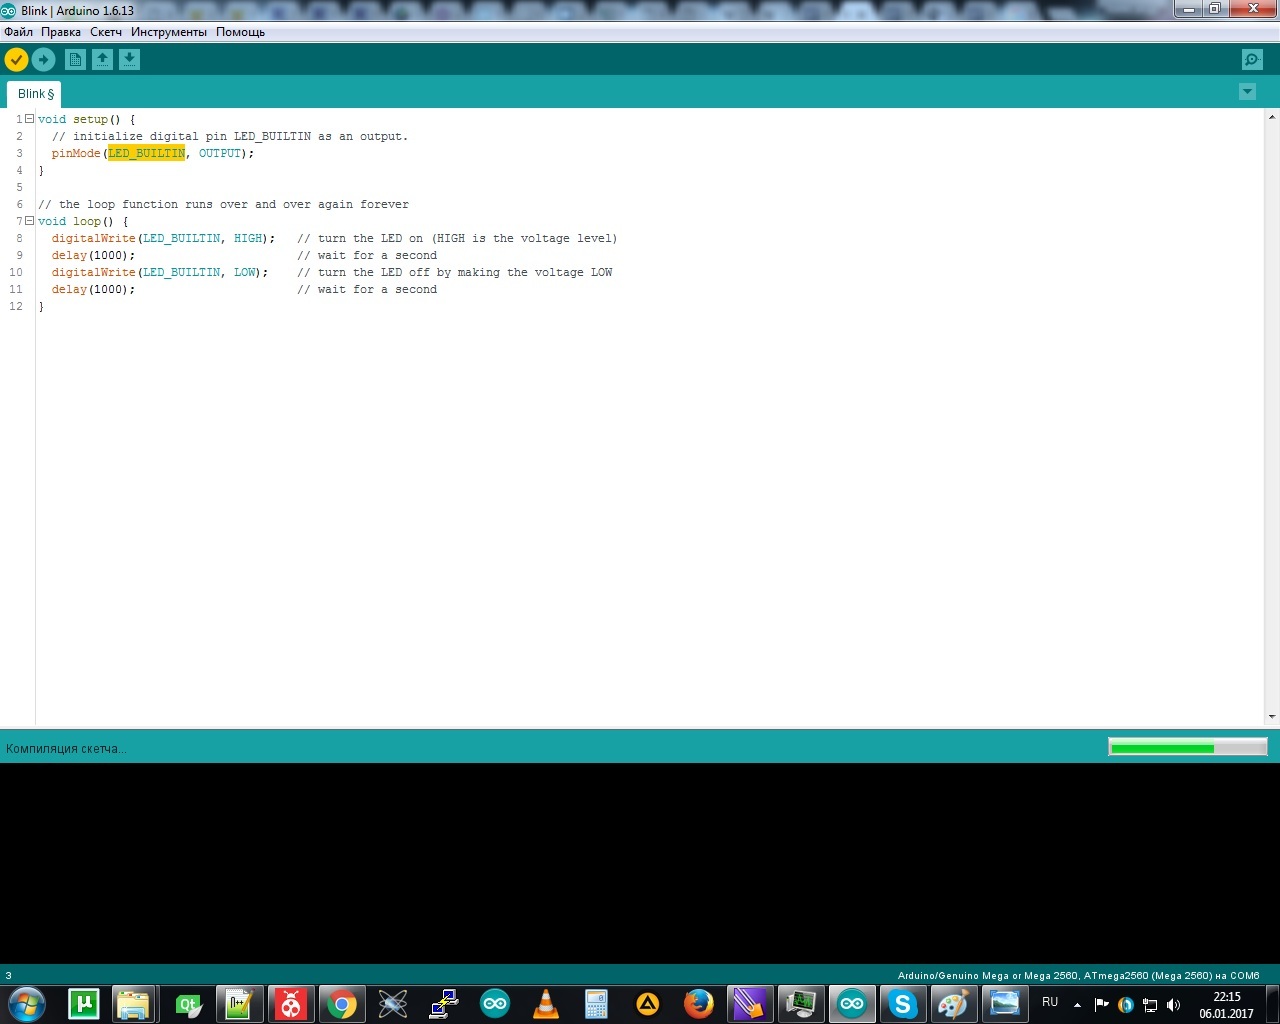
First, open the Arduino IDE , choose our favorite Blink , and turn on the compiler output in the compilation window at the bottom of the editor:

Then we compile the sketch without loading it into the controller:
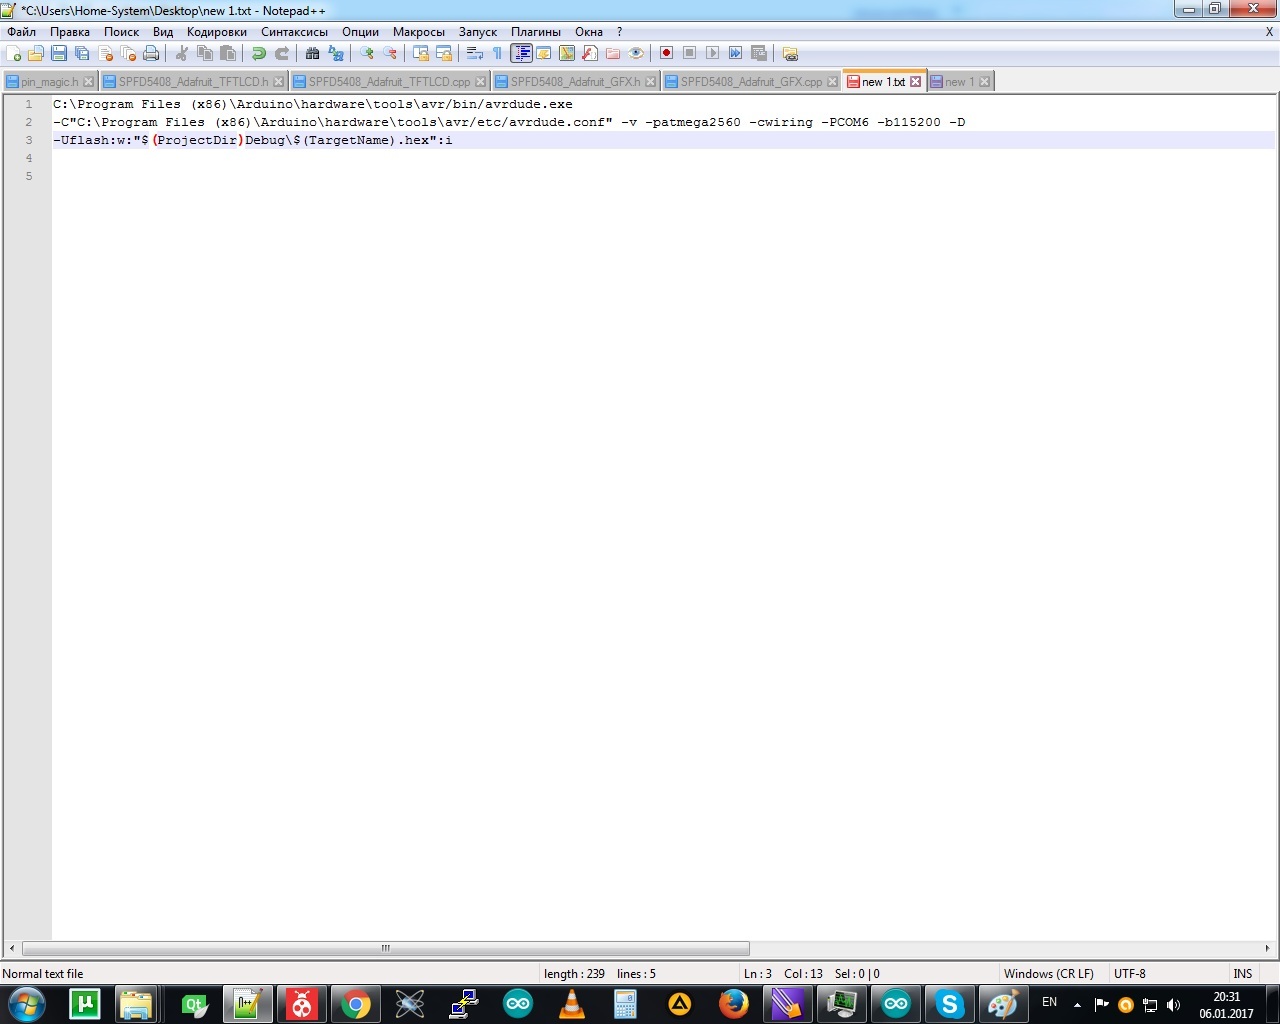
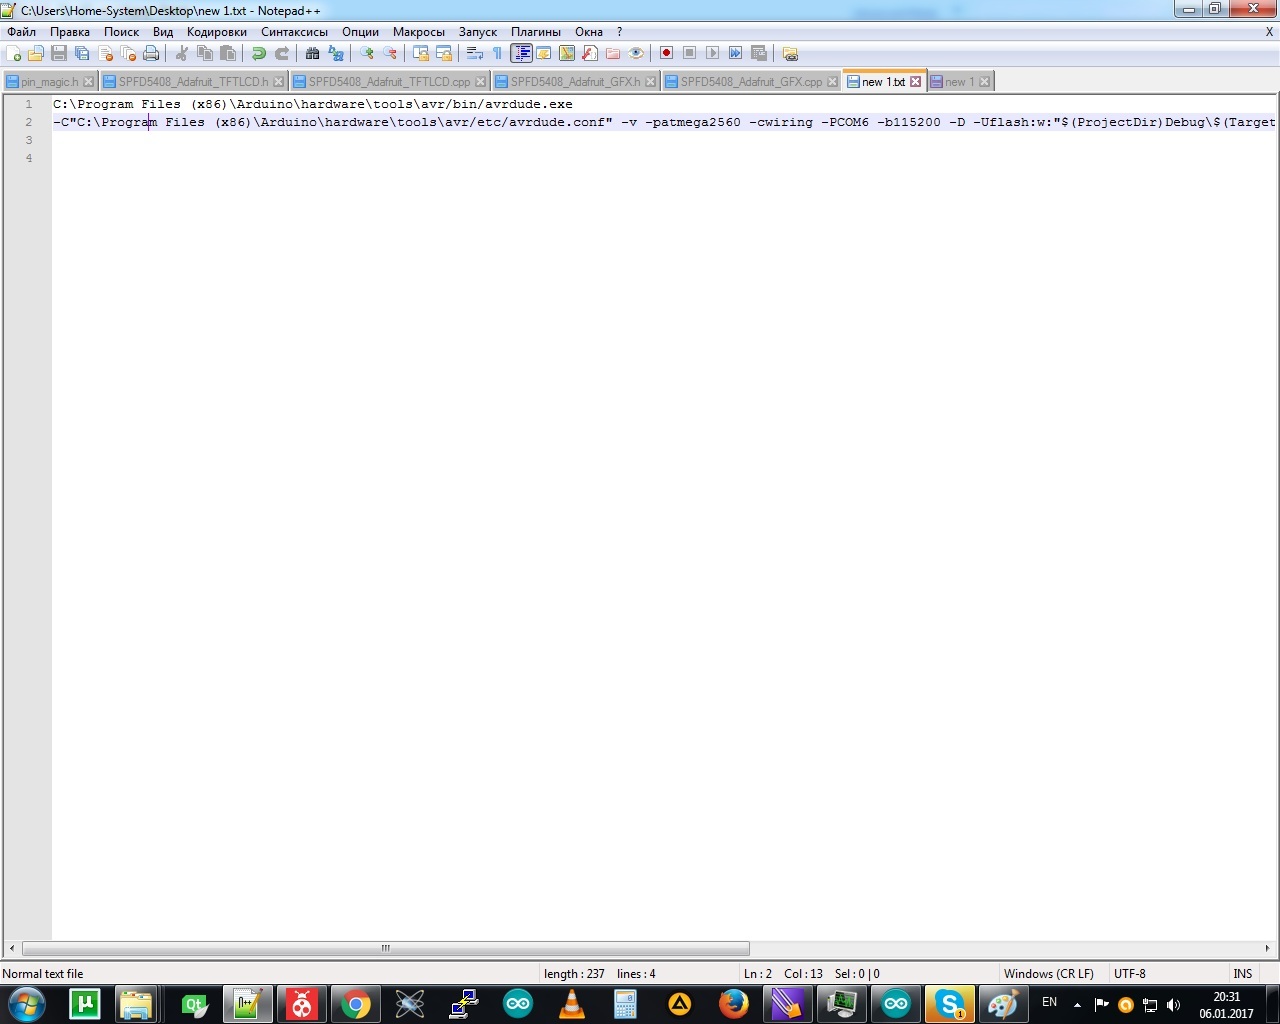
After you need to open some kind of text editor, and do a couple of things - copy the commands for the compiler and the compilation flags into the editor window, and edit it in a similar way:

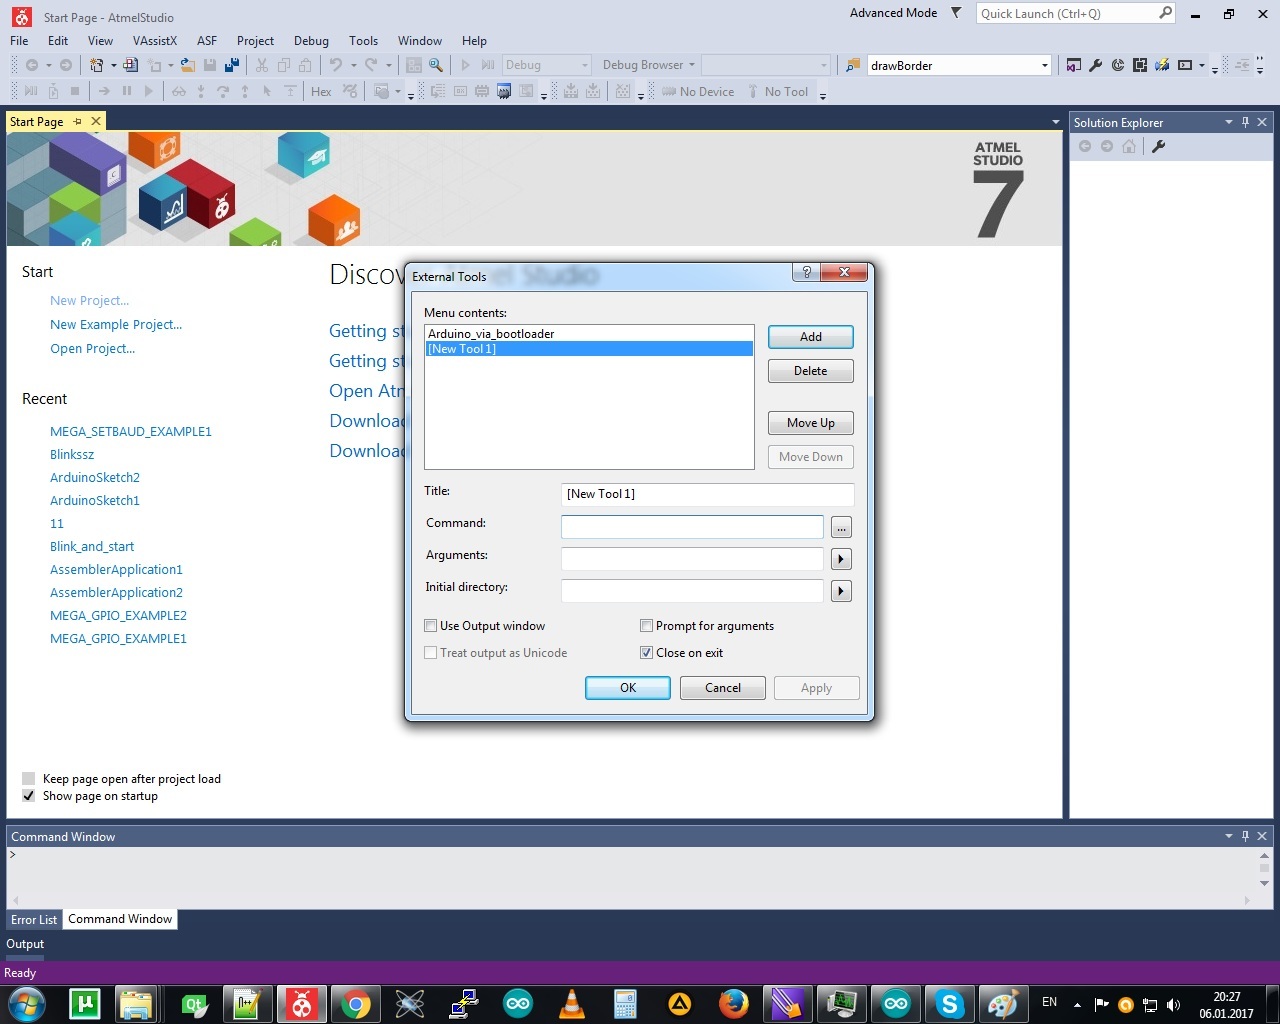
After opening the Atmel Studio 7 environment, select the External Tools item in the Tools tab, create a new profile (you can make several different profiles for each individual Arduino board, where we insert our parameters into the corresponding lines, where the address of the avrdude program is shown , and the commands for the compiler:

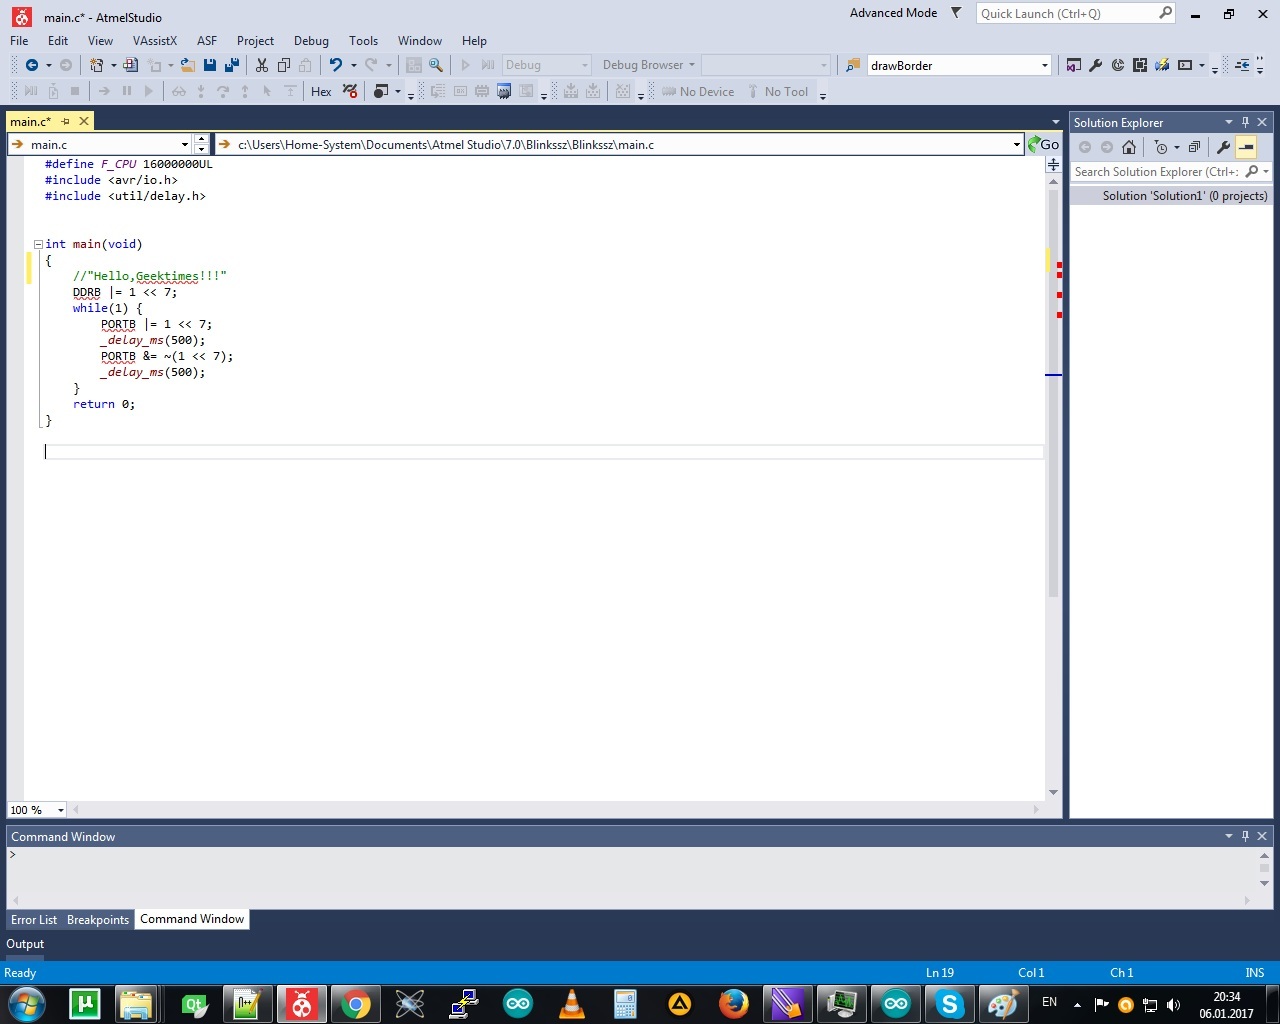
Then you can create any project, writing, for example, the same code of your favorite twinkler, but already in C, and upload our code to the controller, first gathering your project, pressing F7 (Build project), and after clicking on the item with the name of your profile Programming in the Tools tab:
Your program will be written into the memory of the controller's programs, the bootloader will remain in its place, and you can always open the Arduino IDE and write your code in the usual way. I thank everyone for their attention, and I hope that this advice will be useful to someone.
The fact of the matter is this: many of us, starting our way of programming microcontrollers from the Arduino board, finally came to the point
when in the native Arduino IDE environment it became cramped, and cool development environments like Atmel Studio , Keil , Microsoft VS were frightened by an abundance of settings and tools.
For example, I find it very convenient to work with the Arduino IDE tabs mechanism when developing large projects, this is purely my preference - in fact, it takes a lot of time to transfer code, functions and variables to header files and classes. But in fact, there are more weighty arguments in favor of the transition from the Arduino IDE to more serious development tools. This is primarily the presence of a debugger . For beginner programmers of microcontrollers, this seems insignificant, but when time goes on, and the complexity of the programs increases, the requirements for performance and functionality of the MK code increase. And just then there is a need to understand and see how your code works on the microcontroller. Even if you didn’t get a jtag device , it’s very pleasant to watch, even in the simulator, how the necessary values fall into the necessary registers while the program is running. And of course, if you seriously decided to study the programming of microcontrollers and the architecture of the AVR , then you simply cannot do without a debugger. I am already silent about the hidden work of wiring - the Arduino IDE preprocessor, which allows you to write simpler programs using the functionality of the Arduino libraries, and which adds a lot of garbage to the program, which occupies the controller's program memory, and uses the MC resources. Also an important factor is the modesty of the source editor of the Arduino IDE. And how to be found in the world, real hardcore developers of embedded systems and automatics write only on C and assembler , relying on their own intelligence and experience, and not on the development of Italian students (against whom I have nothing bad, and I will not throw stones at them) .
If you agree with the above, then you have already tried, or are just going to install and use Atmel Studio 7 . I myself am a beginner programmer, it can be said that programming was taught a long time ago at school, it was interpreted by BASIC on MSX machines. And only a couple of years ago I had, as they say, on duty to begin the study and development of C and C ++ . Therefore, from a small height of the bell tower of my own experience, I want to recommend AVR Studio , namely Atmel Studio 7 . In fact, this environment gave me quite a bit of hassle with installing and running it (I use “windows” exclusively for work and fun, and this is Win 7 SP1 64 ), there were several attempts to install it with a run, but it ended with a file until I didn’t install the “Windows6.1-KB3033929-x64.msu” update, after which all my efforts were rewarded and the environment started up. After that, much was said about not literary words and expressions, until the medium began to work more or less adequately ( Atmel Studio 7 I was terribly slowed down at first, on a machine with a good Core i7 and 8 gigabytes of fast DDR4 RAM, I don’t understand what happened later Is the environment somehow mysteriously prokashirovalsya in the system, or I'm used to, but now everything works well). I also want to note that this environment was somehow developed and released by the developers of Atmel AVR and ARM controllers, and therefore supports all of its controllers, and provides all the necessary libraries for working with s / s ++. A huge plus, and I suppose the integral part is the presence of an assembler for the platforms described above. Also in the seventh version of the program appeared support for converting Arduino sketches into the program code for the controller in the C language. This option works so far that it is imperfect, and is unable to transform sketches with several tabs, because of which it loses so far a certain relevance.
')
But this environment has a certain disadvantage: it does not support the most popular and cheapest USBaSP programmer, and does not support the possibility of programming directly (using the USB port) Arduino boards from the box. And therefore, in this article I want to share a certain life hacking, and I hope that this will be really useful for someone.
So let's get started. What we need to have: a PC with Atmel Studio 7 installed, an Arduino IDE preferably the latest version, and drivers for your Arduino board, and of course, the “patient” itself. We connect the controller to the PC, the drivers are installed further, and after that you have to perform several manipulations, but this will need to be done once for different Arduino boards.
First, open the Arduino IDE , choose our favorite Blink , and turn on the compiler output in the compilation window at the bottom of the editor:
Then we compile the sketch without loading it into the controller:
After you need to open some kind of text editor, and do a couple of things - copy the commands for the compiler and the compilation flags into the editor window, and edit it in a similar way:
After opening the Atmel Studio 7 environment, select the External Tools item in the Tools tab, create a new profile (you can make several different profiles for each individual Arduino board, where we insert our parameters into the corresponding lines, where the address of the avrdude program is shown , and the commands for the compiler:
Then you can create any project, writing, for example, the same code of your favorite twinkler, but already in C, and upload our code to the controller, first gathering your project, pressing F7 (Build project), and after clicking on the item with the name of your profile Programming in the Tools tab:
Your program will be written into the memory of the controller's programs, the bootloader will remain in its place, and you can always open the Arduino IDE and write your code in the usual way. I thank everyone for their attention, and I hope that this advice will be useful to someone.
Source: https://habr.com/ru/post/370041/
All Articles