What is a SIM-bank and how it works
Devices such as VoIP GSM gateways are growing in popularity among Russian companies and entrepreneurs. The scope of their application is quite wide - starting with the company's savings on calls to mobile numbers, ending with various SMS-broadcasts. The needs of many companies are not limited to one, even the most powerful, gateway. When using several similar devices, especially distributed geographically, the labor costs for their support and administration increase significantly. Devices called SIM banks make it possible not only to simplify work with several VoIP GSM gateways, but also to add to the last many interesting possibilities. Today, using the example of SMB32 and SMB128 SIM banks, we will get to know and learn how to work with this class of devices.

SIM bank is a device of aggregation of SIM cards in one place. Simply put, this is a device into which SIM cards are physically connected, and a SIM card is connected to a GSM gateway via an IP network. This means that GSM gateways can be installed anywhere - even in different cities and countries, while the SIM cards themselves will always be at your fingertips. At the same time, for the operator, the registration point of the SIM card will be the location of the gateway with which it is currently working, and not its actual location.
Aggregation of multiple SIM cards in one device is the main function of a SIM bank. But it can also perform other functions, for example:
')
Thanks to the SIM bank, you can at any time swap SIM cards in gateways located in different parts of the city or program a scenario in which SIM cards are automatically linked to another GSM gateway and, thereby, create the illusion of a SIM card movement for a telecom operator.
Perhaps the most popular today SIM-class devices are those that are produced under the name GoIP. There is a SMB32 model for 32 SIM cards, and there is a SMB128 model, respectively, for 128 SIM cards. We had an older model on hand and a pair of four-channel VoIP GSM GoIP 4 gateways. The settings described in the article will also apply to the younger SMB32 model and to other VoIP GSM GoIP gateways models (on one channel, on eight, on sixteen).


On the left - SMB32 SIM Bank, on the right - SMB128 SIM Bank
But what you should pay attention to is the device manufacturer. According to the glorious Chinese tradition, VoIP GSM gateways called GoIP are produced by at least two companies - Hybertone and DBL. Although these devices are identical at the hardware level, they may have differences in software. Everything described in this article is applicable to GSM gateways and SIP banks manufactured by DBL. To guarantee the applicability of these settings to Hybertone devices, I, unfortunately, can not.
For completeness, it is worth noting that Dinstar, another manufacturer of VoIP GSM gateways, also produces SIM banks. They have models for 64 and 128 SIM-cards, but unfortunately, it hasn’t been possible to work with them yet.
GoIP SIM banks can operate in two modes: act as a server for GSM gateways or work in conjunction with free SMB Scheduler Server software. The first option is simpler, but has some limitations. It is suitable for those companies that use one SIM bank and do not plan to transfer SIM cards in it between different gateways. Working with the SMB Scheduler Server does not have these limitations - according to the developers, up to 10,000 SIM cards are supported, as well as the possibility of their distribution both between the channels of one gateway and between the gateways themselves.
We will consider both of these options for work - from simple to complex. But first you need to register our GSM gateways on the IP PBX, in our case it will be Asterisk. Those who are familiar with both VoIP GSM GoIP gateways and Asterisk can simply skip the next section.
Initially, quite a bit of theory. GoIP GSM gateways can register on the SIP server in four different ways:
For the basic configuration of the GoIP - Asterisk combination, we will use the fourth option, but in the registration mode. We will send all incoming calls to SIM cards to some internal number to PBX. Outgoing calls will be routed based on prefixes: depending on which SIM card you want to place a call on, Asterisk will substitute a specific prefix into the called number. The gateway will analyze the prefix, then drop it and route the call through the desired SIM card (channel).
In Asterisk, we create a SIP peer for our gateway with the Line ID - 70064 parameter (these are the last five digits of the gateway’s serial number, for convenience):
As I said, the GSM gateway in our example will distribute outgoing calls to its lines, based on the prefix number. But for this we need Asterisk to add these prefixes to numbers, guided by some logic. In our case, there will be no special logic - Asterisk will in turn add prefixes 011, 012, 013 and 014 (which correspond to 1-4 lines of the gateway) until it finds a free line and the call does not pass. By playing with a number mask, you can build a more flexible outgoing line selection logic, based, for example, on which telecom operator the called number belongs to.
Now in the GoIP web-interface, go to the Configurations section - Basic VoIP . For the Config Mode option, select the Trunk Gateway Mode option — the corresponding settings for this mode will be displayed below. In the SIP Trunk Gateway1 option, we specify the IP address of our SIP server or its domain name. In the Phone Number option, the name of the peer created on the SIP server side is specified, in our case it is goip70064 . Re-register Period (s) - specifies the time interval in seconds for re-registration on the SIP server; we specified 60 seconds, if you specify 0 - then the registration will not be carried out. Next comes the Authentication ID option, which specifies the name for authentication of the gateway on the SIP server and often coincides with the name of the SIP peer, in our case this is again goip70064 . Then the password is specified in the Password option, we specified - pass70064 . In the last option, Routing Prefix - specifies the prefix, which will be distributed outgoing calls between GSM lines. In the extensions.conf file in Asterisk, we used the prefixes 011 - 014, so they should be indicated here:

After the basic connection settings, add the settings for incoming and outgoing routing. Configuration of inbound routing is available in Configuration - Call In . Here it is enough to specify for each line in the Forwarding to VoIP option the Number - the number that will be called on the IP-PBX. In our case, I indicated just 5555 for all lines. In order to simply verify that calls actually come from our GSM lines to the SIP server, this will be quite enough.

Configuring outbound routing is done in the Configuration - Call out section. For each line, the Dial Plan parameter is configured, in which you need to write a rule that will remove the prefix (the same prefix that we specified in the Configurations section - Basic VoIP ) at the beginning of the called number:

For our example of these settings, it will be quite enough: we will be able to make calls through the GoIP gateway lines, add the appropriate prefix to the called numbers, and also receive calls from any GSM line, directing them all to 5555 extension number, which is connected to Asterisk. We have made similar settings for the second GoIP gateway, which will also work with our SIM bank.
Now let's connect our GSM GoIP 4 gateways to the SMB128 SIM bank operating in server mode. To do this, you need to switch the SIM bank to the server operation mode and add accounts for each GoIP gateway. In the SMB128 web interface, go to the Configurations - SIM Bank Settings section and in the Operation Mode option, select the Use Buil-in SIM Server option. In the GoIP Clients section, add the required number of accounts for each GoIP gateway. You will need to fill in the following fields:
In our example, we got the following settings (other options remained in the default value):

Next, we connect the GoIP gateways to the SIM bank. In the GoIP gateway web interface, go to the Configurations section - Preferences . We translate the Remote Server option to the Enable state, after which additional options will appear. We switch Remote SIM to the Enable state — thereby, indicating the gateway to use the mode of operation with a remote SIM server. In the Server option, we indicate the IP address of the SIM bank or its domain name, and in the ID option, the gateway identification number is the same Login ID that we used when setting up an account in the SIM bank. In the Password option, specify the corresponding password.

As already mentioned, the mode of operation of the SIM bank as a server has some limitations. The most important of them is that each channel of each GSM gateway is allocated its own range of SIM-cards, which cannot be used by other channels. That is, the whole range of SIM-cards is divided into several non-overlapping sets, each of which is assigned to a specific GSM channel.
It looks like this: in the Configurations - SIM Bank Settings section of the Web interface of a SIM bank, there is an option # of SIM slots reserved per line , which indicates the number of SIM cards that can be used by each of the channels. In our example, we have two four-port GoIP4 gateways, for a total of 8 channels. If in this option we specify, for example, the value “3”, then the first channel of the first gateway will have access to SIM cards No. 1, No. 2 and No. 3, the second channel of the first gateway No. 4, No. 5 and No. 6, and the first channel second gateway - №13, №14 and №15.

After we have allocated to each channel its set of SIM cards, it is necessary to give answers to two questions: first, what event must occur for the SIM bank to replace the current SIM card for the GSM channel with another SIM card from the set . Secondly, which SIM card should be replaced when this event occurs? We will give the answer to the first question in the next section, but the SIM Schedule Mode option answers the second question. The following methods are available for selecting a working SIM card:
Now is the time to set up events, the occurrence of which entails switching to another SIM-card or carrying out SIM-banks for some other actions. There are two subsections in the Configurations section for this:


The following actions can be assigned to each of the events:
In principle, these are all basic settings when a SIM bank is running in server mode. The only thing you should pay attention to is the correct installation and removal of SIM cards. In order to do this safely, you must first turn off the power to the necessary slot. The keys on the case of the SIM bank are designed for this purpose, but it is much easier to do this using the Web interface. Go to the Install / Remove SIM Cards section and click on the title of the required slots. Gray color means that power is supplied to the slot, red color does not. Click Submit to confirm the action, install or remove the SIM card, turn on the slot power and confirm the action again with the Submit button.
The SIM Slot Status section is intended for monitoring in the SIM bank of SIM cards. The data in this section is presented in the form of a table, where each cell corresponds to one SIM-card and contains the following information:
Also, when you hover the mouse over a cell, a pop-up prompt will appear with advanced status parameters and statistics for the SIM card.

The work of the SIM bank as a client is possible when using the free software Scheduler Server. Scheduler Server is a software server that allows you to manage several GoIP gateways and SMB SIM banks at once. At the time of this writing, the current release version of software 1.7.2 and is available for download at the link .
When using the Scheduler Server, the following features become available:
Looking ahead, I will note that the Scheduler Server has its limitations as compared to using the SIM bank as a server. First of all, it concerns the fact that switching between SIM-cards is possible only by time, but not by events.
System requirements:
Network requirements:
After unzipping the resulting package, you need to run the smb_scheduler_install.sh script, which will ask several clarifying questions and install everything, including the database. Further, all configuration is done in the web interface.
The main role of the server is to connect the SIM card in the SIM bank with the GoIP gateway line. It works as follows:
There are two ways to distribute SIM cards: in fixed mode and in group assignment mode. Fixed mode is the establishment of a GSM-line connection - the SIM slot is manual; this connection will not change until the user himself makes any changes. The group assignment mode is a dynamic mode of creating connections. A GSM line is a SIM slot.
Unlike the mode of operation of a SIM bank as a server, where each group of SIM cards can only be tied to a specific GSM channel, the use of the Scheduler Server provides much more opportunities for the distribution of SIM cards. It works as follows: groups are created, to which you can link either any slots in the SIM bank, or any GSM lines of any GSM gateway. Accordingly, the distribution of SIM-cards on GSM-lines is carried out within these groups.
However, there is another feature - every GSM gateway (the gateway, not the line) is tied to a zone. Zones are created by the user and, according to the idea of the developers, should characterize the real territorial location of the gateway. It is necessary to implement the SIM card motion emulation function: The Scheduler Server is configured by default to constantly switch SIM cards between gateways from different zones.
When does a SIM switch occur? Alas, in the case of the Scheduler Server, only temporary conditions work. For each group, the following temporary rules for the distribution of SIM cards can be defined:
The last question to be answered is how the selection of the next one for the appointment of a SIM card takes place. The algorithm here is pretty simple:
First, using the Scheduler Server Web interface, you need to create accounts for all GSM gateways and SIM banks that will be connected to it. Accounts for GSM gateways are created in the GoIP section. Click Add and fill in the following fields:

Accounts for SIM banks are created, respectively, in the section of SIM Bank . To add a new device, you need to fill in the following fields:

Go to the web-interfaces of our devices. Let's start with the GSM gateway GoIP. In the Configurations - Preferences section , we translate the Remote Server and Remote SIM options to the Enable state. In the Server option, we specify the IP address of the Scheduler Server or its domain name, the ID option indicates the gateway identification number - the same GoIP ID that we used when we created the account in the Scheduler Server, in the Password field we specify the corresponding password. Switch the Net protocol to the UDP state.

Now we will register our SIM bank on the Scheduler Server. In the SMB128 web interface, go to the Configurations section - SIM Bank Setting and in the Operation Mode option, select Use External SIM Server , and in the SIM Data Communications with option, select SIM Server . All other settings are similar to those of the GSM gateway.

The easiest way to set up a SIM group destination is in the Configuration - Group section of the web interface. After the required number of groups has been created, you can bind the slots of the SIM bank to them - to do this, click the SIM link to the right of the group name. GSM- GoIP , – Scheduler .

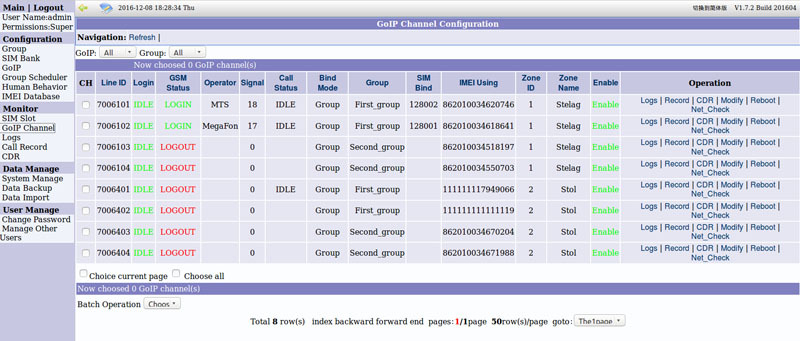
SIM- «» GSM- GSM-, Monitor — GoIP Channel .
SIM- GoIP SMB Scheduler Server. , , « ». , / , GoAntiFraud . , GoIP SMB. , -, . , 7- , .
What is SIM-bank
SIM bank is a device of aggregation of SIM cards in one place. Simply put, this is a device into which SIM cards are physically connected, and a SIM card is connected to a GSM gateway via an IP network. This means that GSM gateways can be installed anywhere - even in different cities and countries, while the SIM cards themselves will always be at your fingertips. At the same time, for the operator, the registration point of the SIM card will be the location of the gateway with which it is currently working, and not its actual location.
Aggregation of multiple SIM cards in one device is the main function of a SIM bank. But it can also perform other functions, for example:
')
- centralized management of SIM cards;
- hot swap / install SIM cards;
- automatic distribution of SIM cards between GSM gateways according to temporary rules;
- Automatic replacement of SIM cards on GSM gateways upon the occurrence of certain events or by temporary criteria.
Thanks to the SIM bank, you can at any time swap SIM cards in gateways located in different parts of the city or program a scenario in which SIM cards are automatically linked to another GSM gateway and, thereby, create the illusion of a SIM card movement for a telecom operator.
What are the SIM-banks are
Perhaps the most popular today SIM-class devices are those that are produced under the name GoIP. There is a SMB32 model for 32 SIM cards, and there is a SMB128 model, respectively, for 128 SIM cards. We had an older model on hand and a pair of four-channel VoIP GSM GoIP 4 gateways. The settings described in the article will also apply to the younger SMB32 model and to other VoIP GSM GoIP gateways models (on one channel, on eight, on sixteen).
On the left - SMB32 SIM Bank, on the right - SMB128 SIM Bank
But what you should pay attention to is the device manufacturer. According to the glorious Chinese tradition, VoIP GSM gateways called GoIP are produced by at least two companies - Hybertone and DBL. Although these devices are identical at the hardware level, they may have differences in software. Everything described in this article is applicable to GSM gateways and SIP banks manufactured by DBL. To guarantee the applicability of these settings to Hybertone devices, I, unfortunately, can not.
For completeness, it is worth noting that Dinstar, another manufacturer of VoIP GSM gateways, also produces SIM banks. They have models for 64 and 128 SIM-cards, but unfortunately, it hasn’t been possible to work with them yet.
SIM Bank Operation Modes
GoIP SIM banks can operate in two modes: act as a server for GSM gateways or work in conjunction with free SMB Scheduler Server software. The first option is simpler, but has some limitations. It is suitable for those companies that use one SIM bank and do not plan to transfer SIM cards in it between different gateways. Working with the SMB Scheduler Server does not have these limitations - according to the developers, up to 10,000 SIM cards are supported, as well as the possibility of their distribution both between the channels of one gateway and between the gateways themselves.
We will consider both of these options for work - from simple to complex. But first you need to register our GSM gateways on the IP PBX, in our case it will be Asterisk. Those who are familiar with both VoIP GSM GoIP gateways and Asterisk can simply skip the next section.
Connecting the GoIP gateway to the SIP server Asterisk
Initially, quite a bit of theory. GoIP GSM gateways can register on the SIP server in four different ways:
- Single Server Mode - in this mode, the GoIP gateway registers on a remote SIP server using just one account. All incoming and outgoing calls for all lines on the gateway will go through one SIP connection. Routing is carried out at the expense of prefix substitution to the called number in accordance with the used GSM line on the gateway.
- Config By Line - in this mode, each GSM line on the gateway has its own independent settings. Accordingly, for each line on the SIP server is set up a separate account. In this mode, each line on the GSM gateway can be registered on its SIP server.
- Config By Group - this mode is the combination of Single Server Mode and Config By Line - all the lines on the gateway are combined into groups, and each group is assigned its own SIP settings. Accordingly, the lines combined into one group use a SIP connection corresponding to this group.
- Trunk Gateway Mode - the main feature of this mode is the ability to connect to a SIP server without registration. Call routing, as in the first mode, is based on the prefixes that are set for each line.
For the basic configuration of the GoIP - Asterisk combination, we will use the fourth option, but in the registration mode. We will send all incoming calls to SIM cards to some internal number to PBX. Outgoing calls will be routed based on prefixes: depending on which SIM card you want to place a call on, Asterisk will substitute a specific prefix into the called number. The gateway will analyze the prefix, then drop it and route the call through the desired SIM card (channel).
In Asterisk, we create a SIP peer for our gateway with the Line ID - 70064 parameter (these are the last five digits of the gateway’s serial number, for convenience):
[goip70064] type=friend host=dynamic defaultuser=goip70064 secret=pass70064 qualify=yes dtmfmode=rfc2833 context=from-trunk-sip-goip70064 As I said, the GSM gateway in our example will distribute outgoing calls to its lines, based on the prefix number. But for this we need Asterisk to add these prefixes to numbers, guided by some logic. In our case, there will be no special logic - Asterisk will in turn add prefixes 011, 012, 013 and 014 (which correspond to 1-4 lines of the gateway) until it finds a free line and the call does not pass. By playing with a number mask, you can build a more flexible outgoing line selection logic, based, for example, on which telecom operator the called number belongs to.
[from-phones] exten => _8XXXXXXXXXX,1,Dial(SIP/goip70064/011${EXTEN}) ; GSM exten => _8XXXXXXXXXX,n,Dial(SIP/goip70064/012${EXTEN}) ; GSM exten => _8XXXXXXXXXX,n,Dial(SIP/goip70064/013${EXTEN}) ; GSM exten => _8XXXXXXXXXX,n,Dial(SIP/goip70064/014${EXTEN}) ; GSM exten => _8XXXXXXXXXX,n,Hangup() /Etc/asterisk/sip.conf fileNow in the GoIP web-interface, go to the Configurations section - Basic VoIP . For the Config Mode option, select the Trunk Gateway Mode option — the corresponding settings for this mode will be displayed below. In the SIP Trunk Gateway1 option, we specify the IP address of our SIP server or its domain name. In the Phone Number option, the name of the peer created on the SIP server side is specified, in our case it is goip70064 . Re-register Period (s) - specifies the time interval in seconds for re-registration on the SIP server; we specified 60 seconds, if you specify 0 - then the registration will not be carried out. Next comes the Authentication ID option, which specifies the name for authentication of the gateway on the SIP server and often coincides with the name of the SIP peer, in our case this is again goip70064 . Then the password is specified in the Password option, we specified - pass70064 . In the last option, Routing Prefix - specifies the prefix, which will be distributed outgoing calls between GSM lines. In the extensions.conf file in Asterisk, we used the prefixes 011 - 014, so they should be indicated here:
- Line1: 011
- Line2: 012
- Line3: 013
- Line4: 014
After the basic connection settings, add the settings for incoming and outgoing routing. Configuration of inbound routing is available in Configuration - Call In . Here it is enough to specify for each line in the Forwarding to VoIP option the Number - the number that will be called on the IP-PBX. In our case, I indicated just 5555 for all lines. In order to simply verify that calls actually come from our GSM lines to the SIP server, this will be quite enough.
Configuring outbound routing is done in the Configuration - Call out section. For each line, the Dial Plan parameter is configured, in which you need to write a rule that will remove the prefix (the same prefix that we specified in the Configurations section - Basic VoIP ) at the beginning of the called number:
- for CH1: 011: -011 |
- for CH2: 012: -012 |
- for CH3: 013: -013 |
- for CH4: 014: -014 |
For our example of these settings, it will be quite enough: we will be able to make calls through the GoIP gateway lines, add the appropriate prefix to the called numbers, and also receive calls from any GSM line, directing them all to 5555 extension number, which is connected to Asterisk. We have made similar settings for the second GoIP gateway, which will also work with our SIM bank.
SIM Bank as a server
Connecting the GoIP gateway to the SIM bank
Now let's connect our GSM GoIP 4 gateways to the SMB128 SIM bank operating in server mode. To do this, you need to switch the SIM bank to the server operation mode and add accounts for each GoIP gateway. In the SMB128 web interface, go to the Configurations - SIM Bank Settings section and in the Operation Mode option, select the Use Buil-in SIM Server option. In the GoIP Clients section, add the required number of accounts for each GoIP gateway. You will need to fill in the following fields:
- GoIP Type - model of the GoIP gateway, choose from the drop-down list
- Login ID - identification number of the gateway, used as a login to connect to the SIM bank. Must consist of numbers only. For convenience, you can use the last few digits of the serial number or MAC address of the gateway
- Password - password to connect to the SIM bank
In our example, we got the following settings (other options remained in the default value):
- Operation Mode : Use Built-in SIM Server
- GoIP Type : GoIPx4 Login ID : 70064 Password : pass70064
- GoIP Type : GoIPx4 Login ID : 70061 Password : pass70061
Next, we connect the GoIP gateways to the SIM bank. In the GoIP gateway web interface, go to the Configurations section - Preferences . We translate the Remote Server option to the Enable state, after which additional options will appear. We switch Remote SIM to the Enable state — thereby, indicating the gateway to use the mode of operation with a remote SIM server. In the Server option, we indicate the IP address of the SIM bank or its domain name, and in the ID option, the gateway identification number is the same Login ID that we used when setting up an account in the SIM bank. In the Password option, specify the corresponding password.
SIM card allocation rules
As already mentioned, the mode of operation of the SIM bank as a server has some limitations. The most important of them is that each channel of each GSM gateway is allocated its own range of SIM-cards, which cannot be used by other channels. That is, the whole range of SIM-cards is divided into several non-overlapping sets, each of which is assigned to a specific GSM channel.
It looks like this: in the Configurations - SIM Bank Settings section of the Web interface of a SIM bank, there is an option # of SIM slots reserved per line , which indicates the number of SIM cards that can be used by each of the channels. In our example, we have two four-port GoIP4 gateways, for a total of 8 channels. If in this option we specify, for example, the value “3”, then the first channel of the first gateway will have access to SIM cards No. 1, No. 2 and No. 3, the second channel of the first gateway No. 4, No. 5 and No. 6, and the first channel second gateway - №13, №14 and №15.
After we have allocated to each channel its set of SIM cards, it is necessary to give answers to two questions: first, what event must occur for the SIM bank to replace the current SIM card for the GSM channel with another SIM card from the set . Secondly, which SIM card should be replaced when this event occurs? We will give the answer to the first question in the next section, but the SIM Schedule Mode option answers the second question. The following methods are available for selecting a working SIM card:
- In sequence - sequential distribution - select the first SIM card in the list
- At random - random selection of a working SIM card
- Idle the longest - selects the SIM card that lasts the longest
- The fewest amount of outgoing calls - selects the SIM card that has the lowest number of outgoing calls.
- The least amount of accumulative talk time - selects the SIM card with the least amount of total talk time
Terms of switching between SIM cards
Now is the time to set up events, the occurrence of which entails switching to another SIM-card or carrying out SIM-banks for some other actions. There are two subsections in the Configurations section for this:
- Current Allocation Session - events are set up that can occur right during the current session of the SIM card and even right during a call. For example, this may be the achievement of a certain duration of the SIM card in the active mode, the duration of the current call, the number of successful calls, the number of failed calls in a row, the first successful registration of the SIM card after the appointment and others (the full list of events is in the screenshot).
- SIM Card History - events that are checked on the basis of the accumulated statistics of the SIM card and are checked after each completed call via the SIM card, successful or unsuccessful. For example, it may be the achievement of a certain total duration of calls, the number of all calls, the number of unsuccessful calls, reduction of the balance to a certain level and others (again - in the screenshot).
The following actions can be assigned to each of the events:
- Null - no action assigned, nothing will happen.
- Re-allocate another SIM - assign another SIM card for this GSM line, the current SIM card will be put on hold
- Disable the SIM and re-allocate another SIM - assign another SIM card for this GSM line, the current SIM card will be disconnected, that is, excluded from the set of SIM cards assigned to the line.
- Re-assign a new IMEI - assign a new IMEI value for this GSM line
- Disable the SIM and re-allocate another SIM - disable the current SIM card, then assign a new IMEI value and assign another SIM card for this GSM line
- Check Balance - check the balance on the current SIM card account. For this item to work, you need to make settings in the Configurations - Get Balance section.
- Display Warning - display a warning that will appear in the section for monitoring the status of SIM slots - section SIM Slot Status
In principle, these are all basic settings when a SIM bank is running in server mode. The only thing you should pay attention to is the correct installation and removal of SIM cards. In order to do this safely, you must first turn off the power to the necessary slot. The keys on the case of the SIM bank are designed for this purpose, but it is much easier to do this using the Web interface. Go to the Install / Remove SIM Cards section and click on the title of the required slots. Gray color means that power is supplied to the slot, red color does not. Click Submit to confirm the action, install or remove the SIM card, turn on the slot power and confirm the action again with the Submit button.
SIM Card Monitoring
The SIM Slot Status section is intended for monitoring in the SIM bank of SIM cards. The data in this section is presented in the form of a table, where each cell corresponds to one SIM-card and contains the following information:
- The cell name is the slot number (SIM 1, SIM 2, etc.). Depending on the state of the slot, the color of the name changes:
- gray - the slot is not active or the SIM card is not installed
- green - a SIM card is installed and this slot is enabled, that is, tied to one of the GSM gateway lines
- blue - the SIM card is installed, but is in the standby state, in other words, not currently tied to the GSM gateway
- red - power off
- S - (Status) displays the current status:
- RUNNING - SIM card is in operation, those are connected to the GSM gateway
- SLEEP - the SIM card is installed, but is in the standby state, in other words, not currently tied to the GSM gateway
- DISCNT - SIM card has been removed from the slot or power is off.
- B (Bind Line) - GSM number, in conjunction with which this SIM card works; consists of <gateway identification number> + <GSM line number> - for example, for our gateway with ID 70064, the first line will look like - 7006401, the second - 7006402, and so on.
- G - (GSM Register) indicates whether the SIM card is registered or not: Y is registered, N is not registered.
- T - (Call Time) total time of calls, in minutes
- C - (Call Count) total number of calls
Also, when you hover the mouse over a cell, a pop-up prompt will appear with advanced status parameters and statistics for the SIM card.
SIM bank as a customer
The work of the SIM bank as a client is possible when using the free software Scheduler Server. Scheduler Server is a software server that allows you to manage several GoIP gateways and SMB SIM banks at once. At the time of this writing, the current release version of software 1.7.2 and is available for download at the link .
When using the Scheduler Server, the following features become available:
- centralized management of multiple SMB SIM Bank devices and GoIP gateways
- static binding of the SIM card to the GSM gateway line
- dynamic distribution of SIM cards between GSM gateways
- automatic replacement of SIM-cards on GSM gateways upon the occurrence of a certain event
- automatic switching of the SIM card from one GSM gateway to another
Looking ahead, I will note that the Scheduler Server has its limitations as compared to using the SIM bank as a server. First of all, it concerns the fact that switching between SIM-cards is possible only by time, but not by events.
Install Scheduler Server
System requirements:
- recommended for use as OS - Linux Centos 32-bit
- Apache 2 or higher is recommended as HTTP server.
- PHP 5 or higher
- MySQL server version 5 or higher
Network requirements:
- packet loss should not exceed 5%
- packet transfer delay should not exceed 300 ms
- one SIM channel can occupy a band of up to 11 kbps
After unzipping the resulting package, you need to run the smb_scheduler_install.sh script, which will ask several clarifying questions and install everything, including the database. Further, all configuration is done in the web interface.
How does Scheduler Server work?
The main role of the server is to connect the SIM card in the SIM bank with the GoIP gateway line. It works as follows:
- GSM gateway and SIM bank are registered on the Scheduler server
- Scheduler server connects the SIM-card in the SIM-bank with the line of the GSM-gateway in accordance with the rules
- GSM gateway registers the corresponding SIM card with the service provider
There are two ways to distribute SIM cards: in fixed mode and in group assignment mode. Fixed mode is the establishment of a GSM-line connection - the SIM slot is manual; this connection will not change until the user himself makes any changes. The group assignment mode is a dynamic mode of creating connections. A GSM line is a SIM slot.
Group mode
Unlike the mode of operation of a SIM bank as a server, where each group of SIM cards can only be tied to a specific GSM channel, the use of the Scheduler Server provides much more opportunities for the distribution of SIM cards. It works as follows: groups are created, to which you can link either any slots in the SIM bank, or any GSM lines of any GSM gateway. Accordingly, the distribution of SIM-cards on GSM-lines is carried out within these groups.
However, there is another feature - every GSM gateway (the gateway, not the line) is tied to a zone. Zones are created by the user and, according to the idea of the developers, should characterize the real territorial location of the gateway. It is necessary to implement the SIM card motion emulation function: The Scheduler Server is configured by default to constantly switch SIM cards between gateways from different zones.
When does a SIM switch occur? Alas, in the case of the Scheduler Server, only temporary conditions work. For each group, the following temporary rules for the distribution of SIM cards can be defined:
- cyclic interval - redistribution is performed at regular intervals, for example, every hour
- according to the daily schedule - up to 9 time intervals are allocated for each day, each of which has one SIM card. After this time interval, the SIM card goes into standby mode. When a new interval occurs, the GSM line is assigned the next SIM card.
- according to the weekly schedule - similar to the previous item, but the schedule is assigned immediately for the whole week.
The last question to be answered is how the selection of the next one for the appointment of a SIM card takes place. The algorithm here is pretty simple:
- For the first time, a SIM card and a GSM line from one group are randomly linked and put into operation.
- When working time ends, the SIM card and GSM line break the connection and go to the standby state
- Upon the occurrence of a new working interval, a new communication is assembled, taking into account the following rules:
- The SIM card will not be connected to the GSM line with which it was last connected
- The SIM card will not be connected to the line of the GSM gateway having the same zone number as it was last time.
Connecting devices to the Scheduler Server
First, using the Scheduler Server Web interface, you need to create accounts for all GSM gateways and SIM banks that will be connected to it. Accounts for GSM gateways are created in the GoIP section. Click Add and fill in the following fields:
- GoIP ID (number) : ID number (will be used as login when connecting)
- GoIP Name : arbitrary name of the connected gateway
- Password : password
- Type : GoIP gateway model - selected from the dropdown list
- Group : the group to which GoIP will be included (if already created)
- Zone ID : number of territorial zone
- Zone Name : arbitrary name of the territorial zone
Accounts for SIM banks are created, respectively, in the section of SIM Bank . To add a new device, you need to fill in the following fields:
- SIM Bank ID (Number) : ID number (will be used as a login when connecting)
- SIM Bank Name : arbitrary name of a connected SIM bank
- Password : password
- Type : type - model of the SIM-bank - selected from the drop-down list
- Group : the group in which the SIM bank will be included (if already created)
- The remaining parameters relate to the fine-tuning of the Scheduler Server, in this article we will not consider them.
Go to the web-interfaces of our devices. Let's start with the GSM gateway GoIP. In the Configurations - Preferences section , we translate the Remote Server and Remote SIM options to the Enable state. In the Server option, we specify the IP address of the Scheduler Server or its domain name, the ID option indicates the gateway identification number - the same GoIP ID that we used when we created the account in the Scheduler Server, in the Password field we specify the corresponding password. Switch the Net protocol to the UDP state.
Now we will register our SIM bank on the Scheduler Server. In the SMB128 web interface, go to the Configurations section - SIM Bank Setting and in the Operation Mode option, select Use External SIM Server , and in the SIM Data Communications with option, select SIM Server . All other settings are similar to those of the GSM gateway.
Setting the multi-party mode
The easiest way to set up a SIM group destination is in the Configuration - Group section of the web interface. After the required number of groups has been created, you can bind the slots of the SIM bank to them - to do this, click the SIM link to the right of the group name. GSM- GoIP , – Scheduler .
SIM- «» GSM- GSM-, Monitor — GoIP Channel .
- , SIM-, Operation Modify
- Group None (for fixed bind mode)
- Plan to bind Sim SIM-, Save.
- SIM Monitor — SIM Slot
- , GSM-, Operation Modify
- Group None (for fixed bind mode)
- Plan to bind GoIP Channel GSM- Save .
SIM- GoIP SMB Scheduler Server. , , « ». , / , GoAntiFraud . , GoIP SMB. , -, . , 7- , .
Source: https://habr.com/ru/post/369963/
All Articles