Kettle path to astrophoto. Part 2 - Shooting Jupiter
Hello geektimes! In the first part, it was briefly described what equipment might be suitable (or not suitable) for photographing celestial bodies. In the second part, we turn to the practical consideration of how to get and how to process the images.

In principle, there are a lot of subtleties with software. Continued under the cut.
Note: the purpose of this publication is not to boast of “masterpieces”, but to show the principle of processing astronomical photos, especially since it is very different from the processing of “earthly” photos. Therefore, the request to the "pro" does not write how bad it is compared to the 10 kilobax setup and observatories in Chile. I myself know it :) The following frames were taken in the center of the city from the balcony, so the conditions for astronomy are not the most favorable. But what is, that is.
')
For consideration, choose the most popular and simple objects for lovers: Jupiter and the Orion Nebula (M42).
Jupiter is quite a bright object, so the main problem here is the atmosphere and heat flows from the windows of buildings. With an increase already in 100-200x, the air oscillations imperceptible to the eye noticeably distort the picture. Fortunately, the quality improvement method is simple - an increase in the number of shots. The fluctuations of air are of a random nature, sometimes there are moments of “calm”, therefore a special software can select only clear frames.
Consider a simple example: a source movie of 200 frames, a single frame looks like this:
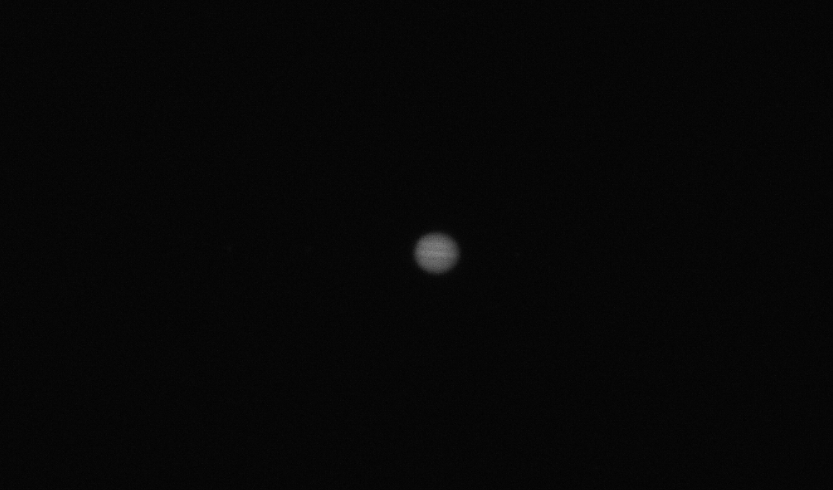
In the original, without compression, this video takes 400 MB. By the way, the video is shown in the player as black and white, because AstroCamera writes video in RAW format.
As you can see, the picture is not very presentable, but it is quite possible to get a relatively decent photo from it.
To do this, do the following.
1. Image Stabilization and Sorting Images by Quality
To do this, use the program PIPP ( Planetary Imaging PreProcessor ).
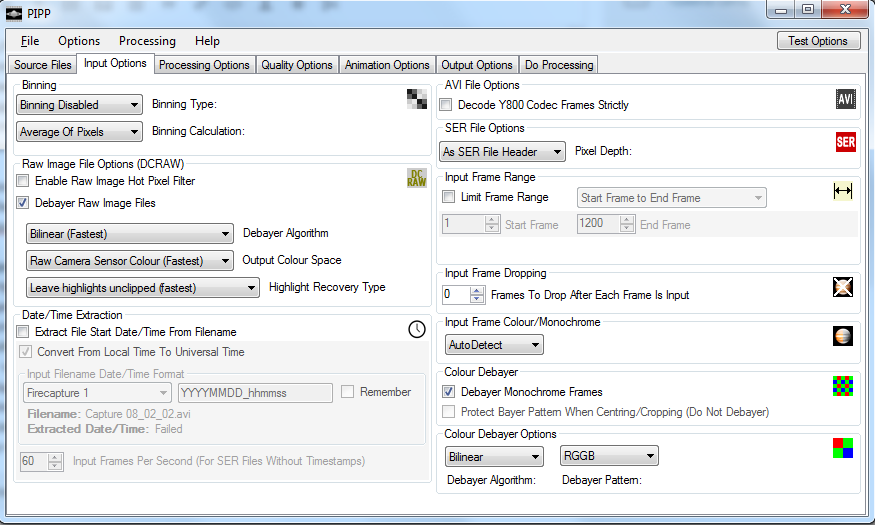
Our task is to select the clearest frames from the entire movie and center the image. Activate the following options in the program:
- Debayer monochrome frames
- Frame stabilization mode: planetary
- Enable quality estimation, 20%
- Output: AVI
2. Gluing images
Combining images allows you to improve the signal-to-noise ratio, because useful signal grows faster than noise. This will then highlight less contrasting details.
We open the video produced in the first step in the Autostakkert program.
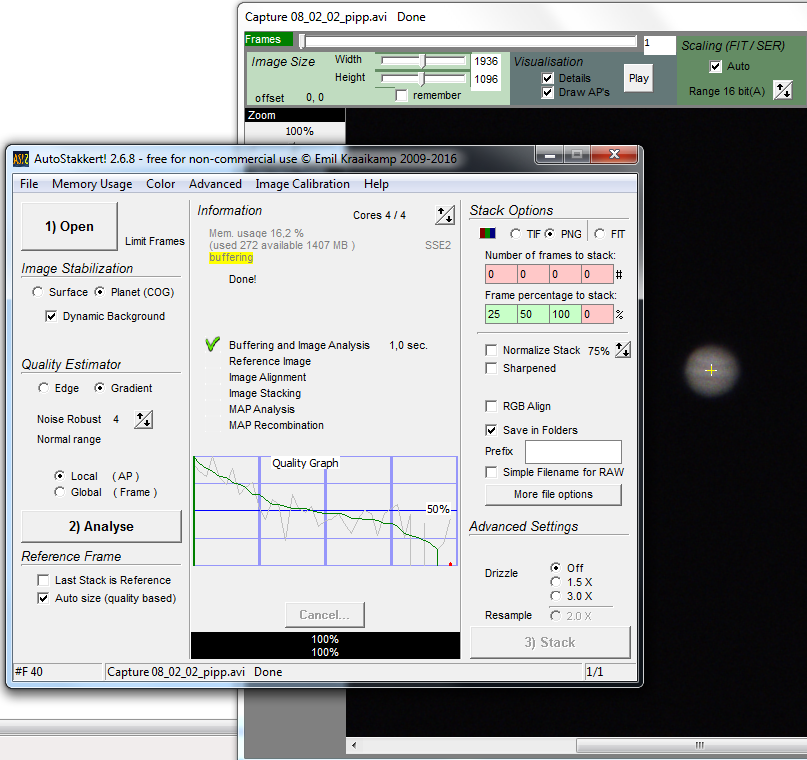
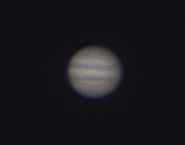
We select the Planet mode and we start gluing. It is interesting to compare the quality of "before" and "after", as you can see, the noise in the image is noticeably less.
The rest is a matter of technique. In Photoshop, with the help of Curves we increase the contrast of the middle part, and also increase the sharpness:

And the final touch. If you unscrew in Photoshop Levels to the maximum, in the frame you can see the satellites of Jupiter:
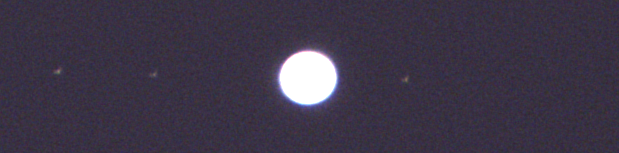
Alas, in this form they are of little use to us - the details of the planet itself would be irretrievably lost. The dynamic range of the camera does not allow to get the details of such different brightness in one frame (by the way, the satellites and the planet are clearly visible). Therefore, we use HDR technology, combining 2 images with different exposures. In the archive of the shooting for that day, I just found an overexposed image, on which Jupiter’s details are not visible, but the satellites are clearly visible:

(sometimes it is useful not to delete even useless frames :)
By the way, this frame clearly shows the distortion of Jupiter due to heat flows from the balcony (you have to shoot with the door open, because the balcony is small).
We combine the layers in Photoshop, in the new layer we select the replacement mode only for the bright areas, slightly adjust the background with the help of Curves.
The end result looks like this:
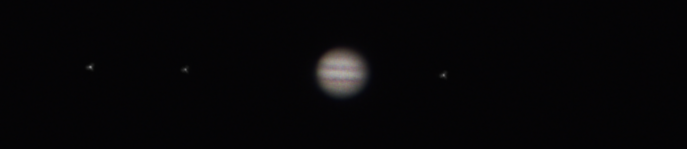
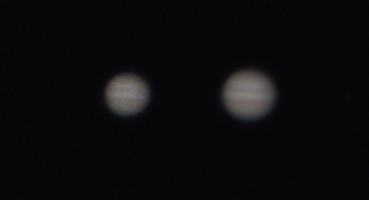
As suggested in the comments, if Registax is used for addition and sharpness correction, the result will be even better. Photo after adding another video from 1000 frames:
Of course, this will not allow us to get into the Astronomy Picture of the Day, but I hope the process is now more or less clear. The next final part will be about photographing nebulae.
Those who wish to try to process the video themselves, can download it by reference (405Mb).
In principle, there are a lot of subtleties with software. Continued under the cut.
Note: the purpose of this publication is not to boast of “masterpieces”, but to show the principle of processing astronomical photos, especially since it is very different from the processing of “earthly” photos. Therefore, the request to the "pro" does not write how bad it is compared to the 10 kilobax setup and observatories in Chile. I myself know it :) The following frames were taken in the center of the city from the balcony, so the conditions for astronomy are not the most favorable. But what is, that is.
')
For consideration, choose the most popular and simple objects for lovers: Jupiter and the Orion Nebula (M42).
Jupiter
Jupiter is quite a bright object, so the main problem here is the atmosphere and heat flows from the windows of buildings. With an increase already in 100-200x, the air oscillations imperceptible to the eye noticeably distort the picture. Fortunately, the quality improvement method is simple - an increase in the number of shots. The fluctuations of air are of a random nature, sometimes there are moments of “calm”, therefore a special software can select only clear frames.
Consider a simple example: a source movie of 200 frames, a single frame looks like this:
In the original, without compression, this video takes 400 MB. By the way, the video is shown in the player as black and white, because AstroCamera writes video in RAW format.
As you can see, the picture is not very presentable, but it is quite possible to get a relatively decent photo from it.
To do this, do the following.
1. Image Stabilization and Sorting Images by Quality
To do this, use the program PIPP ( Planetary Imaging PreProcessor ).
Our task is to select the clearest frames from the entire movie and center the image. Activate the following options in the program:
- Debayer monochrome frames
- Frame stabilization mode: planetary
- Enable quality estimation, 20%
- Output: AVI
2. Gluing images
Combining images allows you to improve the signal-to-noise ratio, because useful signal grows faster than noise. This will then highlight less contrasting details.
We open the video produced in the first step in the Autostakkert program.
We select the Planet mode and we start gluing. It is interesting to compare the quality of "before" and "after", as you can see, the noise in the image is noticeably less.
The rest is a matter of technique. In Photoshop, with the help of Curves we increase the contrast of the middle part, and also increase the sharpness:
And the final touch. If you unscrew in Photoshop Levels to the maximum, in the frame you can see the satellites of Jupiter:
Alas, in this form they are of little use to us - the details of the planet itself would be irretrievably lost. The dynamic range of the camera does not allow to get the details of such different brightness in one frame (by the way, the satellites and the planet are clearly visible). Therefore, we use HDR technology, combining 2 images with different exposures. In the archive of the shooting for that day, I just found an overexposed image, on which Jupiter’s details are not visible, but the satellites are clearly visible:
(sometimes it is useful not to delete even useless frames :)
By the way, this frame clearly shows the distortion of Jupiter due to heat flows from the balcony (you have to shoot with the door open, because the balcony is small).
We combine the layers in Photoshop, in the new layer we select the replacement mode only for the bright areas, slightly adjust the background with the help of Curves.
The end result looks like this:
As suggested in the comments, if Registax is used for addition and sharpness correction, the result will be even better. Photo after adding another video from 1000 frames:
Of course, this will not allow us to get into the Astronomy Picture of the Day, but I hope the process is now more or less clear. The next final part will be about photographing nebulae.
Those who wish to try to process the video themselves, can download it by reference (405Mb).
Source: https://habr.com/ru/post/369941/
All Articles