KDX, the last of the Hotline. Full Russian user manual and admin
Mac users who have crossed the turn of the century from past to present, know the word Hotline. Having heard it, they will recall “Hotliner Day”, “Megapups Cave” and other, nostalgic and half-forgotten. Younger users will shrug their shoulders with surprise. And you have to tell them a lot about life in an era when there were no torrents.
But this story is not mandatory and absolutely not needed in the article. There is a site “Hotline. Entry point " at which everything is already told. Told for a long time.
The purpose of this article is different.
')
For more than fifteen years, I was a sysop and a “sub-bed hoster” of a hotline server in one of the local area networks, which had grown from house to long-distance. But everything comes to an end. And I want the experience gained not to be lost.
For the past ten years, the hotline has been launched on a version called “KDX”. Below I give my own adapted translation into Russian of official English manuals, it is written in human-readable language with a calculation for an ordinary non-advanced user. The translation is tested by time and experience: dozens of people used it as “clients” and several KDX servers were raised with it (the numbers are modestly minimal).
What for?
I am sure that hotline is many times better than the ftp-server that is still common in LAN and is able to replace it, adding to the file sharing functionality of communication. And KDX is the best clone of this bush program.

So, the KDX formula:
(FTP + IRC + Jabber + News + NetFon + DC) * encrypted = KDX
Read more - under the cut.
There are four dozen screenshots and many letters.
The BBS-like file-sharing server in its first version (“Hotline”) appeared in 1996 and it was the first P2P program. Even "Napster" was not yet invented. KDX - the latest version of Hotline, the most perfect, almost brought to the ideal. The network legend claims that it was the “swan song” of Adam Hinkley aka “Hinks,” the author of the very first hotline program.
KDX is made for secure file sharing through servers, which can be both public (with a guest account) and private. The latter are the majority. All traffic is strongly encrypted, and the admin server can set different rights for different user groups on the server. Plus, chat, private messages, news board and announcements. Plus ip-phone and voice chat. Plus the ability to transfer files directly past the server from the client to the client (the so-called DCC).
In the best of their years, the number of Hotline users was several million people (you can’t count, the servers are increasingly private, closed to other people ...), especially the mac-users. Nowadays, torrents have pressed all other types of file sharing, but for creating groups of friends connected besides file sharing also by communication, KDX is now as good as nothing else - especially in local grids, where the exchange speeds and without torrents are great.
Haxial Software has long ceased to exist, the domain haxial.com is put up for sale, and even Wikipedia has deleted the corresponding article .
KDX programs are among enthusiasts, "the last of the Mohicans." I will cite two addresses that have been verified over the years:
In addition to these sites, both enthusiasts support KDX servers.
Now that the program is downloaded, go to the point.
This is a manual for the series “for dummies”, allowing you to quickly and painlessly start working with KDX. As much as will be illustrated in detail.
Briefly:
1. Launch KDX Client.
2. Click the “Connect” button in the main menu.
3. In the “Address” field, enter the IP or URL of the KDX server you want to log into.
4. Click the “Connect” button and the connection process will start.
5. Logging on to the server, use the buttons in the main menu, such as "News" and "Chat" .
Details:
You have already downloaded the KDX Client. Further, it is understood that this was a client version 1.600 with an unreleased trial (I will also tell you how to shoot, but at the end ...)
The client does not require installation, just copy (unzip) it along with all your personal belongings to a convenient place on your disk. Usually, after unzipping, a KDXClient1600-Win folder is created with several files inside. Of these, only the executable file KDXClient.exe is important , and the rest can be deleted (this is English documentation and other stuff).
1. Run KDXClient.exe
A license agreement will appear, with which you need to agree without reading it.
Next, a window will appear in which you must enter your name (nickname). It can be changed later.
If you are behind a firewall, then the client will determine this and will give a request for configuring the router using UPnP. Better to agree. But you can postpone for later.
If you agreed and after a while you saw such a bummer ...
... then this means that your router is old, UPnP does not support. This is fraught with the fact that you have to manually "forward ports" on the router, otherwise some features will not be available. If this procedure is unfamiliar to you, then put down a beer to a more experienced comrade, he will do everything for you!
We continue. The client will open your Main Menu for you.
Click on the “Address Book” button and see this picture.
In connection with the closure of the Official Haxial Server, this single entry in the Address Book is irrelevant. You can click on it and see for yourself:
The connection attempt is not successful ...
... and will abort after a timeout.
You can safely delete this entry so that it does not hang out under your feet (right click on the entry and select "delete"). After that, you can fill in your server addresses - poke into the striped button at the top left, or right-click - select "new"; choose the type “server” (forgot - it doesn't matter, select it automatically), enter its name, IP address or URL, as well as your username and password, if you already have them to this server. Below you can make a short description, write down some comments, set the color with which the entry will be reflected in the Address Book and check the windows that should be opened automatically when entering the server.
Save all dialed (everything can later, of course, change - through the right click on the record).
2. ... If you are reluctant to fiddle with the address book filling, simply click on the “Connect” button and the quick connection window will open.
But before you do that, let me ask you - is the atmosphere not gloomy?
The default skin is very brutal and not everyone likes it. Let's customize the client to your tastes. At the same time, and we will understand a little bit from the Main Menu. Pay attention to the top button “Commands” (Commands), it is most often used and in many respects duplicates the main menu itself. If you click on it without connecting to the server, then from above you will see that there are no connections.
Other buttons repeat those in the main menu with some exceptions. Look for the Settings button at the bottom. We need it.
Here is the settings window that it opens. The first tab is “Indentity”. In it, you customize your personal virtual image:
a) your nickname (you entered it at the very beginning, you can change it);
b) self-description (arbitrary; at least an e-mail, even an ICQ number, even the name of a beloved cat and the date of its birth is up to you);
c) color characteristics: font and background (by default - black on yellow);
d) icon (32x32 pixels). Such striped joy, given by default, on any server immediately catches the eye and is set just to identify the complete novices. Therefore, it makes sense to change it for something individual. Icons of the desired size in the network in bulk, select the appropriate (or draw yourself), and then do this:
Open your icon in Paint (or any other graphics editor), select the entire image (Ctrl + A or Edit menu) and copy it to the clipboard (Ctrl + C). After that, go back to the client settings window, hover over our striped joy and ... copy your icon there (Ctrl + V)! Unusual method, is not it? But this is the only way. Created the program guys with humor.
But we will continue to pile up the settings window.
Here is the second tab (Basic Settings). Everything is understandable more or less and without translation, I would advise only to check the second item with a check: “Lists Require Double-Click”: the work is by default built on one-click management (who knows how to work on a Mac) and unaccustomed to such an interface file, just poking at it with a mouse.
I also note the point "Regulary Ping Server". The client and so periodically pings the server, showing that he did not leave. But if you have a rotten connection and the client falls off spontaneously - check the box. Ping will become frequent and troubles will be overcome. If everything is fine with the connection, then do not touch, do not load the server in vain.
The next tab (More Settings) is also understandable. I will leave for independent investigation ...
Tab appearance and fonts. Let's take a look at the last, and then we will return to it and set up everything that is necessary and optional.
The last tab is your internet phone settings.
Let's return to the previous one, to the appearance and fonts, and select the item “Appearance”, which allows you to change the client's skin. Stumble through the menu (change goes on the fly) and select the appropriate for the eyes.
For example, like this.
With this list, all skins are not exhausted; they are only built-in ones. But if in the client's folder you create the Appearance subfolder and upload external skins there, then all the built-in ones (except the first one, by default) will disappear from the menu, and the downloaded ones will be added. Their sea, there is something to choose. And you can make your own, for that is, a special program.
Also here you need to change the font "Chat / News Font". Worth default.
Russian letters does not reflect. Select Myoclon.
And everything will be fine.
And now let's go to some server!
Let's step on “Connect” in the Main Menu and the already familiar window will open.

3. In the "Address" field, enter the IP or URL of the KDX server you want to log into. (We leave the username and password empty - expecting that the server has a guest account for which they are not needed.)
4. Click “Connect”. The client will connect to the server, if it is the will of Holy Connect.
With high probability (but not necessarily) immediately after the connection is established, the server will show you its welcome window. In this case, it is uninformative.
... but usually it makes sense to read it - there are conditions for obtaining a full account, restrictions for guests and other important points. And in general, entering the house you should definitely read the sign on the door.
5. Let's go through the buttons in the Main Menu.
You have already seen the screenshot, so just with the text:
Commands / Commands - an expanded version of the menu; duplicates all the commands from the main one, adds a few rarely used ones and gives access to the menu of work with a specific server (hereinafter we will look at it in detail, with pictures).
Quick Connect / Connect - to connect to the server by IP or URL (discussed above).
Address Book / Address Book - to record frequently visited servers and connect with them by clicking on the mouse (also discussed above).
Personal Messages / Messages - server microaddress (or microjabber, if you like :)) to send private messages to users located on the server. Pay attention to the gray light bulb. If you receive a new message, it lights up and blinks. It's comfortable.
File Transfers - a monitor window that opens when files are downloaded (or applauded): progress bar in%, time forecast, etc. At the top of the frame is a striped button, through it you can always open the folder where the files are downloaded.
Files / File Browser - file browser, opens a window to access files and folders (it will be discussed below, although it is also not rocket-science, everything is understood intuitively).
Chat / Chat - a list of users in the chat, the main chat window and other public created at this time.
News / News - bulletin board, with sections and postings in them (see examples below).
Userlist / UserList - the list of users located on the server is all trite.
Exit / Exit - close the program, of course.
If you are connected not with one Server, but with several (Client can), then in each of the opened windows you will first have a list of servers, and only then in each of them a list (users, files, news) on this server. Again, everything is intuitive.
Now click on “Commands” again in the Main menu. See, the line with the address of the server we connected to appeared at the top? If you click on it, the menu for this server will open (which is convenient if there are a lot of them).
The buttons in it duplicate the buttons in the main menu - in the first part. The second part provides additional features. The third is for server administrators, it’s useless to poke an ordinary user into it.

We press the "News" button ( News ) and see the news window. Under the name (address) of the server are subcategories, there can be arbitrarily many (in this case, only one).

Clicking on the subcategory we see the tape of postings in it (the old ones crawl down, the new ones are on top), the large texts are hidden by the cat, unfold with the "+" button.
Subcategories can be configured differently for different groups of users: either only for reading, or for reading and writing, etc.
The next button is “Chat” ( Public Chat ). She opens a chat list in which the entire list of public chats. Selecting the desired, you get into the chat room of the usual form. Nothing unusual. (Private chat rooms are hidden, they can be entered only by invitation - just drag the invited user from the user list to the private chat window, even if it is on another server).
The next button is “Files”
Also pretty standard - on the left directory tree, on the right their contents. Everything is intuitive.
Only one thing: by virtue of Mac origin, the Client works by default with a single-click interface: poked into the folder - it opened, poked into the file - it began to download. To view the file info you have to poke it with the right button ... It is unusual for Windows users. But this can be disabled in the settings - I wrote about it in detail ...

Next - the “ Search Files ” button. Also called from the file browser menu - this is the striped rectangular button on the left above.
The search is rigorous, case sensitive: keep this in mind.
Search results in a popup window. Files are downloaded immediately from here, the folders get the transition to their contents.
The next button is the “ User List ”. A complete list of living on the server. Allows you to send any of them a private message. Also allows you to put the ignore user who got it.
In order not to bathe, each time typing from the keyboard the address of the server to which you have logged in, you can enter it into your address book. There is a special button ( Add To Adress Book ) in the second subsection of the menu. But you can manually call the book and then add a new address. The add (or edit added) window looks like this:
Then - the option to change your own password to log in to the server ( Change Own Password ), but not the fact that it works - the administrator must enable this option for your account (or the class of accounts to which yours belongs).
Then you can see the public description of the server ( Get Server Info ).
Another item is viewing the “input plate” of the server (Show Greeting), if you quickly skipped it, and there is something important.
And the last item of the second section (Show My Address) allows you to find out your IP - this is necessary in order to send it to another user and connect your Clients directly, bypassing the server, via DCC (for example, to upload intimate photos that you would not want so that the admin server saw).
The third part of the menu is for the admin server. He will figure it out, and you, the user, need nothing.
And at the very bottom - disconnect with the data (remember, we entered the menu of a particular server) Server, if you want to leave only with it, but not exit the program.
6. A little bit about triality.
KDX-client is a non-emergency unit. It is fully functional and without payment, but in a week it will begin to delay the start, reminding you of payment. And every next week will increase the delay by 30 seconds, until it is completely annoying.
There are two ways to get rid of such non-constructive behavior of the program:
a) brute force: version 1.520 win is distributed by good people archive complete with patch, completely biting reminder; version 1.600 has a broken executable that needs to be replaced with the native one in the client's folder (for this operation, do not forget to save a copy of the settings files - with the .stg extension - and everything will work out for you.). Look for this file on the servers, it usually lies in a public jump.
b) in a natural way: by presenting the purchase certificate file to the Client. Since these are nominal, then in public access are rare. But there are.
And do not worry about morality and piracy. The company has already finished its earthly days, it is impossible to buy a license legally, this software is useless and no one will ever make a claim to you for your forced hacking.
This is the short course for KDX Client management. If you have read this far, then you can easily search through the servers yourself and communicate with their inhabitants.
KDX has an easy-to-use internet phone. You can communicate directly with any user (even without connecting to the server) or organize voice chat for several (aka "conference call", to put it in cultural terms).
This is done like this:
1. Both you and the person with whom you want to talk must have a KDX client running.
2. One of you (or both) must know the IP address of the other. If you connect for the first time, then exchange addresses. You can find out your own through the menu “Commands” + “Show my address”.
3. The request will be answered: “Your address for KDX DCC is (...)”, this is your IP. Send it to the interlocutor by e-mail, fax or pigeon mail ... (And the port for the DCC must also be opened - either automatically or manually: see the very beginning of this TFM.
4. The interlocutor, having received the IP, presses the “Connect” button in the KDX client.
5. Select the type of "Client / DCC". All fields are left empty except for “Address”. The received IP of the caller is entered there. Then click the "Connect" button.
6. A connection status window will appear. After that, the window disappears, and if the error message does not appear, then you are connected. (If you can not connect, then - oops! Some troubles. About them below, at the end of the file).
7. Click on the "Commands" button. At the top of the menu, you should see the name of the person you are connected to. Click on it, and a submenu will pop up. You can check the operation by clicking the "Send Message" button.
8. A message box will appear in which you can write the greeting text and send it by pressing the “Send” button.
9. The interviewee should immediately receive the text sent. If everything works well, then its “Messages” button in the Main Menu will flash. Click on flashing to view.
10. Now let's do voice chat. Do you have a microphone and speakers? (It is better to use a headset with headphones - there will be no parasitic echo during the conversation, and generally more convenient).
11. It is also clear that the microphone, which is - should also work. You can test your microphone and speakers / headphones with the help of AudioTester software of the same company (it lies on the servers).
12. This program is also good because all the settings in it are the same as you need to use in KDX. Click the “Commands” button, then “Settings”, then go to the “Voice Settings” panel in this window - and you will see them.
13. So, the microphone and speakers / headphones work. Now you need to open the “Voice Control” window in KDX (to do this, click the “Commands” buttons and then “Voice Control” / “Voice Controls”).
14. Now the one who pushed the first button “Connect” let him enter the “Voice chat”. On the contrary, it is also possible, but it is better if the connected initiates the chat.
15. The Voice Control window and a list of people in the voice chat will appear. Who does not chat - you will not hear. Did the interlocutor appear? You can speak.
16. To do this, click the Start Microphone button and speak. Interlocutor should hear you.
17. The sound transmission quality may not be optimal if the “speed”, “delay”, and “sensitivity” parameters in the “Voice control” window are selected incorrectly. It is especially important that the “sensitivity” is set correctly. Experiment.
Are you delighted? Want to run your own KDX server? I approve!
For a local network where traffic is free and speeds are high, KDX is better than standard FTP in all such cases. For online communities, it is also very, very good.
Do this:
1. Download KDX Server. Unzip the downloaded archive file to a convenient folder.
2. Run the KDX Server program. The first time she starts, she will be asked to enter the login and password for the administrator account. Enter. , – – , ( ). , - ?
3. . , . . «» ( , , ). , , .. – .
4. KDX Server «Bases», «Default» – , . , / Alias / .
5. KDX «Connect», «» «».
6. IP- «». , KDX- . , « ». 0 KDX .
7. , . «».
8. , .
9. , , «» KDX , . , «».
10. , «» KDX , . , « ».
11. , KDX Server KDX . , , . ( – ..)
KDX – , , . , . .
, . , – «» ( « »). «» , – ( – : , ).
.
«» « » / «Server Settings» , . , .
KDX , , ( , ) – ( , ).
, , , – , , , . , ( , ).
? , , , :
, , ?
No , , .
/ Appearance files? (".hap" files)
«Appearances» , KDX . .hap- . «» . ( – , – / . ).
(? .), .hap- ( / ) , , «Appearance.hap». () , .
? / Sound Lists?
Can. " Sound Lists" , KDX . (.dat .ksl — , ; KDXSoundListEdit), – . « » — .
?
MacOS 9. , .
, / ?
- : ( Windows):
«Start/»() à «All Programs/»() à «Startup/»( ). Startup folder/ . . «Create Shortcut/ ».
. , .
( . . .)
("...") ?
, - .
/ / ?
, . , .
, …
, . … … – . « », . , .
KDX . , , , , ( , ; , . . ).
. , - .
/ / , , .
/ / .
.
The KDX chip is in a very flexible user account setup system. You can accurately determine by setting who can access the server and what they can do. At the same time, KDX is designed for a large number (hundreds, thousands) of users who log in at the same time.
The classic task for the server administrator is to give immediately one hundred people access to [files, chat, news] or select it from the same number of people. Exhibiting the rights of each piece by piece - there will be no time to sleep ... Therefore, the system has introduced Classes of accounts. If out of one hundred users mentioned, half belongs to one class, and the second to another - to change access rights, it will be enough to change the rights for two classes and all users, to them the related ones will get (lose) the rights automatically.
The task of the administrator is to think in advance about which groups of users will go to him and create the corresponding classes. As an example: “admins”, “co-admins”, “guests”, “users of the locale”, “users of the Internet”, “personal friends”, “privileged users”, etc. If such a classification is made correctly, then the change of rights for the necessary audience of work will not be.
Each created account must belong to one of the previously created classes, you will choose it in the corresponding menu. Each class has a set of access rights settings, and completely transfers it to the account created in this class. By default, the access rights assigned to the account are initially below the rank and change if the access rights of the class change.
The class settings window looks like this:
But there are cases when a specific account needs to be given some rights that are not available to its class and save them with any changes. To do this, you can always add protected rights in your account, and don’t change them in the class, these changes will not work with this manually altered account.
Window tweaking account looks like this:
The checkboxes in the right column correspond to the rights given to the class to which the account belongs (this is a kind of visual reference to the class in general). Checkboxes in the left column refer only to a custom account.
Flags in these checkboxes can have 3 states: On (tick), Off (empty, space), and Dash (dash, minus). Turning on (On) and turning off (Off), respectively, is hard data and rights taken from this particular account, changing the class rights does not affect them. No change (Dash) means that this right should be enforced in the same way as it is established in the class and should change with changes in it. As a result, the actual account access is indicated by the text color (normal means that the privilege will be given (On), gray means that the right will be selected (OFF)).
All this seems difficult, but once to figure it out - and really setting up becomes simple and time consuming, no matter how many accounts on your server. Just change access for the class and, if necessary, distribute the privileges to individual accounts (or select them)
In the admin's third Server menu there is a “View / Control Display” item. This is practically Remote Desktop.
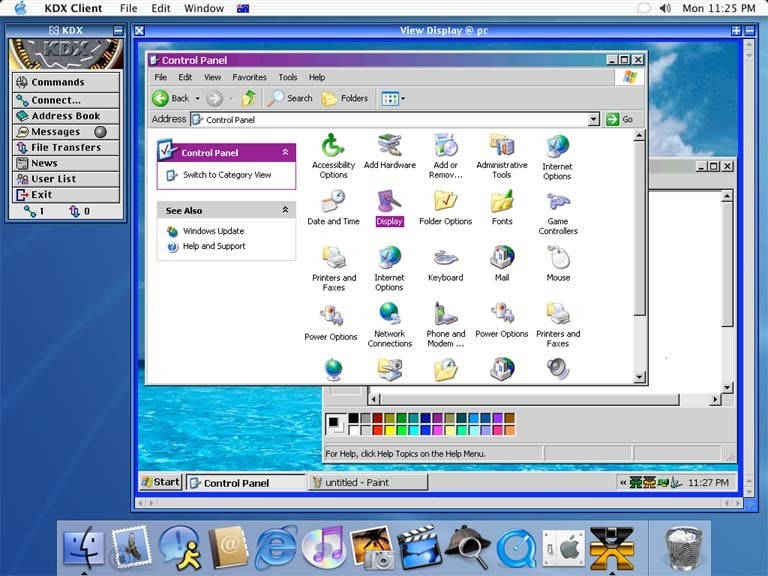
As you can see, with Mac you can steer Winda. On the contrary too. All through and through.
In addition, you can run .exe and .bat files directly from the browser (convenient for automating any permanent routine actions on the server).
There is also a Process Manager window (useful to understand who eats memory so that your computer barely breathes). Of course, you can kill him right there too).
Operations with files through the Client are based on the Mac-model - select the file, click on it with the right key and there already delete, rename, move. Android users will understand everything intuitively.
Product - / - Protocol - / - Port Number - / - Description
KDX Client - TCP - 10600 - Direct Client Connection (DCC) between 2 KDX Clients.
KDX Server - TCP - 10700 - For communicating with the KDX Client, including chat, messages, and file transfer.
KDX TrackerServ - TCP and UDP - 10800 - For communicating with the KDX Client, including giving lists of servers. UDP is for KDX Servers with the tracker.
Well, like everything.
Use. (v.3.0. (ss) 2013.)
But this story is not mandatory and absolutely not needed in the article. There is a site “Hotline. Entry point " at which everything is already told. Told for a long time.
The purpose of this article is different.
')
For more than fifteen years, I was a sysop and a “sub-bed hoster” of a hotline server in one of the local area networks, which had grown from house to long-distance. But everything comes to an end. And I want the experience gained not to be lost.
For the past ten years, the hotline has been launched on a version called “KDX”. Below I give my own adapted translation into Russian of official English manuals, it is written in human-readable language with a calculation for an ordinary non-advanced user. The translation is tested by time and experience: dozens of people used it as “clients” and several KDX servers were raised with it (the numbers are modestly minimal).
What for?
I am sure that hotline is many times better than the ftp-server that is still common in LAN and is able to replace it, adding to the file sharing functionality of communication. And KDX is the best clone of this bush program.
So, the KDX formula:
(FTP + IRC + Jabber + News + NetFon + DC) * encrypted = KDX
Read more - under the cut.
There are four dozen screenshots and many letters.
Short description
The BBS-like file-sharing server in its first version (“Hotline”) appeared in 1996 and it was the first P2P program. Even "Napster" was not yet invented. KDX - the latest version of Hotline, the most perfect, almost brought to the ideal. The network legend claims that it was the “swan song” of Adam Hinkley aka “Hinks,” the author of the very first hotline program.
KDX is made for secure file sharing through servers, which can be both public (with a guest account) and private. The latter are the majority. All traffic is strongly encrypted, and the admin server can set different rights for different user groups on the server. Plus, chat, private messages, news board and announcements. Plus ip-phone and voice chat. Plus the ability to transfer files directly past the server from the client to the client (the so-called DCC).
In the best of their years, the number of Hotline users was several million people (you can’t count, the servers are increasingly private, closed to other people ...), especially the mac-users. Nowadays, torrents have pressed all other types of file sharing, but for creating groups of friends connected besides file sharing also by communication, KDX is now as good as nothing else - especially in local grids, where the exchange speeds and without torrents are great.
Download KDX
Haxial Software has long ceased to exist, the domain haxial.com is put up for sale, and even Wikipedia has deleted the corresponding article .
KDX programs are among enthusiasts, "the last of the Mohicans." I will cite two addresses that have been verified over the years:
In addition to these sites, both enthusiasts support KDX servers.
Now that the program is downloaded, go to the point.
KDX user manual
This is a manual for the series “for dummies”, allowing you to quickly and painlessly start working with KDX. As much as will be illustrated in detail.
KDX client, setup and connection with server
Briefly:
1. Launch KDX Client.
2. Click the “Connect” button in the main menu.
3. In the “Address” field, enter the IP or URL of the KDX server you want to log into.
4. Click the “Connect” button and the connection process will start.
5. Logging on to the server, use the buttons in the main menu, such as "News" and "Chat" .
Details:
You have already downloaded the KDX Client. Further, it is understood that this was a client version 1.600 with an unreleased trial (I will also tell you how to shoot, but at the end ...)
The client does not require installation, just copy (unzip) it along with all your personal belongings to a convenient place on your disk. Usually, after unzipping, a KDXClient1600-Win folder is created with several files inside. Of these, only the executable file KDXClient.exe is important , and the rest can be deleted (this is English documentation and other stuff).
1. Run KDXClient.exe
A license agreement will appear, with which you need to agree without reading it.
Next, a window will appear in which you must enter your name (nickname). It can be changed later.
If you are behind a firewall, then the client will determine this and will give a request for configuring the router using UPnP. Better to agree. But you can postpone for later.
If you agreed and after a while you saw such a bummer ...
... then this means that your router is old, UPnP does not support. This is fraught with the fact that you have to manually "forward ports" on the router, otherwise some features will not be available. If this procedure is unfamiliar to you, then put down a beer to a more experienced comrade, he will do everything for you!
We continue. The client will open your Main Menu for you.
Click on the “Address Book” button and see this picture.
In connection with the closure of the Official Haxial Server, this single entry in the Address Book is irrelevant. You can click on it and see for yourself:
The connection attempt is not successful ...
... and will abort after a timeout.
You can safely delete this entry so that it does not hang out under your feet (right click on the entry and select "delete"). After that, you can fill in your server addresses - poke into the striped button at the top left, or right-click - select "new"; choose the type “server” (forgot - it doesn't matter, select it automatically), enter its name, IP address or URL, as well as your username and password, if you already have them to this server. Below you can make a short description, write down some comments, set the color with which the entry will be reflected in the Address Book and check the windows that should be opened automatically when entering the server.
Save all dialed (everything can later, of course, change - through the right click on the record).
2. ... If you are reluctant to fiddle with the address book filling, simply click on the “Connect” button and the quick connection window will open.
But before you do that, let me ask you - is the atmosphere not gloomy?
The default skin is very brutal and not everyone likes it. Let's customize the client to your tastes. At the same time, and we will understand a little bit from the Main Menu. Pay attention to the top button “Commands” (Commands), it is most often used and in many respects duplicates the main menu itself. If you click on it without connecting to the server, then from above you will see that there are no connections.
Other buttons repeat those in the main menu with some exceptions. Look for the Settings button at the bottom. We need it.
Here is the settings window that it opens. The first tab is “Indentity”. In it, you customize your personal virtual image:
a) your nickname (you entered it at the very beginning, you can change it);
b) self-description (arbitrary; at least an e-mail, even an ICQ number, even the name of a beloved cat and the date of its birth is up to you);
c) color characteristics: font and background (by default - black on yellow);
d) icon (32x32 pixels). Such striped joy, given by default, on any server immediately catches the eye and is set just to identify the complete novices. Therefore, it makes sense to change it for something individual. Icons of the desired size in the network in bulk, select the appropriate (or draw yourself), and then do this:
Open your icon in Paint (or any other graphics editor), select the entire image (Ctrl + A or Edit menu) and copy it to the clipboard (Ctrl + C). After that, go back to the client settings window, hover over our striped joy and ... copy your icon there (Ctrl + V)! Unusual method, is not it? But this is the only way. Created the program guys with humor.
But we will continue to pile up the settings window.
Here is the second tab (Basic Settings). Everything is understandable more or less and without translation, I would advise only to check the second item with a check: “Lists Require Double-Click”: the work is by default built on one-click management (who knows how to work on a Mac) and unaccustomed to such an interface file, just poking at it with a mouse.
I also note the point "Regulary Ping Server". The client and so periodically pings the server, showing that he did not leave. But if you have a rotten connection and the client falls off spontaneously - check the box. Ping will become frequent and troubles will be overcome. If everything is fine with the connection, then do not touch, do not load the server in vain.
The next tab (More Settings) is also understandable. I will leave for independent investigation ...
Tab appearance and fonts. Let's take a look at the last, and then we will return to it and set up everything that is necessary and optional.
The last tab is your internet phone settings.
Let's return to the previous one, to the appearance and fonts, and select the item “Appearance”, which allows you to change the client's skin. Stumble through the menu (change goes on the fly) and select the appropriate for the eyes.
For example, like this.
With this list, all skins are not exhausted; they are only built-in ones. But if in the client's folder you create the Appearance subfolder and upload external skins there, then all the built-in ones (except the first one, by default) will disappear from the menu, and the downloaded ones will be added. Their sea, there is something to choose. And you can make your own, for that is, a special program.
Also here you need to change the font "Chat / News Font". Worth default.
Russian letters does not reflect. Select Myoclon.
And everything will be fine.
And now let's go to some server!
Let's step on “Connect” in the Main Menu and the already familiar window will open.
3. In the "Address" field, enter the IP or URL of the KDX server you want to log into. (We leave the username and password empty - expecting that the server has a guest account for which they are not needed.)
4. Click “Connect”. The client will connect to the server, if it is the will of Holy Connect.
With high probability (but not necessarily) immediately after the connection is established, the server will show you its welcome window. In this case, it is uninformative.
... but usually it makes sense to read it - there are conditions for obtaining a full account, restrictions for guests and other important points. And in general, entering the house you should definitely read the sign on the door.
5. Let's go through the buttons in the Main Menu.
You have already seen the screenshot, so just with the text:
Commands / Commands - an expanded version of the menu; duplicates all the commands from the main one, adds a few rarely used ones and gives access to the menu of work with a specific server (hereinafter we will look at it in detail, with pictures).
Quick Connect / Connect - to connect to the server by IP or URL (discussed above).
Address Book / Address Book - to record frequently visited servers and connect with them by clicking on the mouse (also discussed above).
Personal Messages / Messages - server microaddress (or microjabber, if you like :)) to send private messages to users located on the server. Pay attention to the gray light bulb. If you receive a new message, it lights up and blinks. It's comfortable.
File Transfers - a monitor window that opens when files are downloaded (or applauded): progress bar in%, time forecast, etc. At the top of the frame is a striped button, through it you can always open the folder where the files are downloaded.
Files / File Browser - file browser, opens a window to access files and folders (it will be discussed below, although it is also not rocket-science, everything is understood intuitively).
Chat / Chat - a list of users in the chat, the main chat window and other public created at this time.
News / News - bulletin board, with sections and postings in them (see examples below).
Userlist / UserList - the list of users located on the server is all trite.
Exit / Exit - close the program, of course.
If you are connected not with one Server, but with several (Client can), then in each of the opened windows you will first have a list of servers, and only then in each of them a list (users, files, news) on this server. Again, everything is intuitive.
Now click on “Commands” again in the Main menu. See, the line with the address of the server we connected to appeared at the top? If you click on it, the menu for this server will open (which is convenient if there are a lot of them).
The buttons in it duplicate the buttons in the main menu - in the first part. The second part provides additional features. The third is for server administrators, it’s useless to poke an ordinary user into it.
We press the "News" button ( News ) and see the news window. Under the name (address) of the server are subcategories, there can be arbitrarily many (in this case, only one).
Clicking on the subcategory we see the tape of postings in it (the old ones crawl down, the new ones are on top), the large texts are hidden by the cat, unfold with the "+" button.
Subcategories can be configured differently for different groups of users: either only for reading, or for reading and writing, etc.
The next button is “Chat” ( Public Chat ). She opens a chat list in which the entire list of public chats. Selecting the desired, you get into the chat room of the usual form. Nothing unusual. (Private chat rooms are hidden, they can be entered only by invitation - just drag the invited user from the user list to the private chat window, even if it is on another server).
The next button is “Files”
Also pretty standard - on the left directory tree, on the right their contents. Everything is intuitive.
Only one thing: by virtue of Mac origin, the Client works by default with a single-click interface: poked into the folder - it opened, poked into the file - it began to download. To view the file info you have to poke it with the right button ... It is unusual for Windows users. But this can be disabled in the settings - I wrote about it in detail ...
Next - the “ Search Files ” button. Also called from the file browser menu - this is the striped rectangular button on the left above.
The search is rigorous, case sensitive: keep this in mind.
Search results in a popup window. Files are downloaded immediately from here, the folders get the transition to their contents.
The next button is the “ User List ”. A complete list of living on the server. Allows you to send any of them a private message. Also allows you to put the ignore user who got it.
In order not to bathe, each time typing from the keyboard the address of the server to which you have logged in, you can enter it into your address book. There is a special button ( Add To Adress Book ) in the second subsection of the menu. But you can manually call the book and then add a new address. The add (or edit added) window looks like this:
Then - the option to change your own password to log in to the server ( Change Own Password ), but not the fact that it works - the administrator must enable this option for your account (or the class of accounts to which yours belongs).
Then you can see the public description of the server ( Get Server Info ).
Another item is viewing the “input plate” of the server (Show Greeting), if you quickly skipped it, and there is something important.
And the last item of the second section (Show My Address) allows you to find out your IP - this is necessary in order to send it to another user and connect your Clients directly, bypassing the server, via DCC (for example, to upload intimate photos that you would not want so that the admin server saw).
The third part of the menu is for the admin server. He will figure it out, and you, the user, need nothing.
And at the very bottom - disconnect with the data (remember, we entered the menu of a particular server) Server, if you want to leave only with it, but not exit the program.
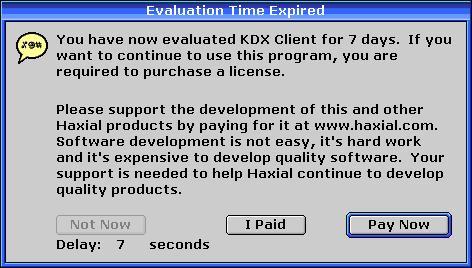
6. A little bit about triality.
KDX-client is a non-emergency unit. It is fully functional and without payment, but in a week it will begin to delay the start, reminding you of payment. And every next week will increase the delay by 30 seconds, until it is completely annoying.
There are two ways to get rid of such non-constructive behavior of the program:
a) brute force: version 1.520 win is distributed by good people archive complete with patch, completely biting reminder; version 1.600 has a broken executable that needs to be replaced with the native one in the client's folder (for this operation, do not forget to save a copy of the settings files - with the .stg extension - and everything will work out for you.). Look for this file on the servers, it usually lies in a public jump.
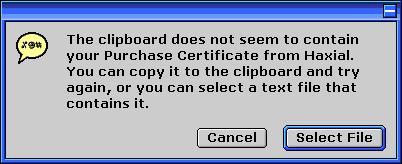
b) in a natural way: by presenting the purchase certificate file to the Client. Since these are nominal, then in public access are rare. But there are.
And do not worry about morality and piracy. The company has already finished its earthly days, it is impossible to buy a license legally, this software is useless and no one will ever make a claim to you for your forced hacking.
This is the short course for KDX Client management. If you have read this far, then you can easily search through the servers yourself and communicate with their inhabitants.
KDX-phone, how to communicate in voice chat
KDX has an easy-to-use internet phone. You can communicate directly with any user (even without connecting to the server) or organize voice chat for several (aka "conference call", to put it in cultural terms).
This is done like this:
1. Both you and the person with whom you want to talk must have a KDX client running.
2. One of you (or both) must know the IP address of the other. If you connect for the first time, then exchange addresses. You can find out your own through the menu “Commands” + “Show my address”.
3. The request will be answered: “Your address for KDX DCC is (...)”, this is your IP. Send it to the interlocutor by e-mail, fax or pigeon mail ... (And the port for the DCC must also be opened - either automatically or manually: see the very beginning of this TFM.
4. The interlocutor, having received the IP, presses the “Connect” button in the KDX client.
5. Select the type of "Client / DCC". All fields are left empty except for “Address”. The received IP of the caller is entered there. Then click the "Connect" button.
6. A connection status window will appear. After that, the window disappears, and if the error message does not appear, then you are connected. (If you can not connect, then - oops! Some troubles. About them below, at the end of the file).
7. Click on the "Commands" button. At the top of the menu, you should see the name of the person you are connected to. Click on it, and a submenu will pop up. You can check the operation by clicking the "Send Message" button.
8. A message box will appear in which you can write the greeting text and send it by pressing the “Send” button.
9. The interviewee should immediately receive the text sent. If everything works well, then its “Messages” button in the Main Menu will flash. Click on flashing to view.
10. Now let's do voice chat. Do you have a microphone and speakers? (It is better to use a headset with headphones - there will be no parasitic echo during the conversation, and generally more convenient).
11. It is also clear that the microphone, which is - should also work. You can test your microphone and speakers / headphones with the help of AudioTester software of the same company (it lies on the servers).
12. This program is also good because all the settings in it are the same as you need to use in KDX. Click the “Commands” button, then “Settings”, then go to the “Voice Settings” panel in this window - and you will see them.
13. So, the microphone and speakers / headphones work. Now you need to open the “Voice Control” window in KDX (to do this, click the “Commands” buttons and then “Voice Control” / “Voice Controls”).
14. Now the one who pushed the first button “Connect” let him enter the “Voice chat”. On the contrary, it is also possible, but it is better if the connected initiates the chat.
15. The Voice Control window and a list of people in the voice chat will appear. Who does not chat - you will not hear. Did the interlocutor appear? You can speak.
16. To do this, click the Start Microphone button and speak. Interlocutor should hear you.
17. The sound transmission quality may not be optimal if the “speed”, “delay”, and “sensitivity” parameters in the “Voice control” window are selected incorrectly. It is especially important that the “sensitivity” is set correctly. Experiment.
Own KDX server, how to start and configure
Are you delighted? Want to run your own KDX server? I approve!
For a local network where traffic is free and speeds are high, KDX is better than standard FTP in all such cases. For online communities, it is also very, very good.
Do this:
1. Download KDX Server. Unzip the downloaded archive file to a convenient folder.
2. Run the KDX Server program. The first time she starts, she will be asked to enter the login and password for the administrator account. Enter. , – – , ( ). , - ?
3. . , . . «» ( , , ). , , .. – .
4. KDX Server «Bases», «Default» – , . , / Alias / .
5. KDX «Connect», «» «».
6. IP- «». , KDX- . , « ». 0 KDX .
7. , . «».
8. , .
9. , , «» KDX , . , «».
10. , «» KDX , . , « ».
11. , KDX Server KDX . , , . ( – ..)
KDX- ( )
KDX – , , . , . .
, . , – «» ( « »). «» , – ( – : , ).
.
«» « » / «Server Settings» , . , .
KDX , , ( , ) – ( , ).
, , , – , , , . , ( , ).
?
? , , , :
- , . ( ) . Check it out.
- , - . , , . . , . .
- , ( ), ( ), - ( ). It happens.
FAQ
, , ?
No , , .
/ Appearance files? (".hap" files)
«Appearances» , KDX . .hap- . «» . ( – , – / . ).
(? .), .hap- ( / ) , , «Appearance.hap». () , .
? / Sound Lists?
Can. " Sound Lists" , KDX . (.dat .ksl — , ; KDXSoundListEdit), – . « » — .
?
MacOS 9. , .
, / ?
- : ( Windows):
«Start/»() à «All Programs/»() à «Startup/»( ). Startup folder/ . . «Create Shortcut/ ».
. , .
( . . .)
("...") ?
, - .
/ / ?
, . , .
, …
, . … … – . « », . , .
Encryption, Security, and Privacy
KDX . , , , , ( , ; , . . ).
. , - .
/ / , , .
/ / .
.
The KDX chip is in a very flexible user account setup system. You can accurately determine by setting who can access the server and what they can do. At the same time, KDX is designed for a large number (hundreds, thousands) of users who log in at the same time.
The classic task for the server administrator is to give immediately one hundred people access to [files, chat, news] or select it from the same number of people. Exhibiting the rights of each piece by piece - there will be no time to sleep ... Therefore, the system has introduced Classes of accounts. If out of one hundred users mentioned, half belongs to one class, and the second to another - to change access rights, it will be enough to change the rights for two classes and all users, to them the related ones will get (lose) the rights automatically.
The task of the administrator is to think in advance about which groups of users will go to him and create the corresponding classes. As an example: “admins”, “co-admins”, “guests”, “users of the locale”, “users of the Internet”, “personal friends”, “privileged users”, etc. If such a classification is made correctly, then the change of rights for the necessary audience of work will not be.
Each created account must belong to one of the previously created classes, you will choose it in the corresponding menu. Each class has a set of access rights settings, and completely transfers it to the account created in this class. By default, the access rights assigned to the account are initially below the rank and change if the access rights of the class change.
The class settings window looks like this:
But there are cases when a specific account needs to be given some rights that are not available to its class and save them with any changes. To do this, you can always add protected rights in your account, and don’t change them in the class, these changes will not work with this manually altered account.
Window tweaking account looks like this:
The checkboxes in the right column correspond to the rights given to the class to which the account belongs (this is a kind of visual reference to the class in general). Checkboxes in the left column refer only to a custom account.
Flags in these checkboxes can have 3 states: On (tick), Off (empty, space), and Dash (dash, minus). Turning on (On) and turning off (Off), respectively, is hard data and rights taken from this particular account, changing the class rights does not affect them. No change (Dash) means that this right should be enforced in the same way as it is established in the class and should change with changes in it. As a result, the actual account access is indicated by the text color (normal means that the privilege will be given (On), gray means that the right will be selected (OFF)).
All this seems difficult, but once to figure it out - and really setting up becomes simple and time consuming, no matter how many accounts on your server. Just change access for the class and, if necessary, distribute the privileges to individual accounts (or select them)
Remote access to a computer
In the admin's third Server menu there is a “View / Control Display” item. This is practically Remote Desktop.
As you can see, with Mac you can steer Winda. On the contrary too. All through and through.
In addition, you can run .exe and .bat files directly from the browser (convenient for automating any permanent routine actions on the server).
There is also a Process Manager window (useful to understand who eats memory so that your computer barely breathes). Of course, you can kill him right there too).
Operations with files through the Client are based on the Mac-model - select the file, click on it with the right key and there already delete, rename, move. Android users will understand everything intuitively.
Trivia
- Do not kick "hung" users, those that came, downloaded and went somewhere without disconnecting. Such an idle connection requires about 0.001 kilobytes per second (on average), which is trivial with current networks. But, returning, the user will immediately be able to see the updated news sections and receive (if they are sent) personal messages.
- In case of any problems with routers and forwarding ports through them: by default, KDX uses the following:
Product - / - Protocol - / - Port Number - / - Description
KDX Client - TCP - 10600 - Direct Client Connection (DCC) between 2 KDX Clients.
KDX Server - TCP - 10700 - For communicating with the KDX Client, including chat, messages, and file transfer.
KDX TrackerServ - TCP and UDP - 10800 - For communicating with the KDX Client, including giving lists of servers. UDP is for KDX Servers with the tracker.
- If there is interest in the statistics of attendance, then turn on its entry in the logs (they are text). The same will be written as in the “Server History” window of the administrative subsection of the menu. The trick is that for viewing logs there is a special stray called "KDX LogView". This program very quickly combed the saved and outputs data in a sorted form: a general picture, data on any user, downloads of each file, etc. In short, any report at your service. Admire.
Well, like everything.
Use. (v.3.0. (ss) 2013.)
Source: https://habr.com/ru/post/369455/
All Articles