Home weather station on esp8266
Hi GT!
With the advent of esp8266 a couple of years ago, I had the idea to create something useful on the basis of this controller that would be necessary in the house, and it would be convenient to use everything. The ability to connect via wi-fi, small dimensions, a sufficient number of I / O pins, ease of programming made it possible to assemble many devices on the basis of this board, and one of them is a weather monitoring system.
Initial system requirements:
')
KDPV:
First, I decided to find existing systems that could be taken as a prototype. There was one suitable for the opportunities - wifi-iot.com , but it was rejected because of the closed code and the need to purchase a license to activate the full list of features. Therefore, I decided to create my own bike.
To implement it was necessary to implement the hardware and software parts.
The following components were purchased on Ebee:
In the local market was purchased housing - Gianta G403 for 70r.
Total - 1000r for components (prices at the time of publication, at the rate - 15 evergreens).
For the program part, an elementary bundle of PHP + MySQL was deployed, deployed on a home server based on a raspberry. Advantage over cloud services - if the Internet is lost, the system continues to operate successfully and is not covered with a copper basin. Minus - the need to write the server part of the system for storing and processing data, but it was interesting to do it yourself.
For programming, the Arduino IDE was chosen, with the module connected for development on esp8266. How to do it - described in detail here - github.com/esp8266/Arduino
At first there was a desire to try to write everything on lua, using the nodemcu firmware, but quickly abandoned this idea, since during the casting of sketches, errors about lack of memory, etc. constantly fell out.
For data exchange between the weather station and Malinka, JSON data format was chosen.
Connection diagrams of sensors to the module - standard ones were used, libraries can be found here:
The following library was also needed - github.com/bblanchon/ArduinoJson
In addition to the above, the data obtained from the following sensors can be connected and configured to the system:
Now I am waiting for a parcel with a CO2 sensor based on the MH-Z19 in order to monitor the presence of carbon dioxide in the air. As soon as I come, I will assemble a module with it in order to expand the list of measured weather parameters in the house.
So, after receiving all the packages, a lot of iterations on debugging the code and assemblies on the layout, it's time to assemble the finished device.
Device layout:

In the case of the Dremel a hole was made for the screen:

After that, the screen itself was fixed inside, a sandwich from the board with the module, and sensors. Also, the reset button was not forgotten :)

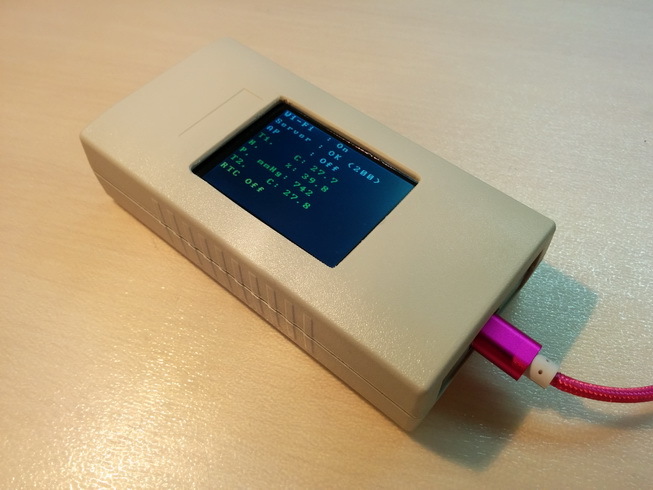
Holes were made in the end plates of the case for ventilation of the sensors, and for the power connector. After connecting - information on the screen:

Remote control is implemented in the module firmware - a web server is raised, using which you can make initial settings (specify the used wifi network, indicate the used sensors, configure the real-time module, view data from the connected sensors, reload the module). When I wrote the pages, I paid attention to the fact that settings can be made from a mobile - so Hello, responsive design! :)
The built-in pages have no external dependencies, all styles and scripts are stored in the module memory.
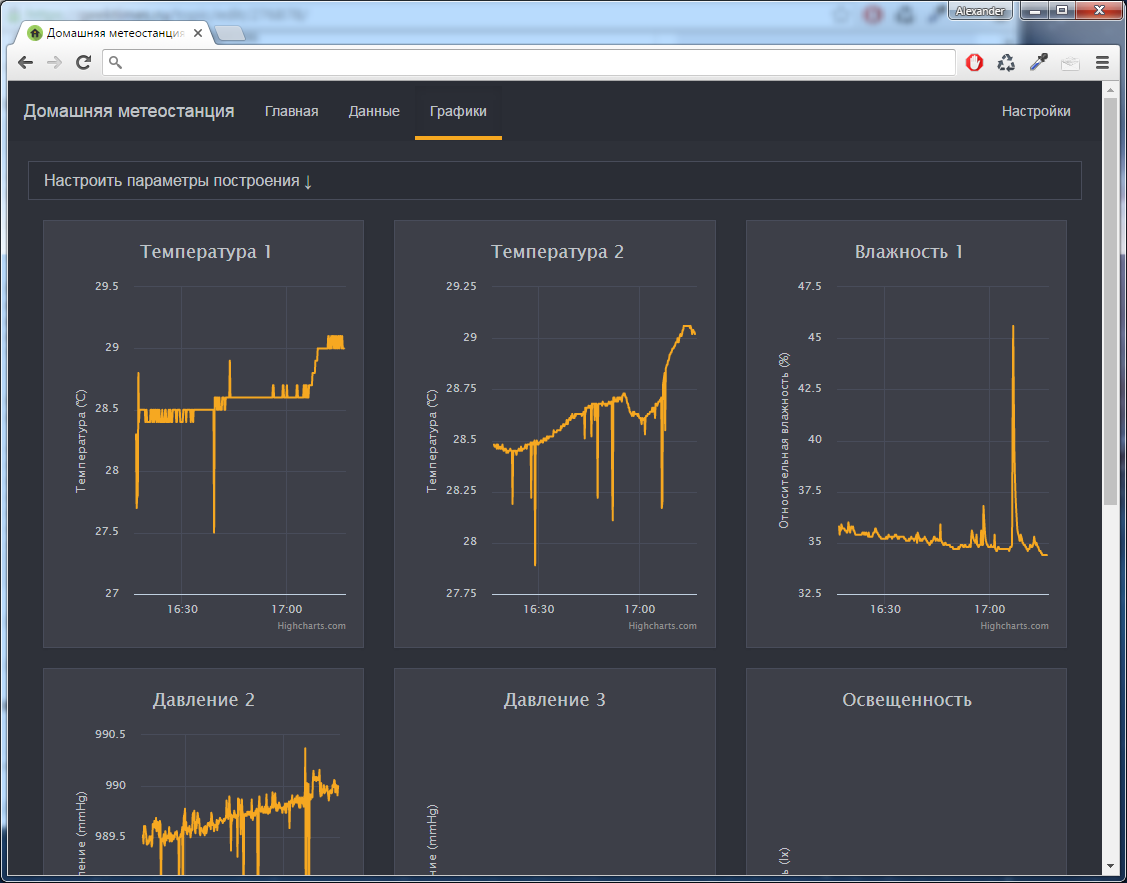
To view the list of connected modules, to conveniently view the received data, to view graphs, a small saytik was developed, deployed on a malinka.
What is planned to implement yet:
The source code of the project is available here: github.com/aproschenko-dev/MeteoEsp
I will once be any constructive criticism and comments.
Update:
For all libraries to modules connected via a 1-wire bus, it is required to replace the wire protocol initialization with Wire.begin () with Wire.begin (0, 2), since standard pins are occupied by the screen.
With the advent of esp8266 a couple of years ago, I had the idea to create something useful on the basis of this controller that would be necessary in the house, and it would be convenient to use everything. The ability to connect via wi-fi, small dimensions, a sufficient number of I / O pins, ease of programming made it possible to assemble many devices on the basis of this board, and one of them is a weather monitoring system.
Initial system requirements:
')
- Remote viewing of measured data
- The ability to remotely control the device
- Availability of display for viewing data "right now"
- Easy connection and power (powered by regular USB charging)
- Transfer data to a home server to collect statistics, view graphs, etc.
- The ability to increase the number of connected sensors
- Ability to use multiple weather sensors simultaneously
KDPV:
First, I decided to find existing systems that could be taken as a prototype. There was one suitable for the opportunities - wifi-iot.com , but it was rejected because of the closed code and the need to purchase a license to activate the full list of features. Therefore, I decided to create my own bike.
To implement it was necessary to implement the hardware and software parts.
The following components were purchased on Ebee:
- NodeMCU board - 350r.
- LCD TFT Display 320x240 based on the ILI9340C chip - 370r.
- DHT22 sensor - 130r.
- Sensor BMP180 - 115r.
- Development Board 5x7 cm - 30p. (with the purchase of 5 pieces)
- Board with micro USB connector - 10p.
In the local market was purchased housing - Gianta G403 for 70r.
Total - 1000r for components (prices at the time of publication, at the rate - 15 evergreens).
For the program part, an elementary bundle of PHP + MySQL was deployed, deployed on a home server based on a raspberry. Advantage over cloud services - if the Internet is lost, the system continues to operate successfully and is not covered with a copper basin. Minus - the need to write the server part of the system for storing and processing data, but it was interesting to do it yourself.
For programming, the Arduino IDE was chosen, with the module connected for development on esp8266. How to do it - described in detail here - github.com/esp8266/Arduino
At first there was a desire to try to write everything on lua, using the nodemcu firmware, but quickly abandoned this idea, since during the casting of sketches, errors about lack of memory, etc. constantly fell out.
For data exchange between the weather station and Malinka, JSON data format was chosen.
Connection diagrams of sensors to the module - standard ones were used, libraries can be found here:
- DHT22 - learn.adafruit.com/dht
- BMP180 - github.com/iot-playground/Arduino/tree/master/external_libraries/SFE_BMP180
- TFT LCD - github.com/gnulabis/UTFT-ESP8266
The following library was also needed - github.com/bblanchon/ArduinoJson
In addition to the above, the data obtained from the following sensors can be connected and configured to the system:
- Illuminance measurement module - BH1750 - github.com/kmaximv/BH1750
- Real-time module - RTC DS1307 - github.com/adafruit/RTClib
- Digital humidity and temperature sensor - SHT21 - github.com/enjoyneering/HTU21D
Now I am waiting for a parcel with a CO2 sensor based on the MH-Z19 in order to monitor the presence of carbon dioxide in the air. As soon as I come, I will assemble a module with it in order to expand the list of measured weather parameters in the house.
So, after receiving all the packages, a lot of iterations on debugging the code and assemblies on the layout, it's time to assemble the finished device.
Device layout:
In the case of the Dremel a hole was made for the screen:
After that, the screen itself was fixed inside, a sandwich from the board with the module, and sensors. Also, the reset button was not forgotten :)
Holes were made in the end plates of the case for ventilation of the sensors, and for the power connector. After connecting - information on the screen:
Remote control is implemented in the module firmware - a web server is raised, using which you can make initial settings (specify the used wifi network, indicate the used sensors, configure the real-time module, view data from the connected sensors, reload the module). When I wrote the pages, I paid attention to the fact that settings can be made from a mobile - so Hello, responsive design! :)
The built-in pages have no external dependencies, all styles and scripts are stored in the module memory.
Screenshots
 |  |
 |  |
To view the list of connected modules, to conveniently view the received data, to view graphs, a small saytik was developed, deployed on a malinka.
Screenshots
 |
 |
 |
What is planned to implement yet:
- NTP time synchronization
- The accumulation of data in the module in case of network loss
- The implementation of authorization on the server view data
- Binding sensors to specific users
- Configure the data displayed on the sensor screen
- Creating an outdoor version of the sensor (I will be glad to advice how to do it better)
- The ability to control the relay
- The possibility of obtaining data from the sensors opening windows doors (for example, reed switches)
- Introduction of amendments to the data to take into account the location of sensors in situ
The source code of the project is available here: github.com/aproschenko-dev/MeteoEsp
I will once be any constructive criticism and comments.
Update:
For all libraries to modules connected via a 1-wire bus, it is required to replace the wire protocol initialization with Wire.begin () with Wire.begin (0, 2), since standard pins are occupied by the screen.
Source: https://habr.com/ru/post/369303/
All Articles