Acoustic suppression device reality, or music from a 3D printer
Good day to you, dear geeks and sympathizers!
According to my observations, almost all owners of 3D printers are divided into two groups: those who need it, and those who really need it. It is with the aim of stimulating the growth of the number of citizens in the second group that this publication was written.
')
Anyone who is interested in what binds a 3D printer and music, why some old sayings have lost relevance, and how to turn a simple piece of cardboard into a steel block - welcome under the cat!
It is no secret that, thanks to the efforts of the
What to do to the lazy and stingy person who wants to get cheap, but high-quality "desktop" speakers? As in most similar cases, the question already contains a part of the answer: the columns need to be done.
Taking the opportunity, I decided to realize my old dream - omnipolar speakers. These speakers differ from those with a conventional frontal arrangement in that sound waves are radiated simultaneously in all directions with the same amplitude and phase, which in theory should create the most natural sound picture. In its simplest form, this is achieved by placing the diffusing cone on the upward-facing broadband head of the loudspeaker. The correct calculation of such acoustic systems (hereinafter referred to as AU) is not easy and requires serious education in this area. Therefore, I have chosen the oldest method of research of
The most important component of any speaker that cannot be modified at home is the head of the loudspeaker (hereinafter referred to as HG). Since I decided to make a compact and inexpensive single-band speaker, head selection turned into a non-trivial task with many unknowns.
For myself, I developed the following search algorithm: suitable size - bandwidth - uniform frequency response and phase response - nominal resistance - price.
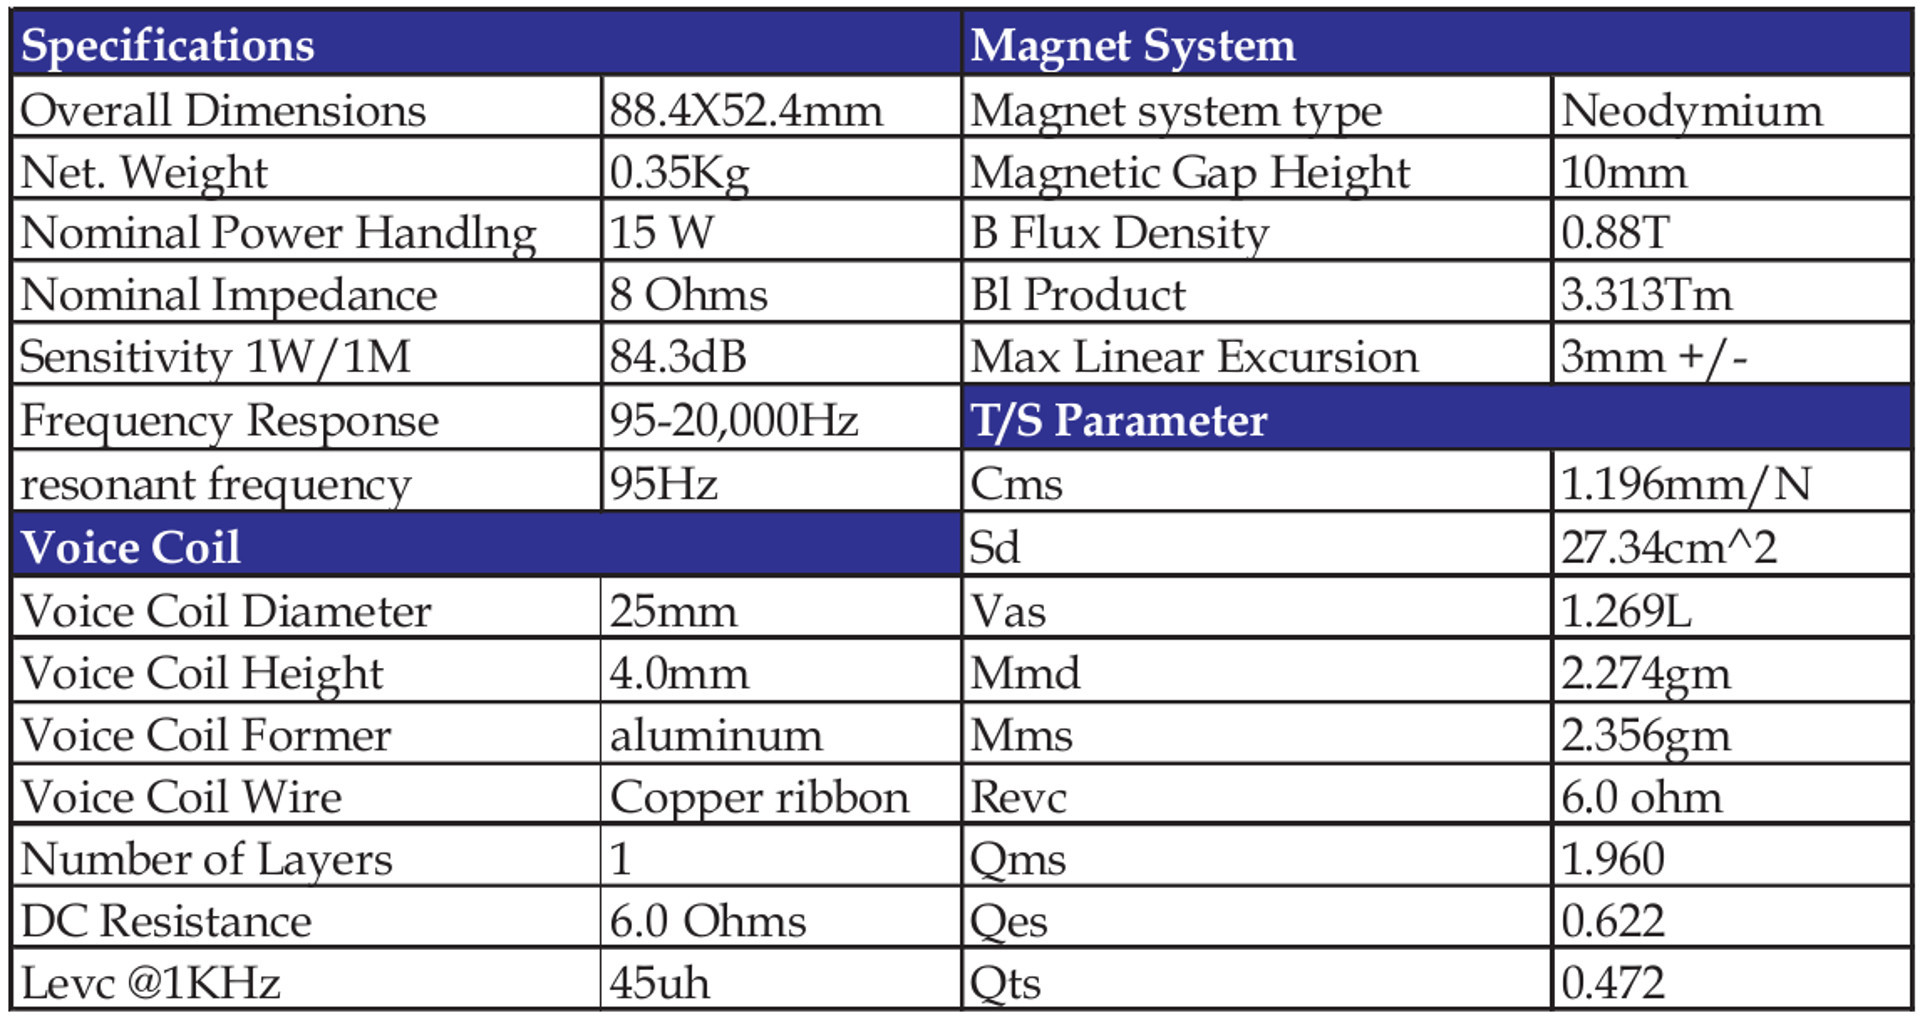
The leader in the search was Fountek's broadband FGRtek GG FR88EX:

This head has an aluminum frame and diffuser, a wide frequency range, smooth frequency response and phase response. All parameters are given by the manufacturer in the technical documentation:

For the AU, the simplest design was chosen: a cylindrical case, GG fixed on the upper end. A sound-scattering cone should be fixed above the RG. Case design - acoustic resistance panel at the bottom, loose sound-absorbing material in the entire volume of the AU. For the case, a tube of thick cardboard with a diameter of 125 mm was chosen (according to the dimensions of the GG). Self-adhesive bitumen vibration-absorbing mats were glued to the inner surface of the pipe, which made it possible to completely suppress the vibrations and the boom of the hull. The technology is simple: heating the mats with a hair dryer, we roll them with a sticky side to the pipe from the inside using an aluminum "rolling pin". The most difficult thing here is to find a woman with a hairdryer.

Further,
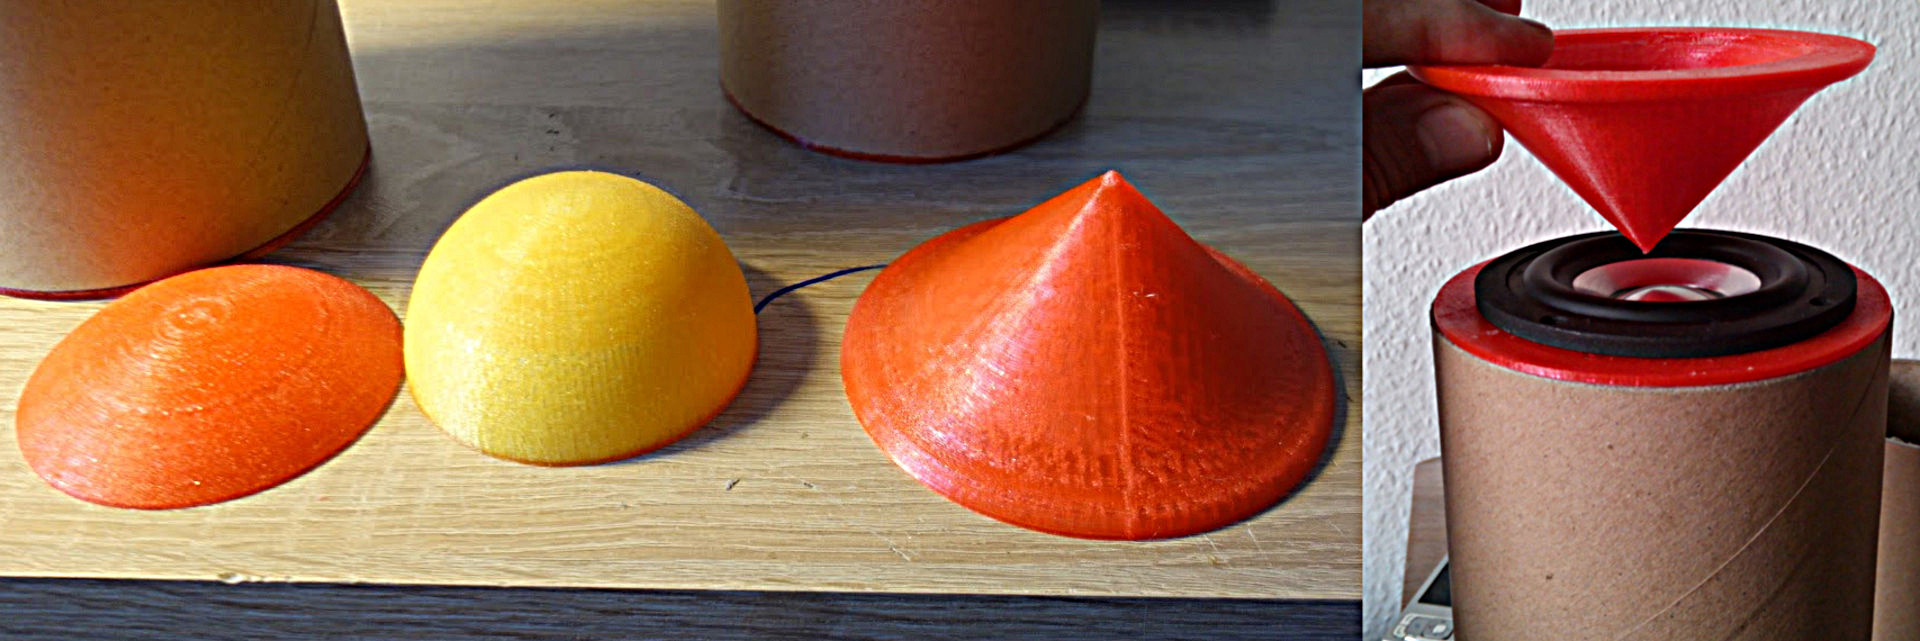
The unconditional victory was won by a conic sound diffuser. On the right side of the photo you can see this cone above the GG mounted on the end of the case on the plug - holder printed on the 3D printer.
A few words about the design: due to the use of dissimilar materials and the complex shape of parts, I excluded the pasting with any veneer or similar material as being too labor-intensive. The black color was considered dull, the silver color was vulgar. I decided to make a modest contribution to the creation of the post-apocalypse universe and to give the AU the appearance of battered military equipment created with the use of radioactive materials.
The process of creating speaker parts looked like this: creating a model in DesignSpark Mechanical — printing on a 3D printer — cleaning a part — primer — coloring. In the process of priming the hull of the AU, the wet primer was partially rubbed off with fingers, which ensured the presence of distinct signs of metal corrosion


A very complex detail: the bottom cap with a grille acoustic impedance panel and a panel for fastening connectors for connecting cables.

After finishing the coloring and drying, one speaker was collected to check the sound quality. The following photo shows part of the design: M3 studs are passed through the end cap - the holder and the holes in the flanges of the GG and the sound-scattering cone. All parts are fixed with M3 flange nuts. The cone is fixed quite high above the GG: this position was determined experimentally from the maximum reproducible high frequencies.

Unfortunately, in this case, a considerable length of relatively thin studs led to a significant vibration of the cone of the sound diffuser.
As a measure to eliminate this unpleasant effect, I decided to make it heavier and “drown out” the sound diffuser by filling it with a loose vibratory absorber. Since the volume of the cavity of the cone of the sound diffuser is small, an additional hollow part with a lid was designed and manufactured:

A mixture of lead shot and fine quartz sand was chosen as a filler. Lead is chosen for a high specific gravity, and fine quartz sand well suppresses vibrations and does not allow a fraction to turn the cone into a rattle. Due to the presence of lead in the cone, the lid with a radioactivity icon is not just a decorative element, but also a functional element (lead contains some amount of radioactive isotopes).
The final version of my self-made omnipolar speakers looks like this:

Unfortunately, on this optimistic note, my camera gave my soul to God, and more photos failed. The sound quality of these speakers is fully consistent with my needs: everyday life melts in the enchanting sounds of Emma Shapplin's Spente le stelle at a third of the available volume, and if you wish, you can eject from reality with Accept's Teutonic Terror.
Published under the WTFPL license.
Well, and traditional: Have fun!
At the request of workers, 3D models and case sizes: drive.google.com/folderview?id=0B3W31PA4TxKDdjU3ZHA4bEt4Rms&usp=sharing
Source: https://habr.com/ru/post/369165/
All Articles