Remote control radio models with their own hands
Hello. I present to a general review a homemade radio remote control for controlling various objects at a distance. This may be a machine, tank, boat, etc. made by me for the "child" radio circle. With the use of radio module NRF24L01 and ATMEGA16 microcontroller.
For a long time I had a box of identical broken game joysticks from consoles. I got from the game institution. I did not see any particular use in faulty gaming joysticks, and it’s a pity to throw out or disassemble. So the dead weight box was gathering dust. The idea of using game joysticks came as soon as I talked with my friend. A friend led a circle for young radio amateurs at the boarding school, and free of charge on weekends, introduced inquisitive children to the world of radio electronics. They're like a sponge, they absorb information. Since I myself very much welcome similar circles for children, and here also in such a place. He suggested the idea of how to use non-working joysticks. The idea was as follows: to create a home-made radio remote control unit for self-assembled models, which I would like to offer the children to study the project. He liked the idea very much, given that to put it mildly, the financing of children's institutions is not very good, and I was interested in this project. Let me, too, will contribute to the development of the radio circle.
The goal of the project is to create a complete device not only as a radio remote control, but also as a counterpart to a radio-controlled object. Considering that the console for children and the connection of the receiving part to the model, should also be as simple as possible.
Assembly and components:
')
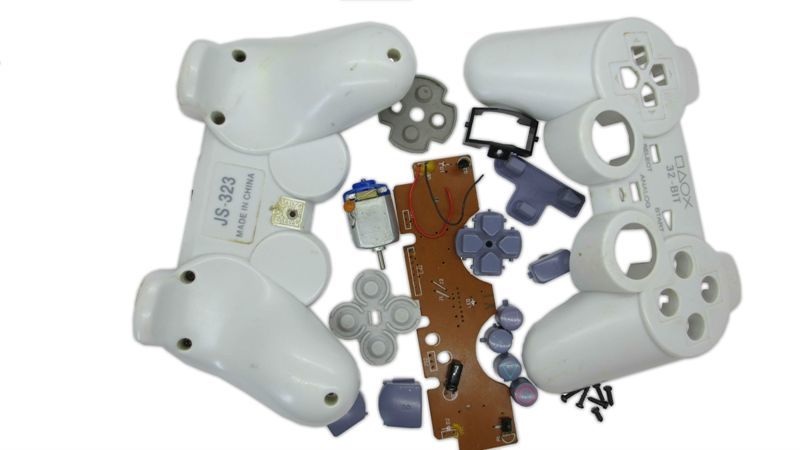
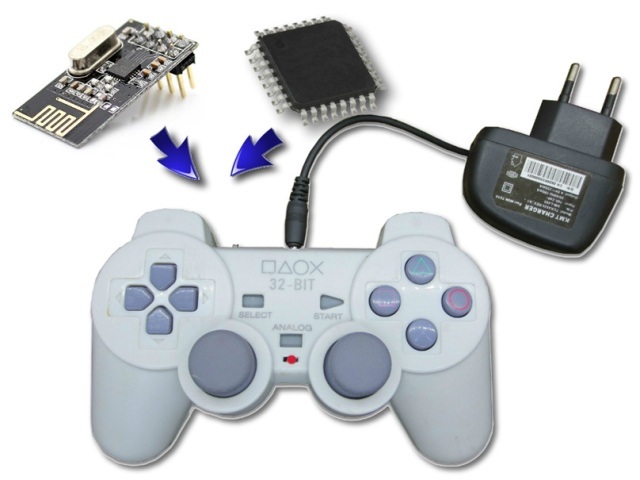
Having disassembled the game joystick into its components, it immediately became clear that it was necessary to make a new printed circuit board, moreover, in a very unusual form. At first, I wanted to dissolve the printed circuit board on an ATMEGA48 microcontroller, but as it turned out, the microcontroller ports simply lack all the buttons. Of course, such a number of buttons, in principle, is not necessary and it was possible to limit only to four ports of the microcontroller ADC for two joysticks and two ports for the clock buttons located on the joysticks. But I wanted to use as many buttons as possible as possible, who knows what else the kids want to add. This was the birth of the ATMEGA16 microcontroller circuit board. The microcontrollers themselves were in my possession, remained from some project.

Elastic bands on the buttons were very worn, and could not be restored. But this is not surprising considering where the joysticks were used. For this reason, applied the clock buttons. Perhaps, the minus of the clock buttons can be attributed to a strong click, resulting from pressing a button. But for this project it is very tolerant.
I did not have to redo the board with the joysticks, I left some one there, which saved a lot of time. End buttons also retained in its original form.
I chose the NRF24L01 radio module as a transceiver, since the price is very small in China at a price of $ 0.60 per piece. bought it. Despite its low cost, the radio module has many capabilities and, of course, it suited me. The next problem I encountered, and in fact, where to place the radio module. The space in the case of the free is not enough, for this reason the radio module is placed in one of the joystick case handles. I didn’t even have to fix it, the module pressed tightly when the body was fully assembled.

Perhaps the biggest problem was the issue of power for the radio remote. Buying some specialized batteries, say lithium, flew into a lot of money, since it was decided to assemble seven sets. Yes, and the remaining free space in the case is not very allowed to use standard AA batteries. Although not significant consumption, you can use various suitable power sources. As always, friendship came to the rescue, a colleague at work fitted lithium flat batteries from mobile phones and a charging bonus to them. Still, I had to redo them a bit, but this is insignificant and much better than charging batteries for them from scratch. Here on flat lithium batteries I stopped.
In the process of testing the radio module, its declared range was justified and confidently worked on line of sight at a distance of 50 meters, the range decreased significantly through the walls. There were also plans to install a vibration motor that reacted, say, to some kind of collision or other actions in a radio-controlled model. In this regard, provided on the PCB transistor switch for control. But I left additional complications for later, you first need to run in the program, since it is still damp. Yes, and the design, given that this prototype requires minor modifications. So as they say “with the world on a thread”, a radio control panel was created with practically no investment.
Printed circuit board - atmel-programme.clan.su/pultdzhostik.rar
Radio modules took here - alipromo.com/redirect/cpa/o/rhc8f0n1hlzfodwgihmb8nwr9wx53k5g
Source: https://habr.com/ru/post/368571/
All Articles