Intel Edison. Working with the Intel IoT Analytics cloud: creating rules and sending notifications

Cloud Intel IoT Analytics allows you to lay simple logic to perform a specific action. Creating rules is divided into two stages. At the first stage, you need to specify the actions to be performed . In the second stage, specify a set of conditions that must be fulfilled to perform the action. For example, a temperature value above 28 C.
Actions may be:
- sending notifications by email;
- sending the generated command to the Actuation element. A control element on the end device, for example, on-off relay;
- executing an HTTP GET request with a specific set of parameters. Sending a message to external systems;
Consider the following scenario: when a temperature of 28 C is reached, it is required:
- send email to web@devdotnet.org
- turn on the fan to reduce the temperature by turning on the relay. It should be noted that reaching a temperature of 28 ° C can be a short-term oscillation. Therefore, to avoid frequent switching on of the fan, it is required to set a time interval of 10 seconds for which the temperature will be above 28 C. Only in this case, the fan must be turned on.
- when lowering the temperature below 28 C, the fan must be turned off.
Rules are created in the Rules section. Each execution of the rule is accompanied by the formation of an alert in the system, section Alerts .
Take a booth from Intel Edison. Work with the cloud Intel IoT Analytics: registration and sending data .
The solution consists of the following points:
- Creation of commands for sending Actuation - relay
- Creating rules for sending notifications and on / off relays
- Arduino code change
1. Forming commands for sending Actuation - relay
It is required to create commands Complex command , for this purpose we will pass to the section Control .
Create a command to turn on the relay.
Select the edison habr device, the relay1 component, the action value 1 , the websocket transport, add the Add action command. Press the Save as complex command button and save the command named relay1_ON

Just create a shutdown command, just select, action value 0 , name relay1_OFF
In the Complex commands section, the created commands will be displayed.

')
2. Creating rules for sending notifications and switching on / off relays
Go to the Rules section, add the rule Add a rule
Fill in the fields:
Name: Higth_temp_PowerOnRelay_and_send_to_web@devdotnet.org
Description: when the temperature reaches 28 ° C, send a notification email web@devdotnet.org and turn on the relay
Priority: Medium - affects only the order of processing, the rule with the value of Higth will be executed first
Notifications type. Next, specify the type of notification.
Available:
- sending email
- command execution for Actuation
- perform GET HTTP request
You can create several different notifications / actions for a rule.
Choose Email . In the Email notifications section, select web@devdotnet.org from the list.
Add the second action Actuation. From the list of Actuation notifications, select relay1_ON.

Go to the next page, digging Next.
In the device selection step, select - edison habr
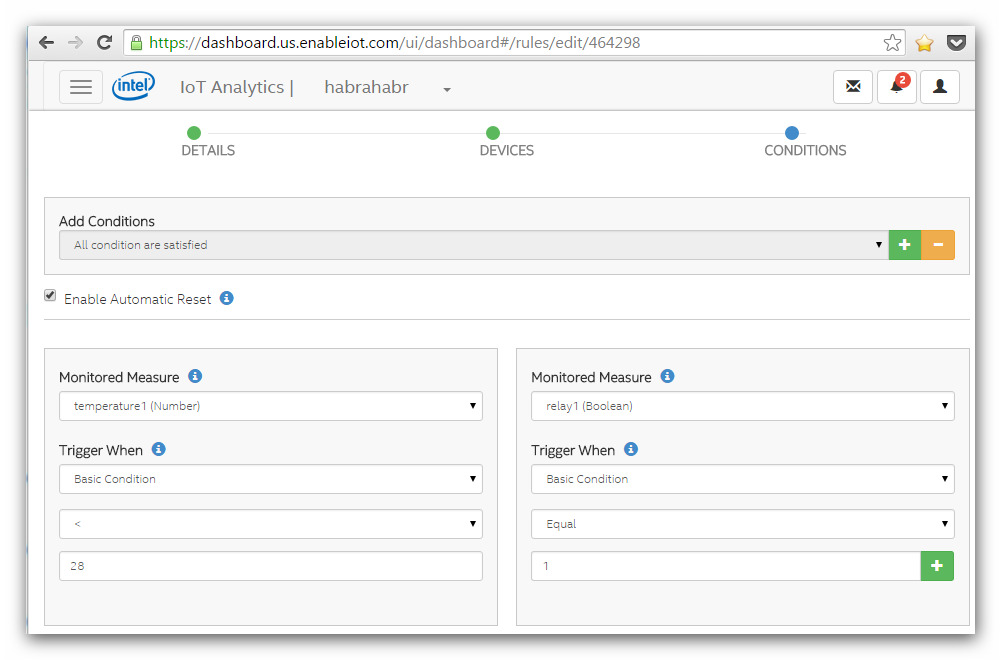
The next step is to create the conditions.
Conditions may be several. For several conditions, a logical rule is defined:
Add Conditions
- At least one condition is satisfield - at least one condition must be met (true)
- All condition are satisfield - all conditions must be met (true)
Parameter Enable Automatic Reset - affects the repeated fulfillment of the condition. If you do not mark it, then the melt will be executed once, and will switch to Archive status and will not be active in the future. Therefore, in our case, it is required to mark this item as true.
It is required to add two conditions. The first condition, the comparison of the temperature value, the expression: "> = 28" .
Monitored Measure field : temperature1 (Number) - choose the required sensor from the list
The Trigger When field contains items:
- Base Condition - basic comparison
- Timenased Condition - the comparison should perform for a certain time (seconds, minuses, hours, weeks, months)
- Statistics Based Condition is the basis of the statistical standard deviation of all values in the specified expression.
Choose - Timenased Condition
Expression: "> = 28" in the last 10 seconds
Second, the relay state must be false i.e. turned off. Otherwise, they will constantly send commands to turn on the relay, after each temperature measurement above 28 C.
Field Monitored Measure: relay1 (Boolean)
Field Trigger When: Base Condition - basic comparison
Condition Eqal "0" - equals 0

Save, the Done button .
Create the second rule
Name: Low_temp_PowerOffRelay_and_send_to_web@devdotnet.org
Actuation notifications: relay1_OFF
As a result, two rules will be created.

3. Changing the Arduino code
In the previous example , an error was made in sending the relay state. Regardless of the command sent, the relay status always assumed to be false, the operator:
iotkit.send("relay1", 0); Below is the corrected version of the code:
if ((component != NULL)) { if (strcmp(component->valuestring, "relay1") == 0) { if ((command != NULL)) { if (strcmp(command->valuestring, "RELAY.v1.0") == 0 && strcmp(value->valuestring, "0") == 0) { Serial.println("Relay Off!"); digitalWrite(9, false); //Send state Actiator iotkit.send("relay1", 0); } if (strcmp(command->valuestring, "RELAY.v1.0") == 0 && strcmp(value->valuestring, "1") == 0) { Serial.println("Relay on!"); digitalWrite(9, true); //Send state Actiator iotkit.send("relay1", 1); } } } } Now let's test, raise the temperature.
Temperature graph

Alert


Cool the sensor


The creation of the rules is over. When waiting for action, you should consider the time delay (up to 1 minute) from the moment the conditions coincide.
As can be seen from the article, a sufficiently flexible functional of forming the conditions is laid, and the main actions are present. GET HTTP request can be used to send SMS messages via HTTP sending gateways.
A small addition. The agent sending data to the cloud automatically does not start by default when Intel Edison is turned on, so it should be switched to autostart mode. Run the command:
# systemctl enable iotkit-agent
Table of contents
- Intel Edison. First start
- Intel Edison. Work with Intel IoT Analytics cloud: register and send data
- Intel Edison. Working with the Intel IoT Analytics cloud: creating rules and sending notifications
- Intel Edison. Cloud Intel IoT Analytics: sending SMS and RESTful client on ASP.NET
Source: https://habr.com/ru/post/368545/
All Articles