Reducing the polygonality of 3D models using Autodesk 3Ds Max and Rhinoceros
Sometimes in our work we have to deal with 3D models that have excessive polygonality. This may occur for the following reasons:
• Model obtained by scanning
• Model created in programs such as Zbrush, Maya, etc.
• The author, when exporting to STL for some reason, set the highest number of polygons
As a result, when working with such a model, we have the following problems:
• The complexity of its editing. For example, dividing or sharing with another model.
• Increase the loading time of the model in the slicer. Some slicers still have a limit on the number of polygons of 3D models.
• Increased slicing time.
Consider ways to reduce the number of polygons 3D models using Autodesk 3Ds Max and Rhinoceros.
Let's start with Autodesk 3Ds Max.
Run 3Ds Max and call the Import command.
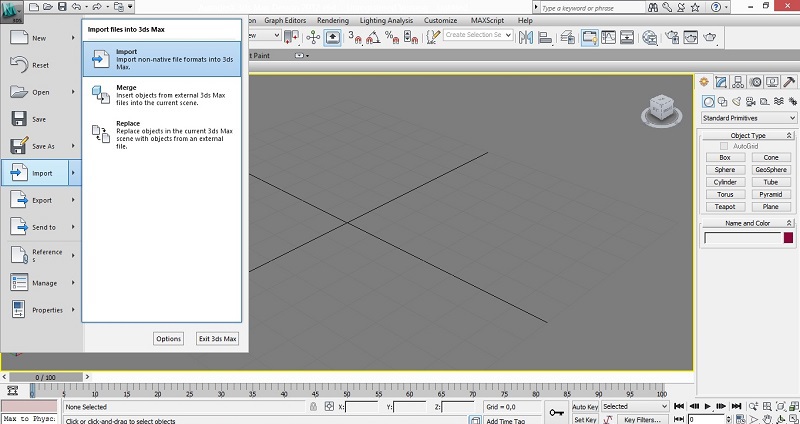
In the window that appears, remove all the checkboxes (otherwise the import process may be very long). Especially to slow down the import process can be operations Weld (merging vertices) and Unify Normals (alignment of normals).

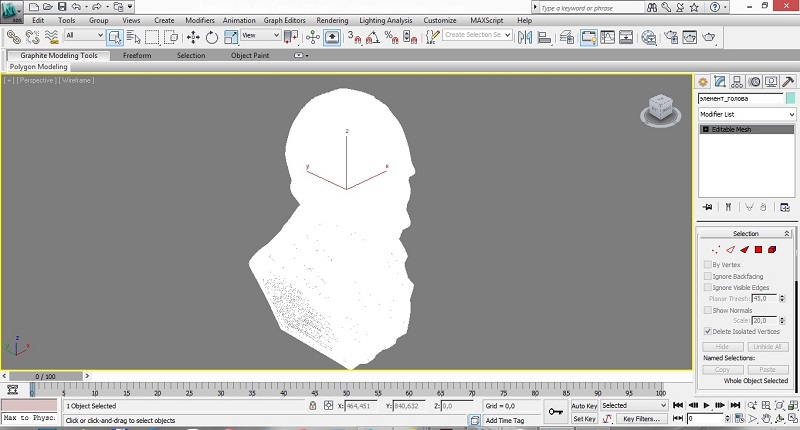
When switching to the wireframe display mode, you can see that the number of vertices in the 3D model is overestimated several times.
In the modifier stack, call the Prooptimiser modifier. If you wish, you can use the old version of the modifier called Optimize.

Click on the Calculate button. After rendering, it will be possible to see the number of vertices in the model and reduce them as a percentage (100% - the current number of vertices in the model). The modifier shows the number of vertices before and after applying the modifier.
Sometimes the 3D model is a cloud of vertices and with a decrease in the number of vertices a glitch is possible as in the figure.

To fix it, it is necessary to put a check at the parameter Merge vertices (the union of vertices) before clicking on the Calculate button.

This will slow down the rendering process, but the result will be a model, as in the figure.

Reduce the number of polygons until it affects the shape of the object. So in the example, with a decrease to 10% (10 times) the shape almost does not change, and with a decrease to 3% (33 times), changes are visible.
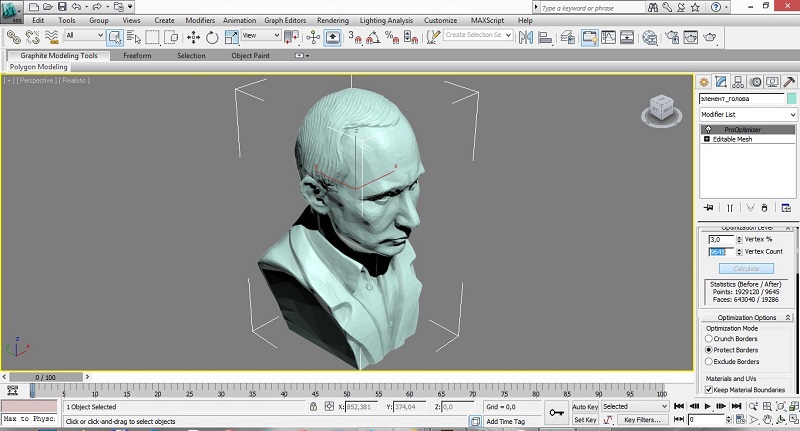
I recommend to convert the 3D model to Editable Poly before further work.

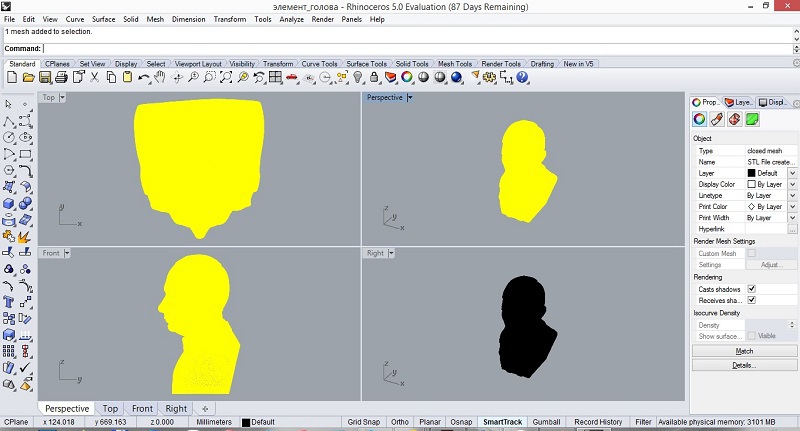
Now let's run Rhinoceros. Open the file with the 3D model (stl is in the list of supported files). For reasons we already understand, we remove all the jackdaws in the window that appears.

After the import is completed, the 3D model will appear in the viewports.
Run the command Reduce Mesh (polygon reduction).
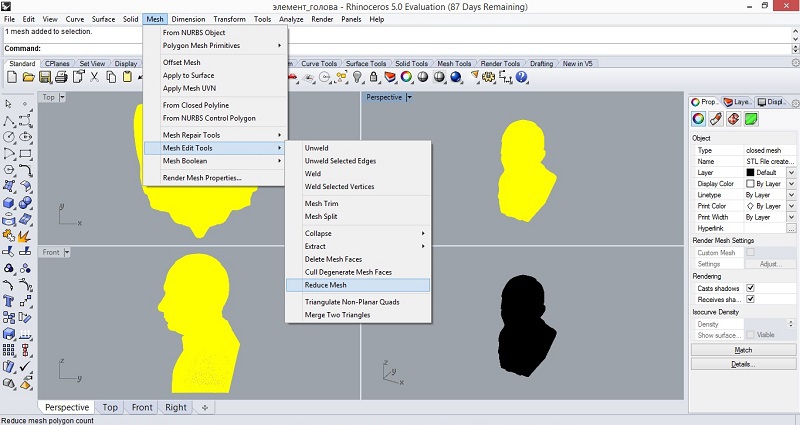
In the window that appears, specify the number of percentages that you want to reduce the 3D model. You can adjust the accuracy of the operation (this increases the rendering time).

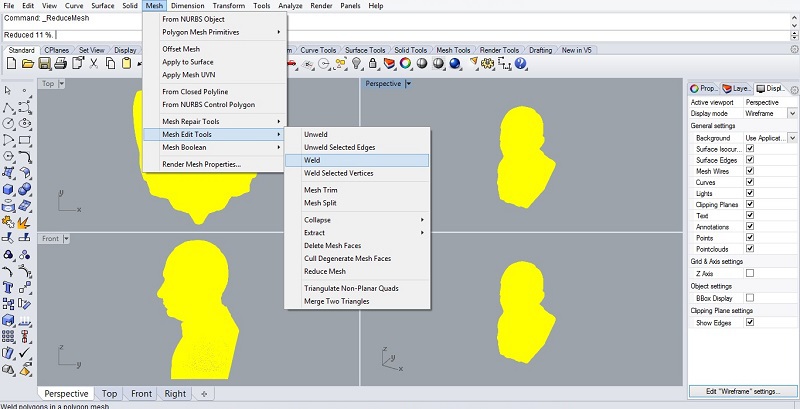
For a 3D model as in the example, it is recommended to first apply the command
Weld (vertex merge)
After that, it is not difficult to divide the model and print it on a 3D printer.

• Model obtained by scanning
• Model created in programs such as Zbrush, Maya, etc.
• The author, when exporting to STL for some reason, set the highest number of polygons
As a result, when working with such a model, we have the following problems:
• The complexity of its editing. For example, dividing or sharing with another model.
• Increase the loading time of the model in the slicer. Some slicers still have a limit on the number of polygons of 3D models.
• Increased slicing time.
Consider ways to reduce the number of polygons 3D models using Autodesk 3Ds Max and Rhinoceros.
Let's start with Autodesk 3Ds Max.
Run 3Ds Max and call the Import command.
In the window that appears, remove all the checkboxes (otherwise the import process may be very long). Especially to slow down the import process can be operations Weld (merging vertices) and Unify Normals (alignment of normals).
When switching to the wireframe display mode, you can see that the number of vertices in the 3D model is overestimated several times.
In the modifier stack, call the Prooptimiser modifier. If you wish, you can use the old version of the modifier called Optimize.
Click on the Calculate button. After rendering, it will be possible to see the number of vertices in the model and reduce them as a percentage (100% - the current number of vertices in the model). The modifier shows the number of vertices before and after applying the modifier.
Sometimes the 3D model is a cloud of vertices and with a decrease in the number of vertices a glitch is possible as in the figure.
To fix it, it is necessary to put a check at the parameter Merge vertices (the union of vertices) before clicking on the Calculate button.
This will slow down the rendering process, but the result will be a model, as in the figure.
Reduce the number of polygons until it affects the shape of the object. So in the example, with a decrease to 10% (10 times) the shape almost does not change, and with a decrease to 3% (33 times), changes are visible.
I recommend to convert the 3D model to Editable Poly before further work.
Now let's run Rhinoceros. Open the file with the 3D model (stl is in the list of supported files). For reasons we already understand, we remove all the jackdaws in the window that appears.
After the import is completed, the 3D model will appear in the viewports.
Run the command Reduce Mesh (polygon reduction).
In the window that appears, specify the number of percentages that you want to reduce the 3D model. You can adjust the accuracy of the operation (this increases the rendering time).
For a 3D model as in the example, it is recommended to first apply the command
Weld (vertex merge)
After that, it is not difficult to divide the model and print it on a 3D printer.
')
Source: https://habr.com/ru/post/367663/
All Articles