Making your own Z-Wave device based on Z-Uno
The Z-Wave protocol is very popular, and there is a huge variety of compatible devices. However, everyone who has ever automated their home, faced with the fact that something is still missing.
Someone lacks a pressure sensor, someone has a rain sensor, someone wants a device for 6 relays in one case, and also on batteries. And someone just needs to control the iRobot Roomba through the Z-Wave.
But all this is not in Z-Wave (and in other protocols, too), and manufacturers are not in a hurry to fulfill all your dreams.
')
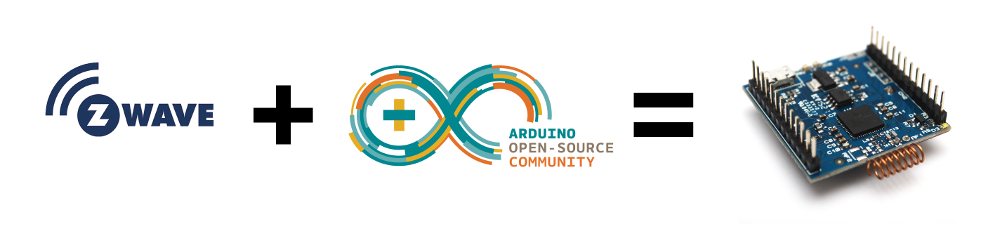
We heard your pain and created the perfect combine. Meet the Z-Uno, which combines simplicity and versatility. Z-Uno is Arduino in the world of Z-Wave. On this board you can collect all your dream devices and more.
About the creation of the device Z-Wave and the difficulties associated with this, I wrote recently . Obviously, no one will develop their own device for themselves - this is too difficult and expensive. But imagine if you are given access to the periphery of the Z-Wave chip, an open source compiler, a simple IDE, easy access to the Z-Wave network, certified functionality and the ability to work with any other Z-Wave device.
And so we made it available in our new Z-Uno device (it is more correct to call Z-Uno a platform, not a device, because there are a lot of devices on this small board). The idea behind Z-Uno is simple:
You write C code in the Arduino style directly in the Arduino IDE. The same medium is used to download your code via USB (it is also possible to upload a new code via radio via Z-Wave controllers - the so-called OTA flashing). Your code controls all the legs as in Arduino. The familiar Arduino feature set is supplemented with specific features for working with the Z-Wave network — receiving and sending commands. All the difficulties of Z-Wave are hidden under the hood of Z-Uno.
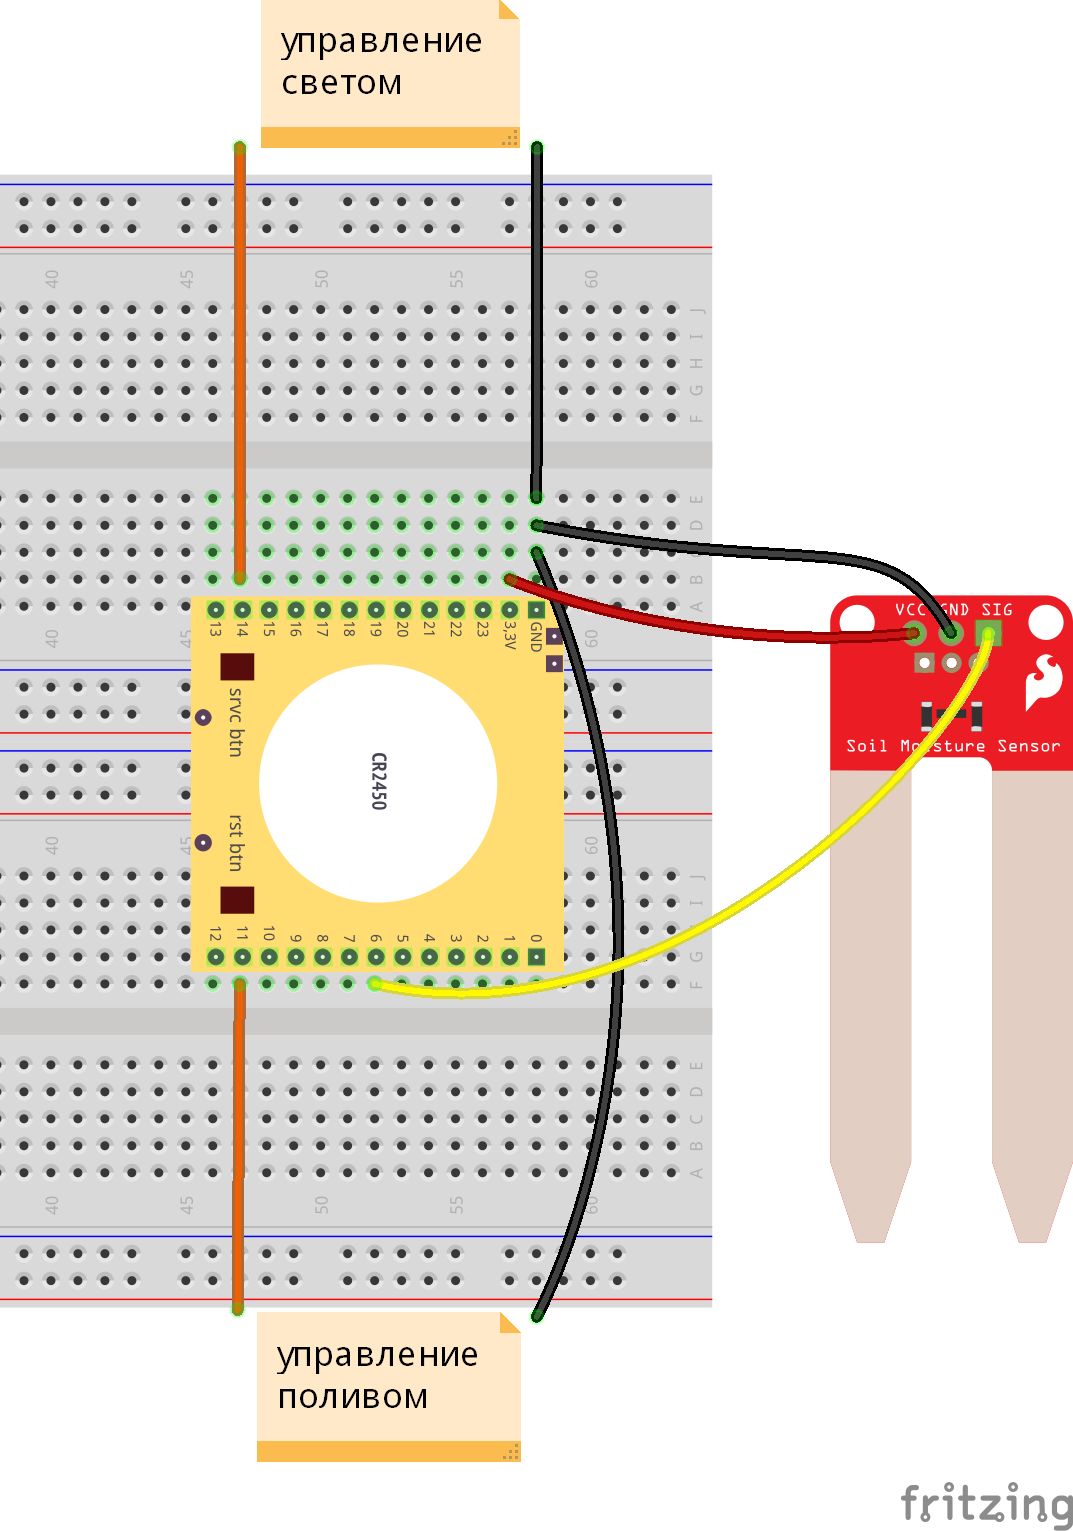
We give an example of an unusual device. For example, you want to remotely water your favorite flower, and also include lighting. Well, he is very dear to you, and you want to turn on the watering yourself, and not automatically, in order to feel your involvement in the care of the plant. To do this, you will take a soil moisture sensor, as well as a relay to turn on watering and LED strip for lighting. But do not want to pull the wires to the flower. How to be? Connect to one of the Z-Uno ADC our humidity sensor, relays to digital outputs, and lighting to PWM. The value from the ADC will be transmitted via Z-Wave in the form of a “multi-level sensor” (Sensor Multilevel), the relay will be represented via a “binary switch” (Switch Binary), and the regulator of the LED tape through a “multi-level switch” (Switch Multilevel). Z-Wave controllers immediately pick up the data provided in this form, display them in the interface and allow you to remotely control.
This is how the sensor, relay and dimmer connection to Z-Uno will look like (for simplicity, I didn’t draw either the details of connecting the irrigation relay or the dimmable LED ribbon control circuit - it is assumed that you already have this part of the circuitry by assembling a prototype on Arduino ). This device will be powered by a micro-USB port Z-Uno, and 3.3 V for the Z-Uno itself and a soil moisture sensor are obtained thanks to the built-in DC-DC converter.
Thus, we just wrote a code similar to what you had for the Arduino, to read the humidity values and to change the state of the legs controlling the relays, and also described the channels for Z-Wave and tied them to the values obtained. The rest of the work on data transfer Z-Uno will do for you. Mobile applications and remote access provided by Z-Wave central controllers will allow you to control watering from anywhere in the world from the same interface that controls the rest of your smart home.
View of our watering device in the Z-Way / RaZberry interface:

View of our watering device in the Fibaro Home Center 2 and Home Center Lite interface:

The view of our irrigation device in the Vera Edge interface (it is clear that the exotic soil moisture sensor is not shown, but replacing with relative humidity solves the problem in this case):

View of our watering device in the Zipato ZipaBox interface:

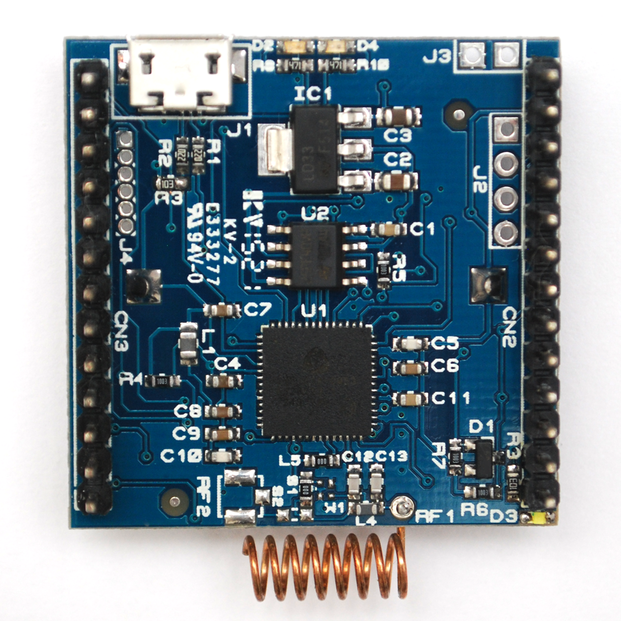
Z-Uno is based on the Mitsumi WML-C85 module (versions with WML-C84 or ZM5101 can also be found). Almost all the legs and functions we provide to the user through a convenient API as close as possible to the Arduino language. Therefore, the characteristics of the Z-Uno are very similar to those of the SD3502, ZM5101 and WML-C84.
Note that Z-Uno is a booming project. Italicized stated goals. As implementation and testing we will mark them in normal font. The * symbol indicates partially implemented functions (move the mouse to display a comment).
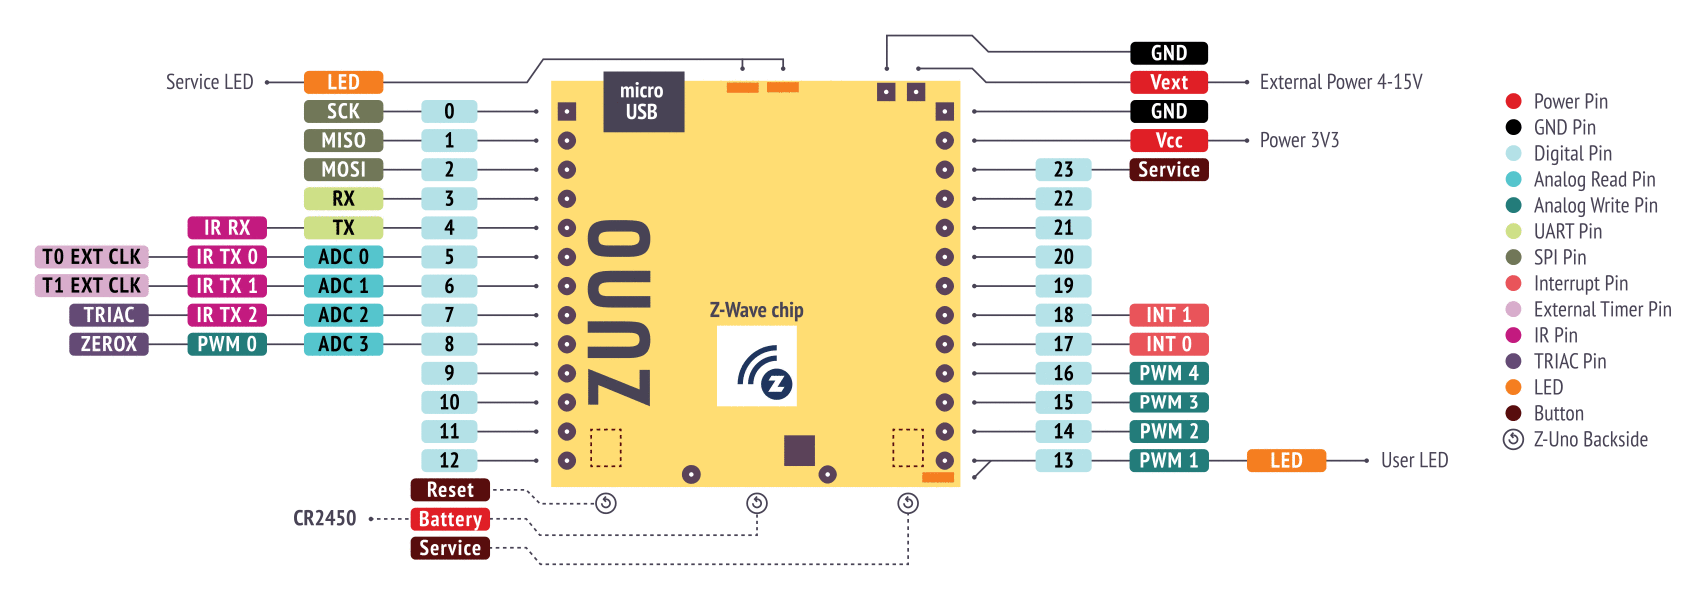
Z-Uno pinout (click to view large picture ):
Each user channel can contain one of the following classes of Z-Wave commands:
Custom sketches are uploaded to Z-Uno directly from the Arduino IDE. To work with Z-Uno, you need to install the corresponding package, which contains the compiler, the loader, the libraries and the .h files of the Z-Uno project. This is done from the Board Manager recently introduced in the Arduino IDE. For the Z-Uno package to appear in the list in the card manager, you need to go to the settings and enter a link to the description of the Z-Uno packages in the Additional Boards Manager URLs field: http://z-uno.z-wave.me/files/z- uno / package_z-wave.me_index.json . Next, go to Tools -> Board -> Boards manager and install the package for Z-Uno.
Important! At the moment, only the penultimate Arduino IDE 1.6.5 is supported.
After installing the Z-Uno package, the Z-Wave> Me Z-Uno item will appear in the Tools list in the list of boards, and the Z-Uno Programmer in the list of programmers. Select the desired port (COM port for Windows, ttyACM port for Linux and cu.usbmodem for OS X). The Burn Bootloader item allows you to update the Z-Uno sketch bootloader and the Z-Wave stack (see Z-Uno architecture below) to the latest version included in the Z-Uno package.
A tick will also appear in the menu to enable encryption (Security command class) and compact packet sending (MultiCommand command class). These features are not supported by some controllers. In addition, in the same list, you can select the frequency of Z-Uno operation (note that the SAW filter is in any case tuned to one of the three frequency ranges, i.e. if you select an unsuitable frequency, the radio communication distance will be significantly lower!).
In the File-> Examples menu, examples specific to Z-Uno will also appear. You can start exploring the possibilities of Z-Uno.
Detailed installation instructions are presented on the Z-Uno project website.
Here you need to use your imagination. Here are a few ideas:
Creating your own devices based on Z-Uno you do not need to study all the documentation of the Z-Wave protocol and ZM5101 microcontrollers. However, you will need some minimal knowledge about Z-Wave to correctly describe the functions you need in the sketch.
In order to present several functions in one device, channels (occasionally called “instances” ) are described in the Z-Wave protocol. In Z-Uno, we use this concept to create complex devices. Each Z-Uno channel provides one of the functions declared by the user. How many functions are described, so many channels will be. Use the macro ZUNO_SETUP_CHANNELS to describe the number and types of channels.
Z-Uno itself will send status reports on the channels to the controller (when calling zunoSendReport (channel number)). However, Z-Uno can also control other Z-Wave devices. To simplify configuration, the concept of an association group (or just an association) is described in the Z-Wave protocol. An association group is a list of network devices to which a certain command will be sent upon the occurrence of a specific event. The type of command and events are programmed in the device, while the list of recipients can be easily changed from the interface of the Z-Wave controllers.
The macro ZUNO_SETUP_ASSOCIATIONS allows you to determine the number of groups available in the device and the type of command to be sent for each group (relay control, dimmer, or running scenes).
Z-Wave protocol is designed so that it is possible to create devices with very low power consumption and to power them from batteries. Most Z-Wave sensors have been working on a battery pack for over a year. However, for this purpose, the device must remain in the “sleep” state most of the time, occasionally waking up to measure sensor values and send reports. Such devices are called "sleeping . "
On the one hand, to make the device battery-powered, and on the other - to be able to control it in real time (without waiting for waking up), Z-Wave introduced another type of power management: “often listening” devices or FLiRS . These devices wake up once a second to check the air for the “wake-up packet” and immediately go to sleep if there is nothing for them. Communication with such devices will take a little longer - before sending the right command, you need to send a special “wake-up packet” within one second. During this time, the network will be silenced, but after waking up, the device will promptly respond to commands before going to sleep. In this mode, the device is able to live on a set of batteries for about a year. Typical devices that require this mode are battery-powered relays, sirens, door locks.
All constantly powered devices, such as dimmers, relays and other performers, are “constantly listening” . This means that they are always available, always listen to the broadcast and act as repeaters for other devices, forming a mesh network .
Z-Uno supports all three power modes. Power mode can be defined by the macro ZUNO_SETUP_SLEEPING_MODE .
Important! When changing the parameters or the number of channels, association groups or power mode, you must exclude Z-Uno from the network and re-enable it in the network. This is caused by the requirement of the Z-Wave protocol not to change its characteristics on the fly.
The information mentioned here should be enough to create your own Z-Wave device, but a deeper understanding never hurts. You can read more in this article , as well as in the book "Basics of Z-Wave" by Christian Petz.
We make Z-Uno fully up-to-date with the latest Z-Wave Plus standard. However, alas, it does not guarantee full performance in all controllers. Alas, many controllers require “patterns” to support specific devices. Writing such templates is difficult or even impossible (the controller manufacturer may not be able to load its template). And some controllers do limit the displayed functions of the device to three or four controls. This greatly limits the ability to use Z-Uno.
Immediately, we note that our own Z-Way controller supports any version of Z-Uno-based devices right out of the box. No, we did not do special support for Z-Uno and did not write any templates. It's just that the Z-Way is written this way, and it is enough for it that the device is certified and complies with the Z-Wave protocol.
So far, we have tested Z-Uno with Z-Way (full compatibility), Fibaro (up to four functions), Vera Edge (exotic sensors are not supported), Zipato (little tested, but so far no problems have been noticed). We hope that the manufacturers of controllers will improve the work of the controllers and support for the functions included in the standard Z-Wave.
 I would like to mention how the Z-Uno is arranged inside. The Z-Uno executable code consists of four parts:
The custom code , also known as the “sketch” , is your code written in simplified C language and loaded into Z-Uno via Arduino IDE. User code controls all the "legs" and the logic of the device. You decide how to connect this or that periphery!
The custom code loader implements the Z-Wave application level in accordance with the user settings, determines the channels and groups of associations, sets the sleep mode. It also controls the service LEDs and handles the service buttons necessary to turn on the device in the network, reset and transfer to the “recovery” mode (the mode in which the user code is not loaded). But the main role of the loader is to call the User Code when retrieving the Set (set value) and Get (request value) packets from the Z-Wave network, as well as calling the loop function all the time while lower levels are not occupied. This level is the main part of the core of the Z-Uno firmware.
The Z-Wave application layer maps user-defined Z-Uno channels, functions, and associations to Z-Wave command classes, ensuring compliance with the Z-Wave Plus standard. This level also provides features such as firmware upgrades, USB and radio ( OTW and OTA ), AES encryption of all radio packets, monitoring radio signal strength, measuring battery charge, periodic waking up, and announces basic device information to the network.
The Z-Wave network layer is based on the Sigma Designs SDK (version 6.5x), which implements the network and radio layers of the Z-Wave protocol, establishing reliable two-way mesh communication in the smart home network. This level is engaged in the calculation of routes, ensuring the delivery of packets to recipients, even outside the direct line of sight, performs forwarding (routing) and receiving packets.
Custom code (sketch) is compiled into the Arduino IDE with the Z-Uno Core Libraries libraries, which must be installed via the Arduino Board Manager. Like Arduino sketches, Z-Uno sketches are common firmware compiled for the corresponding microcontroller. However, compared to Arduino based on Atmel microcontrollers, Z-Uno is based on a Z-Wave chip, i.e. 8051 architecture. Therefore, instead of avg-gcc, the sdcc compiler is used to build Z-Uno sketches .
There is one more difference from Arduino sketches: Z-Uno sketches should interact with the levels below. This interaction is carried out through the Z-Uno Core Libraries, with which the Z-Uno sketches are compiled.
As already mentioned, the User Code can be downloaded via the Arduino IDE via USB (using the Upload button), as well as via radio via the Z-Wave controller, which supports firmware updates in devices.
All lower levels (User Code Loader, Z-Wave Application Level and Z-Wave Network Layer - all together) can also be updated via USB from the Arduino IDE (using the “Upload Bootloader” menu item) or also via radio via the Z-Wave controller.
Note that these lower layers are compiled with the Z-Wave SDK libraries using the Keil C51 compiler, while custom code is compiled using sdcc. I think we will write a separate article about how we crossed a hedgehog with a snake. After all, these compilers even have slightly different conventions and ABI function calls.
We tried to make the perfect product, but it doesn't always work out well;)
Alas, the first released version does not fit on one breadboard (due to the size of the battery, we could not reduce the charge). But the next version will be narrower and fit on one standard layout.
Also in the current version we miscalculated with the choice of the battery - the current one is not able to properly power the device in FLiRS mode. The following will not have a battery on board, but only a cable for connecting an external battery.
Also, the current board does not have protection against connecting both the battery and external power at the same time. This is reminiscent of the protective paper in the battery compartment. But it will be fixed.
As you can see, these shortcomings are important, but not critical for most functions. The rest of the device turned out very versatile and is suitable for creating a variety of sensors and actuators.
It is also worth noting that, unlike the Arduino, the Z-Uno has 3 V on its feet, not 5 V. This should be taken into account in order not to burn the entrances.
After a few workshops, we realized that the product was still difficult: those who are familiar with Arduino should familiarize themselves with the ecosystem of Z-Wave devices and the interface of Z-Wave controllers, and those who are familiar with Z-Wave should have basic knowledge S. Fortunately, the intersection of the subsets of these people is very large.
As I mentioned, Z-Uno is a fast-paced project. We set ourselves a very ambitious goal, and confidently step towards it. Here is a brief outline of the project for the coming months:
All information about the project is published on the website z-uno.z-wave.me . There is also a description of the functions of the C programming language and code examples (in English).
We also have an English-language forum dedicated to Z-Uno.
The Z-Uno Core Libraries code is available on github .
We accept information on errors and suggestions through github: you can create a ticket and report a problem .
Z-Uno is already available (for the time being only in Russia) with our 5 smart partners, who give 5% to all Z-Wave devices for a GT_ZUNO coupon within a week after this publication. We hope, soon Z-Uno will appear in other stores.
The recommended retail price of 3500 rubles.
Details of the project on the website z-uno.z-wave.me .

Someone lacks a pressure sensor, someone has a rain sensor, someone wants a device for 6 relays in one case, and also on batteries. And someone just needs to control the iRobot Roomba through the Z-Wave.
But all this is not in Z-Wave (and in other protocols, too), and manufacturers are not in a hurry to fulfill all your dreams.
')
We heard your pain and created the perfect combine. Meet the Z-Uno, which combines simplicity and versatility. Z-Uno is Arduino in the world of Z-Wave. On this board you can collect all your dream devices and more.
About the creation of the device Z-Wave and the difficulties associated with this, I wrote recently . Obviously, no one will develop their own device for themselves - this is too difficult and expensive. But imagine if you are given access to the periphery of the Z-Wave chip, an open source compiler, a simple IDE, easy access to the Z-Wave network, certified functionality and the ability to work with any other Z-Wave device.
And so we made it available in our new Z-Uno device (it is more correct to call Z-Uno a platform, not a device, because there are a lot of devices on this small board). The idea behind Z-Uno is simple:
You write C code in the Arduino style directly in the Arduino IDE. The same medium is used to download your code via USB (it is also possible to upload a new code via radio via Z-Wave controllers - the so-called OTA flashing). Your code controls all the legs as in Arduino. The familiar Arduino feature set is supplemented with specific features for working with the Z-Wave network — receiving and sending commands. All the difficulties of Z-Wave are hidden under the hood of Z-Uno.
We give an example of an unusual device. For example, you want to remotely water your favorite flower, and also include lighting. Well, he is very dear to you, and you want to turn on the watering yourself, and not automatically, in order to feel your involvement in the care of the plant. To do this, you will take a soil moisture sensor, as well as a relay to turn on watering and LED strip for lighting. But do not want to pull the wires to the flower. How to be? Connect to one of the Z-Uno ADC our humidity sensor, relays to digital outputs, and lighting to PWM. The value from the ADC will be transmitted via Z-Wave in the form of a “multi-level sensor” (Sensor Multilevel), the relay will be represented via a “binary switch” (Switch Binary), and the regulator of the LED tape through a “multi-level switch” (Switch Multilevel). Z-Wave controllers immediately pick up the data provided in this form, display them in the interface and allow you to remotely control.
This is how the sensor, relay and dimmer connection to Z-Uno will look like (for simplicity, I didn’t draw either the details of connecting the irrigation relay or the dimmable LED ribbon control circuit - it is assumed that you already have this part of the circuitry by assembling a prototype on Arduino ). This device will be powered by a micro-USB port Z-Uno, and 3.3 V for the Z-Uno itself and a soil moisture sensor are obtained thanks to the built-in DC-DC converter.
The code of our program for Z-Uno will look like this.
The code is well commented. The meaning of some lines will be described in more detail below.
int moistPin = A1; // int feedPin = 14; // int lightPin = PWM2; // int dimLevel = 0; // int moistLevel = 0; // int moistLevelHist = 50; // ( ) int moistLevelCritical = 300; // , ZUNO_SETUP_CHANNELS( ZUNO_SENSOR_MULTILEVEL_MOISTURE(moistureGetter), // -, ZUNO_SWITCH_BINARY(feedGetter, feedSetter), // - ZUNO_SWITCH_MULTILEVEL(lightGetter, lightSetter) // - ); ZUNO_SETUP_ASSOCIATIONS( ZUNO_ASSOCIATION_GROUP_SET_VALUE // - Z-Wave ); void setup() { // pinMode(feedPin, OUTPUT); // digitalWrite(feedPin, LOW); analogWrite(lightPin, dimLevel); } void loop() { int moistLevelNew = analogRead(moistPin); if (moistLevelNew < moistLevel - moistLevelHist || moistLevelNew > moistLevel + moistLevelHist) { // if (((moistLevel > moistLevelCritical) && (moistLevelNew < moistLevelCritical)) || ((moistLevel < moistLevelCritical) && (moistLevelNew > moistLevelCritical))) { zunoSendToGroupSetValueCommand(CTRL_GROUP_1, moistLevel < moistLevelCritical); // , } moistLevel = moistLevelNew; zunoSendReport(CHANNEL_1); // ( 1) } delay(60*1000); } byte moistureGetter(void) { byte tmpLevel = moistLevel / 9; // 0 () - 900 ( ) 0-100% ( 10-) if (tmpLevel > 100) tmpLevel = 100; return tmpLevel; } void feedSetter(byte value) { digitalWrite(feedPin, value ? HIGH : LOW); } byte feedGetter() { return digitalRead(feedPin); } void lightSetter(byte value) { dimLevel = (value > 99) ? 99 : value; // ( ) analogWrite(lightPin, dimLevel*255/99); } byte lightGetter() { return dimLevel; } The code is well commented. The meaning of some lines will be described in more detail below.
Thus, we just wrote a code similar to what you had for the Arduino, to read the humidity values and to change the state of the legs controlling the relays, and also described the channels for Z-Wave and tied them to the values obtained. The rest of the work on data transfer Z-Uno will do for you. Mobile applications and remote access provided by Z-Wave central controllers will allow you to control watering from anywhere in the world from the same interface that controls the rest of your smart home.
View of our watering device in the Z-Way / RaZberry interface:
View of our watering device in the Fibaro Home Center 2 and Home Center Lite interface:
The view of our irrigation device in the Vera Edge interface (it is clear that the exotic soil moisture sensor is not shown, but replacing with relative humidity solves the problem in this case):
View of our watering device in the Zipato ZipaBox interface:
Some bare facts about Z-Uno
Z-Uno is based on the Mitsumi WML-C85 module (versions with WML-C84 or ZM5101 can also be found). Almost all the legs and functions we provide to the user through a convenient API as close as possible to the Arduino language. Therefore, the characteristics of the Z-Uno are very similar to those of the SD3502, ZM5101 and WML-C84.
Note that Z-Uno is a booming project. Italicized stated goals. As implementation and testing we will mark them in normal font. The * symbol indicates partially implemented functions (move the mouse to display a comment).
Specifications:
- 28 kB of flash memory for your sketches
- 4kB RAM,
- Z-Wave radio transceiver on channels 9.6, 40 and 100 kbps,
- 22 GPIO (some overlap with other functions),
- 4 ADC,
- 5 PWM * ,
- 2 UART * ,
- 1 USB (in serial mode),
- 64 kByte EEPROM ,
- 1 SPI (master or slave modes)
- 4 IR controllers and 1 IR receiver with learning function,
- 1 TRIAC / ZEROX dimming controllers,
- 1 interrupt * ,
- 2 timers (16 MHz or from an external source) ,
- I2C (software on the legs GPIO) ,
- 1-wire (software on the legs GPIO) ,
- 8x6 button scanner (including in deep sleep mode) ,
- 2 service LEDs, 1 service button,
- 1 custom LED (like pin 13 for Arduino).
Z-Uno pinout (click to view large picture ):
Power Modes:
- USB 5 V, external 3 V, external 4-15 V or 3 V battery,
- always online, sleeping or FLiRS ,
Z-Wave features:
- Z-Wave Plus Compliance
- All Z-Wave frequencies (due to different SAW filters there will be 3 types of Z-Uno)
- Support for 128-bit AES encryption boxes described in the Z-Wave protocol
- Update firmware and bootloader via USB or radio (Z-Wave OTA),
- MultiChannel (10 user channels - each channel provides one function, see below),
- 10 groups of associations to control other devices
- The ability to control the radio Z-Wave relays, dimmers, locks, running scenes,
Each user channel can contain one of the following classes of Z-Wave commands:
- Binary Switch (for relay),
- Multilevel Switch (for dimmers, blinds),
- Color Switch (for colored lamps) ,
- Binary Sensor and Notification (for detectors and alarms),
- Multilevel Sensor (for sensors that return a numeric value),
- Meter (for counters) .
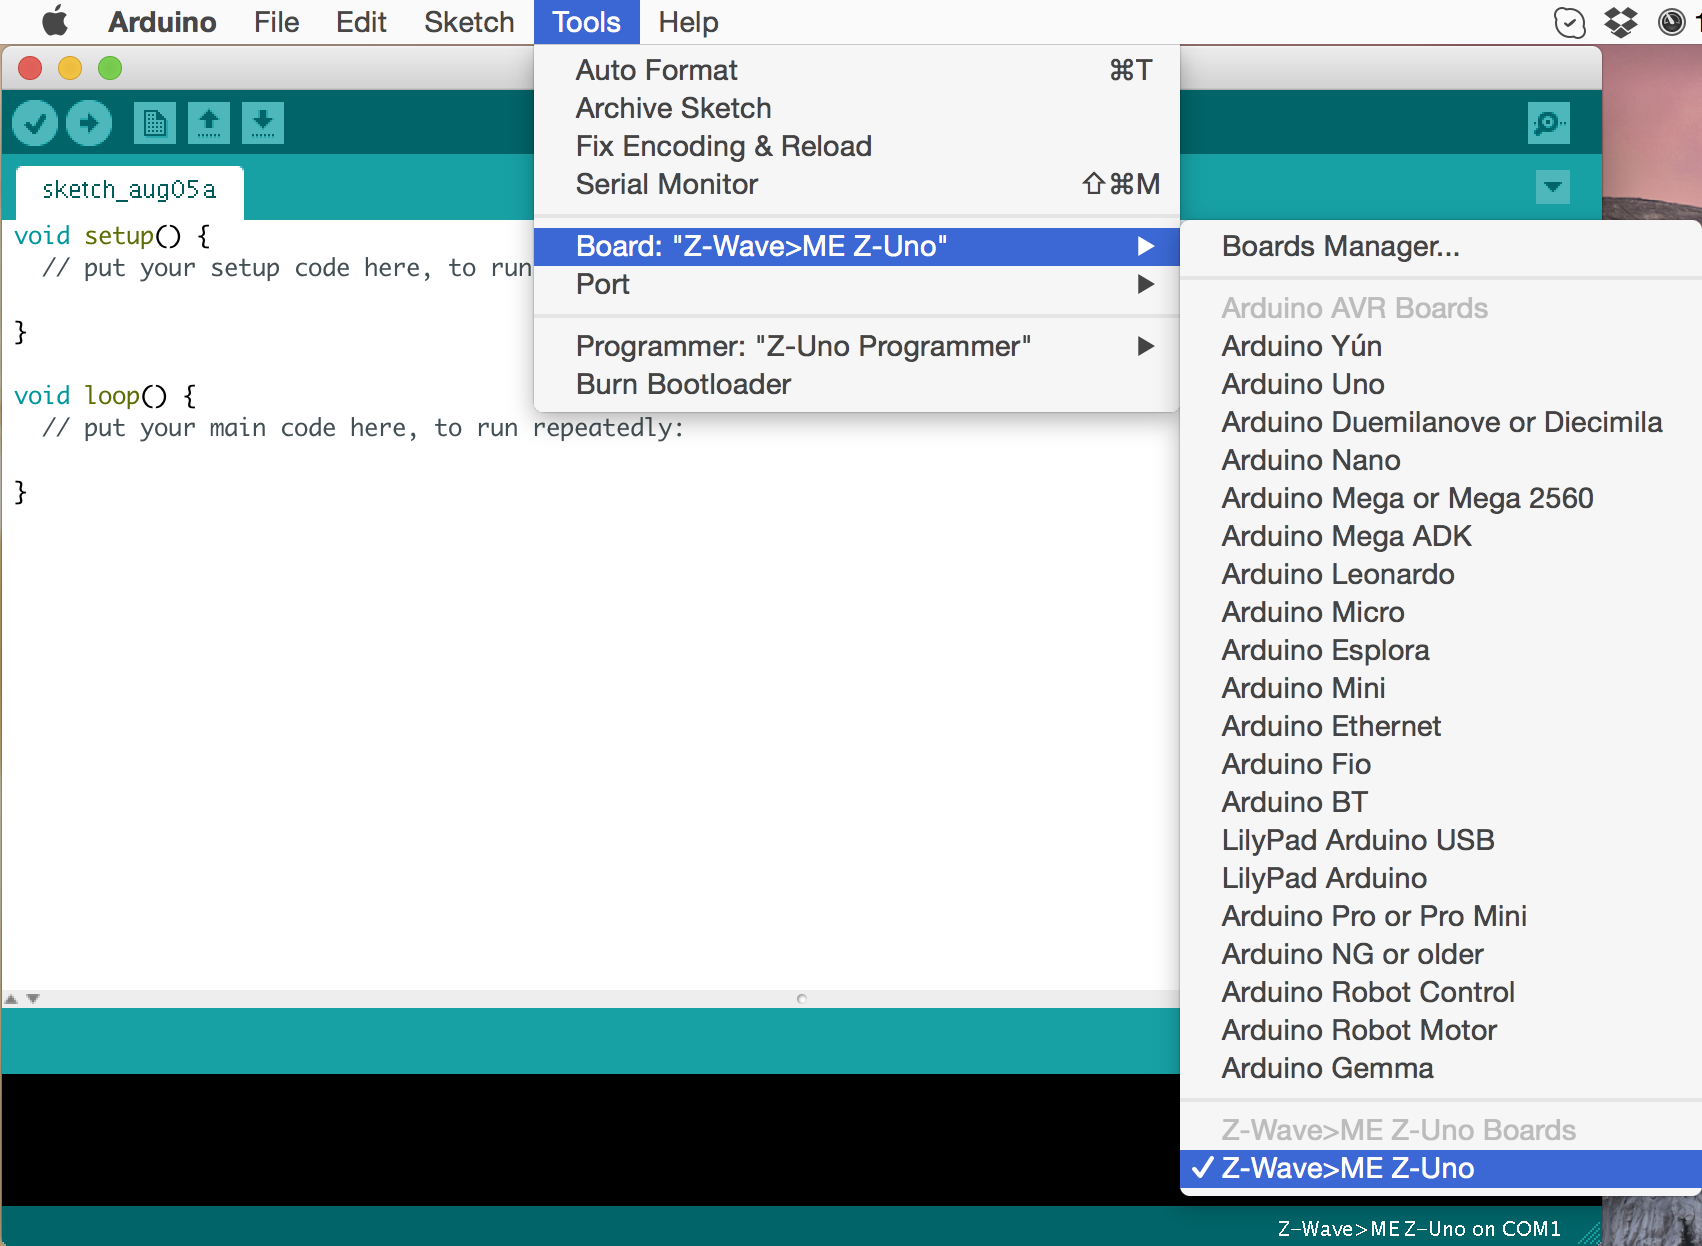
Installing and configuring Z-Uno programming environment
Custom sketches are uploaded to Z-Uno directly from the Arduino IDE. To work with Z-Uno, you need to install the corresponding package, which contains the compiler, the loader, the libraries and the .h files of the Z-Uno project. This is done from the Board Manager recently introduced in the Arduino IDE. For the Z-Uno package to appear in the list in the card manager, you need to go to the settings and enter a link to the description of the Z-Uno packages in the Additional Boards Manager URLs field: http://z-uno.z-wave.me/files/z- uno / package_z-wave.me_index.json . Next, go to Tools -> Board -> Boards manager and install the package for Z-Uno.
Important! At the moment, only the penultimate Arduino IDE 1.6.5 is supported.
After installing the Z-Uno package, the Z-Wave> Me Z-Uno item will appear in the Tools list in the list of boards, and the Z-Uno Programmer in the list of programmers. Select the desired port (COM port for Windows, ttyACM port for Linux and cu.usbmodem for OS X). The Burn Bootloader item allows you to update the Z-Uno sketch bootloader and the Z-Wave stack (see Z-Uno architecture below) to the latest version included in the Z-Uno package.
A tick will also appear in the menu to enable encryption (Security command class) and compact packet sending (MultiCommand command class). These features are not supported by some controllers. In addition, in the same list, you can select the frequency of Z-Uno operation (note that the SAW filter is in any case tuned to one of the three frequency ranges, i.e. if you select an unsuitable frequency, the radio communication distance will be significantly lower!).
In the File-> Examples menu, examples specific to Z-Uno will also appear. You can start exploring the possibilities of Z-Uno.
The whole process in pictures


Detailed installation instructions are presented on the Z-Uno project website.
What else can be done on Z-Uno?
Here you need to use your imagination. Here are a few ideas:
- Battery operated switch
- Dimmer Twister (Rotary Dimmer),
- Sensor temperature, humidity, light, voltage, distance, pressure, rain, ...
- Counter, dry contact sensor, low voltage relay,
- IR remote,
- LED driver
- Engine management,
- Button panel (keyboard) on batteries,
- Converter from Z-Wave to other protocols (any sensors connected via SPI / UART / I2C / 1-wire buses).
Z-Uno and Z-Wave
Creating your own devices based on Z-Uno you do not need to study all the documentation of the Z-Wave protocol and ZM5101 microcontrollers. However, you will need some minimal knowledge about Z-Wave to correctly describe the functions you need in the sketch.
Channels
In order to present several functions in one device, channels (occasionally called “instances” ) are described in the Z-Wave protocol. In Z-Uno, we use this concept to create complex devices. Each Z-Uno channel provides one of the functions declared by the user. How many functions are described, so many channels will be. Use the macro ZUNO_SETUP_CHANNELS to describe the number and types of channels.
For example, this is how we describe a device for measuring humidity and turning on watering and lighting.
This code describes three channels. The first will contain a class of commands Sensor Multilevel and transmit the value of soil moisture, the second will control irrigation, and the third will provide a light switch.
ZUNO_SETUP_CHANNELS( ZUNO_SENSOR_MULTILEVEL_MOISTURE(moistureGetter), ZUNO_SWITCH_BINARY(feedGetter, feedSetter), ZUNO_SWITCH_MULTILEVEL(lightGetter, lightSetter) ); This code describes three channels. The first will contain a class of commands Sensor Multilevel and transmit the value of soil moisture, the second will control irrigation, and the third will provide a light switch.
Associations
Z-Uno itself will send status reports on the channels to the controller (when calling zunoSendReport (channel number)). However, Z-Uno can also control other Z-Wave devices. To simplify configuration, the concept of an association group (or just an association) is described in the Z-Wave protocol. An association group is a list of network devices to which a certain command will be sent upon the occurrence of a specific event. The type of command and events are programmed in the device, while the list of recipients can be easily changed from the interface of the Z-Wave controllers.
The macro ZUNO_SETUP_ASSOCIATIONS allows you to determine the number of groups available in the device and the type of command to be sent for each group (relay control, dimmer, or running scenes).
For example, this is how we describe a group to control another device such as a relay.
At the top of the project file:
and in the right place in the code:
ZUNO_SETUP_ASSOCIATIONS(ZUNO_ASSOCIATION_GROUP_SET_VALUE); and in the right place in the code:
zunoSendToGroupSetValueCommand(CTRL_GROUP_1, ); Power management
Z-Wave protocol is designed so that it is possible to create devices with very low power consumption and to power them from batteries. Most Z-Wave sensors have been working on a battery pack for over a year. However, for this purpose, the device must remain in the “sleep” state most of the time, occasionally waking up to measure sensor values and send reports. Such devices are called "sleeping . "
On the one hand, to make the device battery-powered, and on the other - to be able to control it in real time (without waiting for waking up), Z-Wave introduced another type of power management: “often listening” devices or FLiRS . These devices wake up once a second to check the air for the “wake-up packet” and immediately go to sleep if there is nothing for them. Communication with such devices will take a little longer - before sending the right command, you need to send a special “wake-up packet” within one second. During this time, the network will be silenced, but after waking up, the device will promptly respond to commands before going to sleep. In this mode, the device is able to live on a set of batteries for about a year. Typical devices that require this mode are battery-powered relays, sirens, door locks.
All constantly powered devices, such as dimmers, relays and other performers, are “constantly listening” . This means that they are always available, always listen to the broadcast and act as repeaters for other devices, forming a mesh network .
Z-Uno supports all three power modes. Power mode can be defined by the macro ZUNO_SETUP_SLEEPING_MODE .
Important! When changing the parameters or the number of channels, association groups or power mode, you must exclude Z-Uno from the network and re-enable it in the network. This is caused by the requirement of the Z-Wave protocol not to change its characteristics on the fly.
Learn more about Z-Wave
The information mentioned here should be enough to create your own Z-Wave device, but a deeper understanding never hurts. You can read more in this article , as well as in the book "Basics of Z-Wave" by Christian Petz.
Controller Compatibility
We make Z-Uno fully up-to-date with the latest Z-Wave Plus standard. However, alas, it does not guarantee full performance in all controllers. Alas, many controllers require “patterns” to support specific devices. Writing such templates is difficult or even impossible (the controller manufacturer may not be able to load its template). And some controllers do limit the displayed functions of the device to three or four controls. This greatly limits the ability to use Z-Uno.
Immediately, we note that our own Z-Way controller supports any version of Z-Uno-based devices right out of the box. No, we did not do special support for Z-Uno and did not write any templates. It's just that the Z-Way is written this way, and it is enough for it that the device is certified and complies with the Z-Wave protocol.
So far, we have tested Z-Uno with Z-Way (full compatibility), Fibaro (up to four functions), Vera Edge (exotic sensors are not supported), Zipato (little tested, but so far no problems have been noticed). We hope that the manufacturers of controllers will improve the work of the controllers and support for the functions included in the standard Z-Wave.
Z-Uno Internal
I would like to mention how the Z-Uno is arranged inside. The Z-Uno executable code consists of four parts:The custom code , also known as the “sketch” , is your code written in simplified C language and loaded into Z-Uno via Arduino IDE. User code controls all the "legs" and the logic of the device. You decide how to connect this or that periphery!
The custom code loader implements the Z-Wave application level in accordance with the user settings, determines the channels and groups of associations, sets the sleep mode. It also controls the service LEDs and handles the service buttons necessary to turn on the device in the network, reset and transfer to the “recovery” mode (the mode in which the user code is not loaded). But the main role of the loader is to call the User Code when retrieving the Set (set value) and Get (request value) packets from the Z-Wave network, as well as calling the loop function all the time while lower levels are not occupied. This level is the main part of the core of the Z-Uno firmware.
The Z-Wave application layer maps user-defined Z-Uno channels, functions, and associations to Z-Wave command classes, ensuring compliance with the Z-Wave Plus standard. This level also provides features such as firmware upgrades, USB and radio ( OTW and OTA ), AES encryption of all radio packets, monitoring radio signal strength, measuring battery charge, periodic waking up, and announces basic device information to the network.
The Z-Wave network layer is based on the Sigma Designs SDK (version 6.5x), which implements the network and radio layers of the Z-Wave protocol, establishing reliable two-way mesh communication in the smart home network. This level is engaged in the calculation of routes, ensuring the delivery of packets to recipients, even outside the direct line of sight, performs forwarding (routing) and receiving packets.
Custom code (sketch) is compiled into the Arduino IDE with the Z-Uno Core Libraries libraries, which must be installed via the Arduino Board Manager. Like Arduino sketches, Z-Uno sketches are common firmware compiled for the corresponding microcontroller. However, compared to Arduino based on Atmel microcontrollers, Z-Uno is based on a Z-Wave chip, i.e. 8051 architecture. Therefore, instead of avg-gcc, the sdcc compiler is used to build Z-Uno sketches .
There is one more difference from Arduino sketches: Z-Uno sketches should interact with the levels below. This interaction is carried out through the Z-Uno Core Libraries, with which the Z-Uno sketches are compiled.
As already mentioned, the User Code can be downloaded via the Arduino IDE via USB (using the Upload button), as well as via radio via the Z-Wave controller, which supports firmware updates in devices.
All lower levels (User Code Loader, Z-Wave Application Level and Z-Wave Network Layer - all together) can also be updated via USB from the Arduino IDE (using the “Upload Bootloader” menu item) or also via radio via the Z-Wave controller.
Note that these lower layers are compiled with the Z-Wave SDK libraries using the Keil C51 compiler, while custom code is compiled using sdcc. I think we will write a separate article about how we crossed a hedgehog with a snake. After all, these compilers even have slightly different conventions and ABI function calls.
Disadvantages of Z-Uno
We tried to make the perfect product, but it doesn't always work out well;)
Alas, the first released version does not fit on one breadboard (due to the size of the battery, we could not reduce the charge). But the next version will be narrower and fit on one standard layout.
Also in the current version we miscalculated with the choice of the battery - the current one is not able to properly power the device in FLiRS mode. The following will not have a battery on board, but only a cable for connecting an external battery.
Also, the current board does not have protection against connecting both the battery and external power at the same time. This is reminiscent of the protective paper in the battery compartment. But it will be fixed.
As you can see, these shortcomings are important, but not critical for most functions. The rest of the device turned out very versatile and is suitable for creating a variety of sensors and actuators.
It is also worth noting that, unlike the Arduino, the Z-Uno has 3 V on its feet, not 5 V. This should be taken into account in order not to burn the entrances.
After a few workshops, we realized that the product was still difficult: those who are familiar with Arduino should familiarize themselves with the ecosystem of Z-Wave devices and the interface of Z-Wave controllers, and those who are familiar with Z-Wave should have basic knowledge S. Fortunately, the intersection of the subsets of these people is very large.
What Z-Uno is not
- Z-Uno is a single device (with multiple channels). Those. there can be no full gateway between Z-Wave and other Z-Uno technology (for this purpose, there is a Bridge Controller in Z-Wave).
- Z-Uno is a subsidiary Z-Wave device and cannot be a controller (that is, build and administer a network). However, through associations, Z-Uno can control other devices.
- Z-Uno is not a complete device - you will need to connect sensors (for example, from a list compatible with Arduino) and program work with them.
Project Development and Plans
As I mentioned, Z-Uno is a fast-paced project. We set ourselves a very ambitious goal, and confidently step towards it. Here is a brief outline of the project for the coming months:
- January - syntax cleaning, preparation for Z-Wave Plus certification.
- February - Z-Wave Plus certification, adding EEPROM functions, with NZ XRAM memory.
- March - adding protocols SPI, I 2 C, 1-wire.
- April - release of the updated version of the board (for the 865-870 MHz band - Z-Wave frequencies for Russia, Europe, Malaysia, India, ...)
- May and further - adding new functions in order of priority (based on the wishes of users).
- somewhere in the fall - release versions of the board for other regions.
Follow the news!
All information about the project is published on the website z-uno.z-wave.me . There is also a description of the functions of the C programming language and code examples (in English).
We also have an English-language forum dedicated to Z-Uno.
The Z-Uno Core Libraries code is available on github .
We accept information on errors and suggestions through github: you can create a ticket and report a problem .
Well, where to buy?
Z-Uno is already available (for the time being only in Russia) with our 5 smart partners, who give 5% to all Z-Wave devices for a GT_ZUNO coupon within a week after this publication. We hope, soon Z-Uno will appear in other stores.
The recommended retail price of 3500 rubles.
Details of the project on the website z-uno.z-wave.me .
Source: https://habr.com/ru/post/367571/
All Articles