Hands-on work with the Intel IoT Developer Kit, Intel XDK, Edison, Clouds and Twitter
Many who take Intel Edison for the first time do not know where to start. Today we will learn how to create simple projects with great potential. It will consider connecting to a cloud service, reacting to twitter messages, creating Cordova mobile applications, working with a mobile device emulator, and viewing graphs from sensor data stored in the cloud. These are all aspects of the Internet of Things (IoT) - the Internet of things.
This article contains revised and updated materials from the Internet of Things Developer Lab SFTL005 held at the IDF15 Developer Forum, held August 18-20, 2015 in San Francisco. The article helps to figure out how to use Intel Edison to build a complete solution and describes general principles that can be used in other projects for the Internet of things.
A series of practical exercises using the Intel Edison platform is described, which shows how to install and use Edison and software. Considered a platform connection to the Internet, work to sensors and data exchange with the cloud service. Describes how to create an application that remotely monitors the state of a touch sensor.
')
The Intel IoT Developer Kit is a complete hardware and software solution that helps developers try their hand at the Internet of Things and realize their project. Intel Edison itself is a small, cost-effective, but powerful computing platform designed to create prototypes and products for the Internet of things and wearable devices. It is controlled by a dual-core Intel Atom processor with a frequency of 500 MHz, implemented as a system on a chip, and additionally containing a 32-bit Intel Quark microcontroller with a frequency of 100 MHz. Intel Edison has built-in Wi-Fi and Bluetooth modules. More details can be found in the article “Practical Intel IoT”. Edison - the mighty "crumb" . "
The Intel Edison platform operating system is based on Yocto. The Yocto Project is an open source project whose goal is to simplify the development of special Linux distributions for embedded systems and ensure their portability between different platforms.
The Intel Edison platform also integrates the Arduino development environment with the Linux system, allowing you to use Linux system calls and services in Arduino sketches.
In the development for the Intel Edison platform, you can use JavaScript in the Intel XDK environment, C / C ++ in the Eclipse environment, regular sketches in the Arduino IDE and visual programming in Wyliodrin. Python and command line are also available.
This article will explain how to create projects for the Internet of Things in the Intel XDK using JavaScript, how to load them onto a board, launch and debug them.
Key Elements of the Internet of Things
The Internet of Things consists of four key elements: a data generator, a data collector, a cloud service, and decision making. Data generators contain sensors. The Intel Developer Kit makes it easy to add sensors and actuators to an IoT project and collect information. Information collected at the device level is transferred to the cloud service and then delivered to the end user.
We will need the following components:
- Intel Edison module .
- Arduino expansion board .
- Set Grove Starter Kit Plus .
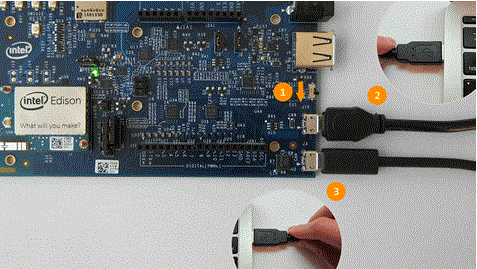
- Two micro USB cables (Micro B -> Type A).
- Power Supply.
Detailed instructions for building Intel Edison can be found in the Assembling Intel Edison article.
Getting started
If you have a new board, you need to update its firmware. This must be done in the case if you have not done this for a long time. Check the version number of the firmware (the latest at the moment - 159), you can command:
configure_edison --version To download the latest version and firmware, go to Intel® Edison Board Software Downloads . Read the instructions to install Intel Phone Flash Tool Lite and then write the latest firmware image to the Intel Edison board.
Basic steps:
- Install the driver installer for 64-bit Windows. It will also install the Arduino development environment.
- Download the latest firmware for Intel Edison. (At the moment it is 2.1)
- Download Intel Phone Flash Tool Lite.
- Sew Intel Edison using the downloaded firmware.
- Install a serial terminal .
Intel Edison Platform Setup
If you installed the terminal via serial port via USB, then you can configure Intel Edison.
On the Intel Edison console, type:
configure_edison --setup 
Following the prompts, set the password for the root user. This is necessary for proper operation of the Intel XDK environment. Also set the name of the board, so that later it would be easier to find it in network devices. Make sure you give a unique name. Please do not use the name "edison", as this usually leads to problems with mDNS.

For a detailed description of connecting Intel Edison to a local Wi-Fi network, see the instructions .
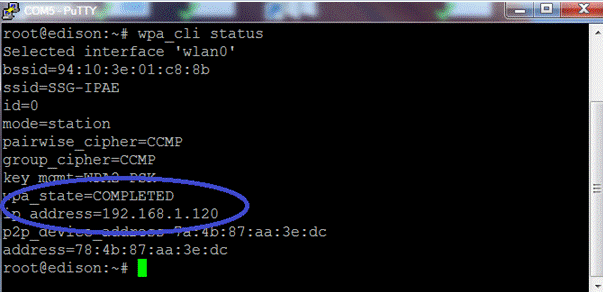
After you have connected to a local Wi-Fi network, enter:
wpa_cli status Verify that the connection status is "COMPLETED" and an IP address is assigned.
Set Seeed Studios Grove Starter Kit Plus
The Seeed Studios Grove Starter Kit Plus is a collection of various sensors and actuators that can be used without any soldering. The kit contains various basic modules and sensors for input and output. Instructions for installing the basic shield and connecting the components can be found in the articles “IoT Ingredients of Fast Food Delicacies: Intel Edison + Intel XDK + JavaScript + Grove Kit” and “Creating JavaScript-Based Intel® IoT projects with the Grove - Starter Kit” .
Installing Intel XDK IoT Edition
Intel XDK IoT Edition is a free tool that allows you to create, test, debug, and run applications on Intel Edison. It has code examples that interact with sensors and actuators. It also offers a list of virtual mobile devices that a developer can use to test his application. To download, install and connect the Intel XDK to the Intel Edison board, see the article “Getting Started with the Intel XDK IoT Edition” .
Creating a new project
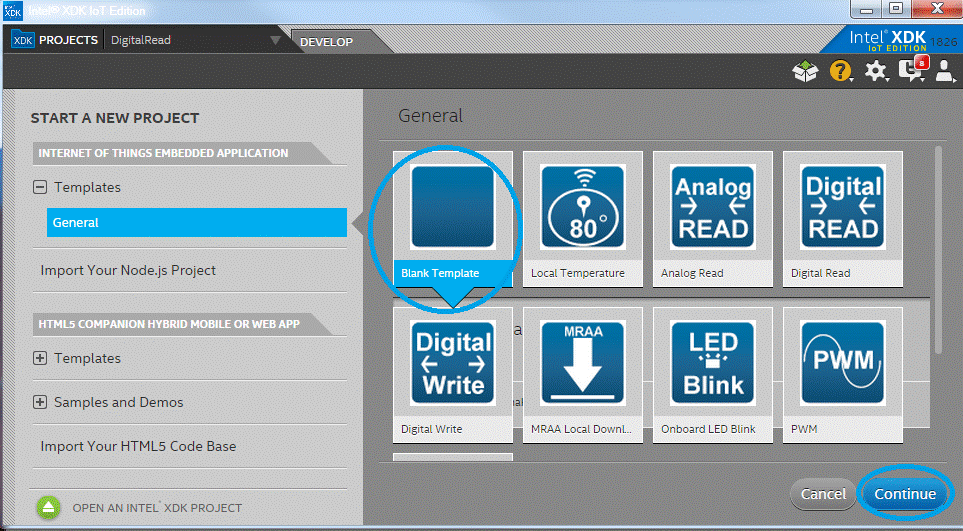
A new project can be created either from a template or left blank. We will go through the steps of creating the simplest project in the Intel XDK to work with the light sensor.
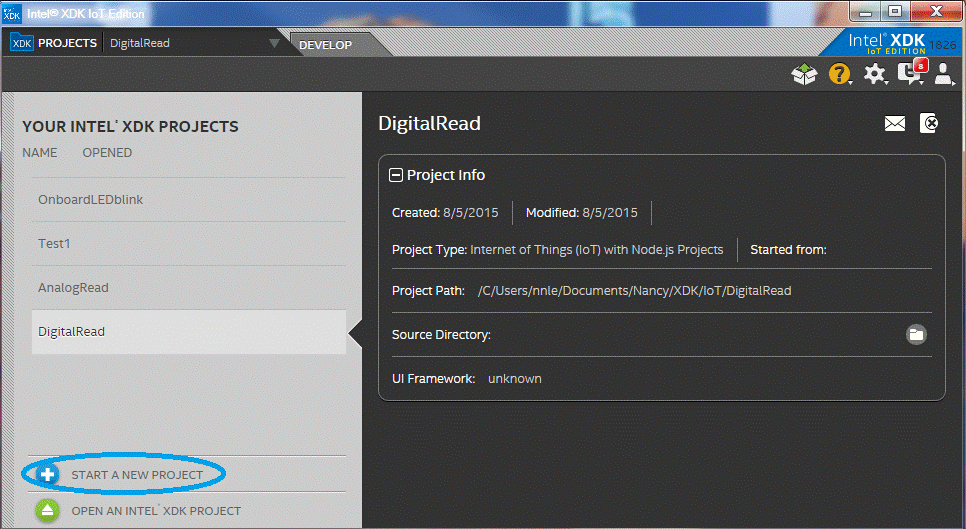
Create an empty project and name it LightSensor.
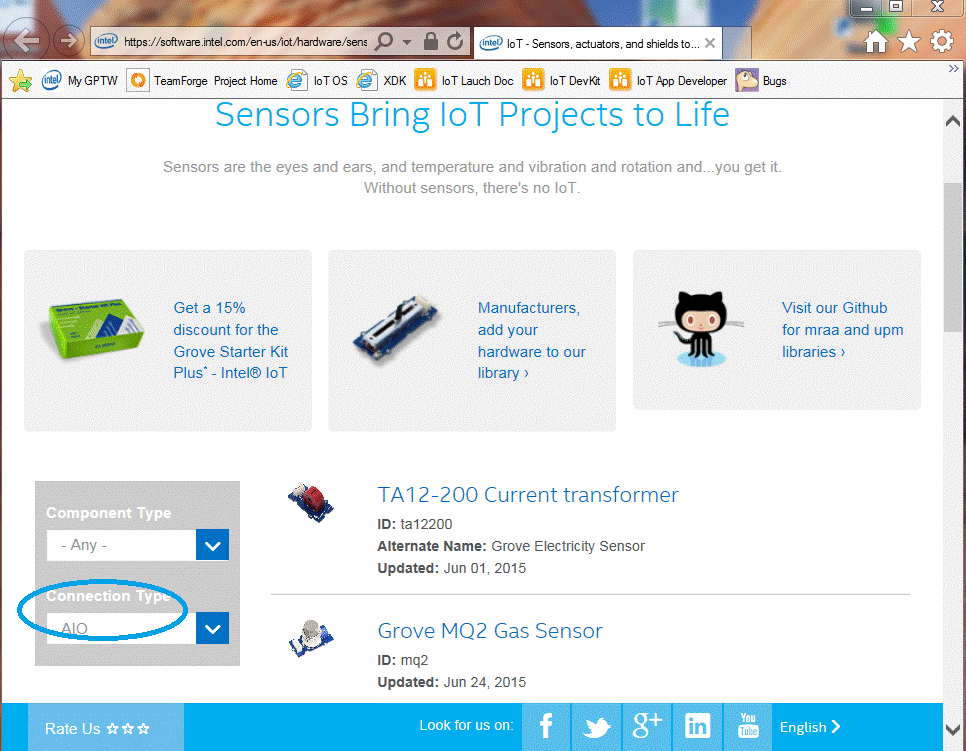
Examples of code for sensors can be found on the page with their description . To see a sample code for a light sensor, in the Connection Type drop-down list on the left, select AIO, and in the displayed list of sensors, find Grove Light Sensor.
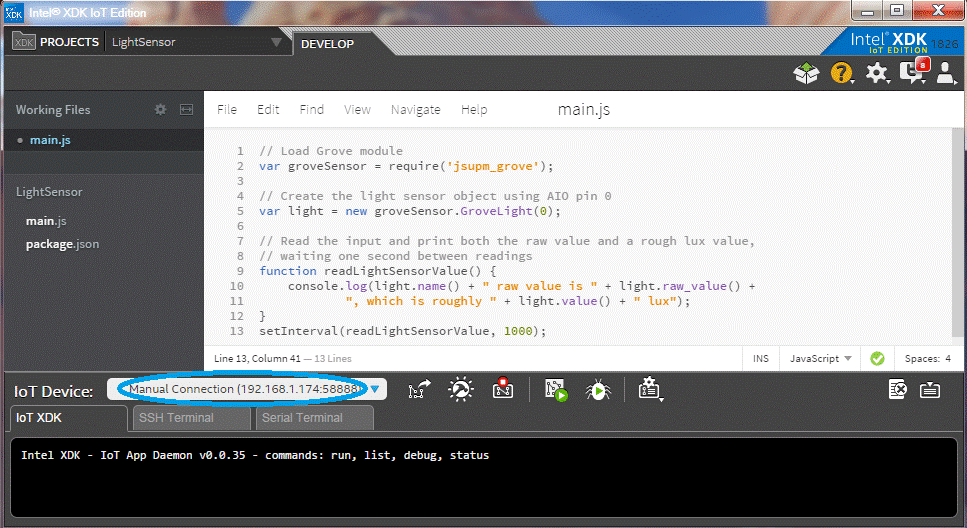
- Copy the JavaScript Grove Light Sensor example into the main.js file of the LightSensor project you just created.
- Connect the Intel Edison module and computer to the same Wi-Fi network.
- To change Wi-Fi settings on the Intel Edison platform, use:
configure_edison --wifi - To determine the IP address on the Intel Edison board, run the following command:
wpa_cli status
You can also install the Bonjour service on your computer, which will allow you to automatically determine the IP address of the Edison board in the Intel XDK.
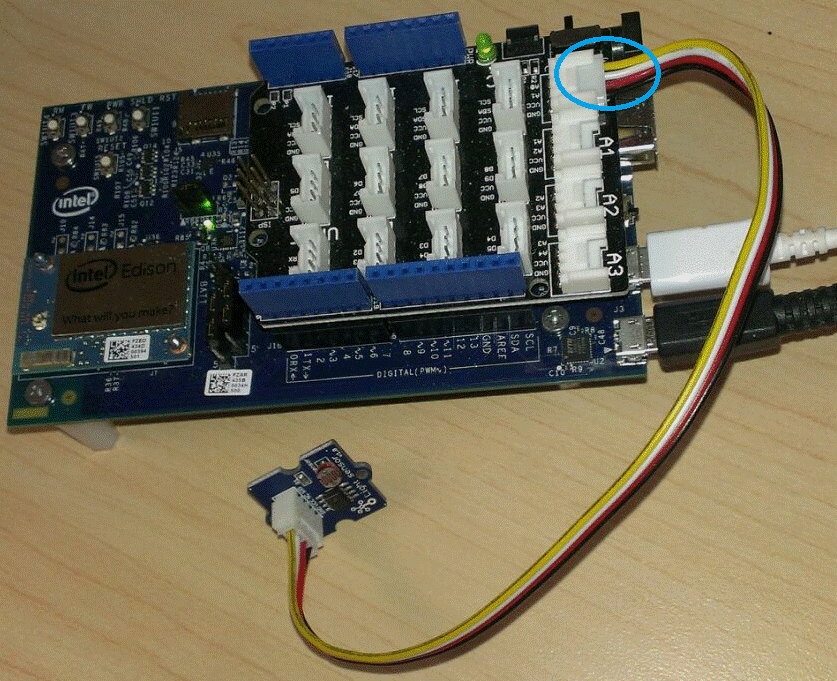
In this example, the light sensor is connected to analog input A0.
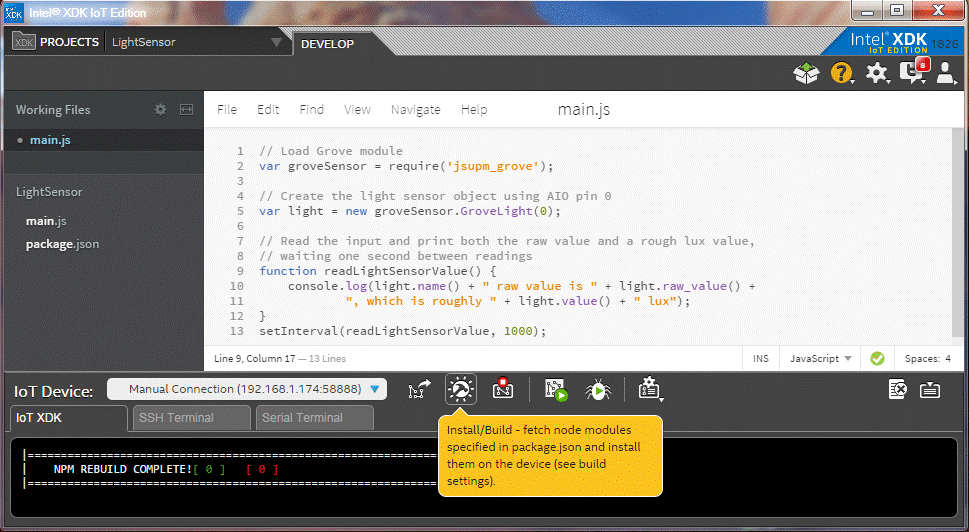
Build and load your LightSensor project using the Intel XDK IoT Edition development environment.
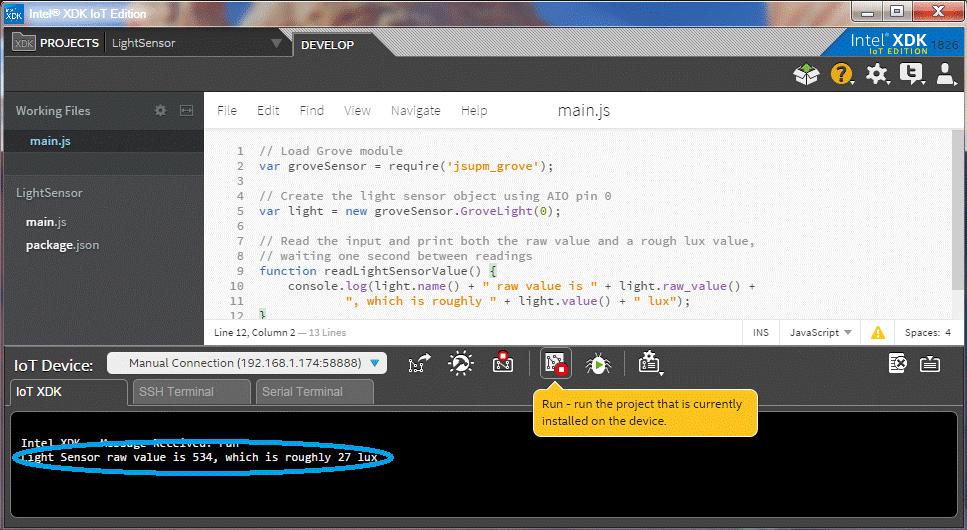
Run the LightSensor project.
Cloud ThingSpeak
There are many cloud applications for the Internet of things. In this article we will talk about ThingSpeak.
ThingSpeak is a platform that offers services for building IoT applications. ThingSpeak includes real-time data collection and processing, data visualization in the form of diagrams, graphs, the ability to create plug-ins and applications for ThingTweet, ThingHTTP, TweetControl, TimeControl, React, and more.
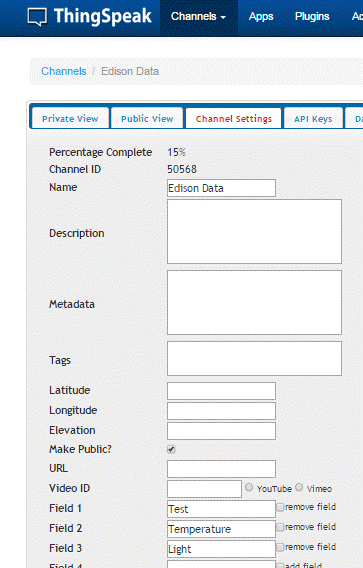
First you need to register an account on thingspeak.com and create a new channel.

The feed is the place where your application stores and retrieves data using the ThingSpeak API. Each of them has a unique Channel ID. When an application reads data from a channel, the Channel ID is used to identify it. Each can use up to 8 data fields. After the channel is created, ThingSpeak publishes and processes the data that your project can then receive. If you make the channel public, other people will be able to find it and access the data. If you make it closed, only you will get access to it.
Now name the fields (Field 1, Field 2, ...) to know what data you put in them.
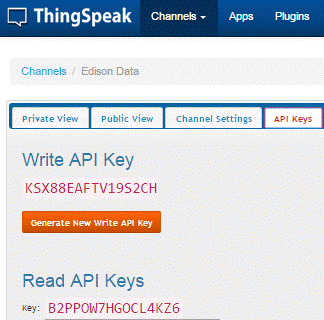
Then go to the Keys API Keys tab and get the writeKey key for writing and readKey for reading.
The easiest way to download data is to change the value of the field manually using a special URL. If “0” appears in the browser window, it means an error occurred while sending data. Otherwise, the update was successful. The “api_key” value for the data update request is the previously described “writeKey” key.
http://api.thingspeak.com/update?api_key=KSX88EAFTV19S2CH&field1="110" Loading the value of several fields:
http://api.thingspeak.com/update?api_key=KSX88EAFTV19S2CH&field1="110"&field2="120" ThingSpeak is an open source IoT application. To start using ThingSpeak on the Intel Edison platform, install the thingspeakclient client module through the terminal.

Now you are ready to write a simple application using ThingSpeakClient. The default URL for ThingSpeakClient () is https://api.thingspeak.com
var ThingSpeakClient = require('thingspeakclient'); var client = new ThingSpeakClient(); By default, the delay before sending data to the server is enabled. To send the data immediately, you can turn it off:
var client = new ThingSpeakClient({useTimeoutMode:false}); If the delay value is set, then each next piece of data will be sent after a specified period of time.
The default delay for updates is 15 seconds. To set another delay, for example, 20 seconds, do the following (the time is specified in milliseconds):
var client = new ThingSpeakClient({useTimeoutMode:20000}); To perform updateChannel (), attach a channel using either just the writeKey write key or both readKey for read and writeKey for write. If the callback function was specified, it will return an error and an answer. In this example, 50568 is the Channel ID, the channel ID.
Example 1. ThingSpeak - Channel Attachment:
// «writeKey» client.attachChannel(50568, {writeKey:'KSX88EAFTV19S2CH'}, callBack); // client.attachChannel(50568, {writeKey:'KSX88EAFTV19S2CH', readKey:'B2PPOW7HGOCL4KZ6'}, callBack); Example 2: ThingSpeak - Channel Update:
// , A0 var light = new groveSensor.GroveLight(0); var lightValue = light.value(); // field3 client.updateChannel(50568, { field3: lightValue }, function(err, response) { }); Example 3. ThingSpeak - getLastEntryInFieldFeed (), reading data:
client.getLastEntryInFieldFeed(50568, 3, function(err, response) { if (err == null) { console.log('read successfully. value is: ' + response.field3); } }); The following example combines work with a light sensor from the LightSensor project with the ThingSpeak project. He reads the value from the light sensor and loads it into ThingSpeak.
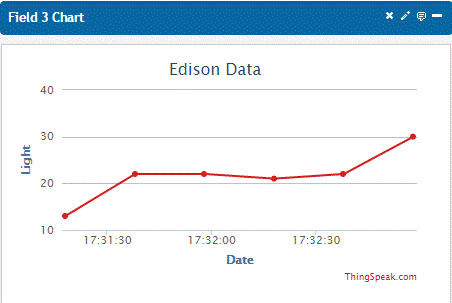
var ThingSpeakClient = require('thingspeakclient'); var client = new ThingSpeakClient(); //var client = new ThingSpeakClient({useTimeoutMode:false}); var client = new ThingSpeakClient({updateTimeout:20000}); //var client = new ThingSpeakClient({useTimeoutMode:false}); // Set the timeout to 20 seconds (Default value is 15 secondes) var client = new ThingSpeakClient({updateTimeout:20000}); var callBack = function(err) { if(!err) { console.log('error: ' + err); } } // Attached a channel with only a writeKey for update a channel: //client.attachChannel(50568, {writeKey:'KSX88EAFTV19S2CH'}, callBack); // ok // Attached a channel with both writeKey and readKey: client.attachChannel(50568, {writeKey:'KSX88EAFTV19S2CH', readKey:'B2PPOW7HGOCL4KZ6'}, callBack); // Load Grove module var groveSensor = require('jsupm_grove'); // Create the light sensor object using AIO pin 0 var light = new groveSensor.GroveLight(0); // Read the input and print both the raw value and a rough lux value. // Upload the light value to field 3 of the channel. function uploadLightValueToThingSpeak() { var lightValue = light.value(); console.log(light.name() + " raw value is " + light.raw_value() + ", which is roughly " + light.value() + " lux"); client.updateChannel(50568, { field3: lightValue }, function(err, response) { console.log('err = ' + err); console.log('response = ' + response); if (err == null && response > 0) { console.log('Update successfully. Entry number was: ' + response); } }); } setInterval(uploadLightValueToThingSpeak, 20000); Data from the light sensor is published in the field field3 "light" on the channel in real time:
ThingTweet
The ThingTweet app connects your twitter account with ThingSpeak and sends a twitter message (tweet) using a simple API.
- Login to https://thingspeak.com/
- In the “Apps” tab, click ThingTweet, then click “Link Twitter Account” to authorize the application to confirm the correctness of your twitter account.

If you do not have a twitter account, register at https://twitter.com and authorize the application.

Now you can send a twitter message via updateChannel (), passing the user name and message as shown below:
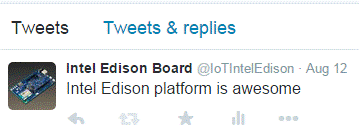
client.updateChannel(50568, { field3: lightValue, twitter: ' IoTIntelEdison ', tweet: 'Intel Edison platform is awesome'}, function(err, response) { if (err == null && response > 0) { console.log('Update successfully. Entry number was: ' + response); } }); To view your tweet, login to twitter.com
ThingHTTP and Twilio
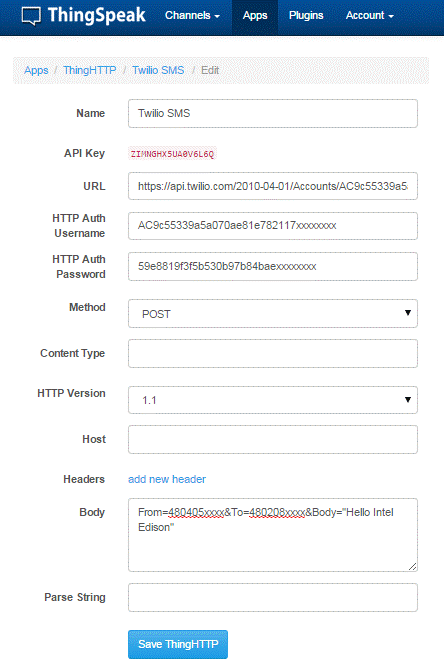
The ThingHTTP application allows you to connect devices to a web server via HTTP requests. GET, POST, PUT, and DELETE methods are available for ThingHTTP. Twilio is another cloud platform for communication via SMS and phone calls. It supports HTTPs requests and allows you to connect the ThingHTTP application with the Intel Edison platform. Below is an example of sending an SMS message using Twilio via the ThingHTTP application.
To get started, go to Twilio and click on “Show API Credentials” to get ACCOUNT_SID and AUTH_TOKEN.
- For SMS messages - api.twilio.com/2010-04-01/Accounts/Twilio_ACCOUNT_SID/SMS/Messages
- To make calls - api.twilio.com/2010-04-01/Accounts/Twilio_ACCOUNT_SID/Calls
- HTTP Auth Username: Twilio ACOUNT_SID
- HTTP Auth Password: Twilio AUTH_TOKEN
- Method: POST
- Body:
- From - Twilio phone number,
- To - the phone number that will receive the SMS message,
- Body - the message.
Tweetcontrol
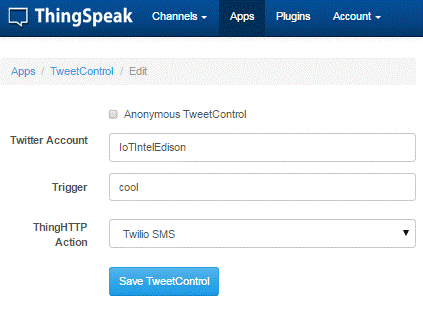
TweetControl listens to commands from Twitter and then performs the action. In the example below, TweetControl listens to Twitter for the launch word “cool”, and then performs the ThingHTTP action “Twilio SMS”.
- Twitter Account - Twitter username. If “Anonymous TweetControl” is enabled, then anyone can run your TweetControl.
- Trigger - a word from a twitter message, including TweetControl, that needs to be executed.
- ThingHTTP Action - a ThingHTTP request to execute.
Now that ThingHTTP and TweetControl are installed, you can send messages from a twitter account. In the sent tweet, the keyword should be specified - the filter and the trigger word - the trigger. Filters can be the following:
- #thingspeak
- thingspeak
- #tweetcontrol
- tweetcontrol
Tweet structure:
filter trigger Sample tweet:

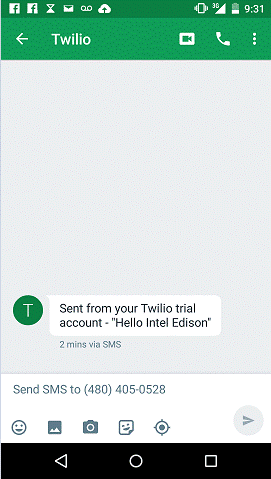
After you send the tweet “#thingspeak IntelEdison is so cool!”, TweetControl will turn on with the word “cool” and force “Twilio SMS” ThingHTTP to send the SMS message “Hello Intel Edison” to your phone.
Timecontrol
TimeControl can also execute a ThingHTTP request, but it will be executed automatically on a schedule. So, create a new TimeControl and fill out the form as follows:
- Name - the name for TimeControl.
- Date and Time - select the date and time when the TweetControl should be executed.
- Action is a necessary action. Select the ThingHTTP application and then select the ThingHTTP "Twilio SMS" request.
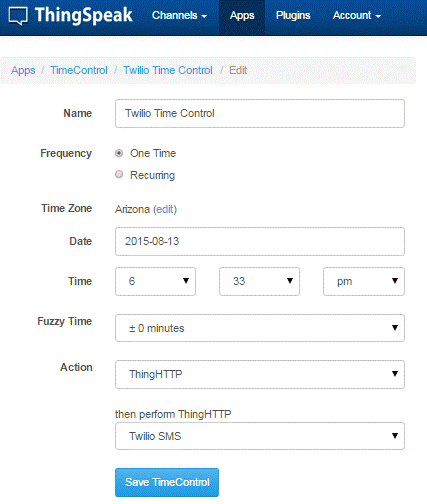
When TimeControl is triggered, the ThingHTTP application “Twilio SMS” is executed and the “Hello Intel Edison” text message is sent to the mobile phone.
React
React executes a ThingHTTP request or sends a ThingTweet message when the data on your ThingSpeak channel meets the specified condition. Check the documentation to create a “Light React” to send a tweet “Your light is dim” using ThingTweet when the brightness value of the light is less than “6”.

Creating the Touch Notifier application and running it in the emulator
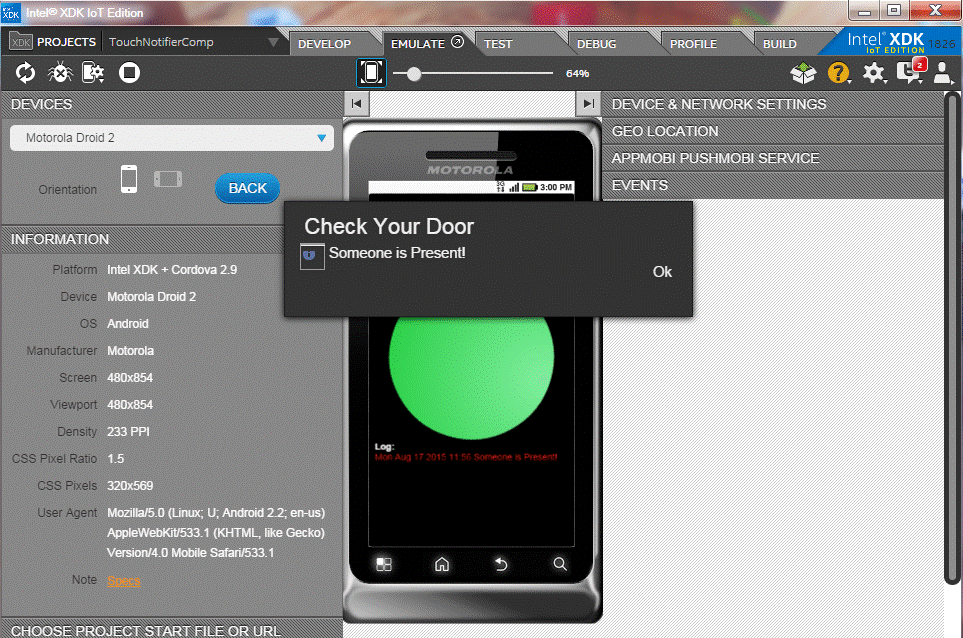
The Intel XDK IoT Edition development environment allows you to create Cordova applications using HTML5, CSS, and JavaScript to track the state of the sensors in the Grove suite. The created application can be tested using an emulator or a real device. We will create the Touch Notifier application that receives data and notifies the user by changing the color of the circle on the mobile device if the touch sensor has been activated.
- To see the list of available templates, go to the left of “Start a New Project” and under the heading “Internet of Things Embedded Application” click “Templates”.
- Select Touch Notifier and continue creating a new project.
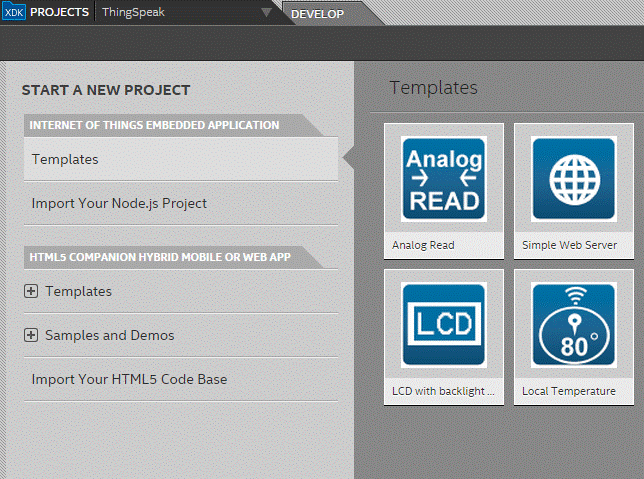
- Connect the touch sensor (Touch sensor) to the Grove expansion board connector, labeled D2, and the squeaker (Buzzer) to the D6 connector.
- Connect the Intel XDK to the Intel Edison board, then build and run the Touch Notifier application on it.
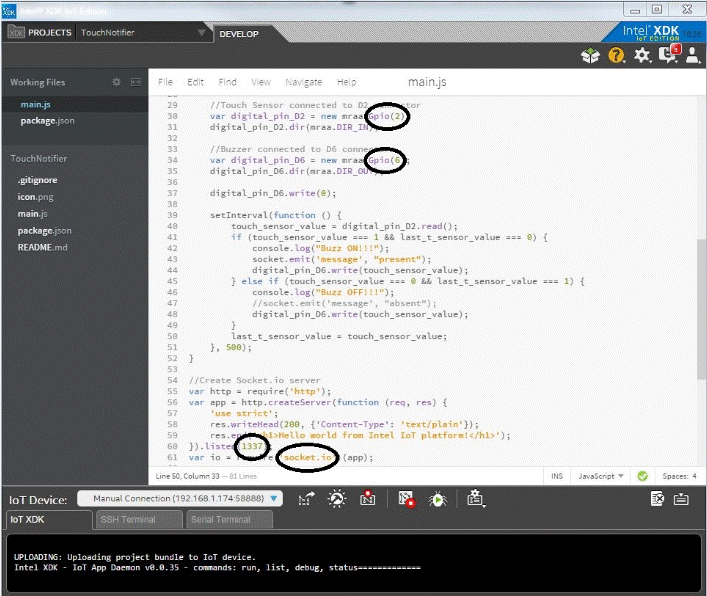
Since the Touch Notifier application uses socket.io to create an HTTP server, make sure that the socket.io module is installed.

Remember the port number 1337 that the web server is listening to, it will be needed later.
To create an Apache Cordova application, go to the “HTML5 Companion Hybrid Mobile for Web App” tab on the left, then click “Samples and Demos” and “General”.
To show the list of templates, go to the “HTML5 + Cordova” tab.
To create an application, click "Touch Notifier Companion App".

You are now on the Cordova Touch Notifier project screen.
- Click the “Emulate” tab and select the mobile device from the drop-down list in the upper left corner. The default is Motorola Droid 2.
- Enter the Intel Edison board IP address, port number 1337, and then click "Submit". The IP address of the Intel Edison board can be obtained with the “wpa_cli status” command in its console. Note that Intel Edison must be on the same Wi-Fi network as the computer itself.

If the message “Connection Error! Server Not Available, make sure that the Touch Sensor application from the Internet of Things Embedded Application section is still running. Now touch the touch sensor and see that the color of the mug has changed to green and the sound from the tweeter is reproduced.

Creating a Touch Notifier application and launching it on a mobile device
To run the Cordova app on a physical mobile device, such as a phone, tablet, or iPad, do the following:
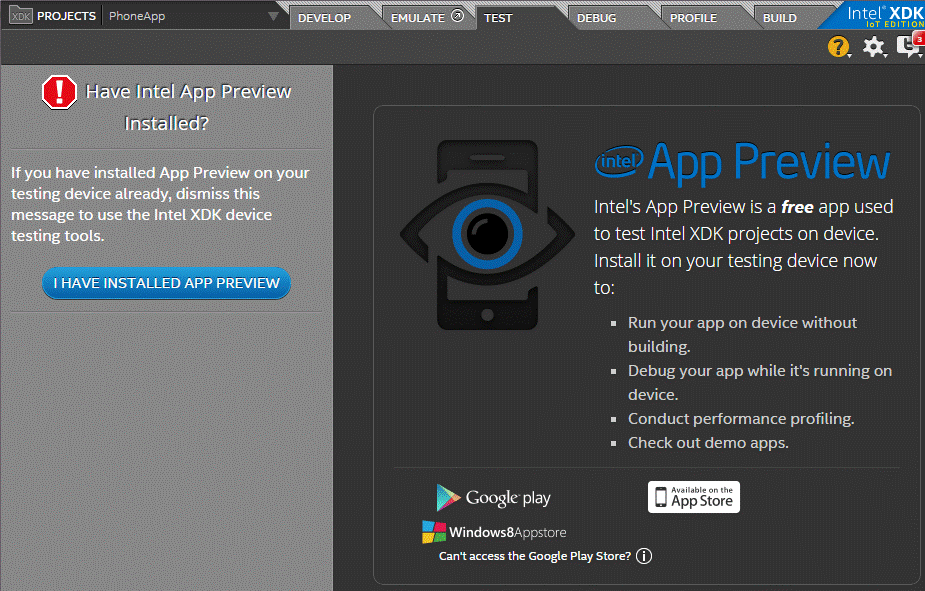
- Download and install the Intel App Preview application from Google Play, the Window Store or the Apple AppStore.
- Switch to the Test tab in the Intel XDK and then click I have installed app preview.
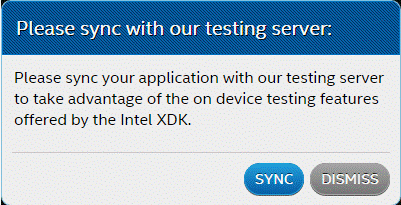
If you miss the next message, click “Sync” to synchronize with the test server.
The mobile device, computer, and Intel Edison board must be on the same local grid so that they can communicate with each other.
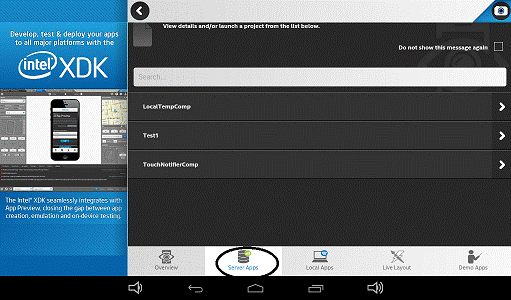
- Open the Intel® App Preview on your mobile device, switch to ServerApps and launch Touch Notifier.
- Connect to Intel Edison using its IP address and port 1337. If the message “Connection Error! Server Not Available ”, check that the“ Things Embedded Application ”is running.
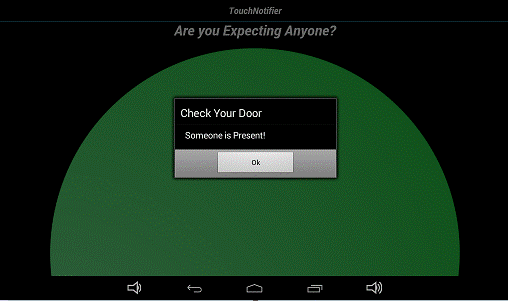
If the connection is successful, the Touch Notifier application will start as shown below:
Conclusion
In this article, we described how to configure the Intel Edison platform to get started with sensors and data exchange in the ThingSpeak cloud service. On the “Sensors Bring IoT Projects to Life” page you can find out what other sensors are available.
We looked at fairly simple projects, but you can figure out how to use the full power of the Intel Edison platform.
Links
- Technical specification, firmware download, user forum and support - www.intel.com/edison
- Intel® XDK for IoT - software.intel.com/en-us/html5/xdk-iot
- Intel® XDK IoT Edition Getting Started Guide
- Eclipse Development Kit, code samples - software.intel.com/iot
- Finished designs and guides for Intel® Edison - www.instructables.com .
- A bunch of cool ideas Arduino projects, many of which can be implemented on the board Intel Edison - playground.Arduino.cc .
Source: https://habr.com/ru/post/367173/
All Articles