Witbox do-it-yourself (Part 1)
Hi, Geektimes!
A little less than a year ago I read an article on Habré about the production of Witbox printers. I especially liked the "cherry" at the end of the article.
Since I am an engineer, I was interested to see how this particular printer works. As a result, I downloaded the model to see "somehow later."
')
It took a little time and I still got to see the assembly of the printer.
In general, I liked the design. You must admit that the printer looks neat and does not look like a spaceship.
Liked the working volume of the print.
From the point of view of manufacturability for self-production, this is a rather complicated printer.
But we are not looking for easy ways! And I wanted to do it.
There was one thing that I clearly didn’t like about this printer - the impossibility of printing ABS with plastic. I decided to fix it.
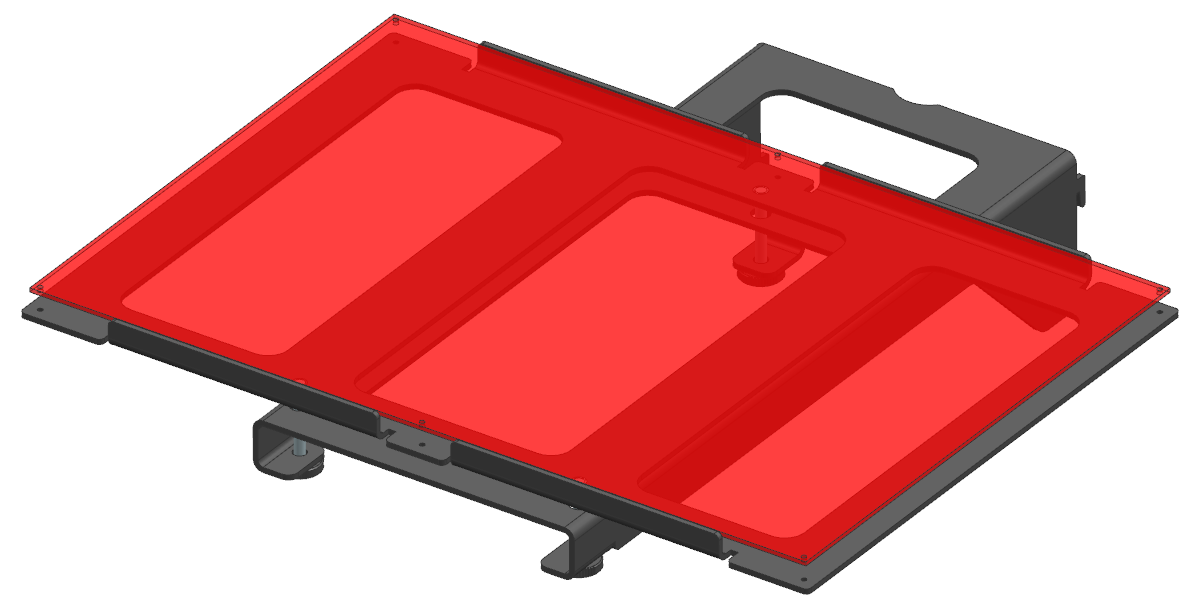
Found on the Internet PCB-Heatbed A4 format and began to rework the printer table for the installation of the heating element. Here's what I got:
Then I started working on the rest of the details. And not in vain spent time. As it turned out, the model is not as accurate as the manufacturer said. I don’t remember the whole list of corrections, but I had to tinker.
So just take and make parts from the manufacturer’s files and build the printer will not work. Something crooked will rise or not gather at all.
Finally, the model was ready. I began to disassemble it into a specification so that there was a list of what and where to order. Some parts decided to order the original. In particular, he decided to order all linear bearings, shafts, screw pair and energy chain from Igus , the tube holder from Festo . Mechanical parts decided to do on the spot, and order electronics in China. 4 most necessary plastic parts asked to print a friend on his small 3D-printer.
Before you order everything, I decided to estimate how much it would cost me. Having sent applications to suppliers and for production, he filled a basket in a famous Chinese online store and waited for commercial offers.
When all the commercial offers came, I reduced all expenses and it was decided: “I will do it!”
But as always, not everything was so simple. Some suppliers do not work with individuals. The solution was found, friends helped. And send orders.
Orders went long. At this time, I took up the modification of the printer firmware. The matter, as it turned out, is not difficult. This was my first contact with Arduino. Then gradually began to come orders.
Chopped sheet metal decided to bend itself. That was a huge mistake!
At first, having worked the bending on the sheet bending machine with my hands on scraps, I thought that everything would work out perfectly. But it was not there. I already wrote that the manufacturability of this printer for self-production is to say the least no ... In mass production, with flexible stamping and prepared devices, everything is easy. But for piece production to order a stamp that will exceed the cost of the printer at times, quite wasteful.
Armed with a listogib, a sledgehammer and a huge vocabulary of obscene words, my friend and I set to work. Bending took several evenings after work. The result at the beginning pleased. But after the assembly, or rather the assembly attempt, it became clear that all was not well. As a result, it was necessary to assemble in a tense state, pressing the parts into place with clamps. But it all gathered. And moreover, not so crooked.
Installing all the parts in place, it turned out that the design is quite workable.
Broach wires took a couple of evenings. Well, then debugging began. For several days I drove to idle, checking the accuracy of the axles.
Then began the "hot" starts. They showed that the heating element of the table does not warm up above 85 degrees with glass on it. Made thermal insulation from the bottom of the cork - 90 degrees, which is also not enough for ABS printing with plastic (as recommended by the plastic manufacturer, this is the minimum). The manufacturer of the heater assures that it freely heats up to 110. I rang the heating table at the terminal and I understood everything on its platforms. Replaced the heater wires with thicker ones - 95. You have to try typing.
First of all I printed the missing plastic parts for the printer, at the same time mastering the skill of selecting print parameters. I think it turned out quite good print quality:


After some time, the test operation revealed more problems. So the printer is still being finalized. Reordered part of the critical sheet metal parts with CNC flexible. There is no decorative design, need more painting, but everything ahead.
The main thing I have proved to myself is that for less money you can make yourself a Witbox, which at the same time can also print with ABS plastic.

Continuation
A little less than a year ago I read an article on Habré about the production of Witbox printers. I especially liked the "cherry" at the end of the article.
Since I am an engineer, I was interested to see how this particular printer works. As a result, I downloaded the model to see "somehow later."
')
It took a little time and I still got to see the assembly of the printer.
In general, I liked the design. You must admit that the printer looks neat and does not look like a spaceship.
Liked the working volume of the print.
From the point of view of manufacturability for self-production, this is a rather complicated printer.
But we are not looking for easy ways! And I wanted to do it.
There was one thing that I clearly didn’t like about this printer - the impossibility of printing ABS with plastic. I decided to fix it.
Found on the Internet PCB-Heatbed A4 format and began to rework the printer table for the installation of the heating element. Here's what I got:
Then I started working on the rest of the details. And not in vain spent time. As it turned out, the model is not as accurate as the manufacturer said. I don’t remember the whole list of corrections, but I had to tinker.
So just take and make parts from the manufacturer’s files and build the printer will not work. Something crooked will rise or not gather at all.
Finally, the model was ready. I began to disassemble it into a specification so that there was a list of what and where to order. Some parts decided to order the original. In particular, he decided to order all linear bearings, shafts, screw pair and energy chain from Igus , the tube holder from Festo . Mechanical parts decided to do on the spot, and order electronics in China. 4 most necessary plastic parts asked to print a friend on his small 3D-printer.
Before you order everything, I decided to estimate how much it would cost me. Having sent applications to suppliers and for production, he filled a basket in a famous Chinese online store and waited for commercial offers.
When all the commercial offers came, I reduced all expenses and it was decided: “I will do it!”
But as always, not everything was so simple. Some suppliers do not work with individuals. The solution was found, friends helped. And send orders.
Orders went long. At this time, I took up the modification of the printer firmware. The matter, as it turned out, is not difficult. This was my first contact with Arduino. Then gradually began to come orders.
Chopped sheet metal decided to bend itself. That was a huge mistake!
At first, having worked the bending on the sheet bending machine with my hands on scraps, I thought that everything would work out perfectly. But it was not there. I already wrote that the manufacturability of this printer for self-production is to say the least no ... In mass production, with flexible stamping and prepared devices, everything is easy. But for piece production to order a stamp that will exceed the cost of the printer at times, quite wasteful.
Armed with a listogib, a sledgehammer and a huge vocabulary of obscene words, my friend and I set to work. Bending took several evenings after work. The result at the beginning pleased. But after the assembly, or rather the assembly attempt, it became clear that all was not well. As a result, it was necessary to assemble in a tense state, pressing the parts into place with clamps. But it all gathered. And moreover, not so crooked.
Installing all the parts in place, it turned out that the design is quite workable.
Broach wires took a couple of evenings. Well, then debugging began. For several days I drove to idle, checking the accuracy of the axles.
Then began the "hot" starts. They showed that the heating element of the table does not warm up above 85 degrees with glass on it. Made thermal insulation from the bottom of the cork - 90 degrees, which is also not enough for ABS printing with plastic (as recommended by the plastic manufacturer, this is the minimum). The manufacturer of the heater assures that it freely heats up to 110. I rang the heating table at the terminal and I understood everything on its platforms. Replaced the heater wires with thicker ones - 95. You have to try typing.
First of all I printed the missing plastic parts for the printer, at the same time mastering the skill of selecting print parameters. I think it turned out quite good print quality:
After some time, the test operation revealed more problems. So the printer is still being finalized. Reordered part of the critical sheet metal parts with CNC flexible. There is no decorative design, need more painting, but everything ahead.
The main thing I have proved to myself is that for less money you can make yourself a Witbox, which at the same time can also print with ABS plastic.
Continuation
Source: https://habr.com/ru/post/366883/
All Articles