Data transfer from computer to microcontroller via monitor
Seeing an article about how one person used the keyboard as a programmer for AVR microcontrollers, I exclaimed: “Yes, he is crazy!”. And then I thought, why am I worse? .. And I decided to write this article about the insane way of transferring information from a PC to a microcontroller.

The whole point is that the screen displays squares that can be painted white or black, that is, have two states. Like bits. And there are eight of them. Like a byte.
What is the difference between black and white? It's funny, but not in color, but in brightness, intensity of light. The intensity of white is much greater than the intensity of black. As an intensity recorder, I used the simplest device specifically designed for this purpose - a photoresistor. Photoresistors are called semiconductor devices, the conductivity of which varies under the action of light. In my case, the conductivity of the darkened photoresistor is much less than the conductivity of the illuminated one. Connecting the photoresistor to the microcontroller chose the simplest - between pin and ground, turning on the built-in power-supply tightening. I checked the voltage that the ATMega8 MCP ADC receives: the photoresistor is looking at the white background on the left and the black at the right. Voltage in Volts.
')

Yes, yes - Arduino IDE. Because there I can quickly jot down a code and immediately pour it into the board with the push of a single button, use the run-in and interpreted library madness.
As you can see, when reading in digital mode, we get 0 on white and 1 on black, which somewhat disagrees with my templates (black zero and white unit), we set the black unit in the program on the PC.
In order to display information on the monitor, a simple C program - Opto_Byte was written in the representation we needed. I wrote it at my request, a neighbor in the hostel - kinetik161, for which he thanks a lot and a liter ofbeer milk. The program has input in the decimal number system from 0 to 255 ((2 ^ 8) -1) through the input field and through the text file TEXT.txt. The text file is located in the same directory as the executable file, each value is entered on a new line, and when the end of the list is reached, the output of values stops. Interval - 1 second. There is an inversion button.

I used the ATMega8 microcontroller, which in the DIP28 package has two full-fledged (8 bit) ports - port B and port D. A quartz resonator is hanging on port B, and a D-UART resistor is on port D. In the end, I used an insane hodgepodge of ports, of which then I made one byte. Connecting photoresistors from the high order to the low order, from left to right: PC3, PC2, PC1, PC0, PB2, PB1, PB0, PD7.

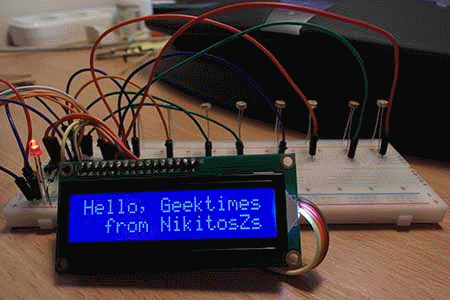
Quickly I collected everything on the breadboard and finally checked the work with sending the data back to the com-port, I decided to connect the sign-synthesizing LCD screen to display information. I attach the code for the Arduino IDE.
Let's check the correct addressing of photoresistors with bits, covering the light source with your finger. You should have the following:
And so, as everything turned out, you can lean the breadboard with photoresistors on the computer screen. Long-legged photoresistors stuck in a breadboard reluctantly, but nevertheless agreed not to run anywhere while shooting a video, although it was not very easy to position them.
Now a little tediousness ... In fact, the monitor is a controlled transparency (matrix of light valves, excited by some external signals: electric, acoustic, optical, magnetic). Each square - bit - covers an area of 60 * 60 pixels (50 is the side of the square and 10 is the gap). I have a monitor with a resolution of 1920 * 1080 pixels, frequency 60Hz. 1920/60 = 32 squares in width, 1080/60 = 18 squares in height, 32 * 18 = 576 bits per frame. Without going into subtleties, in a second we will be able to draw 60 frames, which is 576 * 60 = 34560 bps or 4320 Bytes / s. By reducing the size of the squares to 30 pixels on the side, we get a fourfold increase in speed (17280B / s). Unfortunately, if we reduce further, then our channels will illuminate each other.
Of course, I am not going to use this optoelectronic communication channel, since there are much more convenient, faster and less expensive means of communication that do not occupy a working place on the monitor. However, we should not forget that the most ordinary things can be used in a completely unusual way for us.
The program Opto_Bayt on Ya. Disk
The whole point is that the screen displays squares that can be painted white or black, that is, have two states. Like bits. And there are eight of them. Like a byte.
What is the difference between black and white? It's funny, but not in color, but in brightness, intensity of light. The intensity of white is much greater than the intensity of black. As an intensity recorder, I used the simplest device specifically designed for this purpose - a photoresistor. Photoresistors are called semiconductor devices, the conductivity of which varies under the action of light. In my case, the conductivity of the darkened photoresistor is much less than the conductivity of the illuminated one. Connecting the photoresistor to the microcontroller chose the simplest - between pin and ground, turning on the built-in power-supply tightening. I checked the voltage that the ATMega8 MCP ADC receives: the photoresistor is looking at the white background on the left and the black at the right. Voltage in Volts.
')
Yes, yes - Arduino IDE. Because there I can quickly jot down a code and immediately pour it into the board with the push of a single button, use the run-in and interpreted library madness.
As you can see, when reading in digital mode, we get 0 on white and 1 on black, which somewhat disagrees with my templates (black zero and white unit), we set the black unit in the program on the PC.
In order to display information on the monitor, a simple C program - Opto_Byte was written in the representation we needed. I wrote it at my request, a neighbor in the hostel - kinetik161, for which he thanks a lot and a liter of
I used the ATMega8 microcontroller, which in the DIP28 package has two full-fledged (8 bit) ports - port B and port D. A quartz resonator is hanging on port B, and a D-UART resistor is on port D. In the end, I used an insane hodgepodge of ports, of which then I made one byte. Connecting photoresistors from the high order to the low order, from left to right: PC3, PC2, PC1, PC0, PB2, PB1, PB0, PD7.
Quickly I collected everything on the breadboard and finally checked the work with sending the data back to the com-port, I decided to connect the sign-synthesizing LCD screen to display information. I attach the code for the Arduino IDE.
MK firmware code
#include <Wire.h> // #include <LiquidCrystal_I2C.h> LiquidCrystal_I2C lcd(0x20, 4, 5, 6, 0, 1, 2, 3, 7, NEGATIVE); // ( ) int led = 2; // byte data = 0; // byte dataold = 170; // byte k=0; // LCD void setup() { lcd.begin (16,2); // lcd.setBacklight(1); // lcd.print("Hello, Geektimes"); // lcd.setCursor(2, 1); // lcd.print("from NikitosZs"); // Serial.begin(9600); // UART DDRC = DDRC & 0b11110000; // / DDRB = DDRB & 0b11111000; DDRD = DDRD & 0b01111111; PORTC = PORTC | 0b00001111; // PORTB = PORTB | 0b00000111; PORTD = PORTD | 0b10000000; pinMode(led, OUTPUT); // digitalWrite(led, 1); delay(2000); // lcd.clear(); // digitalWrite(led, 0); // } void loop() { data = get(); // data if(data!=dataold) // , { // Serial.println(data); // lcd.setCursor(1, 0); lcd.print("DEC:"); lcd.setCursor(6, 0); lcd.print(" "); // lcd.setCursor(6, 0); lcd.print(data); lcd.setCursor(1, 1); lcd.print("BIN:"); lcd.setCursor(6, 1); lcd.print("00000000"); // if(data>127) k=0; // else if(data>63) k=1; else if(data>31) k=2; else if(data>15) k=3; else if(data>7) k=4; else if(data>3) k=5; else if(data>1) k=6; else k=7; lcd.setCursor(6+k, 1); lcd.print(data, BIN); dataold=data; // } } byte get(){ byte raw=1, rawold=0; // raw rawold while(raw != rawold) // , ( ) { rawold = raw; // byte data1 = 0b10000000 & PIND; // byte data2 = 0b00000111 & PINB; byte data3 = 0b00001111 & PINC; raw = data3 << 4; // , raw = raw + (data2 << 1); raw = raw + (data1 >> 7); } return raw; // } Let's check the correct addressing of photoresistors with bits, covering the light source with your finger. You should have the following:
And so, as everything turned out, you can lean the breadboard with photoresistors on the computer screen. Long-legged photoresistors stuck in a breadboard reluctantly, but nevertheless agreed not to run anywhere while shooting a video, although it was not very easy to position them.
Now a little tediousness ... In fact, the monitor is a controlled transparency (matrix of light valves, excited by some external signals: electric, acoustic, optical, magnetic). Each square - bit - covers an area of 60 * 60 pixels (50 is the side of the square and 10 is the gap). I have a monitor with a resolution of 1920 * 1080 pixels, frequency 60Hz. 1920/60 = 32 squares in width, 1080/60 = 18 squares in height, 32 * 18 = 576 bits per frame. Without going into subtleties, in a second we will be able to draw 60 frames, which is 576 * 60 = 34560 bps or 4320 Bytes / s. By reducing the size of the squares to 30 pixels on the side, we get a fourfold increase in speed (17280B / s). Unfortunately, if we reduce further, then our channels will illuminate each other.
Of course, I am not going to use this optoelectronic communication channel, since there are much more convenient, faster and less expensive means of communication that do not occupy a working place on the monitor. However, we should not forget that the most ordinary things can be used in a completely unusual way for us.
The program Opto_Bayt on Ya. Disk
Source: https://habr.com/ru/post/366755/
All Articles