You just can not edit data

Of course, you are constantly editing something and are well able to do it. What about data in a mobile application when you need to place a large number of elements on the screen? Do not forget that you need to do this as carefully as possible for the user, the effectiveness of which directly depends on the convenience of input. The task ceases to be trivial.
After reading the article, you will learn how:
- organize data structure so that it is convenient to edit
- provide "dynamism" to your UI
- determine whether something has changed
- keep a history of changes
- make multiplayer in 5 minutes
At the end you will find a finished prototype with source code, demonstrating the described approach.
We at 2GIS strive for the most accurate and current data. One of the tools that provides this advantage is, in the literal sense, “by-feet”. In the fields, our specialists verify the data on the map and directory, and also collect a lot of data about the organization.
The situation is complicated by the following requirements:
- You need to add photos to any attribute of the processed object;
- know where and when the user edited a specific attribute;
- be able to roll back changes if necessary;
- add new attributes without changing the application;
- collect only the necessary list of data for this task;
- search for firms by various criteria and do it quickly.
In addition, you need to provide for crowdsourcing scenarios and the possibility of multi-user work on the same device, since different specialists can use the same device.
Preparing "convenient" data
We need not only to show the data, but also to edit it. Consequently, the read / write storage is indispensable. SQLite is suitable for us - it works perfectly for Android and includes all the necessary functionality.
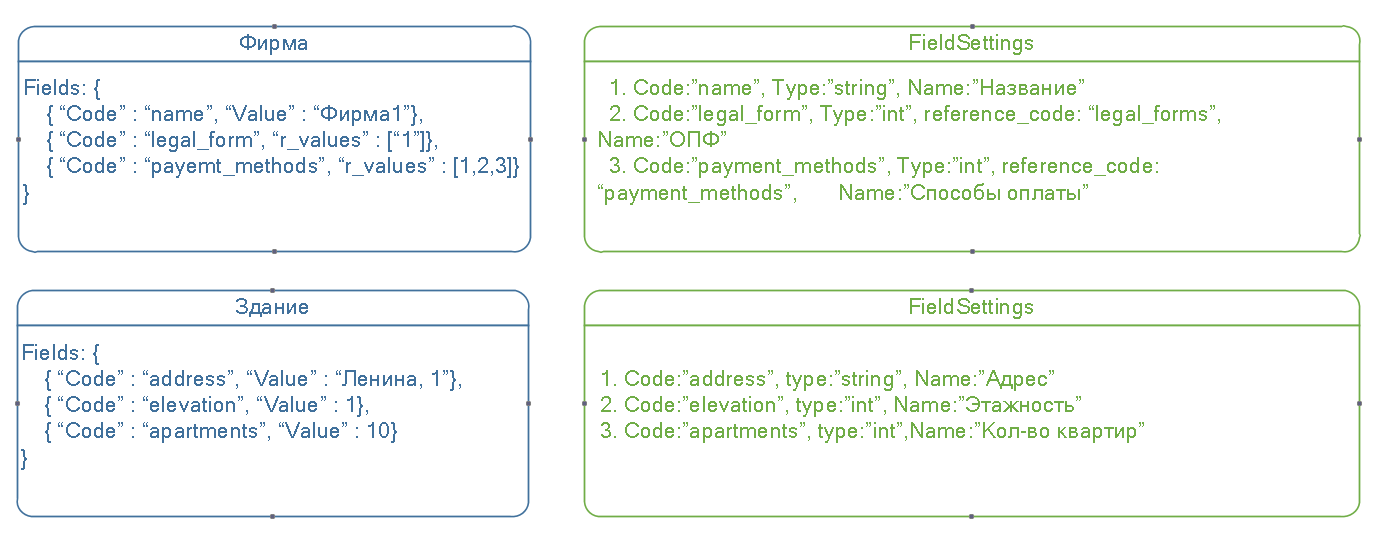
To ensure convenient data expansion and uniform work with various objects, it was decided to use JSON for storage. Moreover, we described any object, be it a house, or a company, simply as a set of “fields” (or attributes), so that a typical object began to look like this:
{ "fields": [ { "code": "BrandName", "value": "2" }, { "code": "NameDescription", "value": " " } ] } In the simplest case, the values we have are stored in the string: True / False, number, date, range of numbers and dates. More complex data for ease of serialization / deserialization is stored full-fledged objects and it looks like this:
public class FieldDto { @SerializedName("code") private String code; // @SerializedName("value") private String value; // @SerializedName("r_values") private List<Long> referenceValues; // @SerializedName("change_info") private ChangeInfoDto changeInfo; // ( ) // EntityState @SerializedName("state") public int State; // ( , , , ) public List<Long> getReferenceValues() { return this.referenceValues; } public void setChangeInfo(ChangeInfoDto changeInfo) { this.changeInfo = changeInfo; } public ChangeInfoDto getChangeInfo() { return this.changeInfo; } @Override public boolean equals(Object o) { if (o == null) return false; if (o == this) return true; if (!(o instanceof FieldDto)) return false; FieldDto other = (FieldDto) o; return this.code.equals(other.code); } public boolean isEmpty() { return StringHelperKt.isNullOrEmpty(this.value) && (this.referenceValues == null || this.referenceValues.isEmpty()); } public void setRemovedState() { State = EntityState.STATE_REMOVED; } } The idea is as follows. We have an attribute uniquely identified by its code. It has some value that may or may not be present (isEmpty method). In addition, we are able to compare the values of two attributes (equals method).
The complex attributes of the type of work time in our implementation are highlighted by separate properties. There are few such attributes, so they will not strain with their constant appearance. The main mass of attributes is placed in a simple line or in references to the r_values directory. In the example above, I just left them for simplicity.
You probably paid attention to the “state” and “change_info” attributes - we will need them to understand whether the value of the field has changed, where and when it was changed.
This is quite enough to describe any of our essence: the house, the entrance to the house, the fence, sight, firm.
The only thing we lack is descriptions of how we should show attribute codes to the user.
This will help us another entity - configuration fields (attributes). It must contain the name and type of the field so that we can create an appropriate control to edit its value.
public class FieldSetting { public static final int TYPE_TEXT = 1; // public static final int TYPE_BOOL_SINGLE = 2; // public static final int TYPE_BOOL_MULTY = 3; // True False public static final int TYPE_BOOL_SIMPLE = 13; public static final int TYPE_INT = 4; public static String ATTRIBUTE_START_GROUP = "start_group"; public static String ATTRIBUTE_END_GROUP = "end_group"; private final long id; private final int type; private final String name; private final Long parentId; private final String parentName; private final String fieldCode; private final String referenceCode; public FieldSetting(long id, int type, String name, String parent_name, Long parentId, String fieldCode, String referenceCode) { this.id = id; this.type = type; this.name = name; this.parentName = parent_name; this.parentId = parentId; this.fieldCode = fieldCode; this.referenceCode = referenceCode; } public int getType() { return type; } public String getName() { return name; } public Long getParentId() { return parentId; } public String getParentName() { return parentName; } public String getFieldCode() { return fieldCode; } public String getReferenceCode() { return referenceCode; } public long getId() { return id; } } Simplified, you can imagine it like this:
Let's organize simple storage
Let us turn to the issue of storage in the database, because we do not just need to tamp the data into some kind of table, we also need to organize search, indexing and add links between objects.
The decision to store data in JSON immediately simplifies our life from the point of view of the DBMS: there is no need to make tables for each entity, we actually work in terms of the “document”. But we still need some connections between the objects. For example, to show a list of all organizations in a building.
In the case of the 2GIS data structure, the parent-child connection is enough in 90%, so the easiest way is to place it directly in the object itself. But in general, without a table of links can not do.
The final structure of the tables will look like this:
-- CREATE TABLE object_data ( id INTEGER NOT NULL, -- ID type INTEGER NOT NULL, -- (, ..) attributes TEXT, -- JSON parent_id INTEGER, -- ID (, ) PRIMARY KEY ( id ) ); -- CREATE TABLE object_data_history ( id INTEGER NOT NULL, -- ID version INTEGER NOT NULL, -- type INTEGER NOT NULL, -- attributes TEXT, -- JSON parent_id INTEGER, -- ID PRIMARY KEY ( id, version ) ); -- CREATE TABLE field_settings ( id INTEGER NOT NULL, -- ID field_code TEXT, -- object_type INTEGER NOT NULL, -- (, ..) type INTEGER NOT NULL, -- (, , ..) name TEXT, -- reference_code TEXT -- PRIMARY KEY ( id ) ); -- CREATE TABLE reference_items ( id INT NOT NULL, -- ID ref_code TEXT NOT NULL, -- code INTEGER NOT NULL, -- name TEXT NOT NULL, -- sortpos INTEGER NOT NULL, -- PRIMARY KEY ( id ) ); -- CREATE TABLE relations ( parent_id INTEGER NOT NULL, -- ID child_id INTEGER NOT NULL, -- ID type INTEGER NOT NULL -- ); -- ( ) CREATE TABLE template_data ( id INTEGER NOT NULL, type INTEGER NOT NULL, name TEXT NOT NULL, json TEXT NOT NULL, PRIMARY KEY (id, type) ); -- CREATE VIRTUAL TABLE search_data USING fts5(content="", name) That's all. In a simple case, this is sufficient for the implementation of the requirements declared at the beginning of the article.
I draw your attention to the fact that JSON in object_data.attributes is stored as text. To save space, which will take quite a lot, it is better to store it as a BLOB and compress while saving.
An alternative simple option is to use a plugin for Sqlite , which allows you not only to compress, but also to encrypt data. True, it is paid.
The attentive reader must have noticed the object_data_history table. It completely duplicates object_data, adding only the version of the object, and allows you to save the change history with the desired "depth". If desired, it will be possible not only to display data on the screen without any significant modifications of logic, but also to easily “roll back” the state of the object to the desired version. In addition, the history will be useful for determining whether an object has changed.
Making a "good" search
Overboard we have left only the search. And here again SQLite will help us, which provides at least a limited, but, nevertheless, less full text search ( FTS ). The good old indexes, by the way, have not gone away anywhere and will also be useful.
There is one nuance. FTS is not included in the Android SQLite distribution. In addition, the library has other useful extensions that you may need. Therefore, you will have to either find a ready-made assembly with everything you need, or assemble yourself, which is not at all difficult. To do this, read the manual and do everything in steps. Further it will be necessary only to connect the received aar to your project and replace all links with android.database.sqlite.SQLiteDatabase with your org.sqlite.database.sqlite.SQLiteDatabase package.
But back to the FTS. Using content-less tables (see the table search_data) allows you to build a full-text index without duplicating data, and we can easily organize a search by company name, its contacts and rubrics. Moreover, the index can be updated on the fly when editing data or adding new ones, so that everything at once becomes searchable. The fire!
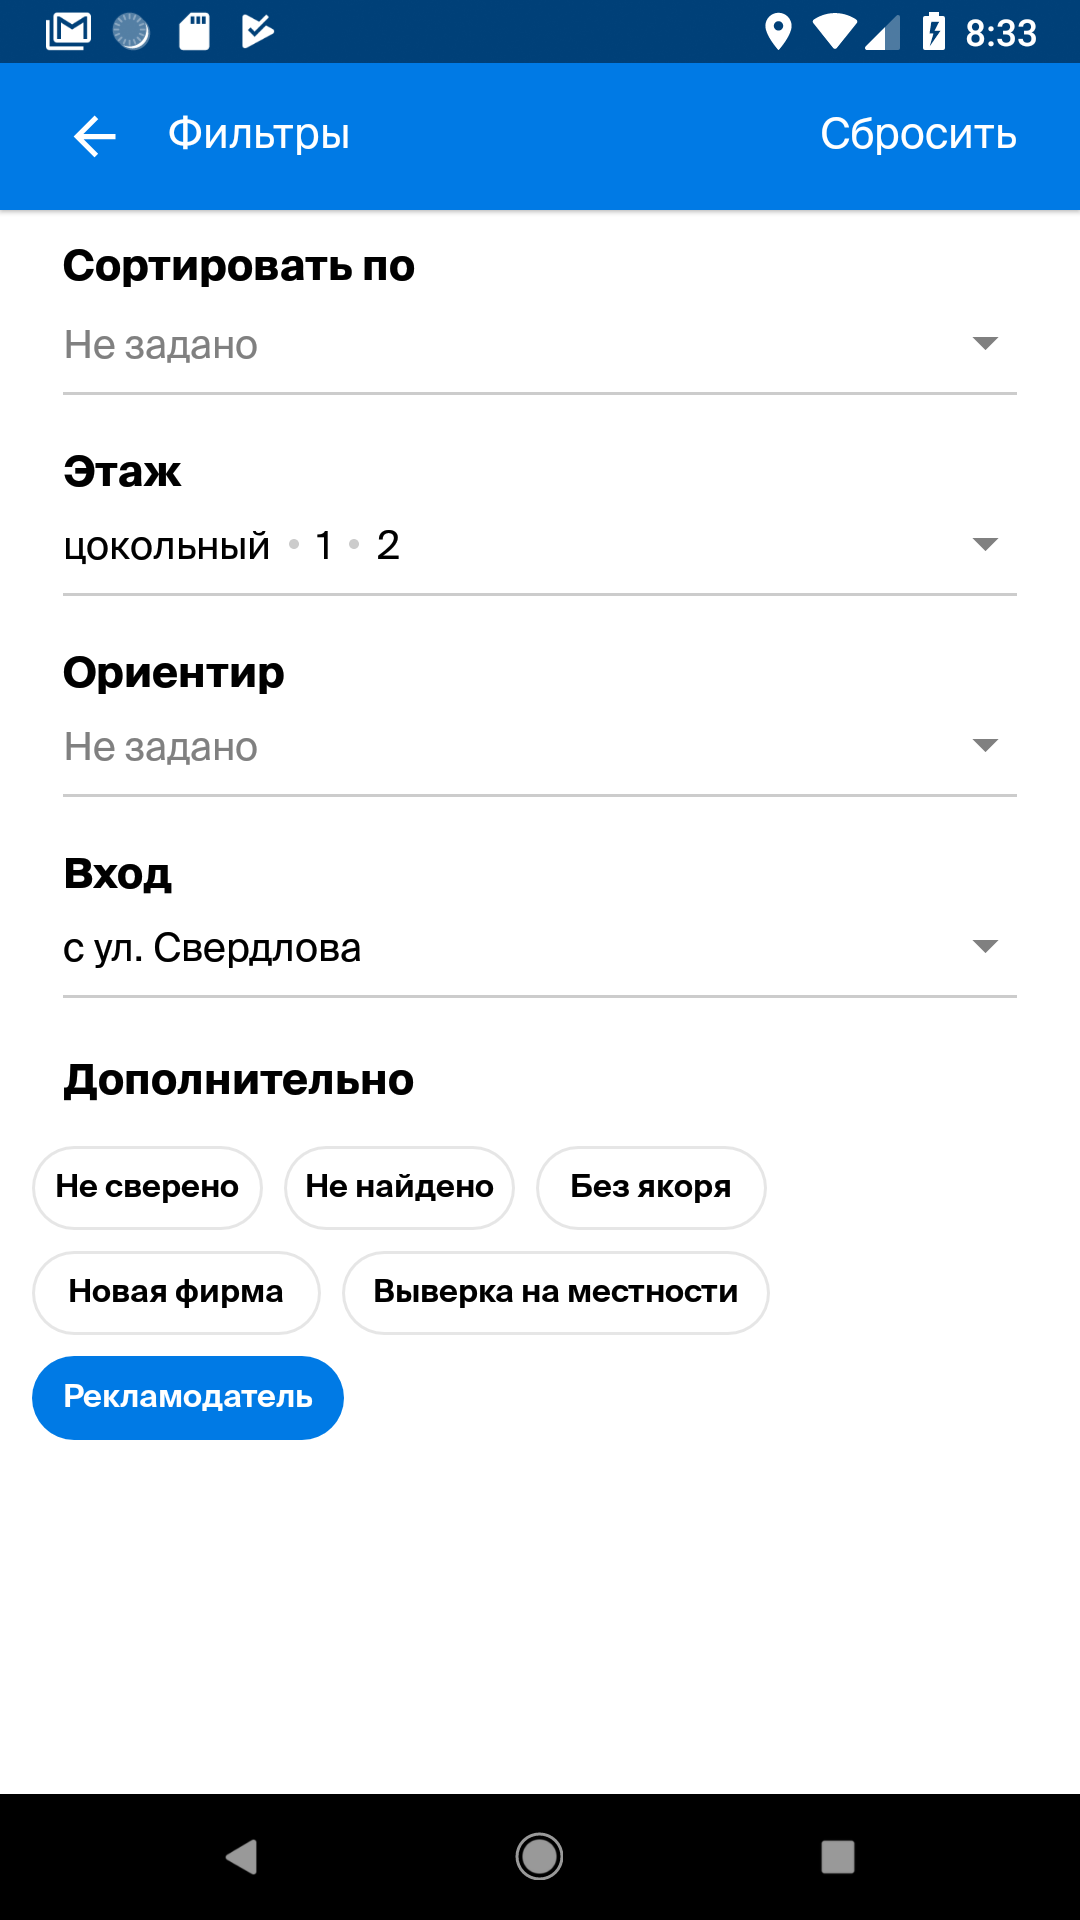
If you need additional criteria for the search (for example, in our case, you need to be able to filter organizations tied to a specific entrance in the building), then you can create the appropriate table for a specific object type with the necessary indices. It is clear that the data will be duplicated, but our main goal is the data editing mechanism; we are not experiencing much of a place.
An example of filters that are used in our application looks like this:
Thus, any view on which we will display data entry fields must contain a layout to which you can add children, for example:
<?xml version="1.0" encoding="utf-8"?> <LinearLayout xmlns:android="http://schemas.android.com/apk/res/android" android:layout_width="match_parent" android:layout_height="match_parent" android:orientation="vertical" xmlns:app="http://schemas.android.com/apk/res-auto"> ... <android.support.v4.widget.NestedScrollView android:layout_width="match_parent" android:layout_height="match_parent" android:fillViewport="true" > <LinearLayout android:layout_width="match_parent" android:layout_height="wrap_content" android:orientation="vertical" > <LinearLayout android:id="@+id/fev_content" android:layout_width="match_parent" android:layout_height="wrap_content" android:minHeight="20dp" android:orientation="vertical"> </LinearLayout> ... </LinearLayout> </android.support.v4.widget.NestedScrollView> </LinearLayout> The implementation of the addition will look like this:
vContent = this.mainView.findViewById(R.id.fev_content); @Override public void addLayoutView(DynamicView view) { vContent.addView((View) view.getView()); } We introduce the abstraction DynamicView, which allows us to hide the implementation details of a specific control for editing some type of attribute:
interface DynamicView { val view: Any val fieldCode: String fun getViewGroup(): DymamicViewGroup? fun setViewGroup(viewGroup: DymamicViewGroup) fun getValue(): FieldDto? fun setValue(value: FieldDto) fun hasChanges(): Boolean fun setTemplate(templateItem: EditObjectTemplateDto.ItemDto) } And immediately we introduce the concept of a template and a template element, which we need just to support “dynamism”. We want to be able to change the UI right on the fly depending on some criteria. To do this, use the description of the template in JSON:
{ "items": [{ "field_code": "photos" }, { "field_code": "start_group", "group_name": "", "bold_caption": true, "show_header": true }, { "caption": "", "field_code": "c_name" }, { "field_code": "NameDescription" }, { "field_code": "OrganizationLegalForm" }, { "caption": ". ", "field_code": "LegalName" }, { "field_code": "end_group" }, { "field_code": "c_address_name", "validator": "required" }, { "field_code": "start_group", "layout_orientation": "horizontal" }, { "field_code": "ref_point" }, { "edit_control_type": 18, "field_code": "Floor" }, { "field_code": "end_group" }, { "field_code": "AddressDescription" }, { "edit_control_type": 16, "field_code": "loc_verification" }, { "field_code": "end_group" } ] } The template determines the list and order of the attributes that we will edit on the screen. If necessary, you can combine controls into groups using start_group / end_group, select bold_caption headers or hide them completely with show_header.
There is another important tag - edit_control_type. It defines the type of control with which the attribute will be edited. For example, if we in one case want to see radio buttons, and in the other, use switch to edit Boolean attributes.
In general, in the description of the template, you can enter any flexibility you need to support the necessary requirements, but its main purpose is visibility and order of attributes.
Putting it all together
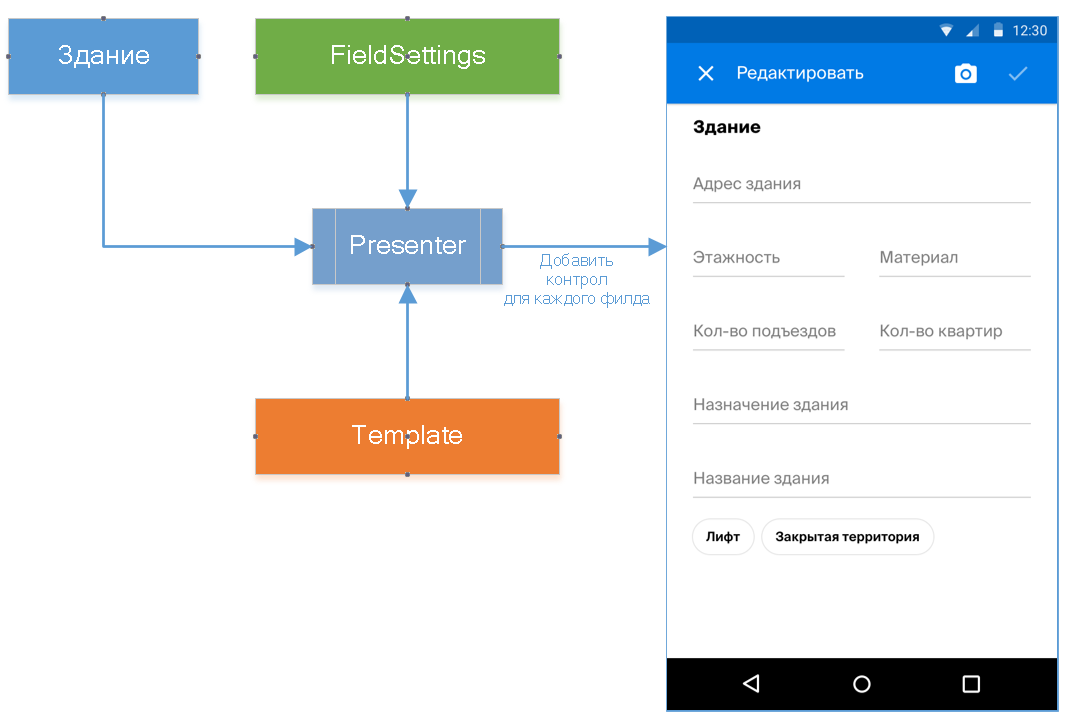
The magic on the formation of the view will be placed in the presenter. He will be engaged in creating controls for editing each attribute, placing them on the screen, mapping object data to these controls and saving changes to the database.
abstract class DynamicViewPresenterBase<TDto : SimpleDto, TView : DynamicViewContainer> { private lateinit var views: MutableList<DynamicView> private lateinit var template: EditObjectTemplateDto internal lateinit var containerView: TView internal lateinit var dto: TDto private val removedFields = HashSet<String>() fun init(dto: TDto, containerView: TView) { this.containerView = containerView this.dto = dto val configuration = getFieldsConfiguration(fieldsConfigurationService) this.template = editTemplate this.views = ArrayList(configuration.size) addDynamicViews(configuration) onInit(configuration) } private fun addDynamicViews(configuration: List<FieldConfiguration>) { val groupStack = Stack<DymamicViewGroup>() var lastViewGroup: DymamicViewGroup? = null val processedFields = HashSet<String>(10) for (templateItem in this.template.Items) { ... val config = getFieldConfiguration(configuration, templateItem.FieldCode) ?: continue processedFields.add(config.fieldCode) processField(lastViewGroup, templateItem, config) } } private fun processField(lastViewGroup: DymamicViewGroup?, templateItem: EditObjectTemplateDto.ItemDto, config: FieldConfiguration) { val view = getDynamicView(templateItem, config) views.add(view) if (lastViewGroup != null) { lastViewGroup.addView(view) } else { this.containerView.addLayoutView(view) } } private fun getDynamicView(templateItem: EditObjectTemplateDto.ItemDto, config: FieldConfiguration): DynamicView { val view = fieldViewFactory.getView(this.containerView, config, templateItem) val field = this.dto.getField(config.fieldCode) if (field != null) { view.setValue(field) } view.setTemplate(templateItem) return view } fun onOkClick() { var initialDto: TDto? = null val beforeSaveDtoCopy = dtoCopy try { if (!dto.IsInAddingMode()) { initialDto = getInitialDto() } } catch (e: DataContextException) { onGetInitialDtoError(e) return } val fields = getFieldFromView(initialDto) dto.setFields(fields, removedFields) dto.changeInfo = locationManager.changeInfo fillRemovedFields(dto, initialDto) try { val hasChanges = dto.IsInAddingMode() || initialDto != dto if (hasChanges || beforeSaveDtoCopy != null && beforeSaveDtoCopy != dto) { if (!hasChanges) { dto.changeInfo = null } saveObject(dto, initialDto) } else { undoChanges(dto, initialDto) } afterSaveObject() } catch (e: DataContextException) { onSaveError(e) } } fun undoChanges() { try { if (!dto.IsInAddingMode()) { val initialDto = getInitialDto() undoChanges(dto, initialDto) closeView() } } catch (e: DataContextException) { onGetInitialDtoError(e) } } abstract fun closeView() fun onBackButtonClick() { var hasChanges = false for (value in views) { if (value.fieldCode == FieldSetting.FIELD_START_GROUP) { continue } if (value.hasChanges()) { hasChanges = true break } } if (!hasChanges) { closeView() return } containerView.showCloseAlertDialog() } ... } In the init method, we get the configuration by the getFieldsConfiguration method. This is a list of the attributes available for this type of object. Then we take an editing template that determines the appearance of the screen, and in the addDynamicViews method we create all controls and add them via addLayoutView to the parent layout.
When saving changes to the onOkClick method, we refer to the object's initial state to determine if something has changed in the current state, and then to the table with the object_data_history history to determine if something has changed from its very first version.
If the current state has not changed - do nothing.
If you returned to the first version, we roll back the changes.
If this is a new state, update object_data_history.
If the user has clicked “back” - using the same mechanism we can warn him about the need to save changes. And all this is achieved by a simple test for equality of the attributes of the object.
Implementing String Attribute Editing
Let's look at how the implementation of a control for editing a string attribute looks like. We are required to implement DynamicView. Let's take a look at the code:
open class EditTextFactory internal constructor(commonServices: UICommonServices) : ViewFactoryBase(commonServices) { override fun getView(container: DynamicViewContainer, configuration: FieldConfiguration): DynamicView { val mainView = getMainView(inflater) val editText = mainView.findViewById<EditText>(R.id.det_main_text) ... val dynamicView = object : DynamicEditableViewBase(locationManager) { override val view: View get() = mainView override val currentValue: FieldDto get() = FieldDto(configuration.fieldCode, editText.text.toString()) override val fieldCode: String get() = configuration.fieldCode override fun setValue(value: FieldDto) { initialValue = value editText.setText(value.value) } } editText.setOnFocusChangeListener { v, hasFocus -> if (!hasFocus) { dynamicView.rememberChangeLocation() } } return dynamicView } } Everything is pretty trivial. We create an EditText, set the value in the setValue method, set the current value in the getCurrentValue method, and subscribe to the focus loss event to remember where and when the user changed it.
In the base implementation, the setInitialValue method is intended to preserve the original value. rememberChangeLocation records the date and place of the change. And the setChangeInfo method does all the magic: compares the current attribute value with the original one, determines the status of the attribute change, and sets changeInfo.
The rest of the controls are implemented in the same way, it makes no sense to consider them further. An example of the design of some of them is presented below.
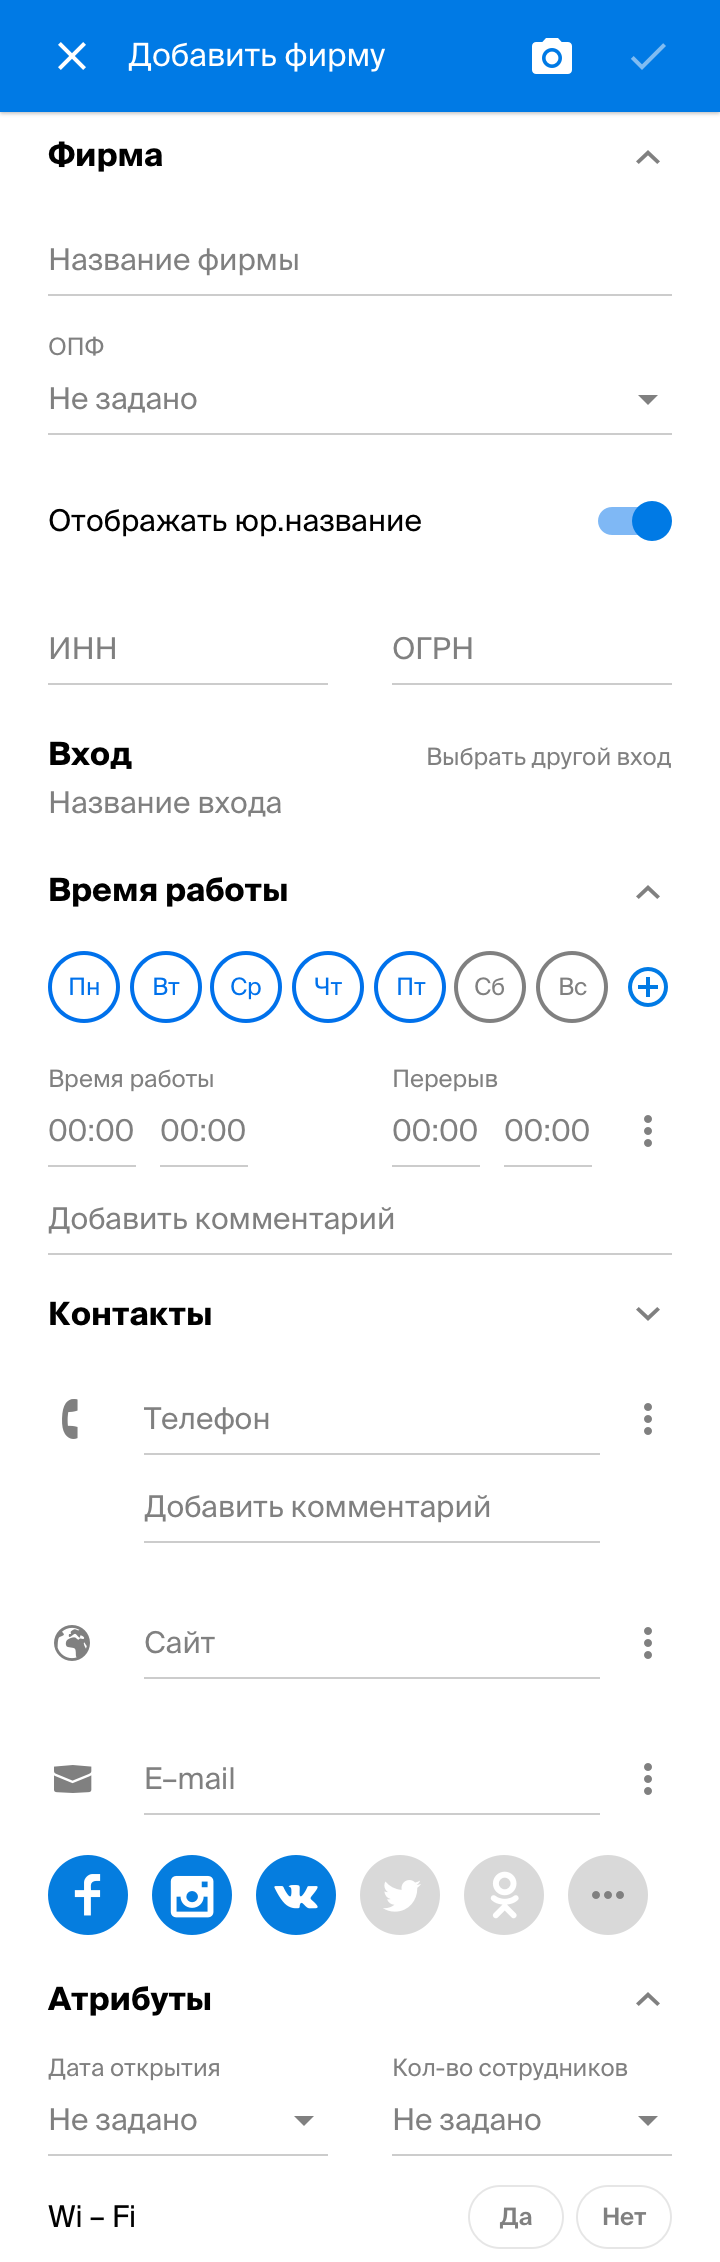
')
The only thing you want to pay attention to is in the photo. According to the requirements, we need a mechanism by which we can bind any photo to the desired attribute.
We used a simple solution - added tags to the pics. Moreover, the set of tags is determined by the type of object, and the tags themselves may correspond to attributes, although not necessarily.
On the screen, it looks like this:
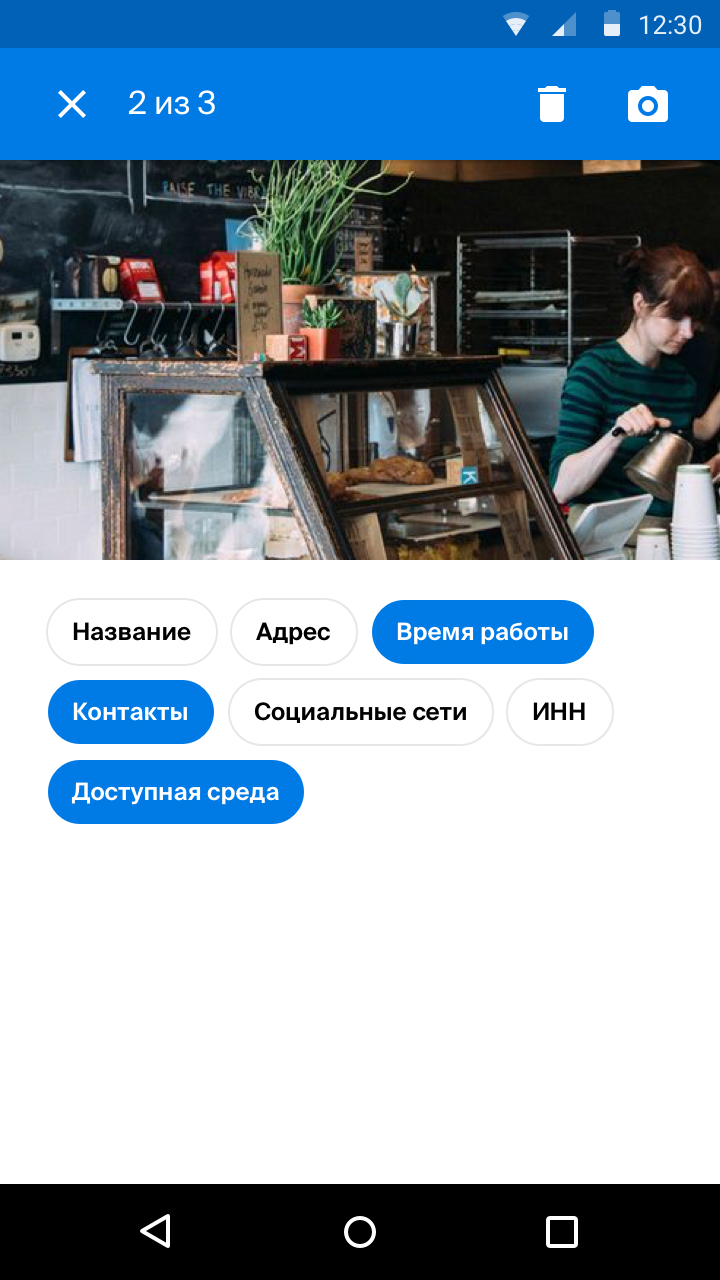
User takes a picture, indicates the necessary tags. A specialist in the office will be able to add all the necessary data to the system. You can go ahead and make automatic recognition of the necessary information in the picture, for example, to find the TIN or OGRN. This is in our age of spacecraft is done elementary right on the device.
The final structure of relationships is as follows:

Editing templates can be stored as you like, we add them to the database and deliver them to the application from the server upon receipt of changes. This allows you to change screens right on the fly, just enough to download new templates.
You can further develop the implementation using the same mechanism for viewing information. It is enough to make a template for editing a company and for viewing it. There will be two templates and two screens, but both will be dynamically configured using the approach described above.
Multiplayer mode in five minutes
Let's talk now about the multiplayer mode. At the beginning of the article I promised to show how to make it in five minutes. And here again the chip SQLite will help us. See, from the point of view of data preparation, our reality looks like this:
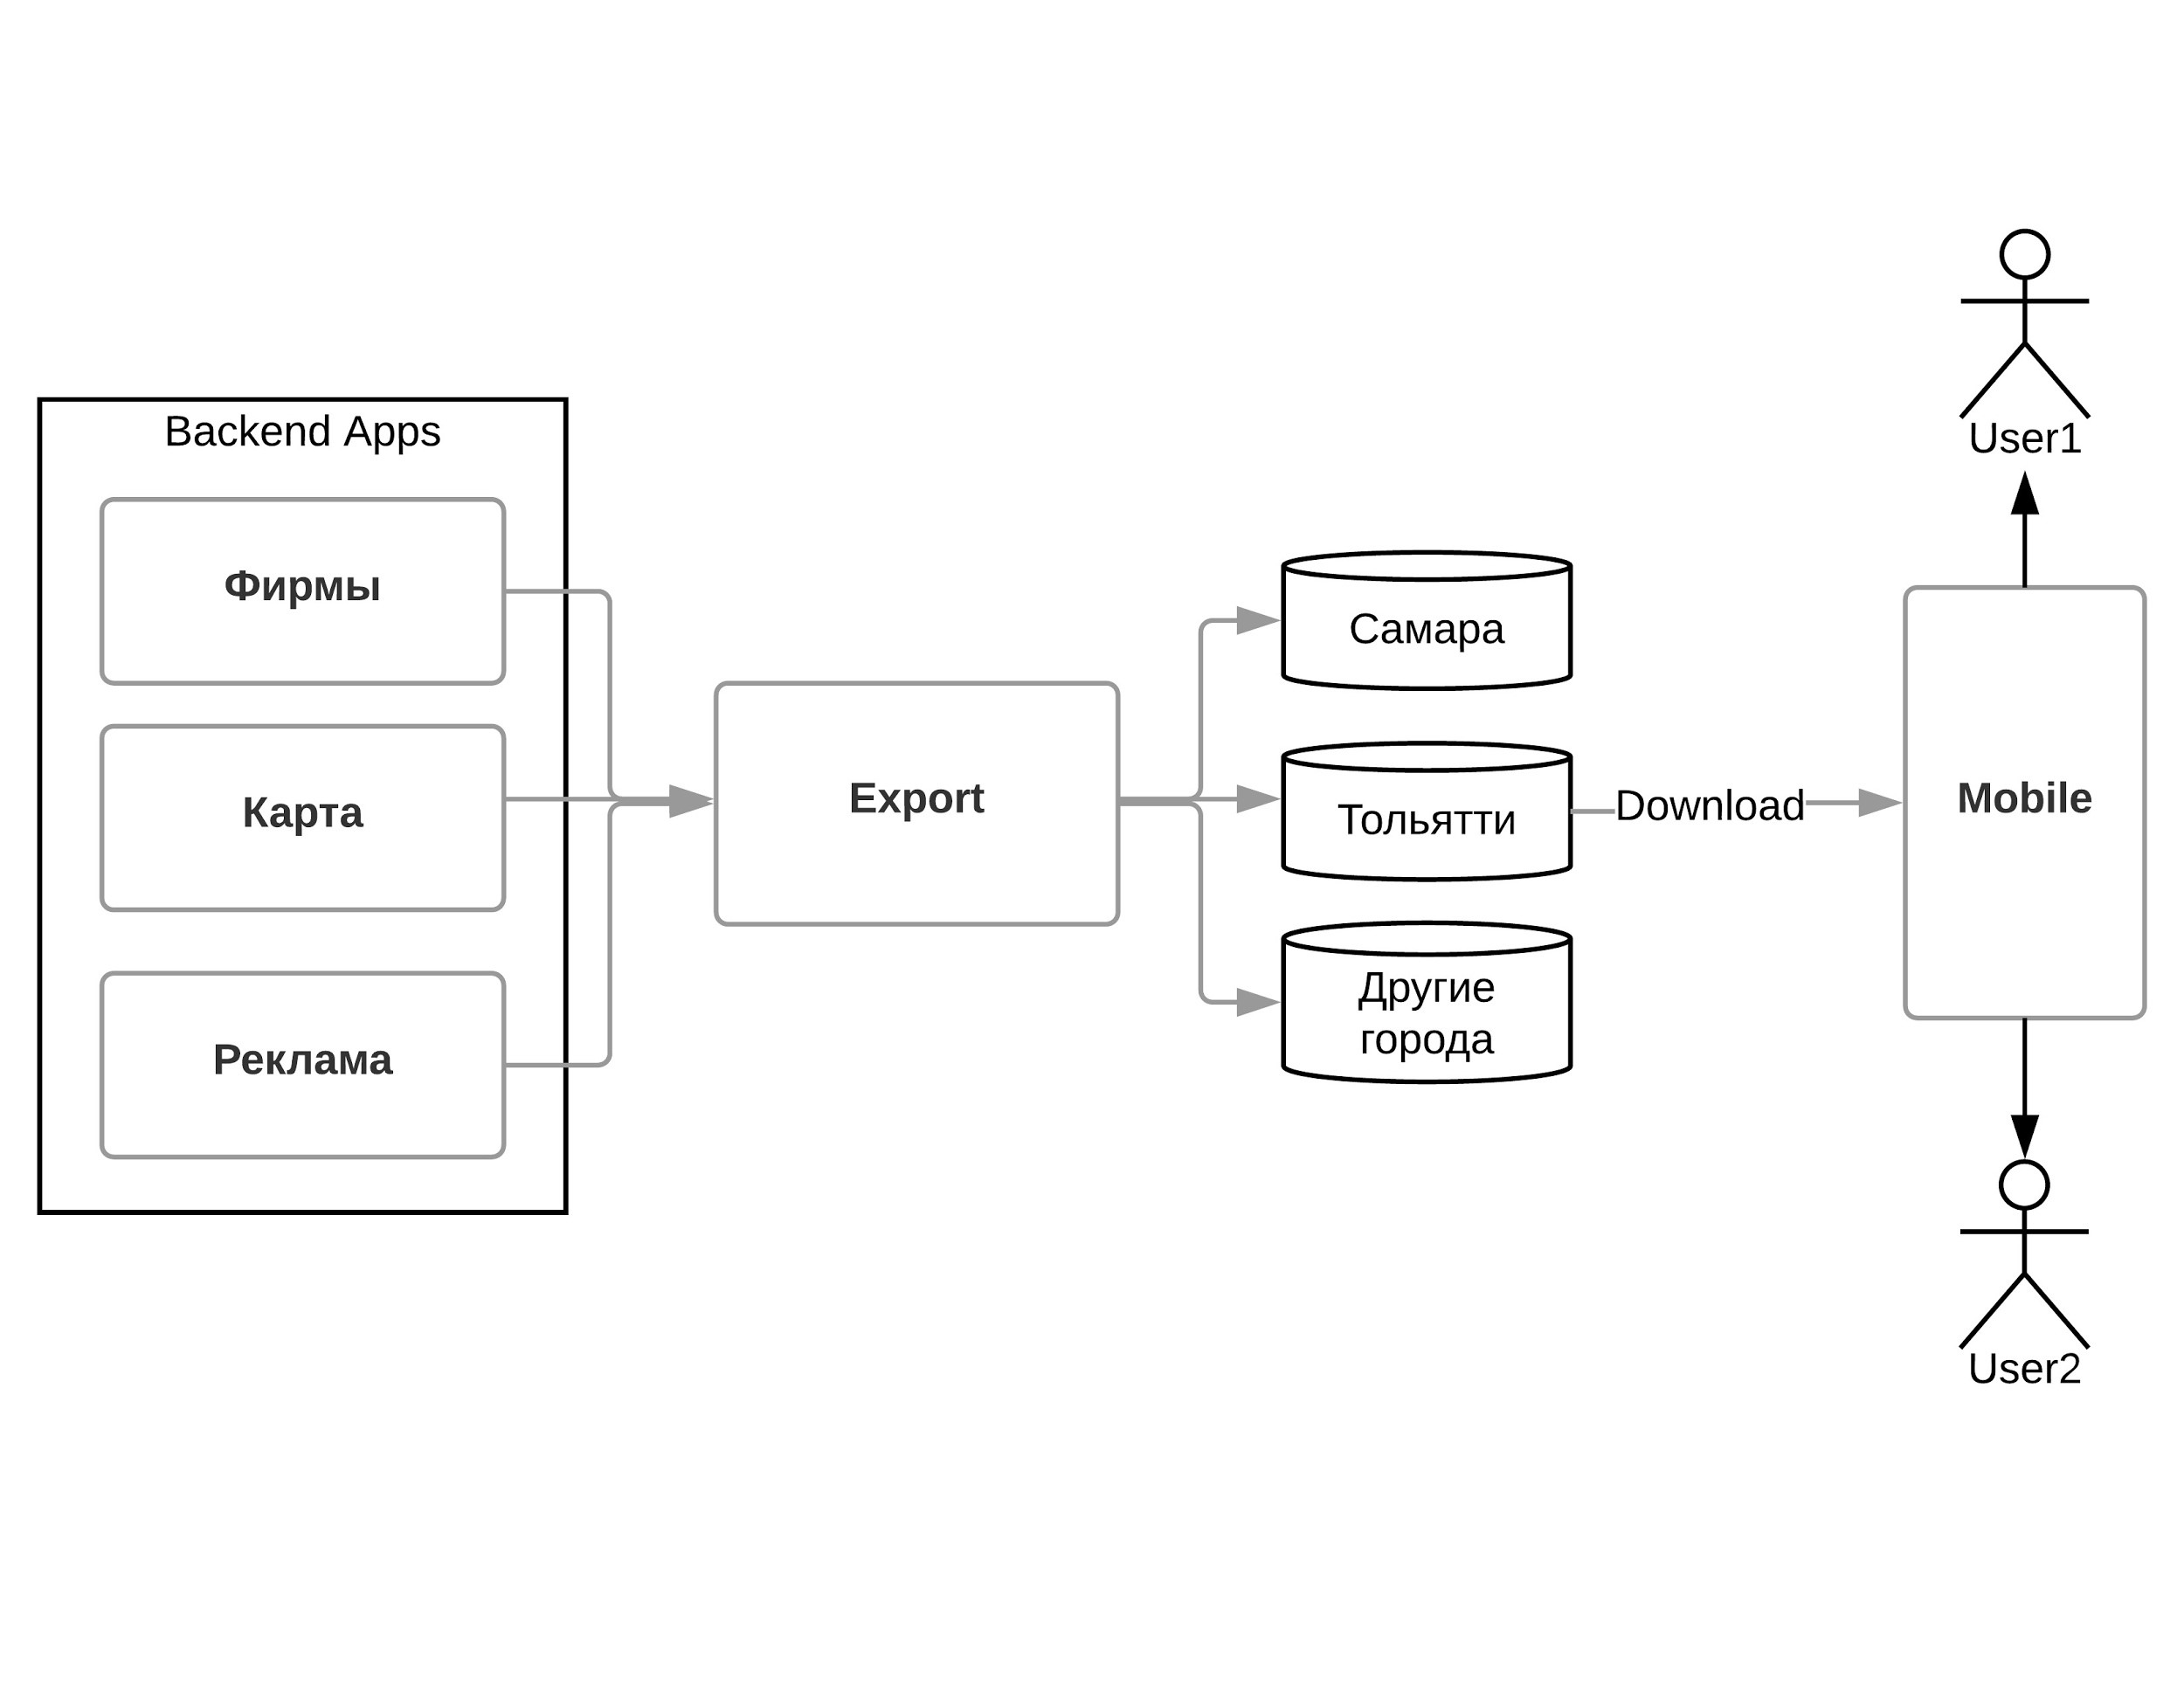
There is an export on the back, which collects data from all internal systems, cuts them into "regions" and unloads all the necessary region.sqlite - all attributes by geo-objects and by firms.
"Regions" user downloads to his phone - this is common to all data. If different people work with the same device, they use the same data from the “region”.
The work they do to collect new organizations and update existing ones should be personalized: each user has his own tasks and his own results. We fix this data in the user.sqlite database. To make it convenient to retrieve them from the database and make joins with the region data, we use the command
ATTACH database in SQLIte.
There is no need to keep any connections with users within one base, it is enough to make your base for each user and attach a region. If the user is in a different region, simply attach this region. The rest works automatically.
This simple team simply dramatically, almost to zero, reduces labor costs in the scenario of multi-user work.
About delivering updates from the server
Since all the data we have actually laid in one table in the simplest case, then we only need to add the version of the data to the base of the region. We use back-end versioning on the backend, which greatly simplifies life.
This means that we need only one number - the maximum version of the data at the time of unloading, which we save to the base of the region. To get updates, just transfer this version and get all changes and deletions. The API method here looks like this:
/api/regionchanges?region_id&entity_type&max_version In general, receiving data from the server is indirectly related to the topic of the article. I mentioned it only because you can use this mechanism if you want to deliver editing templates, not an application. Those. we, to change the editing screen, just go to the server and get fresh templates. Pretty obvious and easy to implement.
In conclusion, I would like to say that the relative simplicity of the solution lies in a simple data structure. The correct organization of the data allowed to close a significant part of the requirements, and the finished technical solutions and patterns coped with the rest.
Feel free to use:
- storing attributes in JSON
- building a UI based on a template
- SQLite tokens (attach database, FTS and other extensions)
, . , , .
Source: https://habr.com/ru/post/366089/
All Articles