Master class from Volgograd schoolchild: continue to make your own 3D printer, or From RepStrap to RepRap
History, as is known, tends to repeat itself. In August, we already wrote on Habré about Volgograd schoolboy Mikhail Kozenko, who assembled his 3D printer. Over the past five months since then, the young inventor has become adept in his business and has prepared for us another photo and text report.
All warm greetings from Volgograd! In August last year, I already talked about how I assembled my first 3D printer, and how this idea came to my mind at all. In short, I am constantly engaged in various projects and a few years ago I realized that I needed a 3D printer for further research and projects. After that, I began to study the relevant materials on assembling a 3D printer at home. I realized that I can use some ready-made components, which at first is logical to assemble a temporary design, and then print the details to a new, already “normal” printer using the resulting device. Actually, this is a typical transition from printers created according to the RepStrap concept to RepRap printers.
Participating in discussions on various portals and forums, I, unfortunately, faced such a problem that many people do not know or know, but do not understand what 3D printers are, RepRap, RepStrap, RepRap 1.0 (Darwin) and RepRap 2.0 (Mendel), let's look at these things.
')
So what is a 3D printer? A 3D printer is a peripheral device that uses the method of layer-by-layer creation of a physical object using a digital 3D model. In this case, the process of three-dimensional printing is often called rapid prototyping (Rapid Prototyping), since 3D printers were originally created for this purpose. There are several basic technologies of 3D printing, more details about them can be found in this article, and I just say that I use FDM technology (fusion modeling) in my printer.
In 2005, Adrian Bower, a teacher of mechanical engineering at the University of Bath in the UK, founded the RepRap project (from the English. Replicating Rapid Prototyper - a self-replicating mechanism for rapid prototyping), the purpose of which was the distribution of 3D printing using self-replicating devices. That is, you can ask a friend who has a RepRap device to play it to you. 3D printing here was very helpful. At the beginning of 2008, the first model of such a device, called RepRap 1.0 (Darwin), appeared. It was a 3D printer capable of printing many plastic parts for its own design. The shape of it was a cube with a thermal head moving along the X and Y axes, and a desktop moving along the Z axis. In 2009, the second model RepRap 2.0 (Mendel) appeared, it was a prism with an extruder moving along the X axes and Z, and the desktop moving along the Y axis. Further from third-party enthusiastic developers, different models of printers began to appear, which were mainly improvements to the first two devices. At the moment, the project is not very advanced in the field of printing of electrical components, as planned, but, nevertheless, it has greatly developed and advanced 3D printing in everyday life. Some of the major manufacturers of personal 3D printers at one time left the RepRap project and followed the path of commercialization. Many people, not having familiar owners of 3D printers, began to create devices for printing RepRap printers from scrap materials, and this approach was called RepStrap.

Reprap 1.0 (Darwin)

RepRap 2.0 (Mendel)
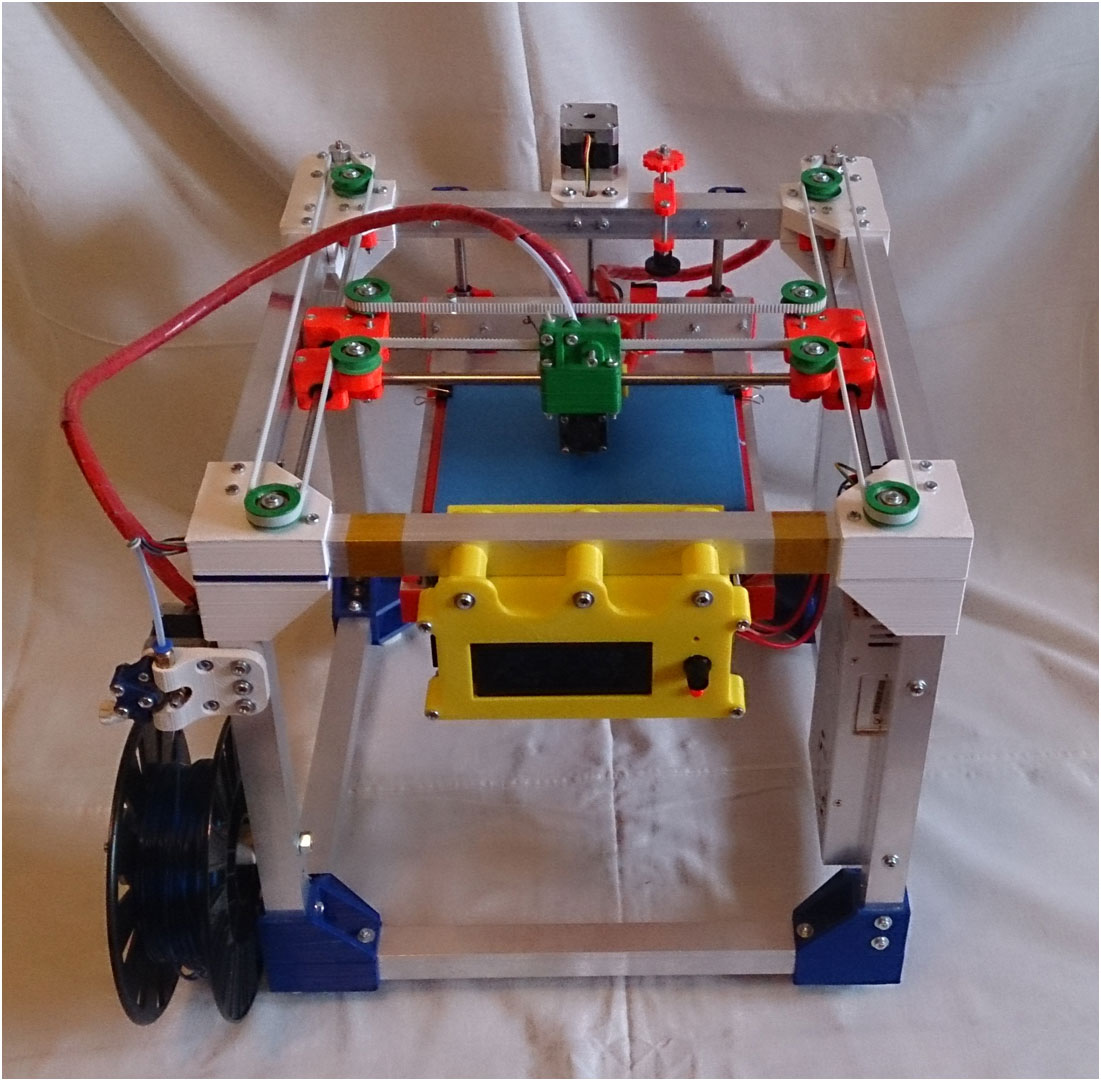
Now back to my project. After I finished my first printer in early August, I immediately began working on a second printer, VolgoBot 0.1. I designed it in such a way that, if necessary, it will be possible without much difficulty to modify and modify its structure. The layout remains almost the same as the first one: the printer is a cube with a thermal head moving along the X and Y axes and positioned using a mechanism called H-bot and a desktop moving along the Z axis. My printer uses an extruder type - Bowden-extruder. The printer frame is assembled from a 25x25 square aluminum profile. Polished cylindrical shafts with a diameter of 8 mm and linear bearings LM8UU are used as guides. The model e3D v6 is used as a thermal head. The electronics remained the same: Arduino Mega 2560 + Ramps v1.4 + 4 drivers A4988 + 400 W power supply and the Smart controller autonomous printer control card. The firmware also remained the same - Marlin, but slightly customized for a specific printer.
I planned to finish the printer by the beginning of the school year, but by the end of the summer I had only a designed printer, and it still had to be translated into something material. School began, and the free time was almost gone, however, by the beginning of October the printer was almost finished. I tried to run it, and ... crash! The extruder did not want to work in any way, and I needed to go to St. Petersburg in 3 hours! The trip took two weeks, but after returning, I still figured out the problem. It consisted in an incorrectly manufactured thermal head of a thermal head. Because of this, the plastic bar is constantly stuck in it. A week of unsuccessful struggle with the problem did not bring results. Then it was decided not to save on the extruder and immediately buy the English original thermal head e3D v6, from which, strictly speaking, the Chinese manufacturers are copying. The original costs almost 40 pounds, and this, in my opinion, is very expensive - in China you can find solutions that are much cheaper, but it will require a long search and constant samples until you find a quality and at the same time a cheap option. In fairness, I note that for all the time using the thermal head there was not a single problem.
But the law of meanness worked here: as soon as my order was sent, I managed to get the “old” extruder to work - let it be not perfect. I printed the case for electronics, and externally the printer was finished, in such a state it had to be shown on television. When in November the thermal head came from England (with marmalades in a box, as a bonus, and indeed it should be noted that it was made extremely qualitatively and in good faith), I installed it (and I again, as an evil, in less than a day fly to Yaroslavl) and everything went just fine! Returning a week later, I began to select the settings and improve the quality, slightly redid the cooling of the printed part, and as a result, by the beginning of December, the printer was completely ready.

And this pre-New Year period began, it seems, endless checklists, in the end I just managed to post a photo of the finished printer in my blog on 3dtoday.ru.
At the end of my humble story, perhaps, I repeat the words I said in the first article:
To implement my VolgoBot 0.1 I needed:
1. Desire and a clear goal to get in the end a convenient and reliable device;
2. Some amount of money (for my second printer I needed about 31 thousand rubles in total);
3. Good CAD and ability to work in it (I used the home version of KOMPAS 3D and student Autodesk Inventor);
4. Design time (it took me a month);
5. Time to build the printer itself (unfortunately, I can’t say it for sure, since I was in school at the same time and was away);
6. The time for setting up the printer itself (taking into account the experience gained in creating the first printer, it took me only 3 days).
I'm not going to stop there, since I still have a lot of ideas that I want to implement, for example, to remake the Z axis drive from screw to belt drive. Very interesting, what will come out, so I do not say goodbye! If there are objective comments and criticism, I will be sincerely happy to listen and discuss. In the meantime, here's a short video about my project:

3D model VolgoBot 0.1

Light at the beginning of the 3D printer road

Finished printer frame

Z carriage

Only forward!

Carriage X

Printed part for new printer

X axis and Y carriage

After 3 hours I will go to Peter

We have established a seal, we make a housing for electronics
In this form, and on TV you can!

Hooray! A new thermal head has arrived!

Again Lenin, but this time a classmate asked him to print. ABS plastic, nozzle 0.4, layer thickness 0.2
See you again! In the next post, literally in a few days, I will show how it will be possible to print the cover of the book “Simple Science” on a 3D printer . Why this particular book? Because the guys from this company helped me get on Habr half a year ago, and now on Giktayms.
Note author: I immediately answer a possible question: Misha Kozenko (@ kozenkomichael99) after innovations on Habré account does not allow writing materials, as well as on Hiktimes. Therefore, as in August of last year, we publish the material on our blog, and in the comments to the discussion, Misha himself will join in the hope that someone will give him an invite (we, unfortunately, do not have a rating to provide him with such a presentation) .
All warm greetings from Volgograd! In August last year, I already talked about how I assembled my first 3D printer, and how this idea came to my mind at all. In short, I am constantly engaged in various projects and a few years ago I realized that I needed a 3D printer for further research and projects. After that, I began to study the relevant materials on assembling a 3D printer at home. I realized that I can use some ready-made components, which at first is logical to assemble a temporary design, and then print the details to a new, already “normal” printer using the resulting device. Actually, this is a typical transition from printers created according to the RepStrap concept to RepRap printers.
Participating in discussions on various portals and forums, I, unfortunately, faced such a problem that many people do not know or know, but do not understand what 3D printers are, RepRap, RepStrap, RepRap 1.0 (Darwin) and RepRap 2.0 (Mendel), let's look at these things.
')
So what is a 3D printer? A 3D printer is a peripheral device that uses the method of layer-by-layer creation of a physical object using a digital 3D model. In this case, the process of three-dimensional printing is often called rapid prototyping (Rapid Prototyping), since 3D printers were originally created for this purpose. There are several basic technologies of 3D printing, more details about them can be found in this article, and I just say that I use FDM technology (fusion modeling) in my printer.
In 2005, Adrian Bower, a teacher of mechanical engineering at the University of Bath in the UK, founded the RepRap project (from the English. Replicating Rapid Prototyper - a self-replicating mechanism for rapid prototyping), the purpose of which was the distribution of 3D printing using self-replicating devices. That is, you can ask a friend who has a RepRap device to play it to you. 3D printing here was very helpful. At the beginning of 2008, the first model of such a device, called RepRap 1.0 (Darwin), appeared. It was a 3D printer capable of printing many plastic parts for its own design. The shape of it was a cube with a thermal head moving along the X and Y axes, and a desktop moving along the Z axis. In 2009, the second model RepRap 2.0 (Mendel) appeared, it was a prism with an extruder moving along the X axes and Z, and the desktop moving along the Y axis. Further from third-party enthusiastic developers, different models of printers began to appear, which were mainly improvements to the first two devices. At the moment, the project is not very advanced in the field of printing of electrical components, as planned, but, nevertheless, it has greatly developed and advanced 3D printing in everyday life. Some of the major manufacturers of personal 3D printers at one time left the RepRap project and followed the path of commercialization. Many people, not having familiar owners of 3D printers, began to create devices for printing RepRap printers from scrap materials, and this approach was called RepStrap.
Reprap 1.0 (Darwin)
RepRap 2.0 (Mendel)
Now back to my project. After I finished my first printer in early August, I immediately began working on a second printer, VolgoBot 0.1. I designed it in such a way that, if necessary, it will be possible without much difficulty to modify and modify its structure. The layout remains almost the same as the first one: the printer is a cube with a thermal head moving along the X and Y axes and positioned using a mechanism called H-bot and a desktop moving along the Z axis. My printer uses an extruder type - Bowden-extruder. The printer frame is assembled from a 25x25 square aluminum profile. Polished cylindrical shafts with a diameter of 8 mm and linear bearings LM8UU are used as guides. The model e3D v6 is used as a thermal head. The electronics remained the same: Arduino Mega 2560 + Ramps v1.4 + 4 drivers A4988 + 400 W power supply and the Smart controller autonomous printer control card. The firmware also remained the same - Marlin, but slightly customized for a specific printer.
I planned to finish the printer by the beginning of the school year, but by the end of the summer I had only a designed printer, and it still had to be translated into something material. School began, and the free time was almost gone, however, by the beginning of October the printer was almost finished. I tried to run it, and ... crash! The extruder did not want to work in any way, and I needed to go to St. Petersburg in 3 hours! The trip took two weeks, but after returning, I still figured out the problem. It consisted in an incorrectly manufactured thermal head of a thermal head. Because of this, the plastic bar is constantly stuck in it. A week of unsuccessful struggle with the problem did not bring results. Then it was decided not to save on the extruder and immediately buy the English original thermal head e3D v6, from which, strictly speaking, the Chinese manufacturers are copying. The original costs almost 40 pounds, and this, in my opinion, is very expensive - in China you can find solutions that are much cheaper, but it will require a long search and constant samples until you find a quality and at the same time a cheap option. In fairness, I note that for all the time using the thermal head there was not a single problem.
But the law of meanness worked here: as soon as my order was sent, I managed to get the “old” extruder to work - let it be not perfect. I printed the case for electronics, and externally the printer was finished, in such a state it had to be shown on television. When in November the thermal head came from England (with marmalades in a box, as a bonus, and indeed it should be noted that it was made extremely qualitatively and in good faith), I installed it (and I again, as an evil, in less than a day fly to Yaroslavl) and everything went just fine! Returning a week later, I began to select the settings and improve the quality, slightly redid the cooling of the printed part, and as a result, by the beginning of December, the printer was completely ready.
And this pre-New Year period began, it seems, endless checklists, in the end I just managed to post a photo of the finished printer in my blog on 3dtoday.ru.
At the end of my humble story, perhaps, I repeat the words I said in the first article:
“My story is rather not a story about some school genius who invented a bicycle, but simply proof that if there is a desire and a little money, then everyone can assemble a 3D printer!”
To implement my VolgoBot 0.1 I needed:
1. Desire and a clear goal to get in the end a convenient and reliable device;
2. Some amount of money (for my second printer I needed about 31 thousand rubles in total);
3. Good CAD and ability to work in it (I used the home version of KOMPAS 3D and student Autodesk Inventor);
4. Design time (it took me a month);
5. Time to build the printer itself (unfortunately, I can’t say it for sure, since I was in school at the same time and was away);
6. The time for setting up the printer itself (taking into account the experience gained in creating the first printer, it took me only 3 days).
I'm not going to stop there, since I still have a lot of ideas that I want to implement, for example, to remake the Z axis drive from screw to belt drive. Very interesting, what will come out, so I do not say goodbye! If there are objective comments and criticism, I will be sincerely happy to listen and discuss. In the meantime, here's a short video about my project:
And here is a small photo report on the work done:
3D model VolgoBot 0.1
Light at the beginning of the 3D printer road
Finished printer frame
Z carriage
Only forward!
Carriage X
Printed part for new printer
X axis and Y carriage
After 3 hours I will go to Peter
We have established a seal, we make a housing for electronics
In this form, and on TV you can!
Hooray! A new thermal head has arrived!
Again Lenin, but this time a classmate asked him to print. ABS plastic, nozzle 0.4, layer thickness 0.2
See you again! In the next post, literally in a few days, I will show how it will be possible to print the cover of the book “Simple Science” on a 3D printer . Why this particular book? Because the guys from this company helped me get on Habr half a year ago, and now on Giktayms.
Note author: I immediately answer a possible question: Misha Kozenko (@ kozenkomichael99) after innovations on Habré account does not allow writing materials, as well as on Hiktimes. Therefore, as in August of last year, we publish the material on our blog, and in the comments to the discussion, Misha himself will join in the hope that someone will give him an invite (we, unfortunately, do not have a rating to provide him with such a presentation) .
Source: https://habr.com/ru/post/365873/
All Articles