Kubotronic - the way from the cube to the set
Our game cube project, which is cheaper to do than to buy, thanks to our readers, has got its own name - CUBOTRONIC, but, most importantly, the project made one small, but important step.
Kubotronik received extensions in the form of "decorative panels". Initially, these were cubes to use as a building element in children's games or, for example, to make puzzles out of it.

')
The panels allow you to use the Kubotronika base unit as a carrier for interchangeable panels, and the panels can be changed using the developed mounting system or connected to electrical circuits.
The following sets of panels have already been developed:
- Russian alphabet
- English alphabet
- panels for dominoes or dice
- numbers for the bill
- various radio and electronic components

The developed and inherent principle of the formation of the pattern allows you to apply clear contrasting patterns that are well read even at a distance. Those. if the cube is lying on the floor, then from the height of the human height of an adult person it is clearly seen that on the upper face.
By the way, a collection of the same type, you can print in different colors. For example, the vowels are red, and the consonants are printed in blue. These cubes can also be used as an alphabet, and if you decorate all 6 faces of the cubes with these panels, they turn into dice. The rules of games with letters, by the construction of words, on the Internet are many, and the blocks of Kubotronik will allow you to form the necessary configuration of chips for playing with children.
Panels are made of multicolored contrasting plastics. Dark plastic forms the base, and light plastic top panel is 1 mm thick. Panels are printed without supports upside down. Those. at the beginning there is a printing with light plastic, up to a height of 1mm, then a change of plastic and then printing the base and the formation of fasteners. There was a search of options for latches and clamps, but in the end we stopped at just such a lock as in the photo below.

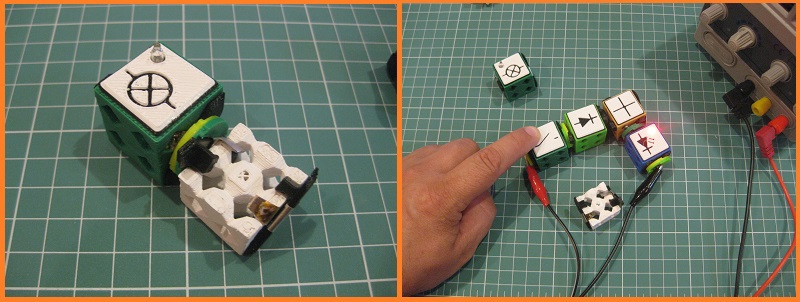
Since we remembered that our readers asked to provide for the possibility to place radio components or, for example, whole electronic modules and controllers, then we began to develop the principle of connecting the cubotronic units together to form electrical contact.
Since the panels with the details were already there, then we got simple cubes, but the idea of creating the game “Circuitry” was born with radio elements, although we think that those who are interested can print these panels themselves and show the basics of circuit design to children.
As a result, three variants of electrical connection were developed:
- purely tin, due to symmetrically located contacts cut from a thin tin from a can
- magnetic, due to a spacer of a magnet placed in a special case
- mechanical, due to the block spacer and electrical contact inserted into the lock of a conventional block

The first is extremely simple to manufacture, but also very fragile, because Tin constantly unbent. On the contrary, with magnetic connection everything was much better, and even very good, everything is very technologically, but ... First you need to buy 12x2 neodymium magnets, and secondly the magnets did not provide exact multiplicity of the obtained circuit so that you can make large circuits with intersection. But most importantly, the scheme did not dock with other structures from cubes, i.e. it was necessary to think about the connection providing the multiplicity of the collected scheme.
On the basis of all this, and the new portion of the read literature of the USSR times about children's radio designers and its use in radio circles, a version was developed that is fully printed on a 3D printer . Those. the owner of the 3D printer can, as necessary, form the cubes he needs and form sets of constructors. This design is convenient for circles, because Well-assembled schemes can be disassembled, so that the details can be used by other circles, but simply can be reprinted.
The scheme uses a thin tin from a can. The tin is cut into strips 5 mm wide. The length of the strips for the contacts of the cubes is 50 mm, and for the spacers 35 mm. For each spacer you need two strips. These strips are placed on each other at right angles. The junction of the strips is soldered. Then the petals are bent in different directions and this design is placed inside the spacer, and the ends of the strips are bent into holes on each side.

Also, pay attention to the photo, through the holes in the spacers it is convenient to make measurements on the already assembled scheme. In the first blocks this was not, but because All electrical switching is removed and hidden under the plastic, then we have provided this moment.
The assembly of the base unit contact is shown in a small video. There you can see in detail the process of turning a constructor block into a radio constructor block.
You can also download all these files from our website:
STL electrical contacts
STL Russian alphabet
Stl english alphabet
STL domino and dice panels
Stl numbers
As the collections of the panels are replenished, we will also lay them out for free access for everyone.
Material provided Master DIY Kit.
Kubotronik received extensions in the form of "decorative panels". Initially, these were cubes to use as a building element in children's games or, for example, to make puzzles out of it.
')
The panels allow you to use the Kubotronika base unit as a carrier for interchangeable panels, and the panels can be changed using the developed mounting system or connected to electrical circuits.
The following sets of panels have already been developed:
- Russian alphabet
- English alphabet
- panels for dominoes or dice
- numbers for the bill
- various radio and electronic components
The developed and inherent principle of the formation of the pattern allows you to apply clear contrasting patterns that are well read even at a distance. Those. if the cube is lying on the floor, then from the height of the human height of an adult person it is clearly seen that on the upper face.
By the way, a collection of the same type, you can print in different colors. For example, the vowels are red, and the consonants are printed in blue. These cubes can also be used as an alphabet, and if you decorate all 6 faces of the cubes with these panels, they turn into dice. The rules of games with letters, by the construction of words, on the Internet are many, and the blocks of Kubotronik will allow you to form the necessary configuration of chips for playing with children.
Panels are made of multicolored contrasting plastics. Dark plastic forms the base, and light plastic top panel is 1 mm thick. Panels are printed without supports upside down. Those. at the beginning there is a printing with light plastic, up to a height of 1mm, then a change of plastic and then printing the base and the formation of fasteners. There was a search of options for latches and clamps, but in the end we stopped at just such a lock as in the photo below.
Since we remembered that our readers asked to provide for the possibility to place radio components or, for example, whole electronic modules and controllers, then we began to develop the principle of connecting the cubotronic units together to form electrical contact.
Since the panels with the details were already there, then we got simple cubes, but the idea of creating the game “Circuitry” was born with radio elements, although we think that those who are interested can print these panels themselves and show the basics of circuit design to children.
As a result, three variants of electrical connection were developed:
- purely tin, due to symmetrically located contacts cut from a thin tin from a can
- magnetic, due to a spacer of a magnet placed in a special case
- mechanical, due to the block spacer and electrical contact inserted into the lock of a conventional block
The first is extremely simple to manufacture, but also very fragile, because Tin constantly unbent. On the contrary, with magnetic connection everything was much better, and even very good, everything is very technologically, but ... First you need to buy 12x2 neodymium magnets, and secondly the magnets did not provide exact multiplicity of the obtained circuit so that you can make large circuits with intersection. But most importantly, the scheme did not dock with other structures from cubes, i.e. it was necessary to think about the connection providing the multiplicity of the collected scheme.
On the basis of all this, and the new portion of the read literature of the USSR times about children's radio designers and its use in radio circles, a version was developed that is fully printed on a 3D printer . Those. the owner of the 3D printer can, as necessary, form the cubes he needs and form sets of constructors. This design is convenient for circles, because Well-assembled schemes can be disassembled, so that the details can be used by other circles, but simply can be reprinted.
The scheme uses a thin tin from a can. The tin is cut into strips 5 mm wide. The length of the strips for the contacts of the cubes is 50 mm, and for the spacers 35 mm. For each spacer you need two strips. These strips are placed on each other at right angles. The junction of the strips is soldered. Then the petals are bent in different directions and this design is placed inside the spacer, and the ends of the strips are bent into holes on each side.
Also, pay attention to the photo, through the holes in the spacers it is convenient to make measurements on the already assembled scheme. In the first blocks this was not, but because All electrical switching is removed and hidden under the plastic, then we have provided this moment.
The assembly of the base unit contact is shown in a small video. There you can see in detail the process of turning a constructor block into a radio constructor block.
You can also download all these files from our website:
STL electrical contacts
STL Russian alphabet
Stl english alphabet
STL domino and dice panels
Stl numbers
As the collections of the panels are replenished, we will also lay them out for free access for everyone.
Material provided Master DIY Kit.
Source: https://habr.com/ru/post/365679/
All Articles