Heating a country house on arduino with data transfer to the internet
I would like to present another example of using Arduino in real tasks. Here I will present the most simple, but really working project of adjusting the heating of the house with the help of electric boiler based on Arduino. I very much hope that this article will help someone to drop fears and try to independently use their hands for their intended purpose, it is very cool to train hands, brains and gives a rare feeling of satisfaction with creating something interesting. Having started working with this controller, I am still in some confusion about the possibilities that open up when using it.
Why, actually, Arduino? Simplicity, accessibility, a lot of documentation and libraries. Like many, probably, I have been watching the Arduino for a long time, since childhood I have loved all kinds of batteries and motors, and here a new level, a full-fledged programming language and a lot of I / O capabilities. When our “most likely economic partners” began to issue it, its prices fell to an acceptable level. As a result, I bought the start of the whale and, having plenty of LEDs and indicators, had the desire to apply it somewhere around the house.

')
My grandmother lives in a village house near Moscow, there is neither normal water supply, nor gas, nor heating, and the solution of all these tasks requires large capital investments or the application of hands. Here there was a place where you can fully use the arduino, there is where to turn. The biggest plus of a country house is that it is traditionally not big and very simple. Similarly, mine, a typical house of a peasant family of the mid-20th century, is a log cabin with one large room and kitchen. There are no other heated rooms, which is a plus for us, it is enough to maintain and control the temperature in a single room.
Heating equipment. Traditionally, the house was stove heating. One “German” stove in the room (heats at the expense of a long winding pipe), the second “Russian” in the kitchen (heats at the expense of the large size of the firebox itself). If someone is in the cinema performances, that the furnace is cool and also natural and romantic, then I take the liberty to assume that these people have never lived in a house with stove heating. In fact, it is not very comfortable, inconvenient and flammable. Therefore, about 5 years ago, a project on distributing the simplest two-pipe heating with a gas boiler was ordered and carried out. It was supposed to feed the boiler from gas cylinders.
Subsequently, it was decided to upgrade the system, add a pump to force the recirculation of the coolant and a small 2-watt electric boiler, so as not to suffer from gas ignition, when it is not very cold. All automation was reduced to the presence of a large knife switch on the wall, when it became chilly, it was turned on, and when it was hot it was turned off. Two kilowatts was enough somewhere up to a temperature of 0 ° C, then I had to light a gas or a furnace, which was extremely inconvenient.

Before changing anything, it was naturally decided to calculate whether this idea had any sense at all. Having calculated by experience gas consumption from cylinders, having estimated the expected consumption of diesel fuel, I came to the conclusion that in such types of heating there is no point if there is enough electricity. For the price, the cylinders came out somewhere 6-7 thousand per month, diesel fuel, if you buy something pale or summer in winter, you can save up to an expense of 5 thousand per month, while on pure electricity it was 7 thousand. Let's add the cost of the boiler, constant hauling cylinders and the smell of salyara, and it becomes clear that electricity is much simpler and no more expensive. Of course, there are pellet burners that are fashionable lately, but they didn’t suit me, because they don’t know how to ignite themselves and therefore have a minimum power, though not small at all (about 5 kW), which 90% of the time simply have nowhere to go, and require at least 2 times a week to fill the fuel, which sometimes there is no one. And the cost of the boilers themselves is an order of magnitude greater than the previous options, so they are suitable for large houses where large capacity and high costs are needed, and not in my case.
I tried to estimate the required power based on gas consumption and other estimates, it turned out that 4-5 kW is needed, with a margin of 6. Market review showed that there is a model of electric boiler, similar to the one already installed, but with 3 heating elements of 2 kW each. Moreover, it was sold without control, which was even more convenient and cheaper for me. In general, the boiler itself is an extremely simple design, a metal cylinder with inlet and outlet pipes, a bolted lid on top, in which the heating elements are fixed. In addition, 2 sensors are embedded into the case, a resistive temperature sensor and a sensor that closes when overheated, both from the auto cooling system. Now there was a question about electricity. My situation was simplified by the fact that there was a workshop next to the house, to which 3 phases were brought (380 people are). Naturally, there was a temptation to feed each heating element from its phase, so a specialized 4-wire cable in metal braid for underground installation was purchased and laid into the boiler room. The cable is inserted into the shield with a series-connected RCD and a block of 3 machines of 10A each. Then the cable went directly to the shield with the arduino and from there to the electric boat.

It is clear that we will manage the heating elements with arduino, the question is how? Adhering to the principle - the simpler, the more reliable, we will simply turn them on or off with the help of a relay without any transitional options. Climbing the aliexpress, I found a relay block for Arduino, which can control 5 power lines at once. One problem, the maximum current that these relays can withstand - 10A, and I get 2kW / 220V ~ 9A. That is almost the maximum, and it is desirable to have a stock of at least 25%. However, I decided to take a chance. Relays honestly lasted almost a week, then just started to melt. We had to decide something quickly, because it was winter and the heating could not be stopped. Therefore, 30A relays were bought, but with 12V windings. Therefore, I quickly soldered each relay through a transistor to turn them on from 5V Arduino.
The scheme worked well for almost a month, and then I noticed that it was somehow too hot at home. The test showed that one relay “sunk” in the on position. I knocked on it - it worked again, but it lasted for several days. I changed it in the hope that it was a marriage, but a week later the same thing happened with the 2nd relay. Putting the last spare, went back to Ali. Specialized relays for arduino at 40A were found there! That should be enough for sure, I thought. A couple of weeks of waiting, and here again I throw out the transistors and put new relays with the ready-made strapping and indication. The joy was short, after 2-3 weeks the stuck relay was again. He began to study the issue, it turns out, in order to reduce the load on the relay and remove the arcing of the contacts, the relay must be turned on not at random, but at the moment when the voltage sinusoid passes through 0. Well, in theory this can be done with the help of our own arduino, only on through sharing all three phases and watching the tension. The problem is that the relay has some response time and, in fact, we still need to install it empirically. In general, the task is not so simple.
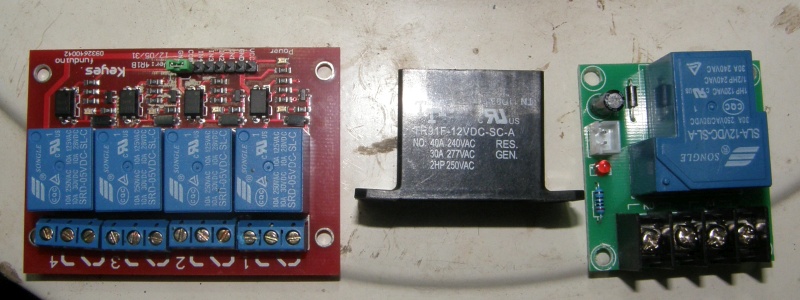
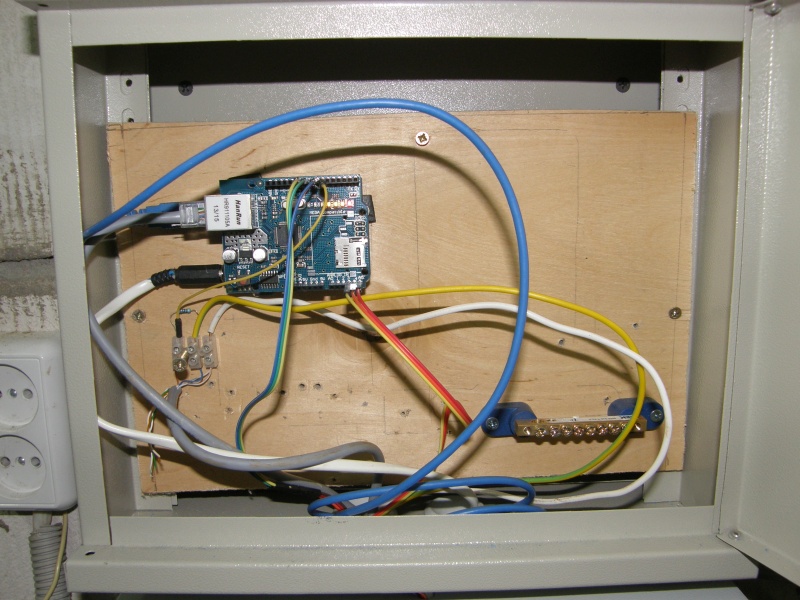
And here I come across the so-called Solid State Relay, in other words, an electrical circuit assembled on a powerful thyristor, in a housing similar to a conventional relay. From its advantages - there is no mechanics, nothing will stick. Does not create a powerful EM-interference, which is important for ethernet'a, about which below. They already contain a circuit that turns the relay on and off when the zero passes. The relay has a power indicator. Well, they are also silent, although in our case this is not so true. After studying the instructions and specifications, SSR-40DA was ordered, which in Russian means solid-state relays with a constant control current of 3-5 V and a load current of up to 40A. At the same time, I decided to move away from the “simpler-better” principle a little and make another control of the current in heating elements. This would let you know about a burned out heating element / relay or a power outage at one of the phases. I added a current control module for 20A to the order, although they looked so flimsy for such a current (the 2.5 square cable did not even climb into their clamp). When the relay and current measurement modules arrived, it turned out that the relay was rather bulky, so it was decided to transfer everything related to the high-voltage part to the new box, and leave the arduino in the old one.
After the first experiments, it turned out that I had completely forgotten that these relays, since they are assembled on thyristors, are rather hot. After a day of operation, the relays heated up so that I could not tolerate holding a finger on them, that is, degrees 60C, and this is already close to the critical 80C. I climbed again on Ali, figuring out which radiators to adapt, and then I learned that there are regular radiators for these SSRs! At the time of installation, the radiators also found that one current control module itself does not let the current through anymore, and a burnt track is visible on the side of the board. Another module also did not cause confidence, I decided to remove them all. In this form, they are still rather weak and dangerous, and there is not much sense from them. The problem of disconnecting the phases or heating elements has so far been postponed as not very relevant, for 3 years neither the first nor the second has happened more than once.

Immediately in the examples was found a piece that allowed to control the average power, having a binary control - on and off. The meaning is simple, we take a certain window of time, say, 1 minute, and in the cycle we turn on or turn off the load depending on the elapsed time. That is, if we need 50% of the power, then turn on the load in the first 30 seconds and turn off in the last 30, then the cycle repeats. Quickly redid it for 3 independent relays, if the power is more than 33%, then I turn on the second relay, if more than 66%, then the third one, and the first one I turn it on and off according to the basic algorithm. Now the main question arises, and by what algorithm to choose the power? Being a programmer by profession, I first decided that the problem was rather simple, cold — add, warm — more than enough, and tried to figure it all out in my mind.
It turned out not so easy. It was useful to watch how they do it in the systems sold, it turned out that everything is as simple as possible, as in an iron - + 1C = off, -1 = on. But then we get almost 4C vibrations due to the inertia of the system! This is too rough, for we can get data to the nearest tenth of a degree. Also I looked at the work algorithms using the outside air temperature, they turned out to be quite simple and worked on ready-made tables that were pre-wired and simply changed depending on the heat loss at home. Digging deeper and deeper, I got to the industrial plants, they used PID-regulator algorithms everywhere. And, oh glory of popularity, it turns out, the Arduino has a free PID library!
A few words about what PID is for our case. The meaning of the algorithm is that we inform it of the required value of a certain parameter (temperature inside the house) and in the cycle we transmit the current value, and it gives us the necessary effect (power that must be supplied to the boiler). Without going into details of the mathematical model, how does it work from the point of view of the programmer. So, we have the temperature in the room, let it be 20C, the desired temperature is 22C, and we give them to our PID algorithm.
The algorithm itself has 3 independent parts, named P, I and D. The first part works extremely simply, it looks at the difference between the desired temperature and the current temperature. That is, the colder, the more power the algorithm will give us. It seems that this is enough, but after all, we have constant heat losses at home, that is, in order to keep the desired temperature, we must always be given some kind of power. That is, even if the temperature in the room is equal to the set one, you cannot turn off the boiler, but you must somehow look for some power equal to the heat loss. A heat loss varies depending on the temperature outside. This is what the second part is doing under the name I. The algorithm is trying to choose the power at which our temperature will be constant. And it seems like this is exactly everything, but no.
The fact is that the boiler itself, the heat carrier, and even more so the house have a very large inertness. And if you cut the boiler by 100%, then you need to reduce the power much earlier than the temperature reaches the desired one; otherwise, even with a complete shutdown, we will still have time to overheat the room by 2 degrees. The same is true when the temperature drops, you need to add power even before as the temperature reached right. This is exactly what the third part of the D algorithm does. Well, now, of course, everything, it remains only to understand which part to give what weight, but the multipliers of each part are involved, which must be selected. By the way, the selection of these factors is a separate and rather complex mathematical task; I selected them “by eye”, recalling what was said above. At first he put all the zeros except P, and picked it up so that the excitation itself did not start. Then I added, and at the end, D.
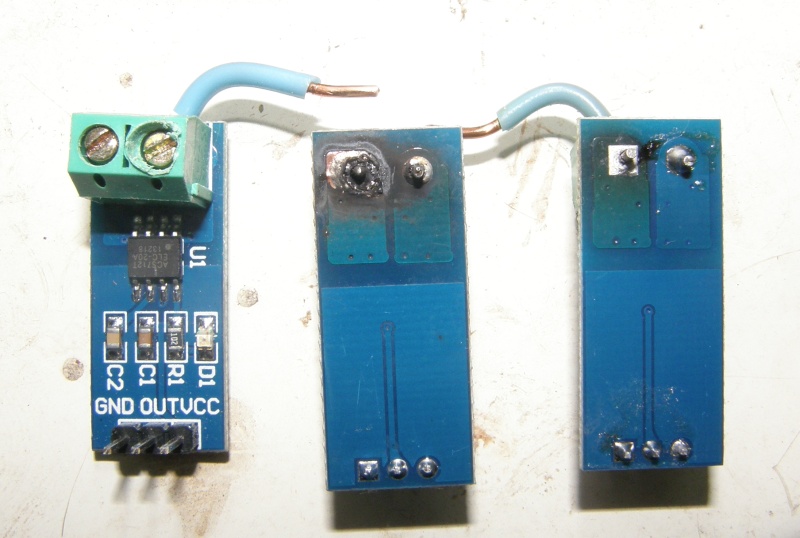
To measure the temperature, digital temperature sensors based on DS18B20 were ordered on the same magic site. The sensor itself is just wonderful, it does not need to either calibrate or somehow tune it, while it can measure the temperature with a given accuracy, and communicates with the Arduino using the OneWier protocol. That is, you can hang an almost unlimited number of sensors on 3 wires up to 50 meters long. If desired, they can not even feed, and work only on the 2nd wire (in fact, they are powered, but from the wire with the signal), but they work slower. In my case, I ordered the sensors in a sealed enclosure, and I connected them with a normal twisted pair. I put 3 sensors, one in the boiler room, one in the house, in the room, and one in the attic under the ceiling, the attic is not heated at all and there I get the temperature outside.

- Fee arduino. I used UNO r3. Price about 350 p.
- Ethernet Shield, about 500 p.
- Twisted pair (depending on how much is needed), the bay at 305m will cost about 4 thousand.
- Temperature sensors, about 200 r.
- Power supply for 110-240 - 12V 2A, 420 p.
- LM7805 stabilizer, somewhere around 20 p.
- Relay SSR-40DA 3 pcs. 330 p.
- Radiators for relays of 200 p.
That is, apart from the twisted pair and the boiler itself, the whole project fits into 4 thousand rubles.

We add the data in the database and show.
But all this, of course, is good, but not to stand constantly with the computer next to the boiler, still I would like to know about what is happening at home, remotely via the Internet. I have long had the most unpretentious VPS server from majordomo for anything. He created a database on MySQL to store temperature data.

Now we need to somehow put the data from the arduino into this database. For this, of course, you will need at least to connect the arduino with the Internet, it is not easy, but very simple. For this we need the Ethernet Shield and its library. An unpretentious router with a “whistle”, first from megafon, and then from yota, has long been installed in the house. We pull the standard twisted pair to the router and add data transfer to the program. The transfer goes through a page call in PHP with parameters - data. Create a page called temp.php on our Internet server
After that, we have data on the temperature and power of the boiler, in order not to climb into the database each time, but to see the latest data, wrote a “temporary” script for php, but as you know, there is nothing more permanent than temporary things, so they I use.
gettemp.php

Of course, this is, in principle, a minimum, which, however, allows you to make a full-fledged and quite convenient control of heating in a small house. Although with some alterations it can be used in multi-room and in general buildings of any complexity, arduino can do a lot, if not everything. In this project I would like to add in the future:
Text programs for Arduino:
Story
Why, actually, Arduino? Simplicity, accessibility, a lot of documentation and libraries. Like many, probably, I have been watching the Arduino for a long time, since childhood I have loved all kinds of batteries and motors, and here a new level, a full-fledged programming language and a lot of I / O capabilities. When our “most likely economic partners” began to issue it, its prices fell to an acceptable level. As a result, I bought the start of the whale and, having plenty of LEDs and indicators, had the desire to apply it somewhere around the house.
')
What is heated
My grandmother lives in a village house near Moscow, there is neither normal water supply, nor gas, nor heating, and the solution of all these tasks requires large capital investments or the application of hands. Here there was a place where you can fully use the arduino, there is where to turn. The biggest plus of a country house is that it is traditionally not big and very simple. Similarly, mine, a typical house of a peasant family of the mid-20th century, is a log cabin with one large room and kitchen. There are no other heated rooms, which is a plus for us, it is enough to maintain and control the temperature in a single room.
Heating
Heating equipment. Traditionally, the house was stove heating. One “German” stove in the room (heats at the expense of a long winding pipe), the second “Russian” in the kitchen (heats at the expense of the large size of the firebox itself). If someone is in the cinema performances, that the furnace is cool and also natural and romantic, then I take the liberty to assume that these people have never lived in a house with stove heating. In fact, it is not very comfortable, inconvenient and flammable. Therefore, about 5 years ago, a project on distributing the simplest two-pipe heating with a gas boiler was ordered and carried out. It was supposed to feed the boiler from gas cylinders.
Subsequently, it was decided to upgrade the system, add a pump to force the recirculation of the coolant and a small 2-watt electric boiler, so as not to suffer from gas ignition, when it is not very cold. All automation was reduced to the presence of a large knife switch on the wall, when it became chilly, it was turned on, and when it was hot it was turned off. Two kilowatts was enough somewhere up to a temperature of 0 ° C, then I had to light a gas or a furnace, which was extremely inconvenient.
Economic expediency
Before changing anything, it was naturally decided to calculate whether this idea had any sense at all. Having calculated by experience gas consumption from cylinders, having estimated the expected consumption of diesel fuel, I came to the conclusion that in such types of heating there is no point if there is enough electricity. For the price, the cylinders came out somewhere 6-7 thousand per month, diesel fuel, if you buy something pale or summer in winter, you can save up to an expense of 5 thousand per month, while on pure electricity it was 7 thousand. Let's add the cost of the boiler, constant hauling cylinders and the smell of salyara, and it becomes clear that electricity is much simpler and no more expensive. Of course, there are pellet burners that are fashionable lately, but they didn’t suit me, because they don’t know how to ignite themselves and therefore have a minimum power, though not small at all (about 5 kW), which 90% of the time simply have nowhere to go, and require at least 2 times a week to fill the fuel, which sometimes there is no one. And the cost of the boilers themselves is an order of magnitude greater than the previous options, so they are suitable for large houses where large capacity and high costs are needed, and not in my case.
Heavy hardware
I tried to estimate the required power based on gas consumption and other estimates, it turned out that 4-5 kW is needed, with a margin of 6. Market review showed that there is a model of electric boiler, similar to the one already installed, but with 3 heating elements of 2 kW each. Moreover, it was sold without control, which was even more convenient and cheaper for me. In general, the boiler itself is an extremely simple design, a metal cylinder with inlet and outlet pipes, a bolted lid on top, in which the heating elements are fixed. In addition, 2 sensors are embedded into the case, a resistive temperature sensor and a sensor that closes when overheated, both from the auto cooling system. Now there was a question about electricity. My situation was simplified by the fact that there was a workshop next to the house, to which 3 phases were brought (380 people are). Naturally, there was a temptation to feed each heating element from its phase, so a specialized 4-wire cable in metal braid for underground installation was purchased and laid into the boiler room. The cable is inserted into the shield with a series-connected RCD and a block of 3 machines of 10A each. Then the cable went directly to the shield with the arduino and from there to the electric boat.
Light hardware
It is clear that we will manage the heating elements with arduino, the question is how? Adhering to the principle - the simpler, the more reliable, we will simply turn them on or off with the help of a relay without any transitional options. Climbing the aliexpress, I found a relay block for Arduino, which can control 5 power lines at once. One problem, the maximum current that these relays can withstand - 10A, and I get 2kW / 220V ~ 9A. That is almost the maximum, and it is desirable to have a stock of at least 25%. However, I decided to take a chance. Relays honestly lasted almost a week, then just started to melt. We had to decide something quickly, because it was winter and the heating could not be stopped. Therefore, 30A relays were bought, but with 12V windings. Therefore, I quickly soldered each relay through a transistor to turn them on from 5V Arduino.
The scheme worked well for almost a month, and then I noticed that it was somehow too hot at home. The test showed that one relay “sunk” in the on position. I knocked on it - it worked again, but it lasted for several days. I changed it in the hope that it was a marriage, but a week later the same thing happened with the 2nd relay. Putting the last spare, went back to Ali. Specialized relays for arduino at 40A were found there! That should be enough for sure, I thought. A couple of weeks of waiting, and here again I throw out the transistors and put new relays with the ready-made strapping and indication. The joy was short, after 2-3 weeks the stuck relay was again. He began to study the issue, it turns out, in order to reduce the load on the relay and remove the arcing of the contacts, the relay must be turned on not at random, but at the moment when the voltage sinusoid passes through 0. Well, in theory this can be done with the help of our own arduino, only on through sharing all three phases and watching the tension. The problem is that the relay has some response time and, in fact, we still need to install it empirically. In general, the task is not so simple.
And here I come across the so-called Solid State Relay, in other words, an electrical circuit assembled on a powerful thyristor, in a housing similar to a conventional relay. From its advantages - there is no mechanics, nothing will stick. Does not create a powerful EM-interference, which is important for ethernet'a, about which below. They already contain a circuit that turns the relay on and off when the zero passes. The relay has a power indicator. Well, they are also silent, although in our case this is not so true. After studying the instructions and specifications, SSR-40DA was ordered, which in Russian means solid-state relays with a constant control current of 3-5 V and a load current of up to 40A. At the same time, I decided to move away from the “simpler-better” principle a little and make another control of the current in heating elements. This would let you know about a burned out heating element / relay or a power outage at one of the phases. I added a current control module for 20A to the order, although they looked so flimsy for such a current (the 2.5 square cable did not even climb into their clamp). When the relay and current measurement modules arrived, it turned out that the relay was rather bulky, so it was decided to transfer everything related to the high-voltage part to the new box, and leave the arduino in the old one.
After the first experiments, it turned out that I had completely forgotten that these relays, since they are assembled on thyristors, are rather hot. After a day of operation, the relays heated up so that I could not tolerate holding a finger on them, that is, degrees 60C, and this is already close to the critical 80C. I climbed again on Ali, figuring out which radiators to adapt, and then I learned that there are regular radiators for these SSRs! At the time of installation, the radiators also found that one current control module itself does not let the current through anymore, and a burnt track is visible on the side of the board. Another module also did not cause confidence, I decided to remove them all. In this form, they are still rather weak and dangerous, and there is not much sense from them. The problem of disconnecting the phases or heating elements has so far been postponed as not very relevant, for 3 years neither the first nor the second has happened more than once.
Now about the software
Arduino
Immediately in the examples was found a piece that allowed to control the average power, having a binary control - on and off. The meaning is simple, we take a certain window of time, say, 1 minute, and in the cycle we turn on or turn off the load depending on the elapsed time. That is, if we need 50% of the power, then turn on the load in the first 30 seconds and turn off in the last 30, then the cycle repeats. Quickly redid it for 3 independent relays, if the power is more than 33%, then I turn on the second relay, if more than 66%, then the third one, and the first one I turn it on and off according to the basic algorithm. Now the main question arises, and by what algorithm to choose the power? Being a programmer by profession, I first decided that the problem was rather simple, cold — add, warm — more than enough, and tried to figure it all out in my mind.
It turned out not so easy. It was useful to watch how they do it in the systems sold, it turned out that everything is as simple as possible, as in an iron - + 1C = off, -1 = on. But then we get almost 4C vibrations due to the inertia of the system! This is too rough, for we can get data to the nearest tenth of a degree. Also I looked at the work algorithms using the outside air temperature, they turned out to be quite simple and worked on ready-made tables that were pre-wired and simply changed depending on the heat loss at home. Digging deeper and deeper, I got to the industrial plants, they used PID-regulator algorithms everywhere. And, oh glory of popularity, it turns out, the Arduino has a free PID library!
A few words about what PID is for our case. The meaning of the algorithm is that we inform it of the required value of a certain parameter (temperature inside the house) and in the cycle we transmit the current value, and it gives us the necessary effect (power that must be supplied to the boiler). Without going into details of the mathematical model, how does it work from the point of view of the programmer. So, we have the temperature in the room, let it be 20C, the desired temperature is 22C, and we give them to our PID algorithm.
The algorithm itself has 3 independent parts, named P, I and D. The first part works extremely simply, it looks at the difference between the desired temperature and the current temperature. That is, the colder, the more power the algorithm will give us. It seems that this is enough, but after all, we have constant heat losses at home, that is, in order to keep the desired temperature, we must always be given some kind of power. That is, even if the temperature in the room is equal to the set one, you cannot turn off the boiler, but you must somehow look for some power equal to the heat loss. A heat loss varies depending on the temperature outside. This is what the second part is doing under the name I. The algorithm is trying to choose the power at which our temperature will be constant. And it seems like this is exactly everything, but no.
The fact is that the boiler itself, the heat carrier, and even more so the house have a very large inertness. And if you cut the boiler by 100%, then you need to reduce the power much earlier than the temperature reaches the desired one; otherwise, even with a complete shutdown, we will still have time to overheat the room by 2 degrees. The same is true when the temperature drops, you need to add power even before as the temperature reached right. This is exactly what the third part of the D algorithm does. Well, now, of course, everything, it remains only to understand which part to give what weight, but the multipliers of each part are involved, which must be selected. By the way, the selection of these factors is a separate and rather complex mathematical task; I selected them “by eye”, recalling what was said above. At first he put all the zeros except P, and picked it up so that the excitation itself did not start. Then I added, and at the end, D.
Measure temperature
To measure the temperature, digital temperature sensors based on DS18B20 were ordered on the same magic site. The sensor itself is just wonderful, it does not need to either calibrate or somehow tune it, while it can measure the temperature with a given accuracy, and communicates with the Arduino using the OneWier protocol. That is, you can hang an almost unlimited number of sensors on 3 wires up to 50 meters long. If desired, they can not even feed, and work only on the 2nd wire (in fact, they are powered, but from the wire with the signal), but they work slower. In my case, I ordered the sensors in a sealed enclosure, and I connected them with a normal twisted pair. I put 3 sensors, one in the boiler room, one in the house, in the room, and one in the attic under the ceiling, the attic is not heated at all and there I get the temperature outside.
Iron Purchased List
- Fee arduino. I used UNO r3. Price about 350 p.
- Ethernet Shield, about 500 p.
- Twisted pair (depending on how much is needed), the bay at 305m will cost about 4 thousand.
- Temperature sensors, about 200 r.
- Power supply for 110-240 - 12V 2A, 420 p.
- LM7805 stabilizer, somewhere around 20 p.
- Relay SSR-40DA 3 pcs. 330 p.
- Radiators for relays of 200 p.
That is, apart from the twisted pair and the boiler itself, the whole project fits into 4 thousand rubles.
We add the data in the database and show.
But all this, of course, is good, but not to stand constantly with the computer next to the boiler, still I would like to know about what is happening at home, remotely via the Internet. I have long had the most unpretentious VPS server from majordomo for anything. He created a database on MySQL to store temperature data.
Now we need to somehow put the data from the arduino into this database. For this, of course, you will need at least to connect the arduino with the Internet, it is not easy, but very simple. For this we need the Ethernet Shield and its library. An unpretentious router with a “whistle”, first from megafon, and then from yota, has long been installed in the house. We pull the standard twisted pair to the router and add data transfer to the program. The transfer goes through a page call in PHP with parameters - data. Create a page called temp.php on our Internet server
<?php $dbhost = 'localhost'; $dbuser = '***'; $dbpass = '***'; $dbname = 'nikolaarduino'; $client_ip = $_SERVER['REMOTE_ADDR']; $temp1 = $_GET["t1"]; $temp2 = $_GET["t2"]; $temp3 = $_GET["t3"]; $power = $_GET["p"]; $connect = mysql_connect($dbhost, $dbuser, $dbpass); if(! $connect ) { die('Could not connect: ' . mysql_error()); } mysql_select_db ($dbname, $connect); $sql = "INSERT INTO Temp (datetime, temp1, temp2, temp3, power, ip) VALUES (Now(), '$temp1', '$temp2', '$temp3', '$power', '$client_ip')"; if(!mysql_query($sql)) {echo '<p><b>Data upload error!</b></p>';} else {echo '<p><b>OK</b></p>';} mysql_close($connect); ?> After that, we have data on the temperature and power of the boiler, in order not to climb into the database each time, but to see the latest data, wrote a “temporary” script for php, but as you know, there is nothing more permanent than temporary things, so they I use.
gettemp.php
<?php $dbhost = 'localhost'; $dbuser = '***'; $dbpass = '***'; $dbname = 'nikolaarduino'; $client_ip = $_SERVER['REMOTE_ADDR']; $connect = mysql_connect($dbhost, $dbuser, $dbpass); if(! $connect ) { die('Could not connect: ' . mysql_error()); } mysql_select_db ($dbname, $connect); $query = 'SELECT * FROM Temp WHERE id=(SELECT MAX(ID) FROM Temp)'; $result = mysql_query($query) or die('Error get data: ' . mysql_error()); echo "<table style='text-align: left; width: 100%;' border='1' cellpadding='2' cellspacing='2'>\n"; while ($line = mysql_fetch_array($result, MYSQL_NUM)) { echo "<tr align='center'><td colspan='2' rowspan='1'>$line[1]</td></tr>"; echo "<tr align='center'><td>TempIN = $line[2]</td><td> TempOUT = $line[3]</td></tr>\n"; echo "<tr align='center'><td colspan='2' rowspan='1'>TempKotel = $line[4]</td></tr>\n"; echo "<tr align='center'><td colspan='2' rowspan='1'>Power = $line[5]</td></tr>\n"; } echo "</table>\n"; mysql_free_result($result); mysql_close($connect); ?> What would you like to add in the future
Of course, this is, in principle, a minimum, which, however, allows you to make a full-fledged and quite convenient control of heating in a small house. Although with some alterations it can be used in multi-room and in general buildings of any complexity, arduino can do a lot, if not everything. In this project I would like to add in the future:
- Temperature regulator. Although practice has shown that 22.5 is quite an optimal value and, in principle, does not require adjustment. Again, I would like to make a regulator remotely from the main arduino, but for this you need either a complex scheme or another arduino. In general, there is something to think about.
- I would like the opportunity not only to read the temperature, but also to change the PID parameters on the fly. It is possible to make a separate “initial warm-up” mode, otherwise parameter I will be normalized for a long time after each restart of the program.
- I want a simple application for android, so that the phone does not poke into a small browser. This is the simplest and already in the process.
- Still, connect the coolant temperature sensor and transmit its data, like other temperature data.
- Emergency alarm. That is, automatically determine the voltage loss on the lines, the failure of the relay or heating elements.
- Make a “carousel”, change the destination of heating elements. Otherwise, it turns out that one heating element always works more than others, and it should in theory be refused first. You just need to change the PINs in the program from time to time. It seems simple, but it does not reach the hands to add.
Text programs for Arduino:
#include <OneWire.h> #include <DallasTemperature.h> #include <PID_v1.h> #include <DHT.h> #include <Ethernet.h> #include <SPI.h> // OneWire DS18S20, DS18B20, DS1822 Temperature Example // // http://www.pjrc.com/teensy/td_libs_OneWire.html // // The DallasTemperature library can do all this work for you! // http://milesburton.com/Dallas_Temperature_Control_Library OneWire ds(6); // on pin 10 (a 4.7K resistor is necessary) DallasTemperature sensors(&ds); boolean waithTemp = false; int TEMPERATURE_PRECISION = 10; int lamp1 = 7; int lamp2 = 8; int lamp3 = 9; DeviceAddress IntThermometer = { 0x28, 0x8E, 0xF4, 0x28, 0x05, 0x00, 0x00, 0x07 }; DeviceAddress OutThermometer = { 0x28, 0x65, 0x15, 0x32, 0x05, 0x00, 0x00, 0xE2 }; DeviceAddress KatThermometer = { 0x28, 0x61, 0x43, 0x28, 0x05, 0x00, 0x00, 0x14 }; byte addr[8]; unsigned long StartTime = 0; unsigned long WorkWindow = 60000; // 10min unsigned long WorkTime, TenTime; float maxData = 100; float celsius, temp; double Setpoint, Input, Output; int ThermometerCount; DeviceAddress Thermometer[100]; PID myPID(&Input, &Output, &Setpoint, 10, 0.1, 5, DIRECT); //0.000006 0.03 40 double targetTemp = 22.5; byte mac[] = { 0xE0, 0x69, 0x95, 0x72, 0x65, 0xE8 }; byte ip[] = { 192, 168, 1, 100 }; byte server[] = { ?, ?, ?, ? }; EthernetClient client; byte webskipcount = 10; byte webcount = 0; void setup(void) { Serial.begin(9600); //Ethernet.begin(mac, ip); Ethernet.begin(mac); sensors.begin(); pinMode(lamp1, OUTPUT); pinMode(lamp2, OUTPUT); pinMode(lamp3, OUTPUT); Setpoint = targetTemp; myPID.SetOutputLimits(0, maxData); myPID.SetMode(AUTOMATIC); celsius = targetTemp; StartTime = millis(); } long filter(long x, long Nb, long k) { static long y = 0, z = 0; z += (x - y); return y = (Nb * z) >> k; }; void loop(void) { byte i; byte type_s; byte data[12]; long Out; if (millis() < StartTime) { StartTime = millis(); } WorkTime = millis() - StartTime; if (WorkTime > WorkWindow) { WorkTime = WorkTime - WorkWindow; StartTime = millis() + WorkTime; } //Serial.println("cycle"); sensors.requestTemperatures(); celsius = sensors.getTempC(IntThermometer); Input = celsius; if (webcount >= webskipcount) { char buffer[10]; String temperatureS1 = dtostrf(celsius, 2, 2, buffer); String temperatureS2 = dtostrf(sensors.getTempC(OutThermometer), 2, 2, buffer); String temperatureS3 = dtostrf(sensors.getTempC(KatThermometer), 2, 2, buffer); String OutputPowerS = dtostrf(Output, 2, 2, buffer); String msg = "GET /temp.php?t1="+ temperatureS1 + "&t2=" + temperatureS2 + "&t3=" + temperatureS3 + "&p="+OutputPowerS; Serial.println(msg); client.connect(server, 80); client.println(msg); client.stop(); webcount = 0; } else { webcount += 1; } myPID.Compute(); //Serial.print(Input);Serial.print(" ");Serial.print(Output);Serial.print(" ");Serial.println(Setpoint); if (Output > maxData/3*2) { digitalWrite(lamp1, HIGH); digitalWrite(lamp2, HIGH); Out = Output - maxData/3*2; } else if (Output > maxData/3) { digitalWrite(lamp1, HIGH); digitalWrite(lamp2, LOW); Out = Output - maxData/3; } else { digitalWrite(lamp1, LOW); digitalWrite(lamp2, LOW); Out = Output; } TenTime = map(Out, 0, maxData/3, 0, WorkWindow); Serial.print(celsius); Serial.print(" "); Serial.print(sensors.getTempC(OutThermometer)); Serial.print(" "); Serial.print(sensors.getTempC(KatThermometer)); Serial.print(" "); Serial.print(Output); Serial.print(" "); Serial.print(TenTime); Serial.print(" "); Serial.println(WorkTime); if (WorkTime < TenTime) { digitalWrite(lamp3, HIGH); } if (WorkTime > TenTime) { digitalWrite(lamp3, LOW); } } Source: https://habr.com/ru/post/364989/
All Articles