How to create music in FL Studio: interesting tricks
Today I want to talk about what basic techniques are used when creating music in FL Studio. I myself write music and use various tools to process it, including products from the Image-Line company (FL Studio and Deckadance), and I enter its Power Users List (in this list I am the only musician from Russia) . In this topic, I will talk about how to use the layering technique (using the example of percussion parts and vocals), as well as how to prepare the recorded vocals for subsequent processing.
Layering
This technique is often used by music producers. It so happened that music producers in Russia are essentially artists' managers, in the rest of the world producers are people who create music in the so-called sequencers (music programs for creating music). For example, Lady Gaga, even if she can compose songs, cannot create the final product herself, and those producers help her in this. One of the most famous producers who worked with her is RedOne.
')
So, back to the layering. This technique is used to give fullness to any of your instruments, as well as the track as a whole. It is most often used when creating a drum and vocal part. First consider the layering on the example of the drum part.
Layering when creating drums. I write acoustic and electronic music using libraries of pre-recorded samples. Such libraries contain sounds recorded in a professional studio, access to which is not always available to novice musicians and producers. An example of such sounds could be one punch, barrel, clap, percussion drum, and other such things. Such libraries can be easily found in the public domain or on sale on the Internet. They are called “One Shot Samples” or “One Shot Libraries”.
The use of pre-recorded drum loops is also justified. They usually are already complete and ready-made versions of drums and can be broken into pieces (for example, barrels separately, cymbals separately, percussions separately, tambourines separately), and if you put them together, you will get a full-fledged drums part. They are called “Drum Loops” and are in large quantities on the Internet. Among other things, there are many programs with ready-made drum libraries, a vivid example of which are "XLN Audio Addictive Drums", "Spectrasonics StyleRMX", "Native Instruments Machine" and others.
Consider the layering of the main barrels ("kick") in the figure below. In order to get a rich and dense sound of the barrel, I use three different variations of them. Studio dense drum (Studio Kick), a sample of an acoustic drum from the library of ready-made drums (Acoustic Kick) and an electronic generated drum (Electronic Kick).

Each of these barrels has its own sound, but together they begin to sound much denser than individually. When combining different drums, it is necessary to take into account that they may not be combined together, therefore sometimes it is necessary to subject them to equalization. In the figure below, one of the barrels (on the left) has low bass frequencies removed, and it creates a so-called clap or click in the upper frequency range, while the other has an emphasis on low frequencies, and it fills the bass component.

When combining drums made up of “One Shot” samples, you can use programs such as “Native Instruments Battery” or “Image-Line FPC”. There you can set the volume of each instrument, spread them around the panorama. The figure below shows 3 barrels combined in a single cell of the Image-Line FPC programs.

In addition, in the music production often use the layering of ready-made batches of drum loops. In my musical practice, I use both of these approaches, namely: I make up part of the drum part from One Shot samples, and I fill part of them with ready-made drum loops, which I selected from special libraries or programs. In the example below, there are 6 levels of drums highlighted in green, composed by me (3 barrel levels, one cotton, closed plates and metal percussions), as well as 4 levels of finished drum loops painted in blue. Together they make up the full percussion part of the song used in the chorus. This integrated approach allows you to get a more complete drum sound.

Work with vocals
Initial vocal treatment. Consider vocal processing at the initial stage, and then we will talk about vocal layering. Naturally, the first thing vocals need to be recorded. For this, I use the “Edison” plugin built into FL Studio. To record the vocals, you need to select the input channel to which your microphone is connected, and then add the “Edison” plugin to the same channel, set the “NOW” and “IN NEW PROJECT” switches, then press the record button and record your vocals (all in the pictures below).


Do not rush to save vocals, right after it is recorded. First you need to get rid of excess noise, which usually gives your microphone, wires, sound card, as well as sources of sound in the room. To do this, try to keep a little silence after recording the vocals, thereby leaving a small area from which you can count the noise generated during the recording. Then select this site and open the “Clean Up Tool”, as shown in the figure below.

Then the plugin will need to create a so-called "noise map", which it will exclude from your vocals. To do this, click the Acquire noise profile button.

Then close the “Clean Up Tool”, highlight all the vocals you recorded, re-open the “Clean Up Tool” (the areas with the most noise were recorded in green), set the value to “Amount” approximately in the middle and click “Accept”.

Then (in the “Edison” window) you will see and hear that your vocals have visibly cleared.
Now let's look at how to remove too loud consonants “C” and “Z” from your vocals. In production, this process is called “De-essing”. De-essing can be done using plug-ins (for example, “AVOX Sybil” or “Fabfilter Pro-C”), but this process can also be done manually. This is true because many of the de-essing plug-ins still process and thus distort all your vocals, not just the consonants, and you can use the “manual” approach to leave the rest of your recording intact.
To do this, upload your vocals to Edison. Switching to the spectral view (as shown below):

... you will see the loud sounds of "C" and "H" (marked in the figure below):

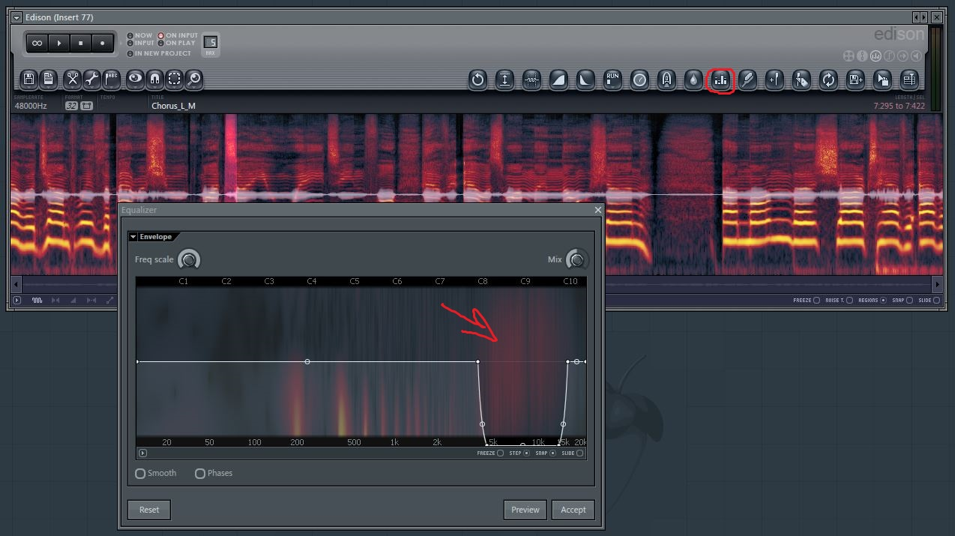
Then select in “Edison” one of the sections where the consonants are located and open “Equalize”, there you will see this section in more detail. Usually voiced consonants range from 5K to 15K. Cut out these frequencies, set “Mix” to about 50% and click “Accept” (all shown in the figure below).
Next you need to do this procedure with all voiced consonants "C" and "Z". You can also do with loud breaths, only you need to equalize the entire frequency range (in fact, just make them quieter).
Layering when creating vocals. Now consider the method of layering, which can and should be used when creating vocals. The well-known backing vocals are, in essence, layering. However, there are several different approaches to this issue.
The first approach is that you invite backing vocalists, or you play your backs yourself. The advantages of this approach are obvious, while the real voice cannot be replaced by anything. Cons: you will need both a recording studio and good backing vocalists. Next, the recorded vocals are added to the lead vocal without a precise fit in time (i.e., the vocals may sound slightly out of tune, but not much).
The second approach is that you can use such programs as Antares Autotune or Image-Line Pitcher to create harmonic backing vocals with only one main vocal part. Briefly describe the process of creating these bekov.
First you need to record the main vocal part (the so-called “Lead Vocal”). Then process it (about vocal processing will be discussed below) and import into FL Studio. Next, you need to send vocals to the effects channel where the Pitcher is located, as indicated below.


In Pitcher, you need to set the following parameters: turn on the “MIDI” button (when you turn on this button, the port number appears in the lower left corner, you need to remember it), and the “HARMONIZE” button. You can also set the switch "Replace-Mix" in one of two positions. The “Replace” position completely removes the main vocals and leaves only the harmonics generated by the plugin. As it is not difficult to guess, the Mix position leaves both your vocals and generated harmonics.

Then you need to add “MIDI out” tools, and in its settings specify the port that was previously specified in the lower left corner of Pitcher.

Then, opening the "Piano Roll", you can set the harmonics for generation (plug-in). You need to specify the notes that the plugin will generate based on your main vocal, and arrange them in time so that they coincide with the main vocal and create the correct harmonics, for example, as shown in the figure below.

The advantages of this approach are in the simplicity and speed of creating harmonics, as well as in the fact that these harmonics will precisely copy your vocals, so you will not have to adjust it for a long time to the location in the mix. But the main disadvantage of this approach is the sound of these backs. Like it or not, but to get rid of the synthesized sound will not work.
The third way lies in the combination of both approaches. Even with just one vocalist (in my case it is myself), you can get large, complete and realistic vocals. All you need is to create suitable harmonics using the method described above. Then you need to remember how your harmonics sound. To understand and hear how only the harmonics sound, in the Pitcher program, you must set the switch to “Replace” and memorize the sound of the harmonics, and then try to reproduce them yourself. At first, it may be unusual to sing such backing vocals, because you need to sing them as precisely as possible throughout their length and try to remove excess expression and “walking” from the notes from your vocals. If you do not fall into the notes in any moment, you can correct your backing vocals in the programs "Celemony Melodyne Editor" or "Image-Line Newtone". Real vocals, even extremely processed with these plug-ins, will still sound more realistic than the generated harmonics.
It is clear that the more layers of backing vocals, the fuller the vocal sounds. But it is important to remember that every time singing in the same way will not work, and sometimes one phrase will sound longer than the other, etc. Therefore, the backing vocals need to be placed exactly in accordance with your lead vocal (as shown in the picture below).

As you can see, each backing vocals are tailored to the others and to the lead vocals. If this is not done, the whole vocal part will sound like a mash-up. Sometimes, I use up to 10 vocal layers (for example, when creating a chorus in a song), and therefore for me this is doubly relevant. I hope my advice will be useful to you. The results of how I use these tricks myself can be heard on my Soundcloud , and you can also take part in my campaign on Indiegogo - do not count for rough advertising and thank you for your attention!
Source: https://habr.com/ru/post/364031/
All Articles