Unlock support for recording TimeShift (TimeMachine) in TV LG 2014 for half an hour and $ 12
Since the beginning of 2013, the well-known company LG started blocking the program recording function for some countries, including Russia. At the same time, this function is available for other countries, previously it was possible to unlock it via the Service Menu, but the loophole was covered.

Below in the pictures will be told and shown how to get around this restriction. Immediately I say, nothing super-secret has been invented, everything has long been known, actions are simple and conditionally safe. No need to solder, only tools are needed.
Everything described below may void your warranty.
First you need the following:
')
1. Phillips screwdriver - 1pc.
2. Test Clip soic8 "Clothespin" for hooking up to SOP8 / SOIC8 -1pcs.

You can order this in China for $ 7-8.
3. Programmer eeprom - 1pc.

I ordered the CH341a not the best option, but only $ 5.
4. Preferably Windows XP or Win7 32bit, as there may be problems with the driver to the programmer.
5. Straight arms and free time ~ 30 minutes.
So let's get started:
Profit! It remains to pick up an external USB drive and the REC button on the remote will work.
PS Steps 5-7 can be skipped and immediately correct the desired byte at offset 0x4EC in the programmer's GUI.
Below in the pictures will be told and shown how to get around this restriction. Immediately I say, nothing super-secret has been invented, everything has long been known, actions are simple and conditionally safe. No need to solder, only tools are needed.
Everything described below may void your warranty.
First you need the following:
')
1. Phillips screwdriver - 1pc.
2. Test Clip soic8 "Clothespin" for hooking up to SOP8 / SOIC8 -1pcs.
You can order this in China for $ 7-8.
3. Programmer eeprom - 1pc.
I ordered the CH341a not the best option, but only $ 5.
4. Preferably Windows XP or Win7 32bit, as there may be problems with the driver to the programmer.
5. Straight arms and free time ~ 30 minutes.
So let's get started:
- We unscrew all the screws on the perimeter of the back cover, there are about 10 of them, all the same. At the bottom and near the plug and connectors there are 4 screw screws, also the same, it is impossible to confuse. Perhaps the very time consuming procedure.
- Next we see the following form:

We are interested in the board, which is on the right, on it is all the logic and flash memory chip (circled in red):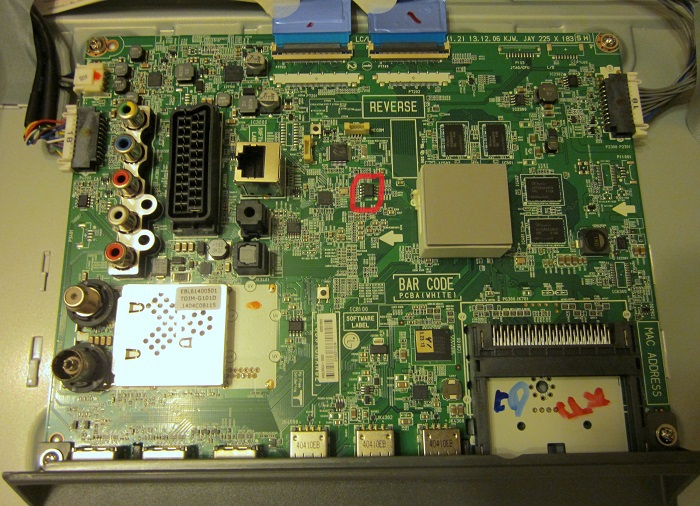 <She's a close up.
- We fasten our clothespin on the microchip, like this:

- We connect the programmer, launch the software and select 24EEPROM / COMMON / 24256 3V. Install the clothespin in the lower contacts of the programmer closer to the lever (as shown). We check that the 1 leg (key) of the chip with the attached clothespin coincides with the programmer key. Press the Read button, then Save, we get the firmware dump.

- Open a dump in HEX-Editore (you can even online )
- A small lyrical digression, previously using the service menu, the following information was obtained:
We translate 651 (0x028B) into binary form and by simple comparisons we determine that DVR-Ready is 5 (6) bits.
Accordingly, 651 + 2 ^ 5 = 651 + 32 = 683 = 0x02AB - Next, look for 8B 02, change to AB 02 and save the dump. (Nearby are other settings from the Tool Option menu, which can also be changed if desired).

- Click Open in the programmer software, load the new dump and click program.
- We unhook the clothespin and twist all the bolts back.
Profit! It remains to pick up an external USB drive and the REC button on the remote will work.
PS Steps 5-7 can be skipped and immediately correct the desired byte at offset 0x4EC in the programmer's GUI.
Source: https://habr.com/ru/post/362833/
All Articles