We program our home on .NET
Recently, I wrote here an article about the project of a smart home control system , in the development of which I am participating. This is a .NET Windows Service that can control the home through scripts and through a web interface. In October, just was the release of version 2.0 .
All the functionality of the system is in the plugins. If you are missing something, you can easily write your own plugin that will interact with the necessary hardware, Internet services or do something else. To make it easier to write your own plugins, I created a small project that can be used as an example.
This demo plugin collects information from nooLite temperature / humidity sensors and displays the received information in the web interface. The result looks like this:
')
temperature chart for the last two days

the current temperature in the rooms (more precisely, the latest values obtained from the sensors)

I bring to your attention a slightly hardcore article on how this plugin was written. There, the steps explain the process of developing your own plug-in for a smart home and provide links to GitHub, by which you can download ready-made code and run it. In this article, you will learn how to create a plug-in and run it in debug mode, how to set up automatic creation of tables in the system database and save data there. And finally, you will learn how to obtain information about temperature and humidity from sensors (if only this is interesting, then scroll through the article to the very end).
So, the thing we are writing is a plugin for an application - a windows service. Accordingly, you first need to deploy a service to your computer to which our plugin will connect. It is very easy to do: you need to download the installer , run it and click “Next” several times. During installation, no parameters are requested. The service is installed in the folder C: \ Program Files (x86) \ ThinkingHome \ service .
Fine! Now in Visual Studio we will create an empty C # Class Library project, while creating, select .NET Framework 4.5 . In principle, not only VS, but also any other IDE, for example, the free Xamarin Studio (and, of course, you can use the free Visual Studio Express ).

Now you need to add to the project a link to the ThinkingHome.Core.Plugins library, which contains the base classes for plugins. The easiest way to do this is to connect it through the NuGet package manager. Just type in the package manager console:
Then everything is simple: create a class MicroclimatePlugin , inherit it from the base class ThinkingHome.Core.Plugins.PluginBase and mark it with the attribute [ThinkingHome.Core.Plugins.PluginAttribute]. The PluginBase class implements the basic functionality of the plugin (more on this later), and the attribute is needed to connect the plugin to the service through MEF . We try to compile the project and get an error. Yeah, you forgot to add a reference to the System.ComponentModel.Composition library in the project (this library is included in the .NET Framework and it contains the MEF implementation). Add it, the project began to compile without errors.
Now we redefine the base class methods to add our own logic to the plugin.
As you can see, we just added a record of messages to the log.
Now we will try to connect our plugin to the service. In the folder where the service was installed (C: \ Program Files (x86) \ ThinkingHome \ service), there is a Plugins folder from which the plugins are loaded at the start of the service. Files of each of the plug-ins should be in a separate folder. We create a folder for our plug-in there (for example, let's call it “ThinkingHome.Plugins.Microclimate”) and in the project properties set the Output Path parameter to “C: \ Program Files (x86) \ ThinkingHome service \ Plugins \ ThinkingHome.Plugins.Microclimate ".
Attention! For all references to third-party libraries, you must set the parameter Copy Local = False!
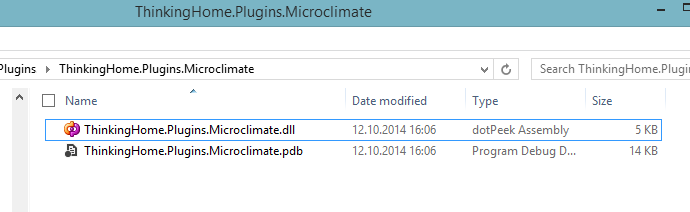
Now we compile the project and see that the DLL with our plugin has appeared in the folder indicated by us.
Since in the development and debugging process, we will often start and stop the service, it makes sense to disable its automatic launch and run it as a console application. In the folder with the service there is a file ThinkingHome.TestConsole.exe. Run it (with administrator privileges!) And see:

Close the console, go to the folder with the logs (C: \ Program Files (x86) \ ThinkingHome \ service \ Logs) and look at the file
<% date%> - ThinkingHome.Plugins.Microclimate.MicroclimatePlugin.log .
We see some lines like this:
Thus, we installed the service, created a plug-in and checked that it successfully connects to the service.
The code we wrote lies on GitHub at: github.com/dima117/thinking-home-plugins-microclimate/tree/6799b7e2f0fb7fc30d0d3d2a4b5cec45cb97fa10 . You can download and run it.
Any plugin connected to the system can store its data in the system database (MS SQL Server CE 4). Tools for working with the database provides the base class PluginBase .
So, we plan to receive information from nooLite temperature / humidity sensors. Each sensor will be tied to a nooLite RX2164 USB adapter channel (receiver) and will periodically send it current temperature / humidity data.
Thus, we should have a list of sensors in the system, for each of which an adapter channel should be specified, to which data is sent and, at a minimum, the name of the sensor for displaying it in the web interface.
We also need another entity to store information from the sensor at a given point in time. Accordingly, it will have the fields: "temperature value", "humidity value", "current time", "sensor ID".
As a result, we get approximately the following database structure:
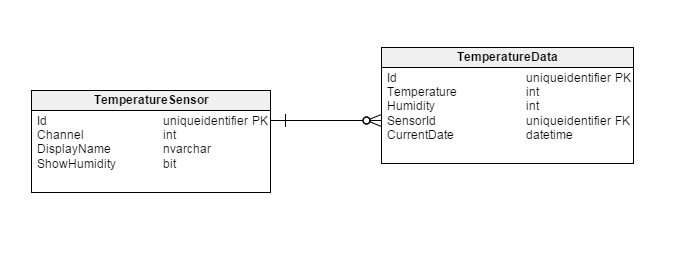
In addition to the listed fields, another “ShowHumidity” field has been added to the sensor model, the value of which determines whether the “humidity” parameter should be displayed in the interface. The fact is that the manufacturer of the nooLite system offers two models of sensors: PT111 , measuring temperature / humidity, and PT112 , measuring only temperature, without humidity. The format of the transmitted data is the same, but the PT112 in the "humidity" field always transmits the value "0". So that an empty value is not displayed in the interface, and this setting has been added.
To automatically create the necessary database structure, the project uses the ECM7.Migrator tool ( more ). Plugins can contain migrations — small C # classes that describe portions of database changes. Each migration has a database version number and the migrator can update the database to the latest version from any previous state. Just add migrations to the project with the plugin and they will be automatically executed when the service starts.
First you need to add to the project a link to the library ECM7.Migrator.Framework . Again, the easiest way to do this is through NuGet. Type in the package manager console:
Do not forget to set for all assemblies added to the project, the parameter Copy Local = False!
Next, you need to mark the entire assembly with the MigrationAssembly attribute (for example, in the AssemblyInfo.cs file):
This attribute is needed to ensure that the database versioning for our plugin is performed independently of other plugins. As a parameter, you must pass some string - a unique key that will not be repeated in other plugins. It is recommended to use for this the full name of the plugin.
After that we add the migrations describing changes in the database. As already mentioned, each migration is a separate class. It must be inherited from the special base class Migration + it must be marked with the special attribute MigrationAttribute , which is given a unique version number of the database version as a parameter.
Migration for sensor table:
It's simple. As you can see, the Apply and Revert methods of the base class are overridden here. Apply - update the database to the version specified in the [Migration] attribute parameter (in our case, version == 1). Revert - rollback changes. The Database property of the base class contains a special object that provides an API for performing various operations on the database. The API has the means to perform all the basic operations with the database + as a last resort. There is the ExecuteNonQuery method with which you can execute an arbitrary SQL query.
Migration for data table:
This migration, in addition to the table, also adds a foreign key. When rolling back, deleting it is not necessary - the migrator is smart and deleting the table will delete its foreign keys.
Now check it all out. Compile the build and run our test console.
In the folder with the logs, we look at the contents of the file <% date%> - ecm7-migrator-logger.log and see the lines:
Oops, it seems we forgot to make a field for the current date in the second table. It is better not to change the already completed migration, since in the general case, someone may have already completed it and the state of the database will not correspond to the migrations to the DLL (that is, it will be incorrect). Create another migration that adds the required field.
After starting the test console, we see the following entries in the log:
As you can see, the migrator himself has determined which migrations have already been completed and only those that are missing are launched (that is, in our case, only the third migration).
The code we just wrote lies on GitHub at:
github.com/dima117/thinking-home-plugins-microclimate/tree/cbb180bf627ef6d7c07ca4eef43e7bbebf510bd7
Now let's describe the classes of our data model. There are no features, except that all class members must be virtual (this is due to the peculiarities of the implementation of the NHibernate ORM, which is used to access data).
Also note that the names of the model properties coincide with the names of the table fields, but for the SensorId field, which is a reference to the sensor table, the Sensor property is described (without the “Id” end), the type of which corresponds to the model type for the associated table.
Now we define how our model corresponds to the database tables. To do this, override in your plugin the InitDbModel method from the base class.
As an input parameter, an instance of the NHibernate.Mapping.ByCode.ModelMapper class is passed here. By default, the mapper assumes that the names of the fields of the tables correspond to the names of the properties of the classes, and the names of the fields-links to other tables correspond to the properties of the same name, but without the ending Id. Thus, in our case, it suffices to specify only the correspondence of classes to the tables in the database — the rest of NHibernate will configure itself. Naturally, ModelMapper provides the means by which you can configure any other, more complex mapping model on the database table.
To add a record to the database about the sensor or to retrieve its data from the database, you need to create a special object - an NHibernate session (this is something similar to DbConnection in ADO.NET). The base class of the plugin has a Context property that contains the application context — an object that implements the IServiceContext interface. You can create an NHibernate session using its OpenSession method.
But how do we test the performance of our code?
One of the easiest ways is to allow accessing the required plug-in methods using the HTTP protocol and call them from the address bar of the browser. In addition, we will need this in the future, when we do the UI.
To access the plug-in methods via HTTP, add a link to the ThinkingHome.Plugins.Listener plugin to the project, slightly change the method signature (parameter set and return type) and mark the methods with a special attribute.
Now in order:
1. As usual, the easiest way to connect another plugin to your project is via NuGet. To connect the ThinkingHome.Plugins.Listener plugin, type the package manager in the console:
Do not forget to specify the option Copy Local = False for the added link.
2. Methods that need to be called via HTTP must accept one parameter of type ThinkingHome.Plugins.Listener.Api.HttpRequestParams and return a value of type object . Through HttpRequestParams, you can get the values of the request parameters, and the return value will be serialized into JSON and transferred to the client.
3. It is necessary to mark the method with a special attribute [ThinkingHome.Plugins.Listener.Attributes.HttpCommand], which as a parameter must be passed a URL (relative to the site root), which will be used to access this method.
Now we can add a sensor by typing the address in the browser (note that all requests must be sent to port 41831 ):
https: // localhost: 41831 / api / microclimate / sensors / add ? channel = 1 & displayName = Test + sensor & showHumidity = false
For the full code for adding a sensor and retrieving data from a database, see GitHub (the AddSensor and GetSensorData methods):
github.com/dima117/thinking-home-plugins-microclimate/blob/7f16f81090d70a6b60d0a6d664fe74abfa1922fa/ThinkingHome.Plugins.Microclimate/MicroclimatePlugin.cs
And finally, the most interesting (but not the most difficult) is obtaining information from sensors and storing it in the database.
As I already wrote, the out-of-box system can work with nooLite wireless temperature / humidity sensors. In order to receive information from sensors on the computer, you will also need a nooLite RX2164 USB adapter (receiver).
There is a special plugin for working with nooLite devices. We connect it through NuGet. As usual, do not forget to put Copy Local = False ;
The plug-in that we just added starts to “listen” to the commands that arrive at the nooLite receiver (the adapter must be connected to the computer when the service starts). When a command is received, the plug-in generates a special type of event inside the system, in the processor of which data received from the sensor are transmitted. We can subscribe to this event and save the data in the database (in the tables that we recently created).
To add a handler for the event "received information from the sensor," you need to describe in our plugin method and mark it with a special attribute [ThinkingHome.Plugins.NooLite.OnMicroclimateDataReceived]. The method must accept 3 parameters as input.
Inside the handler, we open the NHibernate session, get a list of sensors, go through the list and for all sensors whose channel number matches the channel parameter, add an entry to the table with data.
Now we start the service, breathe on the sensor (or put it on the battery) and after a couple of minutes we see that new records have appeared in the database.
You can download the code we have just written from GitHub (the whole project), compile and run it.
github.com/dima117/thinking-home-plugins-microclimate/commit/7f16f81090d70a6b60d0a6d664fe74abfa1922fa
So, in this article we learned:
Please write in the comments if you were interested. If you like this article, there will be a second part, in which you will learn:
The entire project (in the current state, the code is written for the second part of the article) is located at: github.com/dima117/thinking-home-plugins-microclimate
Source code of the smart home system: github.com/dima117/thinking-home
Documentation thinking-home.ru/system
Add to our VKontakte group to keep up with the latest news: vk.com/thinking_home
All the functionality of the system is in the plugins. If you are missing something, you can easily write your own plugin that will interact with the necessary hardware, Internet services or do something else. To make it easier to write your own plugins, I created a small project that can be used as an example.
This demo plugin collects information from nooLite temperature / humidity sensors and displays the received information in the web interface. The result looks like this:
')
temperature chart for the last two days
the current temperature in the rooms (more precisely, the latest values obtained from the sensors)
I bring to your attention a slightly hardcore article on how this plugin was written. There, the steps explain the process of developing your own plug-in for a smart home and provide links to GitHub, by which you can download ready-made code and run it. In this article, you will learn how to create a plug-in and run it in debug mode, how to set up automatic creation of tables in the system database and save data there. And finally, you will learn how to obtain information about temperature and humidity from sensors (if only this is interesting, then scroll through the article to the very end).
Setting up the environment and creating a project blank
So, the thing we are writing is a plugin for an application - a windows service. Accordingly, you first need to deploy a service to your computer to which our plugin will connect. It is very easy to do: you need to download the installer , run it and click “Next” several times. During installation, no parameters are requested. The service is installed in the folder C: \ Program Files (x86) \ ThinkingHome \ service .
Fine! Now in Visual Studio we will create an empty C # Class Library project, while creating, select .NET Framework 4.5 . In principle, not only VS, but also any other IDE, for example, the free Xamarin Studio (and, of course, you can use the free Visual Studio Express ).
Now you need to add to the project a link to the ThinkingHome.Core.Plugins library, which contains the base classes for plugins. The easiest way to do this is to connect it through the NuGet package manager. Just type in the package manager console:
Install-Package ThinkingHome.Core.Plugins Then everything is simple: create a class MicroclimatePlugin , inherit it from the base class ThinkingHome.Core.Plugins.PluginBase and mark it with the attribute [ThinkingHome.Core.Plugins.PluginAttribute]. The PluginBase class implements the basic functionality of the plugin (more on this later), and the attribute is needed to connect the plugin to the service through MEF . We try to compile the project and get an error. Yeah, you forgot to add a reference to the System.ComponentModel.Composition library in the project (this library is included in the .NET Framework and it contains the MEF implementation). Add it, the project began to compile without errors.
Now we redefine the base class methods to add our own logic to the plugin.
[Plugin] public class MicroclimatePlugin : PluginBase { // , public override void InitPlugin() { Logger.Debug("init"); base.InitPlugin(); } // , public override void StartPlugin() { Logger.Debug("start"); base.StartPlugin(); } // public override void StopPlugin() { Logger.Debug("stop"); base.StopPlugin(); } } As you can see, we just added a record of messages to the log.
Now we will try to connect our plugin to the service. In the folder where the service was installed (C: \ Program Files (x86) \ ThinkingHome \ service), there is a Plugins folder from which the plugins are loaded at the start of the service. Files of each of the plug-ins should be in a separate folder. We create a folder for our plug-in there (for example, let's call it “ThinkingHome.Plugins.Microclimate”) and in the project properties set the Output Path parameter to “C: \ Program Files (x86) \ ThinkingHome service \ Plugins \ ThinkingHome.Plugins.Microclimate ".
Attention! For all references to third-party libraries, you must set the parameter Copy Local = False!
Now we compile the project and see that the DLL with our plugin has appeared in the folder indicated by us.
Since in the development and debugging process, we will often start and stop the service, it makes sense to disable its automatic launch and run it as a console application. In the folder with the service there is a file ThinkingHome.TestConsole.exe. Run it (with administrator privileges!) And see:
Close the console, go to the folder with the logs (C: \ Program Files (x86) \ ThinkingHome \ service \ Logs) and look at the file
<% date%> - ThinkingHome.Plugins.Microclimate.MicroclimatePlugin.log .
We see some lines like this:
2014-10-12 16:40:07.0981, Info, init 2014-10-12 16:40:07.1132, Info, start 2014-10-12 16:40:52.1292, Info, stop Thus, we installed the service, created a plug-in and checked that it successfully connects to the service.
The code we wrote lies on GitHub at: github.com/dima117/thinking-home-plugins-microclimate/tree/6799b7e2f0fb7fc30d0d3d2a4b5cec45cb97fa10 . You can download and run it.
Tables in the database for storing data
Any plugin connected to the system can store its data in the system database (MS SQL Server CE 4). Tools for working with the database provides the base class PluginBase .
DB structure
So, we plan to receive information from nooLite temperature / humidity sensors. Each sensor will be tied to a nooLite RX2164 USB adapter channel (receiver) and will periodically send it current temperature / humidity data.
Thus, we should have a list of sensors in the system, for each of which an adapter channel should be specified, to which data is sent and, at a minimum, the name of the sensor for displaying it in the web interface.
We also need another entity to store information from the sensor at a given point in time. Accordingly, it will have the fields: "temperature value", "humidity value", "current time", "sensor ID".
As a result, we get approximately the following database structure:
In addition to the listed fields, another “ShowHumidity” field has been added to the sensor model, the value of which determines whether the “humidity” parameter should be displayed in the interface. The fact is that the manufacturer of the nooLite system offers two models of sensors: PT111 , measuring temperature / humidity, and PT112 , measuring only temperature, without humidity. The format of the transmitted data is the same, but the PT112 in the "humidity" field always transmits the value "0". So that an empty value is not displayed in the interface, and this setting has been added.
Creating tables
To automatically create the necessary database structure, the project uses the ECM7.Migrator tool ( more ). Plugins can contain migrations — small C # classes that describe portions of database changes. Each migration has a database version number and the migrator can update the database to the latest version from any previous state. Just add migrations to the project with the plugin and they will be automatically executed when the service starts.
First you need to add to the project a link to the library ECM7.Migrator.Framework . Again, the easiest way to do this is through NuGet. Type in the package manager console:
Install-Package ECM7Migrator Do not forget to set for all assemblies added to the project, the parameter Copy Local = False!
Next, you need to mark the entire assembly with the MigrationAssembly attribute (for example, in the AssemblyInfo.cs file):
[assembly: MigrationAssembly("ThinkingHome.Plugins.Microclimate")] This attribute is needed to ensure that the database versioning for our plugin is performed independently of other plugins. As a parameter, you must pass some string - a unique key that will not be repeated in other plugins. It is recommended to use for this the full name of the plugin.
After that we add the migrations describing changes in the database. As already mentioned, each migration is a separate class. It must be inherited from the special base class Migration + it must be marked with the special attribute MigrationAttribute , which is given a unique version number of the database version as a parameter.
Migration for sensor table:
using ECM7.Migrator.Framework; . . . namespace ThinkingHome.Plugins.Microclimate.Migrations { [Migration(1)] public class Migration01_TemperatureSensor : Migration { public override void Apply() { Database.AddTable("Microclimate_TemperatureSensor", new Column("Id", DbType.Guid, ColumnProperty.PrimaryKey, "newid()"), new Column("Channel", DbType.Int32, ColumnProperty.NotNull), new Column("DisplayName", DbType.String.WithSize(255), ColumnProperty.NotNull), new Column("ShowHumidity", DbType.Boolean, ColumnProperty.NotNull, false) ); } public override void Revert() { Database.RemoveTable("Microclimate_TemperatureSensor"); } } } It's simple. As you can see, the Apply and Revert methods of the base class are overridden here. Apply - update the database to the version specified in the [Migration] attribute parameter (in our case, version == 1). Revert - rollback changes. The Database property of the base class contains a special object that provides an API for performing various operations on the database. The API has the means to perform all the basic operations with the database + as a last resort. There is the ExecuteNonQuery method with which you can execute an arbitrary SQL query.
Migration for data table:
. . . using ECM7.Migrator.Framework; using ForeignKeyConstraint = ECM7.Migrator.Framework.ForeignKeyConstraint; . . . namespace ThinkingHome.Plugins.Microclimate.Migrations { [Migration(2)] public class Migration02_TemperatureData : Migration { public override void Apply() { Database.AddTable("Microclimate_TemperatureData", new Column("Id", DbType.Guid, ColumnProperty.PrimaryKey, "newid()"), new Column("Temperature", DbType.Int32, ColumnProperty.NotNull, 0), new Column("Humidity", DbType.Int32, ColumnProperty.NotNull, 0), new Column("SensorId", DbType.Guid, ColumnProperty.NotNull) ); Database.AddForeignKey("FK_Microclimate_TemperatureData_SensorId", "Microclimate_TemperatureData", "SensorId", "Microclimate_TemperatureSensor", "Id", ForeignKeyConstraint.Cascade); } public override void Revert() { Database.RemoveTable("Microclimate_TemperatureData"); } } } This migration, in addition to the table, also adds a foreign key. When rolling back, deleting it is not necessary - the migrator is smart and deleting the table will delete its foreign keys.
Now check it all out. Compile the build and run our test console.
In the folder with the logs, we look at the contents of the file <% date%> - ecm7-migrator-logger.log and see the lines:
2014-10-12 16:40:07.0981, Info, SELECT [Version] FROM [SchemaInfo] WHERE [Key] = 'ThinkingHome.Plugins.Microclimate' 2014-10-12 16:40:07.1132, Info, Latest version applied : 0. Target version : 2 2014-10-12 16:40:07.1292, Info, Applying 1: Migration01 temperature sensor 2014-10-12 16:40:07.1612, Info, CREATE TABLE [Microclimate_TemperatureSensor] ([Id] UNIQUEIDENTIFIER NOT NULL PRIMARY KEY DEFAULT newid(),[Channel] INT NOT NULL,[DisplayName] NVARCHAR(255) NOT NULL,[ShowHumidity] BIT NOT NULL DEFAULT 0) 2014-10-12 16:40:07.1612, Info, INSERT INTO [SchemaInfo] ([Version],[Key]) VALUES ('1','ThinkingHome.Plugins.Microclimate') 2014-10-12 16:40:07.1822, Info, Applying 2: Migration02 temperature data 2014-10-12 16:40:07.1822, Info, CREATE TABLE [Microclimate_TemperatureData] ([Id] UNIQUEIDENTIFIER NOT NULL PRIMARY KEY DEFAULT newid(),[Temperature] INT NOT NULL DEFAULT 0,[Humidity] INT NOT NULL DEFAULT 0,[SensorId] UNIQUEIDENTIFIER NOT NULL) 2014-10-12 16:40:07.1822, Info, ALTER TABLE [Microclimate_TemperatureData] ADD CONSTRAINT [FK_Microclimate_TemperatureData_SensorId] FOREIGN KEY ([SensorId]) REFERENCES [Microclimate_TemperatureSensor] ([Id]) ON UPDATE NO ACTION ON DELETE CASCADE 2014-10-12 16:40:07.1912, Info, INSERT INTO [SchemaInfo] ([Version],[Key]) VALUES ('2','ThinkingHome.Plugins.Microclimate') Oops, it seems we forgot to make a field for the current date in the second table. It is better not to change the already completed migration, since in the general case, someone may have already completed it and the state of the database will not correspond to the migrations to the DLL (that is, it will be incorrect). Create another migration that adds the required field.
[Migration(3)] public class Migration03_TemperatureDataCurrentDate : Migration { public override void Apply() { Database.AddColumn("Microclimate_TemperatureData", new Column("CurrentDate", DbType.DateTime, ColumnProperty.NotNull, "getdate()")); } public override void Revert() { Database.RemoveColumn("Microclimate_TemperatureData", "CurrentDate"); } } After starting the test console, we see the following entries in the log:
2014-10-12 16:53:03.6288, Info, Latest version applied : 2. Target version : 3 2014-10-12 16:53:03.6498, Info, Applying 3: Migration03 temperature data current date 2014-10-12 16:53:03.6668, Info, ALTER TABLE [Microclimate_TemperatureData] ADD [CurrentDate] DATETIME NOT NULL DEFAULT getdate() 2014-10-12 16:53:03.6768, Info, INSERT INTO [SchemaInfo] ([Version],[Key]) VALUES ('3','ThinkingHome.Plugins.Microclimate') As you can see, the migrator himself has determined which migrations have already been completed and only those that are missing are launched (that is, in our case, only the third migration).
The code we just wrote lies on GitHub at:
github.com/dima117/thinking-home-plugins-microclimate/tree/cbb180bf627ef6d7c07ca4eef43e7bbebf510bd7
Data model
Now let's describe the classes of our data model. There are no features, except that all class members must be virtual (this is due to the peculiarities of the implementation of the NHibernate ORM, which is used to access data).
// public class TemperatureSensor { public virtual Guid Id { get; set; } public virtual int Channel { get; set; } public virtual string DisplayName { get; set; } public virtual bool ShowHumidity { get; set; } } // public class TemperatureData { public virtual Guid Id { get; set; } public virtual DateTime CurrentDate { get; set; } public virtual TemperatureSensor Sensor { get; set; } public virtual int Temperature { get; set; } public virtual int Humidity { get; set; } } Also note that the names of the model properties coincide with the names of the table fields, but for the SensorId field, which is a reference to the sensor table, the Sensor property is described (without the “Id” end), the type of which corresponds to the model type for the associated table.
Mapping model on the database table
Now we define how our model corresponds to the database tables. To do this, override in your plugin the InitDbModel method from the base class.
public override void InitDbModel(ModelMapper mapper) { mapper.Class<TemperatureSensor>(cfg => cfg.Table("Microclimate_TemperatureSensor")); mapper.Class<TemperatureData>(cfg => cfg.Table("Microclimate_TemperatureData")); } As an input parameter, an instance of the NHibernate.Mapping.ByCode.ModelMapper class is passed here. By default, the mapper assumes that the names of the fields of the tables correspond to the names of the properties of the classes, and the names of the fields-links to other tables correspond to the properties of the same name, but without the ending Id. Thus, in our case, it suffices to specify only the correspondence of classes to the tables in the database — the rest of NHibernate will configure itself. Naturally, ModelMapper provides the means by which you can configure any other, more complex mapping model on the database table.
Adding sensors and getting information from the database
To add a record to the database about the sensor or to retrieve its data from the database, you need to create a special object - an NHibernate session (this is something similar to DbConnection in ADO.NET). The base class of the plugin has a Context property that contains the application context — an object that implements the IServiceContext interface. You can create an NHibernate session using its OpenSession method.
// var sensorId = Guid.NewGuid(); using (var session = Context.OpenSession()) { // - var sensor = new TemperatureSensor { Id = sensorId, DisplayName = " ", Channel = 1, ShowHumidity = true }; // session.Save(sensor); // session.Flush(); } // using (var session = Context.OpenSession()) { var data = session.Query<TemperatureData>() .Where(d => d.Sensor.Id == sensorId) .ToList(); } But how do we test the performance of our code?
Calling plugin methods over HTTP
One of the easiest ways is to allow accessing the required plug-in methods using the HTTP protocol and call them from the address bar of the browser. In addition, we will need this in the future, when we do the UI.
To access the plug-in methods via HTTP, add a link to the ThinkingHome.Plugins.Listener plugin to the project, slightly change the method signature (parameter set and return type) and mark the methods with a special attribute.
Now in order:
1. As usual, the easiest way to connect another plugin to your project is via NuGet. To connect the ThinkingHome.Plugins.Listener plugin, type the package manager in the console:
Install-Package ThinkingHome.Plugins.Listener Do not forget to specify the option Copy Local = False for the added link.
2. Methods that need to be called via HTTP must accept one parameter of type ThinkingHome.Plugins.Listener.Api.HttpRequestParams and return a value of type object . Through HttpRequestParams, you can get the values of the request parameters, and the return value will be serialized into JSON and transferred to the client.
using ThinkingHome.Plugins.Listener.Api; . . . public class MicroclimatePlugin : PluginBase { public object AddSensor(HttpRequestParams request) { string displayName = request.GetRequiredString("displayName"); int channel = request.GetRequiredInt32("channel"); bool showHumidity = request.GetRequiredBool("showHumidity"); . . . } . . . } 3. It is necessary to mark the method with a special attribute [ThinkingHome.Plugins.Listener.Attributes.HttpCommand], which as a parameter must be passed a URL (relative to the site root), which will be used to access this method.
using ThinkingHome.Plugins.Listener.Attributes; . . . [HttpCommand("/api/microclimate/sensors/add")] public object AddSensor(HttpRequestParams request) { . . . } Now we can add a sensor by typing the address in the browser (note that all requests must be sent to port 41831 ):
https: // localhost: 41831 / api / microclimate / sensors / add ? channel = 1 & displayName = Test + sensor & showHumidity = false
For the full code for adding a sensor and retrieving data from a database, see GitHub (the AddSensor and GetSensorData methods):
github.com/dima117/thinking-home-plugins-microclimate/blob/7f16f81090d70a6b60d0a6d664fe74abfa1922fa/ThinkingHome.Plugins.Microclimate/MicroclimatePlugin.cs
Getting information from sensors
And finally, the most interesting (but not the most difficult) is obtaining information from sensors and storing it in the database.
As I already wrote, the out-of-box system can work with nooLite wireless temperature / humidity sensors. In order to receive information from sensors on the computer, you will also need a nooLite RX2164 USB adapter (receiver).
There is a special plugin for working with nooLite devices. We connect it through NuGet. As usual, do not forget to put Copy Local = False ;
Install-Package ThinkingHome.Plugins.NooLite The plug-in that we just added starts to “listen” to the commands that arrive at the nooLite receiver (the adapter must be connected to the computer when the service starts). When a command is received, the plug-in generates a special type of event inside the system, in the processor of which data received from the sensor are transmitted. We can subscribe to this event and save the data in the database (in the tables that we recently created).
To add a handler for the event "received information from the sensor," you need to describe in our plugin method and mark it with a special attribute [ThinkingHome.Plugins.NooLite.OnMicroclimateDataReceived]. The method must accept 3 parameters as input.
- int channel - channel of the adapter for which the command came
- decimal temperature - the current temperature value (the sensor transmits the temperature value every hour or when the temperature changes by more than 0.5 ° C)
- int humidity - the current value of humidity, in% (if the sensor does not support the measurement of humidity, the value 0 is transmitted)
Inside the handler, we open the NHibernate session, get a list of sensors, go through the list and for all sensors whose channel number matches the channel parameter, add an entry to the table with data.
using ThinkingHome.Plugins.NooLite; . . . [Plugin] public class MicroclimatePlugin : PluginBase { . . . [OnMicroclimateDataReceived] // public void MicroclimateDataReceived(int channel, decimal temperature, int humidity) { var now = DateTime.Now; // NHibernate using (var session = Context.OpenSession()) { // var sensors = session .Query<TemperatureSensor>() .Where(s => s.Channel == channel) .ToList(); // foreach (var sensor in sensors) { // var data = new TemperatureData { Id = Guid.NewGuid(), CurrentDate = now, Temperature = Convert.ToInt32(temperature), Humidity = humidity, Sensor = sensor }; // session.Save(data); } // session.Flush(); } } } Now we start the service, breathe on the sensor (or put it on the battery) and after a couple of minutes we see that new records have appeared in the database.
You can download the code we have just written from GitHub (the whole project), compile and run it.
github.com/dima117/thinking-home-plugins-microclimate/commit/7f16f81090d70a6b60d0a6d664fe74abfa1922fa
Conclusion
So, in this article we learned:
- How to create a preset plug-in, connect the plug-in to the smart home service and how to run it in debug mode
- How to make the plugin itself create the necessary database structure
- How to work with DB
- How to subscribe to events of other plug-ins (using the example of obtaining temperature from nooLite sensors)
Please write in the comments if you were interested. If you like this article, there will be a second part, in which you will learn:
- How to add a separate section for the plug-in to the web interface of the smart home system
- How to draw beautiful graphs of temperature and humidity
- How to give the user the opportunity to bring the temperature / humidity values to the start screen of the system’s web interface
The entire project (in the current state, the code is written for the second part of the article) is located at: github.com/dima117/thinking-home-plugins-microclimate
Source code of the smart home system: github.com/dima117/thinking-home
Documentation thinking-home.ru/system
Add to our VKontakte group to keep up with the latest news: vk.com/thinking_home
Source: https://habr.com/ru/post/362639/
All Articles