Google Cloud Storage with PHP: saving files with public access
Due to the fact that the previous service with which I stored the images was covered with a copper basin (most likely due to the fact that it was not profitable), I had to look for other options for storing images. The servers I use are low cost and I don’t want to pay a decent price for an additional 10 GB of disk space. Studying the market, I came across Google Cloud Storage ( GCS ) and decided that this product would suit me (well, at least you can test it). In RuNet (and not only in it) little attention is paid to configure GCS using PHP, so I decided to contribute to this direction.
This article will look at 2 options for configuring GCS for downloading files (in the example the image will be loaded) using a php client and using an existing sdk ( gsutil utility) using the shell. So let's go!
The first thing that needs to be done is to register with the Google Cloud Platform. To do this, click on the link . Perhaps the action has not ended yet, and you can get $ 300 as a gift! You should have no problems, so the registration process decided not to describe. True, you will need to leave your phone number and credit card.
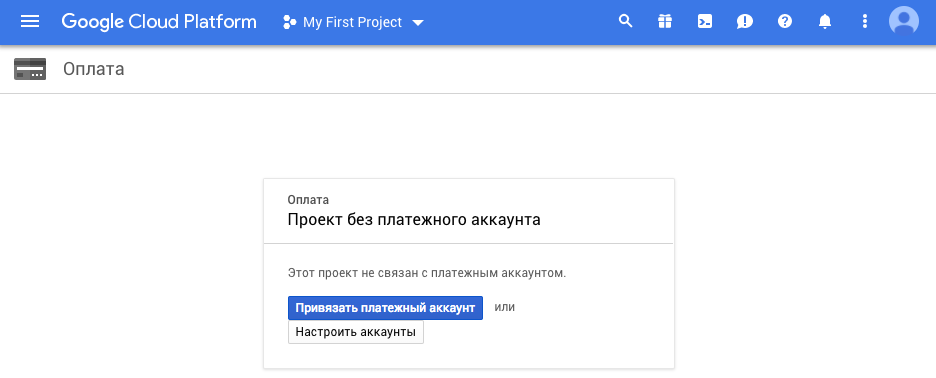
To check, go to the "Payment" section and if you see a similar window, it means that it is desirable for you to link a payment account, otherwise you will not be able to use the GCS JSON API .
')
In the header of the page you should see the block Select a project , when clicked, you will see the following window. In my case, instead of Select Project , Photo Project is displayed, since I have already created two projects.
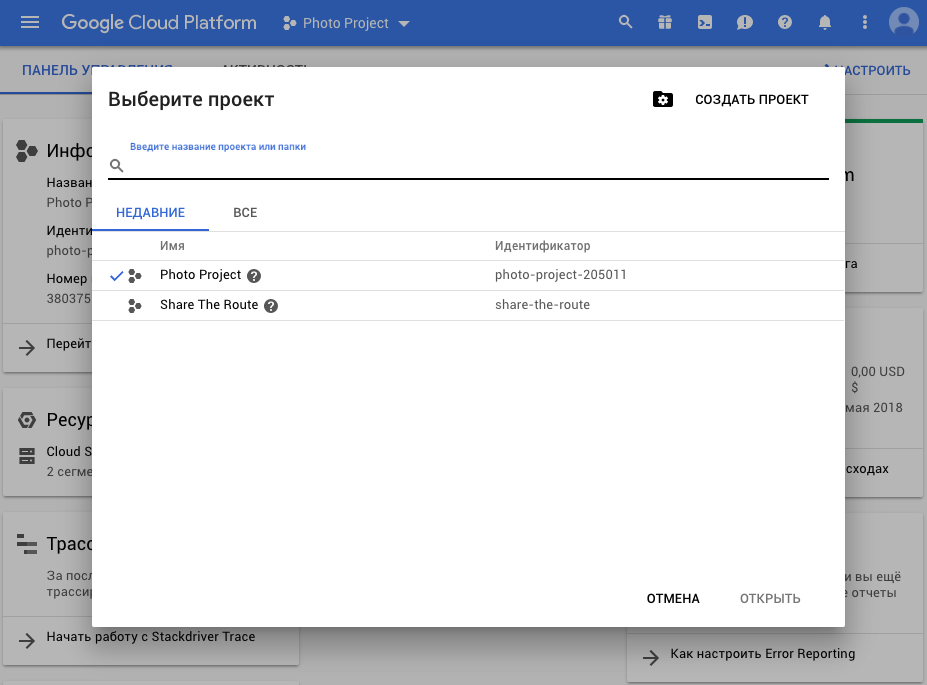
Create your new project by clicking on the button CREATE A PROJECT . Enter the name of the project, and click on the CREATE button. Within a few seconds, your project will be created and you can select it.
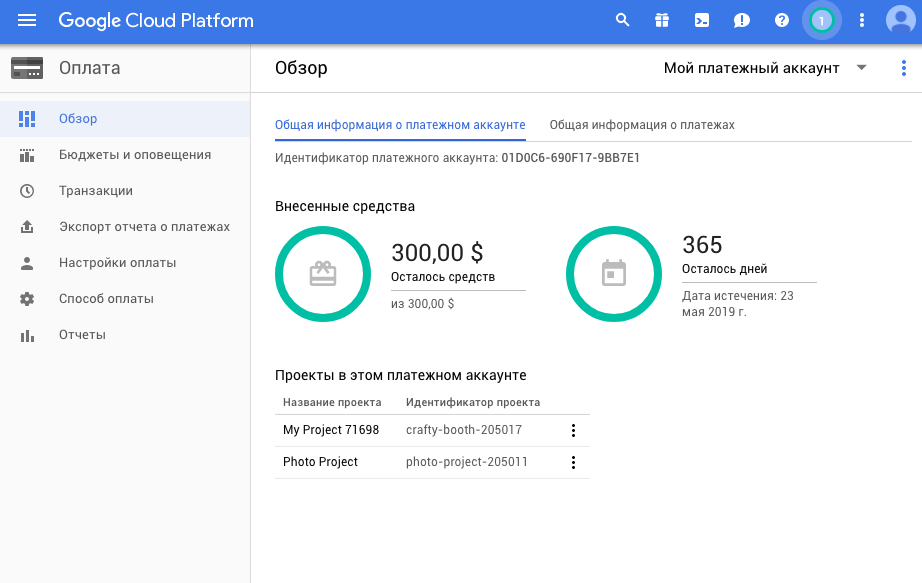
After you have selected the created project, go to the Payment section using the navigation menu on the left side of the page. Please note that in the Projects section of this payment account you have created your project. In my case, a new project called My Project 71698 was automatically added to this block.
But maybe this situation, for example, when the project was created before linking the payment account, but it will not be automatically added. Therefore, I advise you to initially bind a payment account.
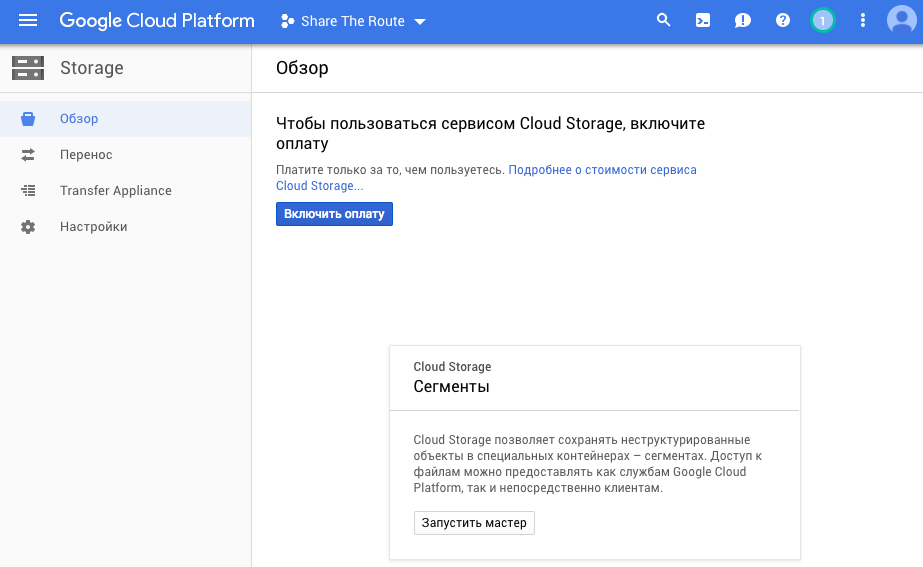
If your project does not appear in the block, then you need to go to the Storage section using the navigation menu and select a payment account using the Enable Payment button. In my case, the Share The Route project has not created a payment account.
You can create a segment using the interface or through a query. For now, let's create a segment using the interface by clicking the Create Segment button.
Depending on the task, you can select the default Storage Class you need.

Briefly describe the storage classes, then:
Multi-Regional - suitable for the site, which is used by the whole country
Regional - a site that is used in most cases in one particular region.
Nearline - for data that is used no more than once a month.
Coldline - for data that is used no more than once a year.
Having selected all the necessary settings, click the Create button.
To configure the server, you can refer to Cloud Storage Client Libraries if you want to customize the project for another programming language.
First, you need to download the library for working with GCS using composer. If suddenly someone does not have it - put it .
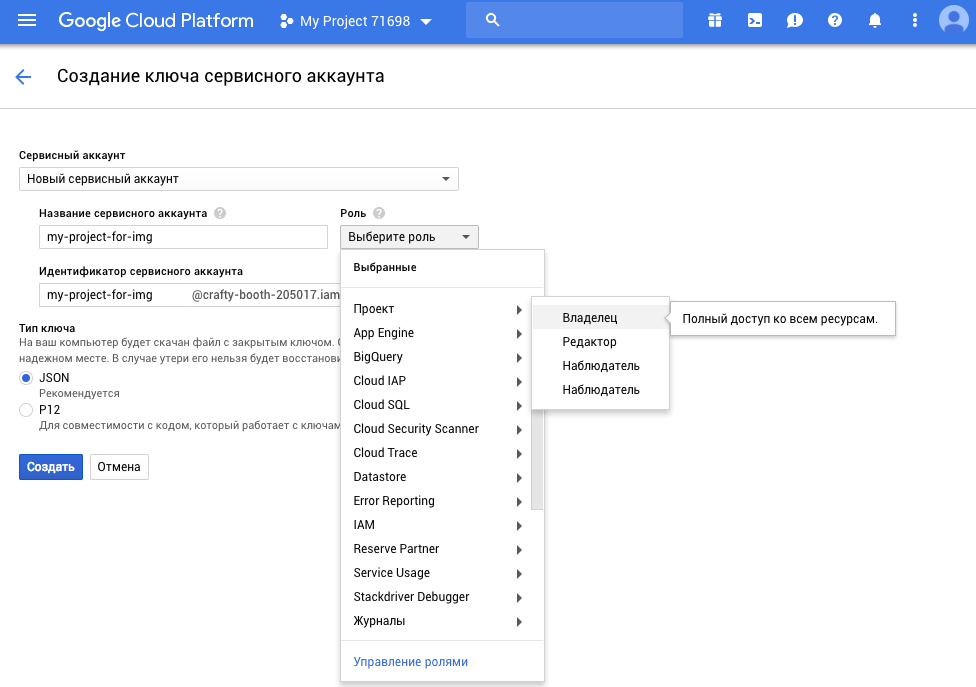
Next you need to get the key. To do this, click the link and in the Credentials tab click the Create credentials button and select the Key for the service account .

In the new window, select the New service account and fill in the Service account name field. In Roles, specify the Owner (Project-> Owner). After that, a key will be created in json format. You can save it at a convenient place for you.
Further, according to the instructions, it is necessary to create an environment variable specifying the path to the file with the key:
Linux / Mac OS
Windows
But due to the fact that for some reason this didn’t work on my Mac OS Sierra, I’ll show an alternative option if someone suddenly faces a similar problem.
This completes all the necessary settings and we can proceed to writing the code:
Create index.html to load the image:
And the gcs.php script that will upload the file to the cloud:
Now let's break the code down a bit.
$ projectId - in order to find out the identifier of your project, you can click on the drop-down list of projects in the header and see the Name and Identifier columns in a new window. The ID column just contains the value we need.

keyFilePath is a link to our key that we downloaded. This property must be specified if the set environment variable cannot be seen by the web service running on the server.
$ bucketName is the name of the segment that we created through the interface. You can see it in the Storage section.
The getResumableUploader method can also be used with one parameter, then the loaded image will be saved to the segment root with the same name. In my example, additional properties were used:
name - is responsible for the new file name. But here you can specify not only the name, but with it the path, relative to the segment. In this case, the images directory has been added, which will be automatically created if it does not already exist.
predefinedAcl - sets the level of access to the downloaded file. The publicRead value indicates that this file can be accessed by reference to any user / site.
In more detail the method can be studied on the following link .
Advantages of the approach:
+ library size <10 MB;
+ can be used on third-party hosting.
Cons of the approach:
- the library is in beta;
- difficult to understand documentation.
Thus, I would advise this option for those people who have little free space on the server or if you use a third-party server without access to the terminal to install the gsutil utility.
First you need to install this utility on the server. To do this, download and install sdk (example for Linux / Mac OS. For Debian / Ubuntu and Windows, see the link ):
After installation, reset the shell:
If you reset the shell, you get an error saying that the node module was not found, then try removing it and installing it again through the repository.
Perform initialization:
During initialization, you will need to log in. If the server supports a graphical shell, the old girl will automatically open in the browser, where you will need to confirm access, otherwise you will receive the text of the link that you need to click on. On this page there will be a key that must be entered into the terminal.
After the authorization, you will be asked to choose a segment with which you will work.
Now you can use all the features of the gsutil utility. You can get acquainted with all the teams by the link .
To copy the images we need the command cp . It has the following structure:
To send an image use the same index.html
And essentially change gcs.php :
The liveExecuteCommand function allows you to track how the transmitted command is executed with intermediate output, but you can also use shell_exec .
Advantages of the approach:
+ convenient documentation;
+ the ability to work through the terminal;
+ more features.
+ simple syntax
Minuses:
- sdk weight about 280 MB;
- access to the terminal on the server is required
In my opinion, this approach is more suitable for those who do not have problems with free space on the server (since sdk is 28 times harder) or work is needed both through the shell and through the terminal.
In the article I tried to describe in detail and step by step how to use GCS to save images and in which case to use one or another approach. I do not pretend to be the absolute truth, but because There is too little information on this topic in runet - I think that the article should be interesting to those who want to add GCS to their project as well.
This article will look at 2 options for configuring GCS for downloading files (in the example the image will be loaded) using a php client and using an existing sdk ( gsutil utility) using the shell. So let's go!
check in
The first thing that needs to be done is to register with the Google Cloud Platform. To do this, click on the link . Perhaps the action has not ended yet, and you can get $ 300 as a gift! You should have no problems, so the registration process decided not to describe. True, you will need to leave your phone number and credit card.
To check, go to the "Payment" section and if you see a similar window, it means that it is desirable for you to link a payment account, otherwise you will not be able to use the GCS JSON API .
')
Creating and setting up a project
In the header of the page you should see the block Select a project , when clicked, you will see the following window. In my case, instead of Select Project , Photo Project is displayed, since I have already created two projects.
Create your new project by clicking on the button CREATE A PROJECT . Enter the name of the project, and click on the CREATE button. Within a few seconds, your project will be created and you can select it.
After you have selected the created project, go to the Payment section using the navigation menu on the left side of the page. Please note that in the Projects section of this payment account you have created your project. In my case, a new project called My Project 71698 was automatically added to this block.
But maybe this situation, for example, when the project was created before linking the payment account, but it will not be automatically added. Therefore, I advise you to initially bind a payment account.
If your project does not appear in the block, then you need to go to the Storage section using the navigation menu and select a payment account using the Enable Payment button. In my case, the Share The Route project has not created a payment account.
You can create a segment using the interface or through a query. For now, let's create a segment using the interface by clicking the Create Segment button.
Depending on the task, you can select the default Storage Class you need.
Briefly describe the storage classes, then:
Multi-Regional - suitable for the site, which is used by the whole country
Regional - a site that is used in most cases in one particular region.
Nearline - for data that is used no more than once a month.
Coldline - for data that is used no more than once a year.
Having selected all the necessary settings, click the Create button.
Setting up a server using a php client
To configure the server, you can refer to Cloud Storage Client Libraries if you want to customize the project for another programming language.
First, you need to download the library for working with GCS using composer. If suddenly someone does not have it - put it .
composer require google/cloud-storage Next you need to get the key. To do this, click the link and in the Credentials tab click the Create credentials button and select the Key for the service account .
In the new window, select the New service account and fill in the Service account name field. In Roles, specify the Owner (Project-> Owner). After that, a key will be created in json format. You can save it at a convenient place for you.
Further, according to the instructions, it is necessary to create an environment variable specifying the path to the file with the key:
Linux / Mac OS
export GOOGLE_APPLICATION_CREDENTIALS="/home/user/Downloads/[FILE_NAME].json" Windows
set GOOGLE_APPLICATION_CREDENTIALS="C:\Users\name\Downloads\[FILE_NAME].json" But due to the fact that for some reason this didn’t work on my Mac OS Sierra, I’ll show an alternative option if someone suddenly faces a similar problem.
This completes all the necessary settings and we can proceed to writing the code:
Create index.html to load the image:
<html> <head> <title>File Upload</title> </head> <body> <h1>File Upload</h1> <form method="post" action="gcs.php" enctype="multipart/form-data"> <label for="inputfile">Upload File</label> <input type="file" id="file" name="file"></br> <input type="submit" value="Click To Upload"> </form> </body> </html> And the gcs.php script that will upload the file to the cloud:
# autoloader GCS require __DIR__ . '/vendor/autoload.php'; # use Google\Cloud\Storage\StorageClient; # , if(isset($_FILES) && $_FILES['file']['error'] == 0) { $allowed = array('png', 'jpg', 'gif','zip', 'jpeg'); $ext = pathinfo($_FILES['file']['name'], PATHINFO_EXTENSION); if(!in_array(strtolower($ext), $allowed)) { echo 'The file is not an image.'; die; } # $projectId = 'crafty-booth-205017'; # GCS $storage = new StorageClient([ 'projectId' => $projectId, 'keyFilePath' => '/home/user/Downloads/[FILE_NAME].json' # ]); # $bucketName = 'my-project-for-img'; $bucket = $storage->bucket($bucketName); # $uploader = $bucket->getResumableUploader( fopen($_FILES['file']['tmp_name'], 'r'), [ 'name' => 'images/load_image.png', 'predefinedAcl' => 'publicRead', ] ); # GCS try { $uploader->upload(); echo 'File Uploaded'; } catch (GoogleException $ex) { $resumeUri = $uploader->getResumeUri(); $object = $uploader->resume($resumeUri); echo 'No File Uploaded'; } } else{ echo 'No File Uploaded'; } Now let's break the code down a bit.
$ projectId - in order to find out the identifier of your project, you can click on the drop-down list of projects in the header and see the Name and Identifier columns in a new window. The ID column just contains the value we need.
keyFilePath is a link to our key that we downloaded. This property must be specified if the set environment variable cannot be seen by the web service running on the server.
$ bucketName is the name of the segment that we created through the interface. You can see it in the Storage section.
The getResumableUploader method can also be used with one parameter, then the loaded image will be saved to the segment root with the same name. In my example, additional properties were used:
name - is responsible for the new file name. But here you can specify not only the name, but with it the path, relative to the segment. In this case, the images directory has been added, which will be automatically created if it does not already exist.
predefinedAcl - sets the level of access to the downloaded file. The publicRead value indicates that this file can be accessed by reference to any user / site.
In more detail the method can be studied on the following link .
Advantages of the approach:
+ library size <10 MB;
+ can be used on third-party hosting.
Cons of the approach:
- the library is in beta;
- difficult to understand documentation.
Thus, I would advise this option for those people who have little free space on the server or if you use a third-party server without access to the terminal to install the gsutil utility.
Setting up the server using the gsutil utility
First you need to install this utility on the server. To do this, download and install sdk (example for Linux / Mac OS. For Debian / Ubuntu and Windows, see the link ):
curl https://sdk.cloud.google.com | bash After installation, reset the shell:
exec -l $SHELL If you reset the shell, you get an error saying that the node module was not found, then try removing it and installing it again through the repository.
Perform initialization:
gcloud init During initialization, you will need to log in. If the server supports a graphical shell, the old girl will automatically open in the browser, where you will need to confirm access, otherwise you will receive the text of the link that you need to click on. On this page there will be a key that must be entered into the terminal.
After the authorization, you will be asked to choose a segment with which you will work.
Now you can use all the features of the gsutil utility. You can get acquainted with all the teams by the link .
To copy the images we need the command cp . It has the following structure:
gsutil cp [OPTION]... src_url dst_url To send an image use the same index.html
<html> <head> <title>File Upload</title> </head> <body> <h1>File Upload</h1> <form method="post" action="gcs.php" enctype="multipart/form-data"> <label for="inputfile">Upload File</label> <input type="file" id="file" name="file"></br> <input type="submit" value="Click To Upload"> </form> </body> </html> And essentially change gcs.php :
# , if(isset($_FILES) && $_FILES['file']['error'] == 0) { $allowed = array('png', 'jpg', 'gif','zip', 'jpeg'); $ext = pathinfo($_FILES['file']['name'], PATHINFO_EXTENSION); if(!in_array(strtolower($ext), $allowed)) { echo 'The file is not an image.'; die; } $name = time() . "." . $ext; $cmd = "gsutil cp -a public-read $_FILES['file']['tmp_name'] gs://my-project-for-img/images/{$name}"; $result = liveExecuteCommand($cmd); if ($result['exit_status'] !== 0) { echo 'No File Uploaded'; die; } echo 'File Uploaded'; } else{ echo 'No File Uploaded'; } The liveExecuteCommand function allows you to track how the transmitted command is executed with intermediate output, but you can also use shell_exec .
public function liveExecuteCommand($cmd, $isLog = false) { while (@ ob_end_flush()); // end all output buffers if any $proc = popen("$cmd 2>&1 ; echo Exit status : $?", 'r'); $live_output = ""; $complete_output = ""; while (!feof($proc)) { $live_output = fread($proc, 4096); $complete_output = $complete_output . $live_output; if ($isLog) echo "$live_output"; @ flush(); } pclose($proc); # get exit status preg_match('/[0-9]+$/', $complete_output, $matches); # return exit status and intended output return array ( 'exit_status' => intval($matches[0]), 'output' => str_replace("Exit status : " . $matches[0], '', $complete_output) ); } Advantages of the approach:
+ convenient documentation;
+ the ability to work through the terminal;
+ more features.
+ simple syntax
Minuses:
- sdk weight about 280 MB;
- access to the terminal on the server is required
In my opinion, this approach is more suitable for those who do not have problems with free space on the server (since sdk is 28 times harder) or work is needed both through the shell and through the terminal.
Conclusion
In the article I tried to describe in detail and step by step how to use GCS to save images and in which case to use one or another approach. I do not pretend to be the absolute truth, but because There is too little information on this topic in runet - I think that the article should be interesting to those who want to add GCS to their project as well.
Source: https://habr.com/ru/post/359318/
All Articles