Navigation Architecture Component. Practical look
At the recent Google IO 2018 , among other things, was presented a solution that helps in the implementation of navigation in applications.
Immediately struck by the fact that the graph of navigation can be viewed in the UI editor, something reminiscent of storyboards from iOS-development. This is really interesting and new for Android developers.
And since I am also the creator of the fairly popular Cicerone library, which allows you to work with navigation on android, I received a lot of questions about whether it was time to migrate to Google’s solution, and why it is better / worse. Therefore, as soon as free time appeared, I created a test project and began to understand.
Formulation of the problem
I will not repeat the introductory words about the new architectural component of the Navigation Architecture Component, about setting up the project and the main entities in the library ( this was already done by Sasha Blinov ), but I will go from the practical side and try the library in battle, examine the possibilities and applicability to real cases.
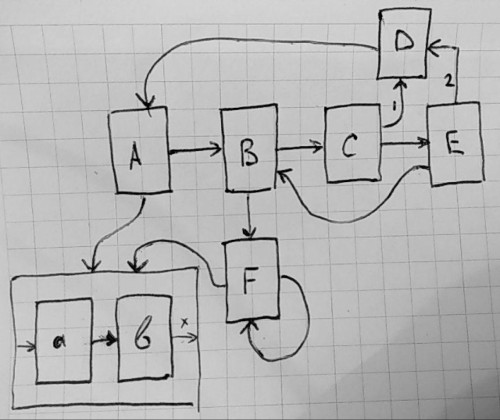
I threw on a sheet of paper a graph of screens with transitions that I would like to implement.
I want to note that navigation in this case is considered within one Activity, I practice this approach not on the first draft, and it showed itself perfectly (discussion of this approach is not the goal of this article).
This graph I tried to describe the most frequent cases that are found in the applications:
- A - start screen. With it, the application starts when you start from the menu.
- There are several straight transitions: A-> B, B-> C, C-> E, B-> F
- From A you can run a separate flow ab
- From F, you can switch to new F screens by building a chain of identical FFF -...
- From F, you can also run the flow ab
- The flow ab is a sequence of two screens, where from the b screen you can exit the flow to the screen from which the flow was started.
- From screen C, you can go to D, replacing the screen, that is, from the chain ABC, go to ABD
- From screen E, you can switch to D, replacing two screens, that is, from the ABCE chain, go to ABD
- From screen E, you can return to screen B
- From screen D, you can return to screen A
Implementation
After transferring such a graph to the code of the test Android application, it turned out beautifully:
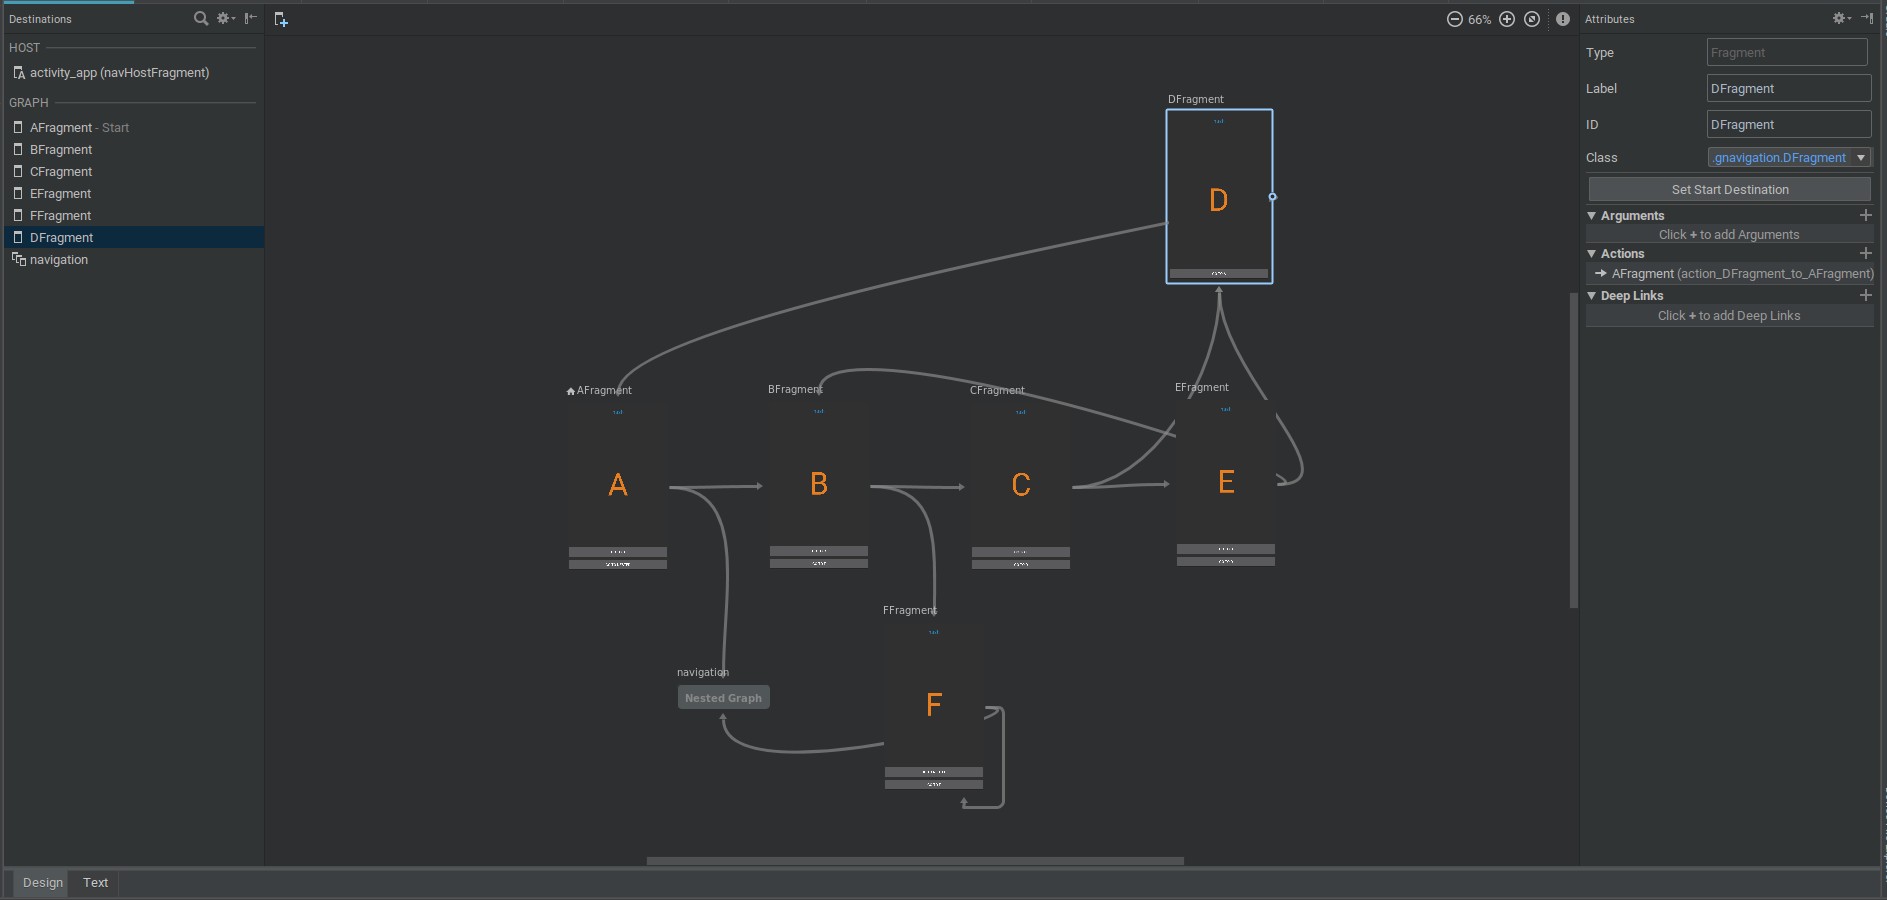
At first glance, it is very similar to the expected result, but let's take it in order.
1. The start screen is set by the property
app:startDestination="@id/AFragment" It works as expected, the application starts from it.
2. Rectilinear transitions look and work correctly.
3. and 5. Nested navigation is easily described and launched as a simple screen. And here is the first interesting feature : I expected the embedded navigation to be somehow connected with the embedded fragments, but it turned out that this is just a convenient representation in the UI-graph, but in practice everything works on one common stack of fragments .
4. Running a chain of identical screens is done without problems. And here you can use the special property of the transition.
app:launchSingleTop="true" When specifying this mode, before going to the new screen, the current top screen in the stack will be checked. If the new and current screens are of the same type, the current screen will be deleted, that is, the upper screen will be constantly re-created without increasing the stack.
The first bug is hidden here: if you open the F screen several times with the app:launchSingleTop="true" parameter app:launchSingleTop="true" and then press the "back" button, you will return to the B screen, but the F screen will remain "hanging" from above.
I can assume that this is due to the fact that the fragment manager inside has saved the transaction from B to the first instance F, and we have already changed it to a new one that will not be known to him.
6. A separate flow from two screens works fine, but the problem is that it is impossible to explicitly describe the behavior, that from the second screen of this flow you need to return to the running screen!
Here we come to an important property of the UI-graph: it is impossible to describe backward transitions on a graph! All arrows - this is the creation of a new screen and the transition to it!
That is, to make the transition "back" in the stack, you must work with the code. The simplest solution for our case is to call popBackStack() twice in a row, the new navigation does not help here. And for more complex flow it will be necessary to invent other solutions.
Navigation.findNavController(view).apply { popBackStack() popBackStack() } 7. Replace screen C with D by specifying in the transition properties
app:popUpTo="@+id/BFragment" as you can see, here we have rigidly tied the logic of the transition between C and D to the previous screen B. This is also not the best place in the new library.
8. Similarly with the transition from E to D - add the app:popUpTo="@+id/BFragment" , and it works as we wanted, but with reference to the screen B
9. As I explained above, there are no returns on the UI-graph. Therefore, returning from screen E to screen B can only be done from the code by calling popBackStack(R.id.BFragment) to the desired screen. But if it is not necessary for you to return to screen B, but it is possible to create a new screen B, then this is done by switching to the UI-graph with the installation of two parameters:
app:popUpTo="@+id/BFragment" app:popUpToInclusive="true" This will throw off the stack to screen B, including him, and then create a new screen B from above.
In real projects, such logic is certainly not suitable , but as an opportunity, it is interesting.
10. Return to screen A, as you already understood, it is impossible to describe on the graph. It is necessary to do it from the code. But following the example of the previous case, you can throw off all the screens and create a new screen A at the root. To do this, create a transition from D to A and add a special property
app:clearTask="true" Now, when calling such a transition, the entire stack of fragments will be cleared first.
One unexplored parameter from the navigation editor UI remains:
app:launchDocument="true" I did not understand its purpose, but most likely it just does not work as stated in the documentation:
If you want to see the system Overview screen. It will bring you the document.
Click here for a copy of the document. You have been taken to their home screen.
findings
From my experiments and a small study of the source code, we can conclude: the new navigation is just a UI wrapper for working with the fragment manager (for the case of an application in one Activity). All arrow transitions are given a unique ID and a set of parameters by which the transaction of fragments is performed on the old “good” fragment manager. The library is still in deep alpha, but already now bugs are noticeable that directly indicate the known problems of the manager’s fragment.
If we need to somehow influence the stack of fragments and make a return on the previous screen, we will have to work in the old manner with the fragment manager.
If you cause navigation when the application is minimized, the application will drop with the classicjava.lang.IllegalStateException: Can not perform this action after onSaveInstanceState
To navigate, you need access to the view to search for navControllerNavigation.findNavController(view)
These are the problems that the Cicerone library solves, so comparing them makes little sense. But you can combine! Because there are useful sides to Google Navigation:
- Visual graph For small projects can be a very helpful hint.
Description of screen input parameters and verification without launching the application directly in the studio.
To do this, you need to connect an additional Gradle plugin and describe the required parameters in the xml properties of the screen.<fragment android:id="@+id/confirmationFragment" android:name="com.example.cashdog.cashdog.ConfirmationFragment" android:label="fragment_confirmation" tools:layout="@layout/fragment_confirmation"> <argument android:name="amount" android:defaultValue=”0” app:type="integer" />- Linking Deep Link to launch any screen from a graph.
I was not able to verify this feature, but there is a suspicion that it is also made in the forehead, so there will simply be a different root screen, and not a complete chain of screens, as we would like. But it is not exactly. - The ability to create reusable parts of the graph is “Nested Graph”. That is, to carry out some part of the graph in a nested graph, which can be run from several places.
Test project
All experiments can be viewed and touched on Github.
')
Source: https://habr.com/ru/post/359282/
All Articles