Create, configure and use your own Git-server
The material, the translation of which we are publishing today, is devoted to setting up Git-servers. Git is a version control system developed by Linus Torvalds . Git is used by millions of people around the world. Companies like GitHub offer Git based hosting services. According to information that can be found in various publications , GitHub is the largest service for hosting IT projects. In particular, in 2017, the GitHub community reached 24 million developers who work on 67 million repositories. Nowadays, GitHub is used by absolutely everyone - from lone programmers to large organizations. I must say that even Google has moved to GitHub, closing its own project of a similar focus.
GitHub is a great service, but especially if you are an individual developer or a small company, you will encounter some limitations when working with GitHub. One of them is that the free package does not include the hosting of private repositories. For this opportunity you have to pay at least $ 7 per month .
In such situations, in order to get around the restrictions, or if you need to control what happens to your repositories, it is best to create your own Git-server. This, on the one hand, will help to save, and on the other - will give full control over the server. Among advanced Linux users, the practice of using their own Git servers, hosted, one might say, for free, on the servers they already use is quite common.
')
In this tutorial, we’ll talk about two approaches to managing a code base using our own Git server. The first is to use the usual Git-server, and the second is to use the tool with the GitLab graphical interface. As a platform for experiments, a server is used on a fully patched Ubuntu 14.04 LTS, deployed on a VPS.
Here we consider the scenario in accordance with which we have a remote server and a local server. We work from time to time with one, then with another.
First, install Git on these two machines. Git can be installed either from a package available in the repository of the distribution used, or manually. Here we will use the simplest method:
Then add a user for Git:
In order to simplify access to a remote server, we will configure ssh login without a password.
Create ssh-keys on the local computer:
The system will ask you where to save the key. If you are satisfied with the standard key storage location, just press Enter. Then you will be asked to set a password that will be needed to access the remote server.
The above command generates two keys - public and private. Record or remember the location of the public key. We will need it in the next step.
Now you need to copy these keys to the server, which will make it possible to establish a communication channel between the two machines. On the local computer, run the following command:
Now connect via ssh to the server and create a project directory for Git. For the repository, you can use any folder that seems appropriate to you:
Then go to this directory:
Create an empty repository:
If the command succeeds, you will see a message similar to the following:
Now you need to create a Git repository on the local machine. To do this, create a directory:
Go to her:
Next, we create project files in it, and, remaining in it, we initialize the repository:
The successful initialization of the repository can be judged by the following message:
Now add the project files to the repository:
From now on, after adding new files to the project or after modifying existing ones, you will need to execute the above command (
In our case, there is a file called GoT (it contains the text of the Game of Thrones review), in which some changes have been made. Changes made to another file. Therefore, when executing the command, the system reported what changes were made to the files. In the above command, the
For example:
Until now, we have worked on a local server. Now we need to send local data to a remote server, which will make them available via the Internet and will allow to organize joint activities of several developers:
Now you can send changes from the local machine to the server or download data from the server using, respectively, the
If other programmers intend to work on the project, first they need to clone the repository from the server on their local computers:
In this command,
Then, after cloning, go to the project directory:
You, instead of the
We believe that the above information is sufficient to help those who have not had experience with Git to begin using their own Git-server. If you need some kind of GUI tool to work with the project on a local machine, you can use something like QGit or GitK for Linux.

QGit is a graphical tool for local working with Git repositories.
Above, we described a system that allows you to collaborate on projects using Git, based entirely on command-line tools. Working in such an environment is, of course, more difficult than with GitHub. Ironically, although GitHub is the world's largest code hosting service, its own code is closed. This is not an open source project, that is, you cannot take this code and create your own GitHub based on it. Unlike something like WordPress and Drupal, GitHub code cannot be downloaded and deployed on its own server.
But, as is usually the case in the open-source world, projects with a closed code can be replaced. In this case, the replacement of GitHub can serve as a very attractive open source project GitLab. It allows everyone to deploy something like GitHub on their own servers. At the same time, GitLab can be used to support the work of a large company or a large team, and to organize its own repository for a small project that is not yet ready to be presented to the general public.
GitLab uses the business model for open-source projects. Namely, there is a freely distributed version of the software, which everyone can deploy on their servers, and a hosting code similar to GitHub.
The open source version of GitLab has two editions - the free Community Edition (Core) and the paid Enterprise Edition (there are its Starter, Premium and Ultimate versions). The latter is based on Community Edition, which scales well, and, in addition, includes some additional organization-oriented features. This is a bit like positioning WordPress.org and WordPress.com.
GitLab features include Git repository management, code review tools, an error tracking system, activity tapes, wiki support. There is also GitLab CI - a system of continuous integration.
Many VPS providers, like DigitalOcean, offer GitLab droppers to users. If you want to deploy GitLab on your own server, you can install this system manually. GitLab offers the Omnibus package for various operating systems. Before installing GitLab, it may be necessary to set up an SMTP mail server so that the system can send email. It is recommended to use Postfix for this purpose. Therefore, before installing GitLab, install Postfix:
During the installation of Postfix, the system will ask you some questions. You should not skip the answers to them, but if the answers are not given, you can reconfigure the system by running the following command:
After running this command, you need to specify the Internet Site parameter and specify a mail identifier for the domain that GitLab will use. Next, you will need to specify a username for Postfix and a mailing address. The values of the remaining parameters can not be changed. After installing and configuring Postfix, you can do GitLab.
Download the latest package from here using
Now install it:
Set up and run GitLab:
Now you will need to set up a domain name in the configuration file, which will enable you to work with GitLab. Open the file:
In this file, you will need to edit the

GitLab website open in browser
By default, the system creates an administrator account with the name

Password change on GitLab website
After the password is changed, you can enter the site and start working with projects.
Work with projects in GitLab
GitLab is a serious system with a lot of possibilities. How to understand them? Allow yourself to bring here a slightly modified quotation from the movie “The Matrix”: “Alas, it is impossible to tell you what GitLab can do. You should see for yourself. "
Dear readers! Do you use your own Git servers? If so, please tell us how you configure and support them.

Why do you need your own Git server?
GitHub is a great service, but especially if you are an individual developer or a small company, you will encounter some limitations when working with GitHub. One of them is that the free package does not include the hosting of private repositories. For this opportunity you have to pay at least $ 7 per month .
In such situations, in order to get around the restrictions, or if you need to control what happens to your repositories, it is best to create your own Git-server. This, on the one hand, will help to save, and on the other - will give full control over the server. Among advanced Linux users, the practice of using their own Git servers, hosted, one might say, for free, on the servers they already use is quite common.
')
In this tutorial, we’ll talk about two approaches to managing a code base using our own Git server. The first is to use the usual Git-server, and the second is to use the tool with the GitLab graphical interface. As a platform for experiments, a server is used on a fully patched Ubuntu 14.04 LTS, deployed on a VPS.
Using git
Here we consider the scenario in accordance with which we have a remote server and a local server. We work from time to time with one, then with another.
First, install Git on these two machines. Git can be installed either from a package available in the repository of the distribution used, or manually. Here we will use the simplest method:
sudo apt-get install git-core Then add a user for Git:
sudo useradd git passwd git In order to simplify access to a remote server, we will configure ssh login without a password.
Create ssh-keys on the local computer:
ssh-keygen -t rsa The system will ask you where to save the key. If you are satisfied with the standard key storage location, just press Enter. Then you will be asked to set a password that will be needed to access the remote server.
The above command generates two keys - public and private. Record or remember the location of the public key. We will need it in the next step.
Now you need to copy these keys to the server, which will make it possible to establish a communication channel between the two machines. On the local computer, run the following command:
cat ~/.ssh/id_rsa.pub | ssh git@remote-server "mkdir -p ~/.ssh && cat >> ~/.ssh/authorized_keys" Now connect via ssh to the server and create a project directory for Git. For the repository, you can use any folder that seems appropriate to you:
git@server:~ $ mkdir -p /home/swapnil/project-1.git Then go to this directory:
cd /home/swapnil/project-1.git Create an empty repository:
git init --bare If the command succeeds, you will see a message similar to the following:
Initialized empty Git repository in /home/swapnil/project-1.git Now you need to create a Git repository on the local machine. To do this, create a directory:
mkdir -p /home/swapnil/git/project Go to her:
cd /home/swapnil/git/project Next, we create project files in it, and, remaining in it, we initialize the repository:
git init The successful initialization of the repository can be judged by the following message:
Initialized empty Git repository in /home/swapnil/git/project Now add the project files to the repository:
git add . From now on, after adding new files to the project or after modifying existing ones, you will need to execute the above command (
git add . ). In addition, you will need to run the git commit command, setting messages that describe commits. It looks like this: git commit -m "message" -a [master (root-commit) 57331ee] message 2 files changed, 2 insertions(+) create mode 100644 GoT.txt create mode 100644 writing.txt In our case, there is a file called GoT (it contains the text of the Game of Thrones review), in which some changes have been made. Changes made to another file. Therefore, when executing the command, the system reported what changes were made to the files. In the above command, the
-a option means processing all the repository files. If you made changes to only one file, you can, instead of the -a option, specify the name of this file.For example:
git commit -m "message" GoT.txt [master e517b10] message 1 file changed, 1 insertion(+) Until now, we have worked on a local server. Now we need to send local data to a remote server, which will make them available via the Internet and will allow to organize joint activities of several developers:
git remote add origin ssh://git@remote-server/repo-<wbr< a="">>path-on-server..git Now you can send changes from the local machine to the server or download data from the server using, respectively, the
push or pull options: git push origin master If other programmers intend to work on the project, first they need to clone the repository from the server on their local computers:
git clone git@remote-server:/home/swapnil/project.git In this command,
/home/swapnil/project.git is the path to the project folder on the remote server, in your case there will be another path.Then, after cloning, go to the project directory:
cd /project You, instead of the
project will be the name of another directory. Now you can start working on the project, accept the changes and send them to the server: git commit -m 'corrections in GoT.txt story' -a git push origin master We believe that the above information is sufficient to help those who have not had experience with Git to begin using their own Git-server. If you need some kind of GUI tool to work with the project on a local machine, you can use something like QGit or GitK for Linux.
QGit is a graphical tool for local working with Git repositories.
Using GitLab
Above, we described a system that allows you to collaborate on projects using Git, based entirely on command-line tools. Working in such an environment is, of course, more difficult than with GitHub. Ironically, although GitHub is the world's largest code hosting service, its own code is closed. This is not an open source project, that is, you cannot take this code and create your own GitHub based on it. Unlike something like WordPress and Drupal, GitHub code cannot be downloaded and deployed on its own server.
But, as is usually the case in the open-source world, projects with a closed code can be replaced. In this case, the replacement of GitHub can serve as a very attractive open source project GitLab. It allows everyone to deploy something like GitHub on their own servers. At the same time, GitLab can be used to support the work of a large company or a large team, and to organize its own repository for a small project that is not yet ready to be presented to the general public.
GitLab uses the business model for open-source projects. Namely, there is a freely distributed version of the software, which everyone can deploy on their servers, and a hosting code similar to GitHub.
The open source version of GitLab has two editions - the free Community Edition (Core) and the paid Enterprise Edition (there are its Starter, Premium and Ultimate versions). The latter is based on Community Edition, which scales well, and, in addition, includes some additional organization-oriented features. This is a bit like positioning WordPress.org and WordPress.com.
GitLab features include Git repository management, code review tools, an error tracking system, activity tapes, wiki support. There is also GitLab CI - a system of continuous integration.
Many VPS providers, like DigitalOcean, offer GitLab droppers to users. If you want to deploy GitLab on your own server, you can install this system manually. GitLab offers the Omnibus package for various operating systems. Before installing GitLab, it may be necessary to set up an SMTP mail server so that the system can send email. It is recommended to use Postfix for this purpose. Therefore, before installing GitLab, install Postfix:
sudo apt-get install postfix During the installation of Postfix, the system will ask you some questions. You should not skip the answers to them, but if the answers are not given, you can reconfigure the system by running the following command:
sudo dpkg-reconfigure postfix After running this command, you need to specify the Internet Site parameter and specify a mail identifier for the domain that GitLab will use. Next, you will need to specify a username for Postfix and a mailing address. The values of the remaining parameters can not be changed. After installing and configuring Postfix, you can do GitLab.
Download the latest package from here using
wget : wget https://downloads-packages.s3.amazonaws.com/ubuntu-14.04/gitlab_7.9.4-omnibus.1-1_amd64.deb Now install it:
sudo dpkg -i gitlab_7.9.4-omnibus.1-1_amd64.deb Set up and run GitLab:
sudo gitlab-ctl reconfigure Now you will need to set up a domain name in the configuration file, which will enable you to work with GitLab. Open the file:
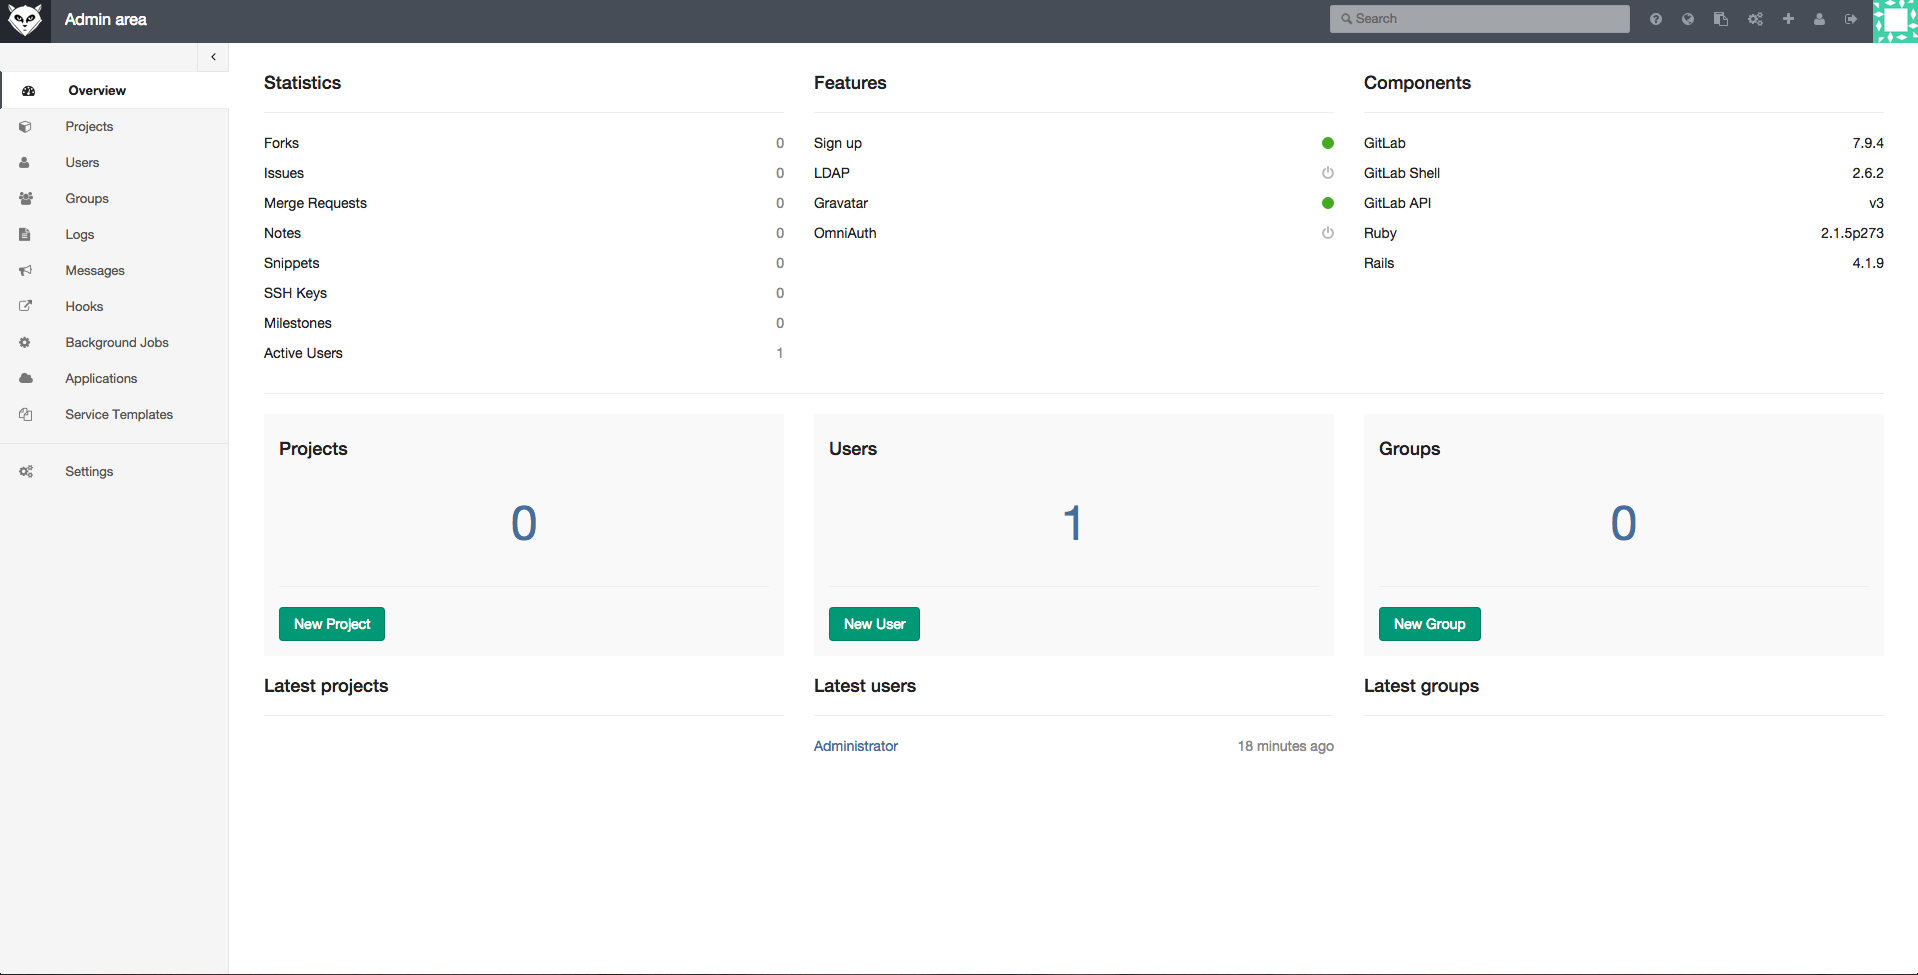
nano /etc/gitlab/gitlab.rb In this file, you will need to edit the
external_url parameter, specifying the server domain name here. After editing the file, it must be saved, after which the newly created GitLab site can be opened in a browser.GitLab website open in browser
By default, the system creates an administrator account with the name
root and password 5iveL!fe . Immediately after the first login to the site, you should change the password.Password change on GitLab website
After the password is changed, you can enter the site and start working with projects.
Work with projects in GitLab
GitLab is a serious system with a lot of possibilities. How to understand them? Allow yourself to bring here a slightly modified quotation from the movie “The Matrix”: “Alas, it is impossible to tell you what GitLab can do. You should see for yourself. "
Dear readers! Do you use your own Git servers? If so, please tell us how you configure and support them.
Source: https://habr.com/ru/post/359216/
All Articles