Reverse engineering of the device firmware on the example of a flashing "rhino". Part 1
On April 26, 2018, INFORION held a conference for students of MSTU. Bauman SMARTRHINO-2018 . A small device based on the STM32F042 microcontroller was prepared especially for the conference.
This rhino was the
The first part of the article is based on the conducted master class and is designed for beginners - attention is paid to basic approaches to the reversal of firmware and the features of working with the IDA disassembler.
')
The second part is a bit more complicated, it focuses on the features of the operation of devices based on real-time operating systems.
Carefully, under the cat a flashing rhinoceros and its firmware!
Legend
The seminar participants were offered the following legend.
You got the device and a small instruction to it.
Lighting device "Rhino"
User's manual
The lighting device "Rhino" is designed to illuminate the premises of a small area. The device combines a stylish compact design, bright LEDs with low current consumption and a USB interface for connecting power.
The device is equipped with a Bluetooth-module for remote control. There are ample opportunities to control the light, allowing you to set the hue and saturation for each LED separately.
The device is controlled through special software "Sinezubik".
Enjoy using!
You do not have the mentioned software for device management and you need to write it from scratch . In addition, you must ensure that the device is safe to use.
That is all the researcher has is a device that can be turned on. If there is a device, then you can try to get its firmware by subtracting it from the flash drive of the microcontroller. This stage was skipped to simplify and speed up the master class - participants received a ready firmware image in the form of a binary rhino_fw42k6.bin file (as if they received the firmware, for example, from updates).
An interested reader can also download the firmware for independent research.
The master class was held online - with the opportunity to ask, to offer their own solutions. For participants was available 4 workers "Rhino".
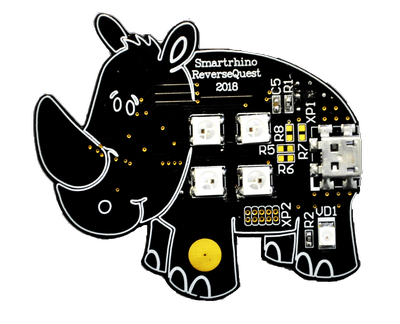
Visual inspection
Briefly: at this stage, an external inspection of the device is carried out in order to search for markings, available connectors.
At the beginning of the seminar, emphasis was placed on first examining the device externally, then starting to reverse the firmware.

First of all, the microcontroller is interested, then the peripheral devices and connectors.
External inspection of the device allowed to establish the following:
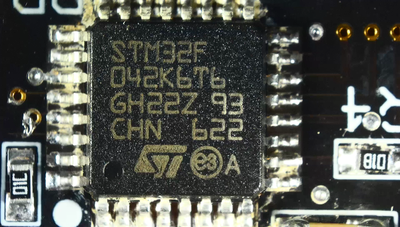
- Microcontroller STM32F042 - here you should immediately refer to the documentation for the microcontroller (if there is one), where you can find out the architecture, microcontroller capacity and many other things (for our case - 32 bit microcontroller on ARM architecture);
- On the back there is a connector without symbols - those who worked with microcontrollers can make a correct assumption that this is a connector for flashing the device (firstly, it is not labeled; secondly, it has 5 contacts, which corresponds to the required number of contacts for microcontroller remaking);
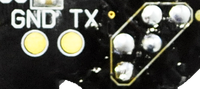
- Contact GND, TX;
- USB-connector to power the device (this is stated in the "Instructions");
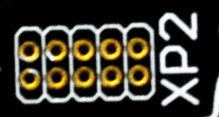
- Unknown XP2 connector on the front of the device;
- An incomprehensible yellow blob on the leg of a rhino is probably a touch button.

The smartest participants immediately turned on the power to the devices and saw the following:

It was also discovered that there were available Bluetooth devices with the names RHINOCEROS-220x , when connected to which a virtual COM port is created in the system. It turned out to be convenient to connect to the device via Bluetooth from a smartphone and interact via the mobile application "Serial Bluetooth Terminal" or similar.
It was found that when sending arbitrary text to the COM port, the device returns the response
Unknown command .Initial firmware research
Briefly: at this stage a preliminary analysis of the firmware is performed. View rows. Download firmware in IDA Pro.
Before analyzing the firmware code, it makes sense to check if the code is not packed. There may be different approaches, in the simple case it is enough to use the strings utility to get the strings of a binary file (given in the abbreviation):
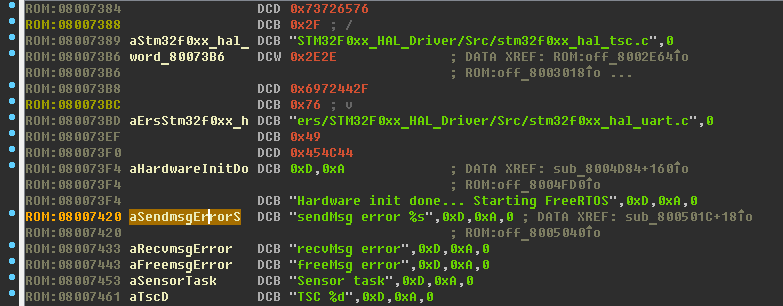
../Drivers/STM32F0xx_HAL_Driver/Src/stm32f0xx_hal_cortex.c ../Drivers/STM32F0xx_HAL_Driver/Src/stm32f0xx_hal_dma.c … Hardware init done... Starting FreeRTOS sendMsg error %s TSC %d SET AUTH %d cmd[%d] %s UART task Bluetooth task AT+AB ShowConnection … AT-AB -BypassMode- state bypass ERROR: Wrong header length cmd: %s led idx %d hue %d sat %d val %d msg %s addr=%x, size=%x User auth pass %s Congrats amigo! Wrong won't give up! ERROR: Unk cmd I've got a super power and now I'm seeing invisible tactical combatant nano-ants everywhere … uartRxTask watchdogTask sensorTask bluetoothTask ledsTask There were a lot of lines - you can make the assumption that the firmware is not compressed and not encrypted. Already at this stage, you can pay attention to some remarkable lines, for example, formatted lines, lines with a description of errors and an indication of the operating system ( did you see them? ). The presence of meaningful lines, by and large, can be considered half of the successful reverse.
Well, let's try to load the firmware into the most popular disassembler. We will use IDA version 6.9 for 32-bit code (since the microcontroller is 32-bit).
When opening the firmware file, IDA cannot automatically determine the architecture and entry point - you need to help it.
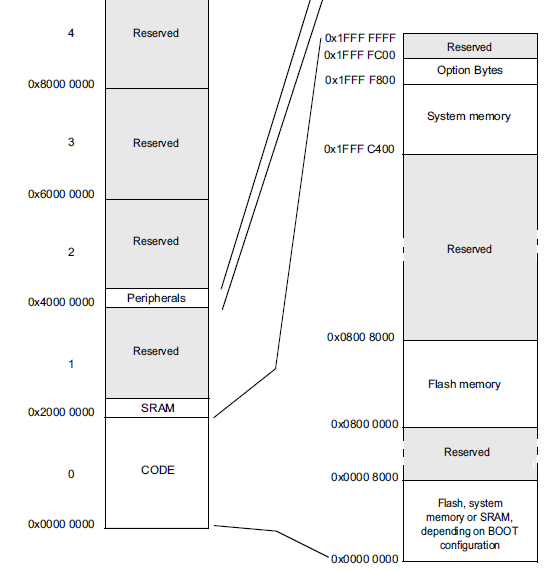
At this stage, you must again refer to the documentation for the STM32F042x4 STM32F042x6 microcontroller and see section 5 “Memory mapping”:
As the Processor Type, select ARM Little endian , set the Manual load checkbox , click OK:

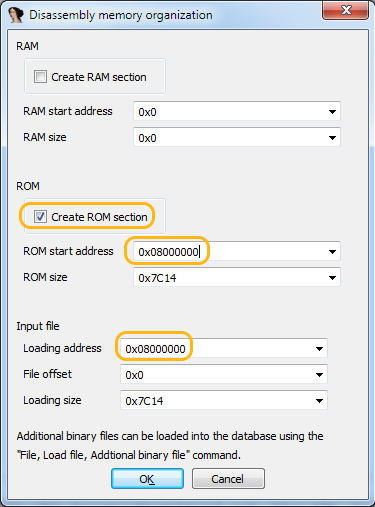
In the “ Do you want to change the processor type ” window, click Yes, then IDA prompts us to create RAM (RAM) and ROM (ROM) segments, set the ROM checkbox.
Now we have to specify the start address of the ROM. On the diagram you need to look at the Flash section - these are addresses 0x08000000 - 0x08008000 . We also indicate that it is in the same address that we want to download the firmware file: Loading address = 0x08000000 .
In the window " ARM and Thumb mode switching instructions " click OK.
Further, IDA says that it knows nothing about arbitrary binary files and you have to determine the entry point — the main function — yourself. Click OK.
Download done. You can study the firmware.
Open the rows window (Shift + F12). You can pay attention to the fact that not all strings match the results from the strings utility - IDA did not recognize everything, unfortunately. After a while we will help her ...
Beginner's Note
- Any program / firmware is a set of binary data. IDA Pro can interpret this source file data in different ways (present data as commands or data in one format or another). At the same time there is no “Back” button (Ctrl + Z) to cancel the selected display - you need to know how to switch between different display modes. ( Cheat sheet with IDA Pro hotkeys )
- Reverse engineer from apparent chaos of binary data restores logic, structure and readability.
- Strings - important information when reversing! Since, in fact, among the entire set of binary data are the most simply and quickly perceived by man. Lines allow to draw conclusions about the purpose of functions, variables, and code blocks.
- Name the functions you have viewed ! By default, IDA gives names to functions by their starting addresses. When analyzing, it is very difficult to keep these addresses in your head; it is much easier to use meaningful names. In order to name a function, at least a quick analysis of it is enough - this will already be an important help for further analysis.
- Name the recognized variables! In order to more effectively analyze the blocks of code and functions, it makes sense to name the variables that IDA recognized, in accordance with their purpose (all, as in the best programming practices).
- Leave a comment , so as not to forget the important. By analogy with programming, comments when reversed allow you to further explain the logic of the program or its individual sections.
- Create structures as much as possible! IDA in its arsenal has a means of working with structures, it makes sense to master this tool and use it if necessary. If there are structures, the code under study will be even easier to read.
String analysis
Briefly: String analysis can help make a rough plan for examining a binary file.
So the lines.
Hardware init done... Starting FreeRTOS sendMsg error %s … cmd[%d] %s rsp[%d] %s UART task Bluetooth task … AT+AB SPPDisconnect AT+AB DefaultLocalName RHINOCEROS-2205 … Only on the basis of the lines you can already get a lot of information:
- Operating system - FreeRTOS;
- Presence of formatted strings - most likely printf-like functions are used, it will be possible to set the purpose of registers / variables
- Names of tasks (tasks) - we can assume the purpose of these tasks and related functions;
- Using AT commands - presumably the interaction between the microcontroller and the Bluetooth module is built in this way.
Not always everything is so rosy when analyzing firmware - lines and debug-information may not be at all or they are uninformative, but when creating the firmware we intentionally did not complicate the process of reverse engineering.
Identification of standard functions
Briefly: at this stage it is necessary to make sure that the strings are really recognized, after which some standard C functions are to be identified.
After downloading the firmware and automatic analysis, IDA recognized the function bodies (not all, by the way), but among the function names there is not a single “normal” (only automatic names from IDA), which can be a little complicated compared to the reverse ELF or PE file .

Thus, in the course of the study, it is necessary to determine the purpose of not only the specific functions of a specific firmware, but also to identify standard C-functions. A reasonable question may arise - where is the guarantee that such functions are in the firmware and that they are standard? Here it is worth saying that usually when creating software (including firmware), in 9 cases out of 10, they do not bother with creating their own unique libc library, but using what has already been written and tested by time. That is why in 90% of cases it is possible to make an assumption about the presence of standard C functions.
Since Hex-Rays Decompiler can turn an ARM assembler into a C-code, let's use this pleasant opportunity. It is worth noting that the presence of a decompiled listing does not eliminate the need to understand the assembler , especially since the decompile does not exist for all platforms.
Open the rows window in IDA (Shift + F12).
Select the line sendMsg error% s , open links to this line (X key - Xrefs - Cross References) - IDA recognized the links to the line, this is good:

However, among the lines highlighted in green in the disassembler, there are simply bytes marked in red. However, some lines are clearly not fully recognized . So, for example, if you set the cursor to the address
0x080074E6 and press the A key (then agree with the sentence “Directly convert to string?”), You get the string “No device connected”. In the same way, you can go through all the line-like data and turn them into strings (or, for example, write a Python script that runs through the specified address range and creates strings).The next obstacle that may arise is unrecognized references to strings (even if the string was recognized). Try to walk through the lines by pressing the X key. For example, in my case, the link to the string “recvMsg error” was not found. An object reference may not be found for two obvious reasons:
- there is no code that refers to the current object;
- IDA did not recognize the link.
We will try to exclude the first of them by performing a binary search on the firmware. Open the binary search window (Alt + B), enter the address of the string, do not forget to put a tick "Find all occurrences":

Received one entry:

Let's
0x0800506 to it (address 0x0800506 ):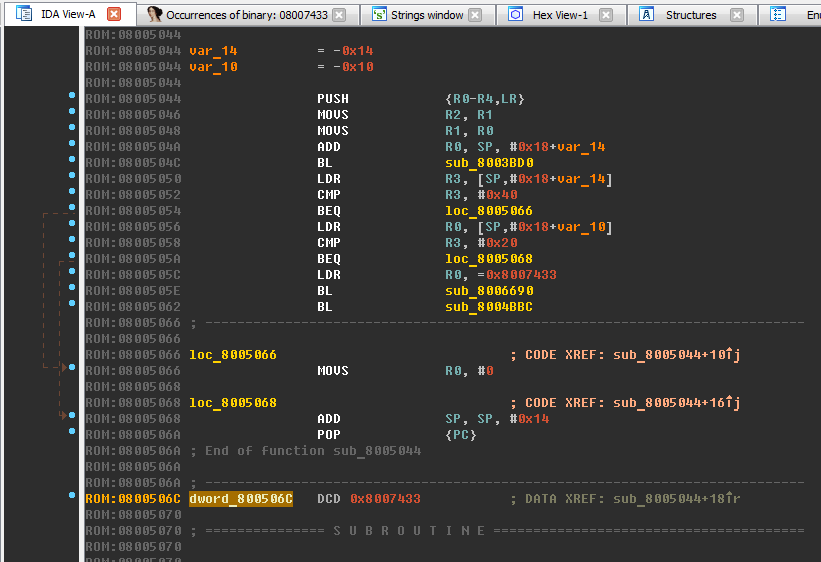
Turn the DWORD number into offset by pressing the O key. A link to the line appeared:

Why are duplicate strings created?
This is due to the ARM architecture feature - the command length is fixed and is 32 bits, therefore, there is no possibility in the command to transfer the full address of the object (also 32-bit). Therefore, the code uses a short offset to the address located next to the function where the full 32-bit address of the object is already stored.
Place the cursor a little higher - inside the function sub_8005070 (range
0x08005070-0x08005092 ). Switch to decompiled listing by pressing Tab: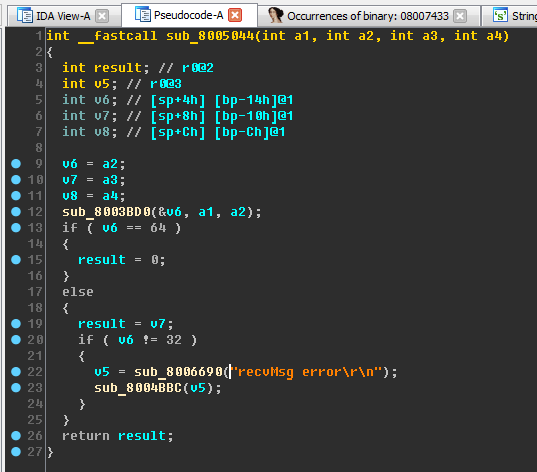
Pay attention to the sub_8006690 function. If you go back to the “sendMsg error% s” line, you can see that it is also passed to the sub_8006690 function. Lines with formatting characters can lead to the assumption that the sub_8006690 function is a standard printf . Let it be printf now at the level of speculation (even if our assumption turns out to be wrong, it will still allow us to advance in the study).
Put the cursor on the name sub_8006690, press the N key, enter the new name x_printf . For convenience, we add the “x_” prefix (from the word “eXecutable”) - this is how we can distinguish the functions we renamed from the functions that IDA gave names to automatically.
We can assume that the preparatory part has been completed; now we turn to the analysis of the task responsible for handling the Bluetooth connection. You can reach it again through the lines. In many IDA windows, you can search by Ctrl + F. So, you can immediately select the line with the word "bluetooth":

What is task?
Task (task, task) - a concept from the world of real-time operating systems (RTOS). If simply, then the task can be represented as a separate process. You can read more in the series of articles about FreeRTOS.
Bluetooth
Briefly: identify and analyze the function of processing commands transmitted via Bluetooth. You will need to create an additional memory segment in IDA.
The string “Bluetooth task \ r \ n” does not have cross-references - we use again the binary search, we get the address where it is used -
0x080058A0 , go there and see a list of partially recognized links:
Create full-fledged links from them (by proclaiming the O key, or by writing a Python script for IDA).
Perhaps not all links are created (addresses highlighted in green):
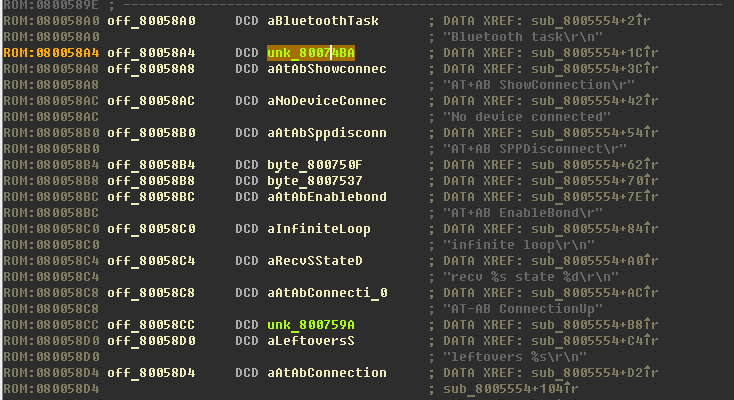
Following the links highlighted in green, we see that there are no lines created. We correct - we help Ida.
Let's return to the line “Bluetooth task \ r \ n”. Now in the code at
0x08005556 there is a link to this line: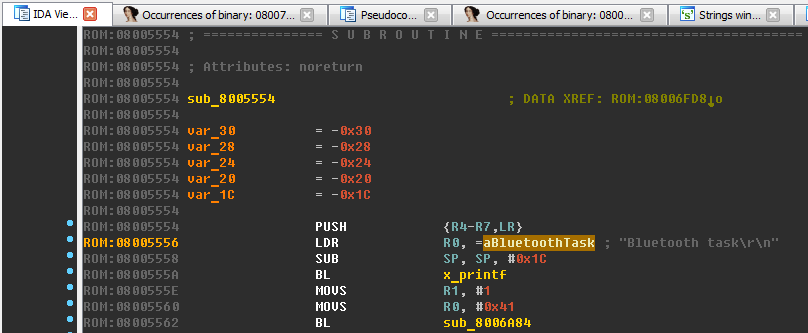
Here we see that this string is passed as an argument to the function x_printf we’ve already seen. Do not forget to give the speaker the name of the current function "sub_8005554", for example, "x_bluetooth_task".
Switch to the decompile and view the function completely. Pay attention to line 132, where a certain number is passed to the function x_printf. If we change the display of a number from decimal to hexadecimal (H key), we see the number
0x8007651 , which is very similar to the address.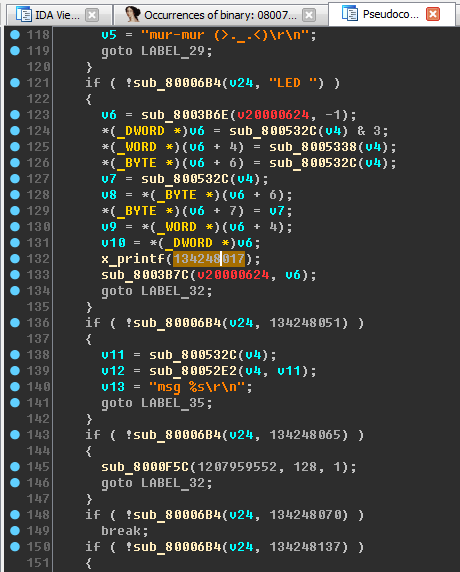
Already familiar situation - IDA did not recognize the link. Helping her, however, for this you need to switch from decompile to disassembler (Tab key): do offset, go through it, create a string. Go back to the decompile, press F5 (update).
We are happy to improve the code:

Let's pay attention to line 132. Again, besides the format string, x_printf must also pass a variable-length argument list (va_list), IDA did not recognize this ... Well, you understand, yes? Let's help her.
Set the cursor on the name of the function x_printf, press Y - the window for changing the prototype of the object will open. Let's enter the correct prototype of the printf function :
int x_printf( const char *format, ... ) Um, sorry, you have an error in the printf prototype ...
I agree, it will be right
void x_printf( const char *format, ... ) . And later we will fix it.IDA will display the arguments for the format string:


It's time to set the destination (names) of variables (again, the lines help us):
x_printf("recv %s state %d\r\n", v0, v25);-x_printf("recv %s state %d\r\n", recv_data , state );x_printf("cmd: %s\r\n", v24);-x_printf("cmd: %s\r\n", cmd );x_printf("addr=%x, size=%x\r\n", v14, v15);-x_printf("addr=%x, size=%x\r\n", addr , size );
Other names are not so obvious, but not super-difficult to understand.
For example, pay attention to the code section:

The variable v3 is compared with the number 3, then the message about the wrong header length appears. It is logical to rename:
- v3 variable in header_len ;
- sub_80006C8 function in x_strlen (you can enter this function and check our assumption).
Next, pay attention to the following code block:

The sub_80006B4 function is used several times. Inside, it looks like this:

Did you recognize her?
strcmp . Rename. We create the harmonious readable code from chaos and fragmentation.
Now pay attention to the variables
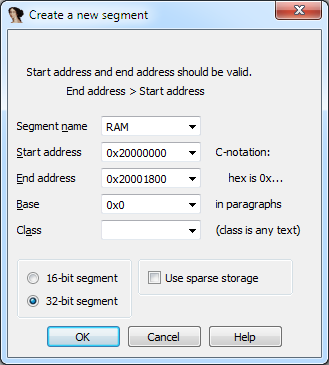
v20000624, v20000344, v20000348 . IDA highlighted them in red. This is because they refer to addresses that are not in the current disassembler database. If you again refer to the documentation for the microcontroller, you can see that the address range 0x20000000-0x20001800 refers to RAM.Why 0x20001800?
0x1800 is 6Kb RAM, and this is indicated in the documentation.
If a variable refers to a non-existent area of memory, xrefs will not be available for it - the study will cause discomfort ... For convenience and performance, it makes sense to create an additional memory segment . Open the segments window (Shift + F7), add the RAM segment:
Update decompil. Pay attention to the variable unk_20000344:
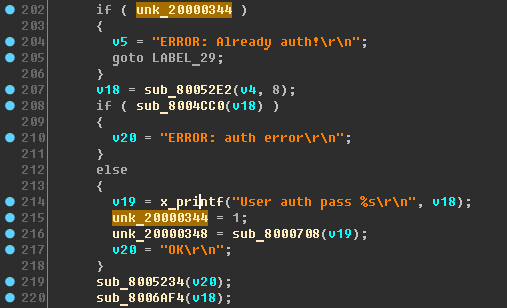
It seems that this is a kind of auth_flag (authorization flag). So we write, that is, we call this variable. In my case, no cross-references were found - use a binary search and create links.
Check on device
Briefly: check individual assumptions on a running device.
Static analysis is a cool thing, but even better if you have the opportunity to examine the code over time. There is also room for creativity, but if you don’t complicate things, the simplest thing is to connect to the device via Bluetooth, send a command and look at the result.
So, for example, when sending the string “ZZZ” the device will respond with the line
ERROR: Wrong header length\r\n , when sending “MEOW” (this line is in the code under study, passed to the strcmp function) we will see mur-mur (>._.<)\r\n , and when sending “ZZZZ” - ERROR: Unk cmd . Thus, the sub_8005234 function can be renamed to x_bluetooth_send .Make a list of commands that may be supported by the device, and immediately check them out. Here's what happened:
“ECH1”- returns “OK”, turns on the echo mode - the command is duplicated to the sender;“ECH0”- turns off the echo mode;“MEOW”- returns “mur-mur (> ._. <) \ R \ n” - either paschalka, or debugging command;“LED “- turns off one of the bright LEDs;“UART”- returns “OK”;“BLE “- flashes once with a red LED;“READ”- returns “ERROR: Not auth!”“WRIT”- returns “ERROR: Not auth!”“AUTP”- returns “ERROR: auth error!”“SETP”- returns “ERROR: Not auth!”“VIP “- returns “Wrong won't give up!”
Intermediate conclusions regarding the protocol:
- the command consists of at least 4 characters;
- There are some rather strange commands that are somehow related to authorization (why is authorization on a lighting device?).
Improved code. Structure creation
In short: if possible, it makes sense to create data structures - a great help for analysis.
Go ahead. The task at least for us is to learn how to control the LEDs.
The experiment showed that the LED command is associated with large LEDs - at least it allowed turning off one of the four large LEDs. Let's see what is in this thread:

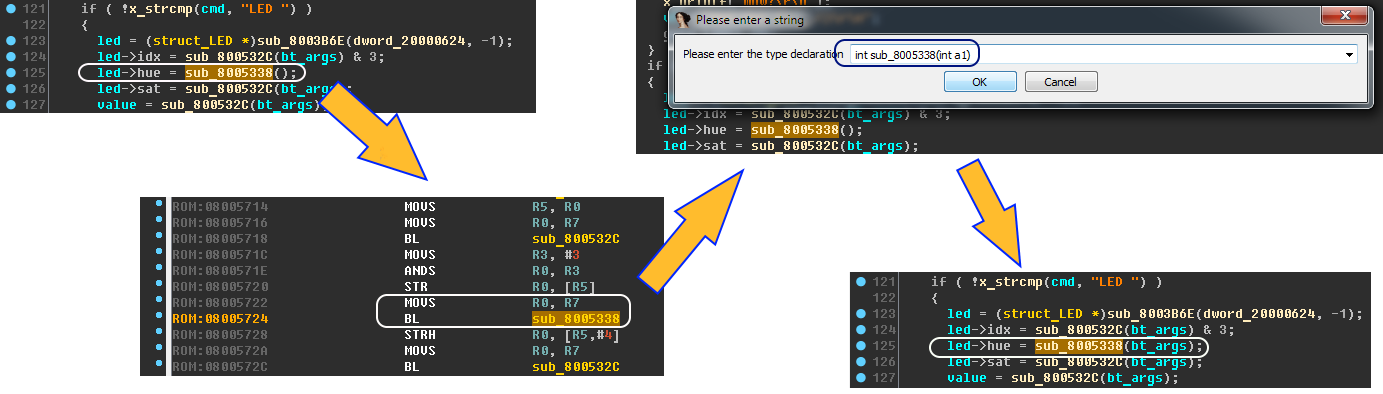
Here it would be possible to rename variables, confusing only constructions like
*(_WORD *)(v6 + 4) = sub_8005338(v4); In most cases, the variable v6 is a pointer to a structure. For convenience, we will also create this structure . Context menu for v6 variable - select the item “Create new struct type”.
IDA proposes the following definition for structure:

Here we trust the automatics regarding the structure field types, but set up readable names based on the data from the format string:
struct struct_LED { _DWORD idx; _WORD hue; _BYTE sat; _BYTE val; }; After creating the structure, the code became even nicer:

The variable v6 was renamed led in the process. Additional variables v7 and v8 have also been renamed for convenience. Do not be confused by the appearance of additional variables - the compiler knows better.
According to the information from the format bar, it can be concluded that the color is set in HSV format (Hue, Saturation, Value). To translate colors from RGB, you can use the table .
It’s still hard to say something about the v4 variable for sure, except that it is a structure and is created in the sub_8005298 function:


It can be assumed that the variable v4 is a command argument, sent via Bluetooth. Let's just call it:
- v4 - bt_args
- sub_8005298 - x_get_bt_args
Decompile may lose previously recognized information.
When manipulating the names and data types in the decompile, function arguments may disappear or appear. In this case, it is necessary for such functions to explicitly indicate their prototype (the Y key on the function header). Due to the fact that in ARM, the first 4 arguments are passed through registers, IDA can “lose” these arguments when decompiling, in this case ... we rush to the aid of IDE. If it is not clear on the decompile which arguments are passed to the function, go to the disassembly listing and look at the registers R0-R3 - are there any values entered in them before referring to the function of interest? If they are entered, then in 90% of cases these are the arguments of the function, and you need to prescribe these arguments in the prototype.
Team “LED”
Briefly: the study of the LED-team, we continue to rename functions and variables.
Let's make some more renaming for easy perception:
- sub_8003B6E - x_create_struct
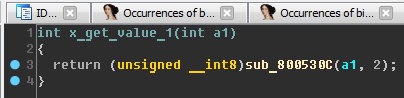
- sub_800532C - x_get_value_1
- sub_8005338 - x_get_value_2
x_get_value_1:
sub_800530C x_get_value_3 . x_get_value_1 x_get_value_2:

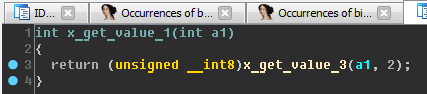
x_get_value_3, (2 4). x_get_value_1 1- , x_get_value_2 – 2-.
x_get_value_3:
- bt_args ( , );
- 2, – 1 ;
- 4, – 2 .
, , x_get_value_3 hex- .
:
- x_get_value_1 — x_get_byte ;
- x_get_value_2 — x_get_word ;
- x_get_value_3 — x_unhexlify .
, x_unhexlify - .
. sub_8005344 :

x_get_dword .
x_unhexlify bt_args — .
:

– ?
, 2 :
- ;
- .
( ) :
- (idx) = 0x00;
- (hue) = 0x00;
- (saturation) = 0xFF;
- (value) = 0xFF.
:
"LED 00 0000 FF FF" — - .:
"LED 000000FFFF" ( «LED» ) – ., , . ( , x_unhexlify), x_unhexlify .
- :
"LED 010078FF80" - :
"LED 0200F0FFFF" - :
"LED 03012FF80"
LED- sub_8003B7C . dword_20000624 . , – (Alt + B):

0x08004FF0, 0x08005D40 . ! – .,
off_8004FF0 off_8005D40 :- sub_8004D84 – , «\r\nHardware init done… Starting FreeRTOS\r\n» — x_main ;
- sub_8005A08 – «LED task\r\n» — x_leds_task .
, dword_20000624 :
- main;
- Bluetooth x_bluetooth_task;
- x_leds_task.
, RTOS, – . :
- dword_20000624 — leds_queue ;
- sub_8003BD0 — x_queue_recv ;
- sub_8003B7C — x_queue_send .
, , :


:
- sub_800501C — x_sendMsg ;
- sub_8005044 — x_recvMsg .
, , , x_leds_task .
, .
- .
- .
- .
- , «» Bluetooth .
- Bluetooth.
. .
Source: https://habr.com/ru/post/359116/
All Articles