Allure-framework. Part 1
On the Internet, there are not so many comprehensive Russian-language information on the second version of Allure , not to mention the problems with official documentation. We decided to fill this gap and write a series of articles that will help readers to understand the rich functionality of the framework in more detail.
The Allure-framework is successfully used in the work of the functional testing automator in the ESF program and greatly simplifies the analysis of the results of test runs.
In our first article we will tell you what Allure is, what it is for, and how to connect it to your project. We will also consider the assembly of the report itself - both on the local machine and using Jenkins. And we will review all pages of the report.
Go!
Every IT professional who came across test automation was likely to sort out the results of test runs. The more you automate the regression model, the more auto-tests appear in your project, therefore, you or your colleague from functional testing spend more time analyzing reports.
')
Allure Framework is a popular autotest report tool that simplifies their analysis. It is a flexible and lightweight tool that allows you to get not only a brief information on the progress of the tests, but also provides all participants in the production process with maximum useful information from the daily execution of automated tests.
Developers and testers use Allure reports to shorten the life cycle of a defect: test drops can be divided into product defects and defects of the test itself, which reduces the time it takes to analyze a defect and eliminate it. Logs can also be attached to the report, test steps are indicated, attachments with various content are added, information about timings and test execution time is obtained. In addition, Allure-reports support interaction with systems of continuous integration and bug-tracking systems, which allows you to always keep at hand the necessary information about the passage of tests and defects.
Allure test managers give an overview of the project's health, it allows you to understand which project features are covered with tests, how defects are grouped, what is the general trend of the project quality.
Once generated, the Allure report is a readable interactive HTML document that can be saved or sent by mail. You can see a sample report at the link .
In order to get information about the AutoTest performance, from which an informative Allure-report will be generated, it is necessary to connect an adapter to the project with autotests. During the tests, the adapter will collect all the necessary information: the start time of the test, the time of its completion, the error with which the test fell, etc. After passing each test, the adapter will collect all the data and aggregate them into .json files and resource files. From the set of such files, the report itself will be formed later.
For different test frameworks you need different adapters. Consider some of them.
This adapter allows you to collect information from tests developed using the Junit4 framework. To connect the adapter, you need to modify your project's pom.xml. In the properties section add:
Add to the dependencies section:
It is also necessary to modify (or create) the build section as follows:
This adapter allows you to collect information from tests developed on Junit5 . To connect the adapter, you need to modify your project's pom.xml. In the properties section add:
Add to the dependencies section:
It is also necessary to modify (or create) the build section as follows:
This adapter allows you to collect information from tests developed on TestNG . To connect the adapter, you need to modify your project's pom.xml. In the properties section add:
Add to the dependencies section:
It is also necessary to modify (or create) the build section as follows:
Source files are a set of JSON files with test results, as well as some other file types (attachment files with various extensions, .properties, etc.). These files will be automatically generated after running your autotests (in our example in the target / allure-results directory). Then from these files it is necessary to assemble a readable html report.
To build an html report, you need a utility called allure – commandline. There are several ways to get a report:
Method 1:
1. Download the latest version of allure – commandline by the link ;
2. Unpack the archive;
3. Add the path to the bin directory from the unpacked archive to the system environment variable.
To make sure the installation is correct, run the command in the command line
A message like this should appear:
After installing allure – commandline, open the folder with the source files in the explorer (in our example, target / allure-results) and in the command window (terminal) execute the command
After this, the html report itself should be generated, which will automatically open in the default browser.
Method 2 (recommended):
1. Add the allure-maven plugin to your project's pom.xml. To do this, we modify the build section as follows:
2. Make sure that the autotests for which you want to receive the report have already been completed (you can run the tests using the mvn clean test command) and the “target” folder of your project contains the “allure-results” with the source files for the report.
3. Run the command
After that, the html – report itself should be generated, which will automatically open in the browser.
To build an html report on Jenkins, you must install the Allure Plugin for your Jenkins (at this stage Jenkins should already be deployed, set up a Job to run your tests, and the results of the runs should be added to your Workspace).
Installing Allure plugin:
1. Go to Manage Jenkins → Manage Plugins
2. Go to the Available tab
3. In the filter field type Allure plugin
4. Mark the checkbox of the found Allure plugin and click Install without restart
Install Allure Commandline:
Consider the option to install Allure Commandline on a machine that has access to the Maven central.
1. Go to Manage Jenkins → Global Tool Configuration
2. In the Allure Commandline block, click the Add Allure Commandline button.
3. In the Name field enter the name Allure Commandline, for example, Allure 2.6.0
4. Select the version of the library that will be downloaded from the Maven central, for example, 2.6.0
5. Click the Save button.
Job configuration for report assembly:
1. Go to your Job configuration
2. In the Post-build Actions section, click the Add post-build action → Allure Report button.
3. In the Results field, specify the path to the “allure-results” directory with the source files for building the report: target / allure-results
4. Click the Save button.
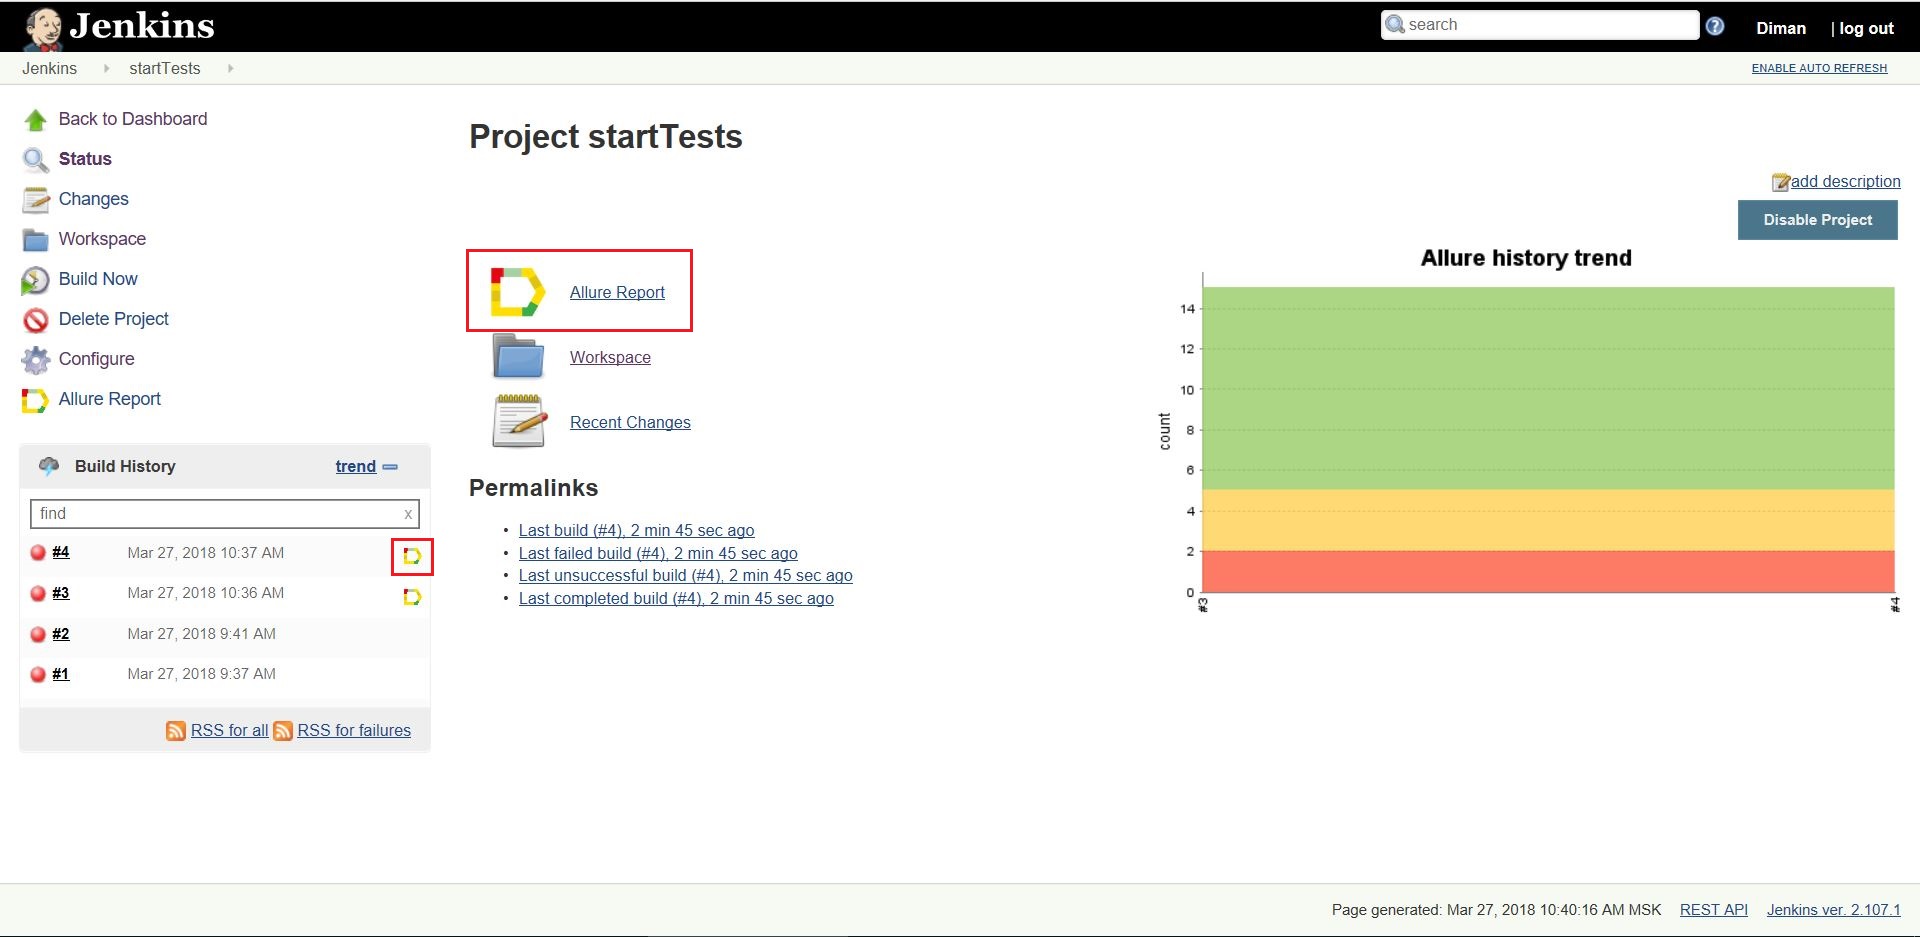
After completing all the settings, run your job. After it is executed, the Allure icon will appear in the Build History block in front of the build number. Clicking on this will display the generated html report:
Overview of Report Pages
1. Page "Overview".
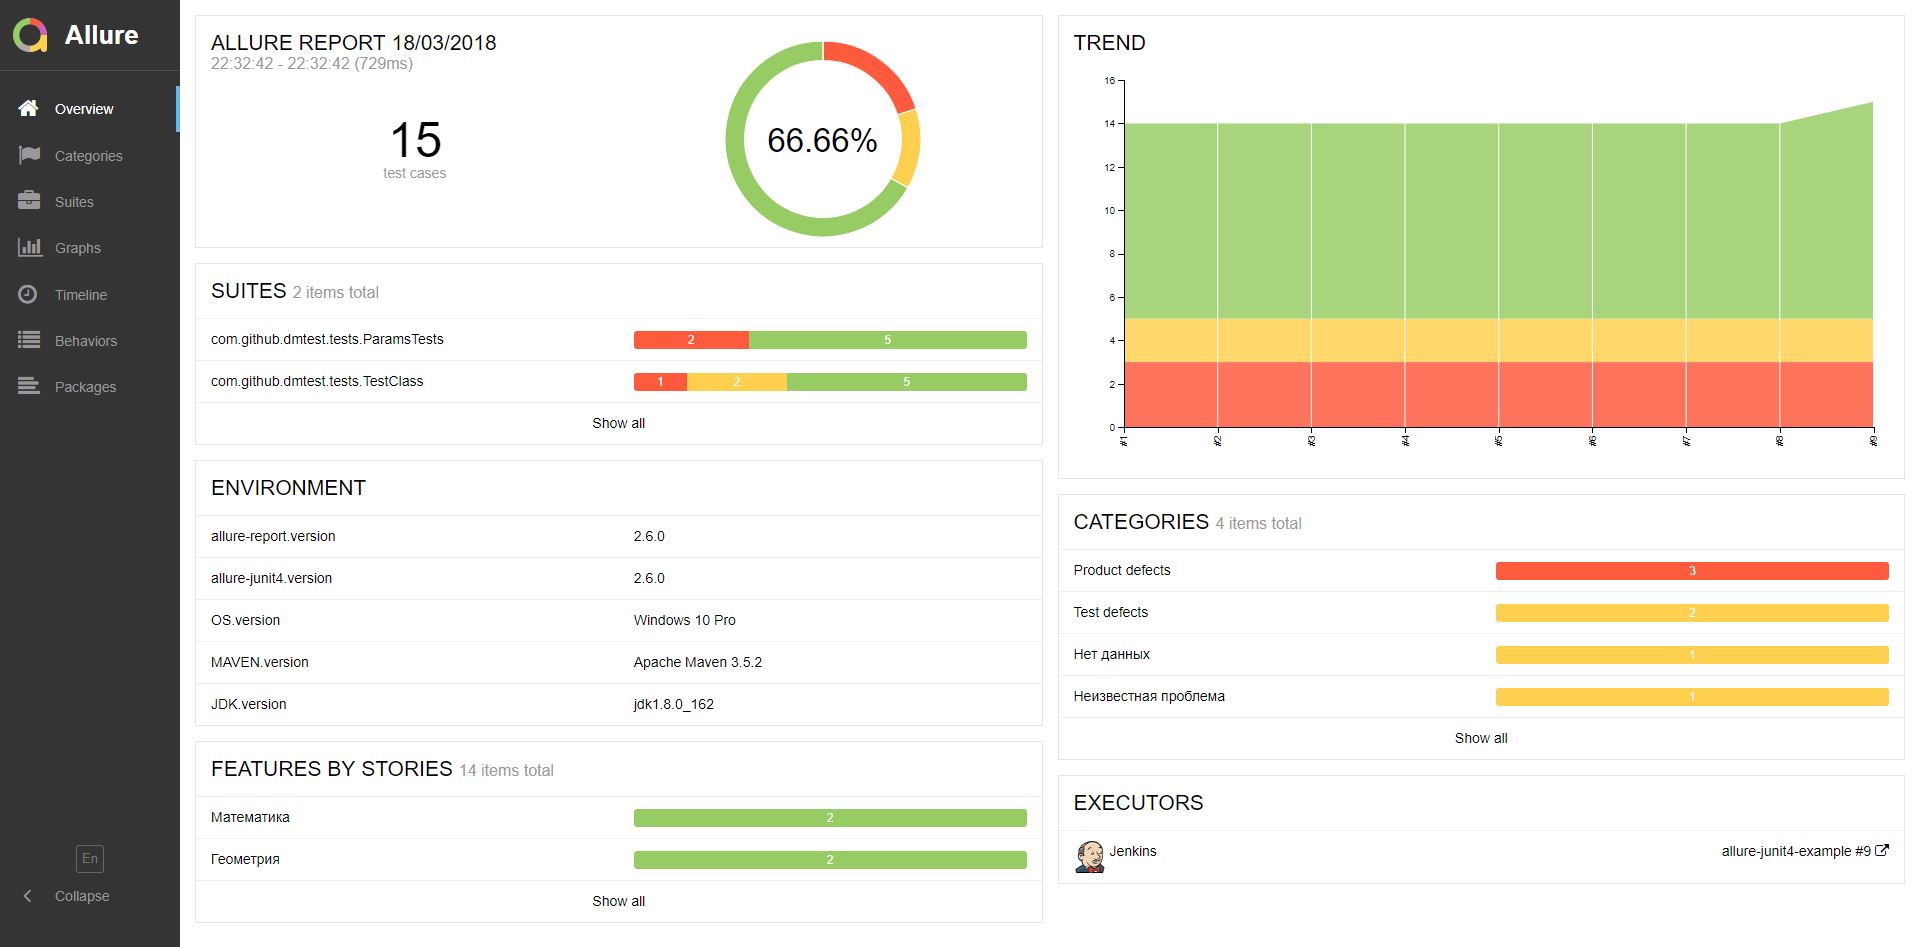
Overview is the main page of the Allure report. It has a block structure. Consider the blocks present on the default home page:
1. Block ALLURE REPORT. Includes the date and time of the test, the total number of cases drove out, as well as a chart indicating the percentage and number of successful tests that fell and failed.
2. Block TREND. Shows the trend of passing tests from assembly to assembly.
3. Block SUITES. Shows the distribution of test results across test sets. In this case, the tests were distributed in packages.
4. Block ENVIRONMENT. Shows the test environment on which the tests were run. This information enters the report from a special file located in the project.
5. CATEGORIES block. Shows the distribution of unsuccessfully passed tests by types of defects.
6. Block FEATURES BY STORIES. Shows the distribution of tests on the functionality that they check.
7. Block EXECUTORS. Shows the performer of the current build. If the execution was performed on a CI tool (for example, Jenkins), then information about the job and the build number will be provided.
2. Page "Categories".

This page provides information on the distribution of defects by type.
3. “Suites” page.

On this page, the standard distribution of the tests performed by test sets or classes containing test methods is presented.
4. Page "Graphs".
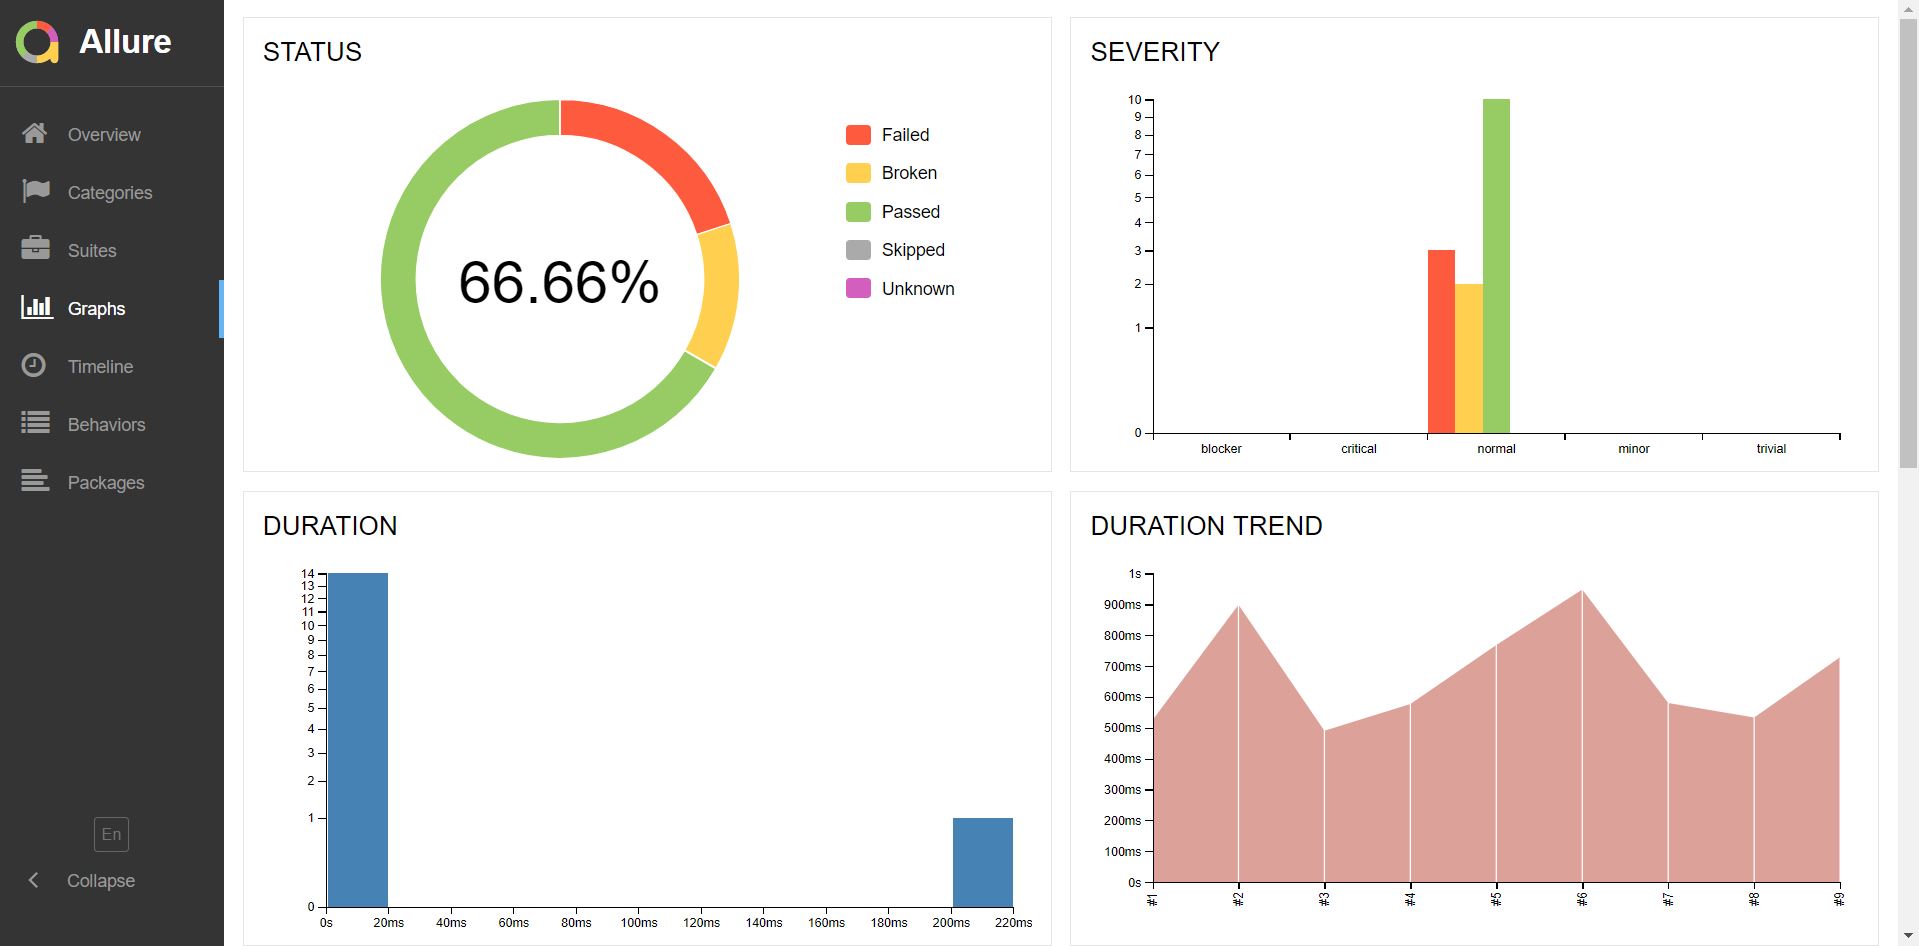
On this page, you can get information about the test run in graphical form: the status of the run, the distribution of tests according to their criticality, duration of passage, restarts, categories of defects, and so on.
5. Page "Timeline".
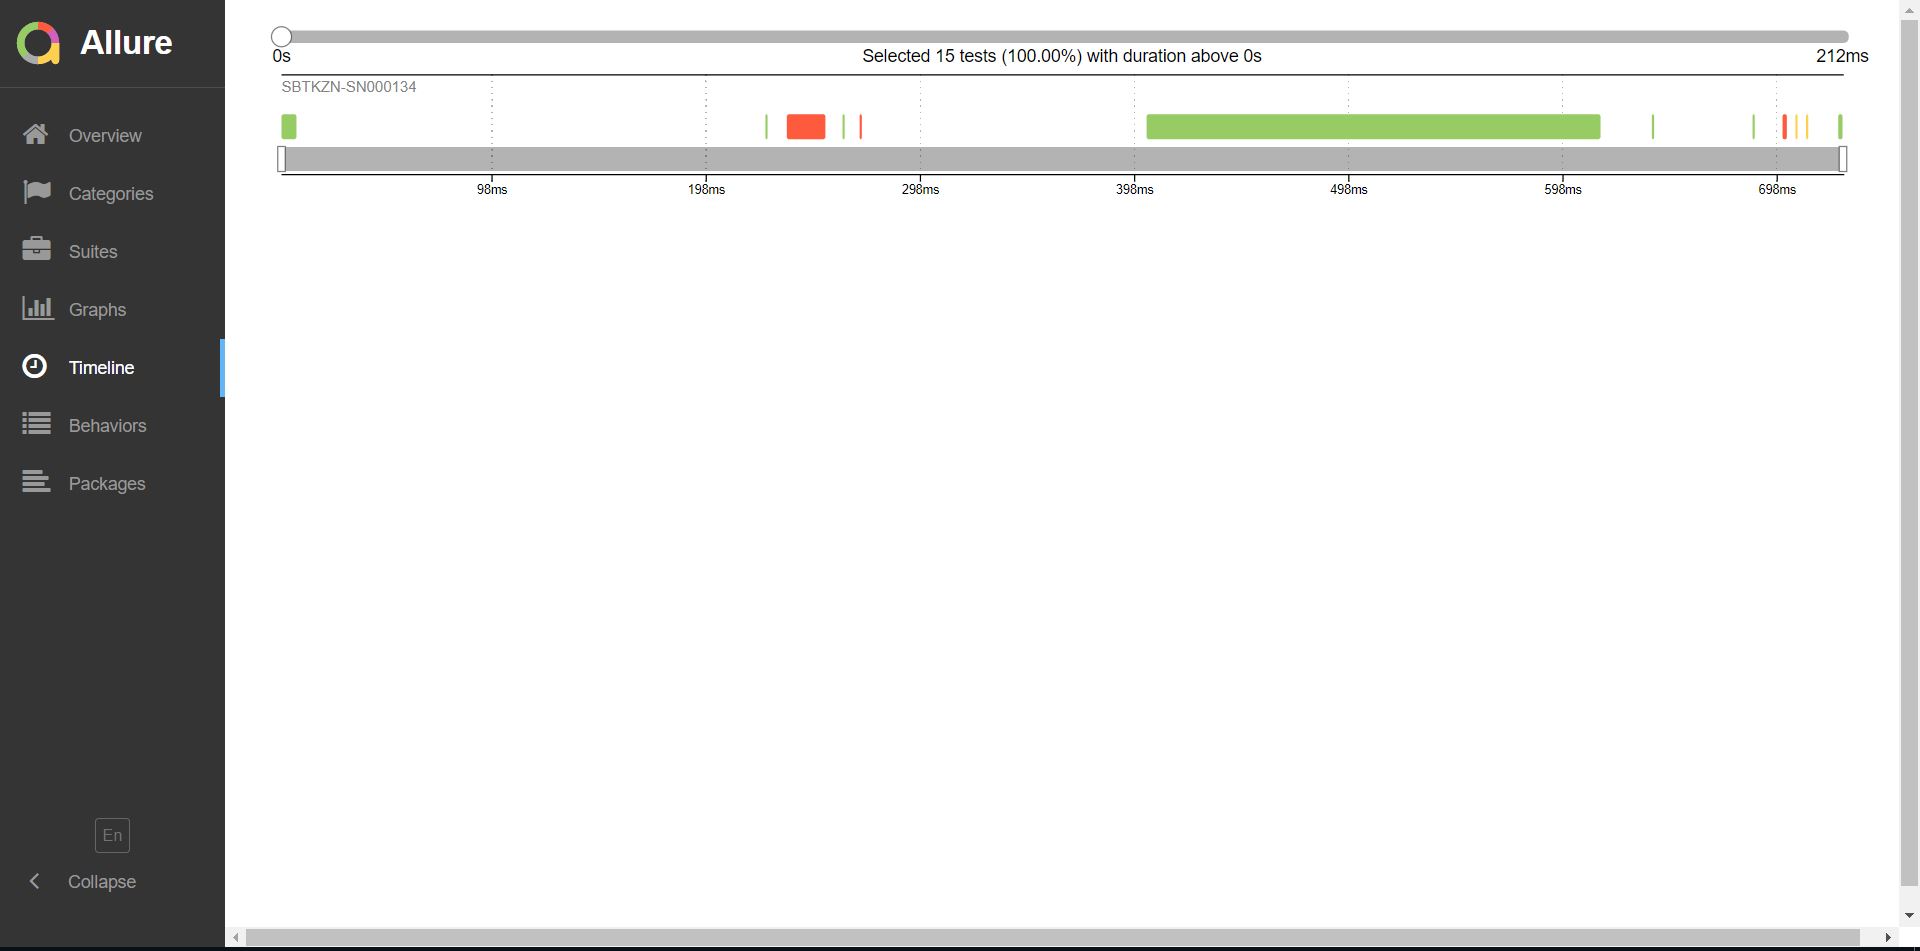
In the case of running tests in parallel mode:
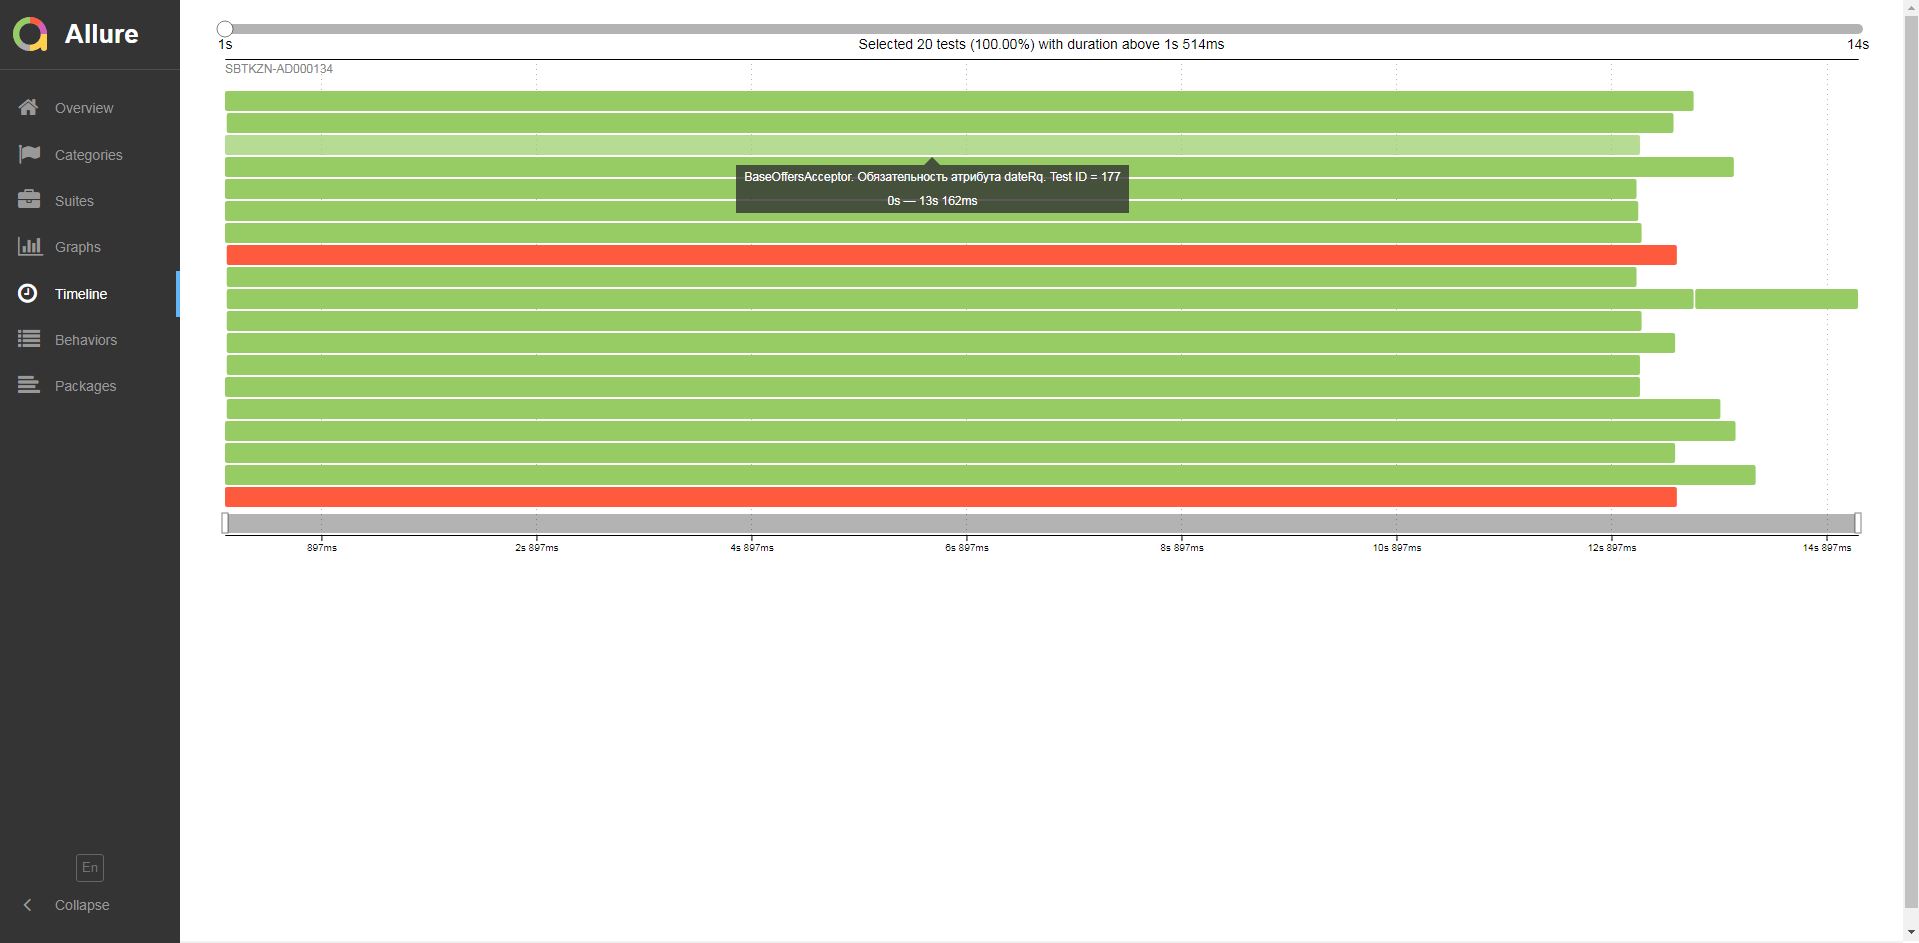
This page visualizes the time frame for passing each test.
6. Page "Behaviors".
On this page, tests are grouped by the tested functionality (Epic, Feature, Story).
7. Page "Packages".

On this page, tests are grouped by packages, in which test classes lie.
Summing up the first article, we note that we got acquainted with the main features of Allure, reviewed its connection to some test frameworks, learned how to assemble a report on the results of a test run, and also reviewed all standard report pages.
The Allure-framework is successfully used in the work of the functional testing automator in the ESF program and greatly simplifies the analysis of the results of test runs.
In our first article we will tell you what Allure is, what it is for, and how to connect it to your project. We will also consider the assembly of the report itself - both on the local machine and using Jenkins. And we will review all pages of the report.
Go!
Little bit in common
Every IT professional who came across test automation was likely to sort out the results of test runs. The more you automate the regression model, the more auto-tests appear in your project, therefore, you or your colleague from functional testing spend more time analyzing reports.
')
Allure Framework is a popular autotest report tool that simplifies their analysis. It is a flexible and lightweight tool that allows you to get not only a brief information on the progress of the tests, but also provides all participants in the production process with maximum useful information from the daily execution of automated tests.
Developers and testers use Allure reports to shorten the life cycle of a defect: test drops can be divided into product defects and defects of the test itself, which reduces the time it takes to analyze a defect and eliminate it. Logs can also be attached to the report, test steps are indicated, attachments with various content are added, information about timings and test execution time is obtained. In addition, Allure-reports support interaction with systems of continuous integration and bug-tracking systems, which allows you to always keep at hand the necessary information about the passage of tests and defects.
Allure test managers give an overview of the project's health, it allows you to understand which project features are covered with tests, how defects are grouped, what is the general trend of the project quality.
Once generated, the Allure report is a readable interactive HTML document that can be saved or sent by mail. You can see a sample report at the link .
Connecting Allure to the Maven Project
In order to get information about the AutoTest performance, from which an informative Allure-report will be generated, it is necessary to connect an adapter to the project with autotests. During the tests, the adapter will collect all the necessary information: the start time of the test, the time of its completion, the error with which the test fell, etc. After passing each test, the adapter will collect all the data and aggregate them into .json files and resource files. From the set of such files, the report itself will be formed later.
For different test frameworks you need different adapters. Consider some of them.
Allure-junit4
This adapter allows you to collect information from tests developed using the Junit4 framework. To connect the adapter, you need to modify your project's pom.xml. In the properties section add:
<properties> ... <maven-surefire-plugin.version>2.20.1</maven-surefire-plugin.version> <aspectj.version>1.8.10</aspectj.version> <allure-junit4.version>2.6.0</allure-junit4.version> ... </properties> Add to the dependencies section:
<dependencies> ... <dependency> <groupId>io.qameta.allure</groupId> <artifactId>allure-junit4</artifactId> <version>${allure-junit4.version}</version> </dependency> ... </dependencies> It is also necessary to modify (or create) the build section as follows:
<build> <plugins> ... <plugin> <groupId>org.apache.maven.plugins</groupId> <artifactId>maven-surefire-plugin</artifactId> <version>${maven-surefire-plugin.version}</version> <configuration> <testFailureIgnore>false</testFailureIgnore> <argLine>-javaagent:"${settings.localRepository}/org/aspectj/aspectjweaver/${aspectj.version}/aspectjweaver-${aspectj.version}.jar"</argLine> <properties> <property> <name>listener</name> <value>io.qameta.allure.junit4.AllureJunit4</value> </property> </properties> <systemProperties> <property> <name>allure.results.directory</name> <value>${project.build.directory}/allure-results</value> </property> </systemProperties> </configuration> <dependencies> <dependency> <groupId>org.aspectj</groupId> <artifactId>aspectjweaver</artifactId> <version>${aspectj.version}</version> </dependency> </dependencies> </plugin> ... </plugins> </build> Allure-junit5
This adapter allows you to collect information from tests developed on Junit5 . To connect the adapter, you need to modify your project's pom.xml. In the properties section add:
<properties> ... <maven-surefire-plugin.version>2.21.0</maven-surefire-plugin.version> <junit-platform-surefire-provider.version>1.1.0</junit-platform-surefire-provider.version> <aspectj.version>1.8.10</aspectj.version> <allure-junit5.version>2.6.0</allure-junit5.version> ... </properties> Add to the dependencies section:
<dependencies> ... <dependency> <groupId>io.qameta.allure</groupId> <artifactId>allure-junit5</artifactId> <version>${allure-junit5.version}</version> </dependency> ... </dependencies> It is also necessary to modify (or create) the build section as follows:
<build> <plugins> ... <plugin> <artifactId>maven-surefire-plugin</artifactId> <version>${maven-surefire-plugin.version}</version> <configuration> <testFailureIgnore>false</testFailureIgnore> <argLine> -javaagent:"${settings.localRepository}/org/aspectj/aspectjweaver/${aspectj.version}/aspectjweaver-${aspectj.version}.jar" </argLine> <systemProperties> <property> <name>junit.jupiter.extensions.autodetection.enabled</name> <value>true</value> </property> <property> <name>allure.results.directory</name> <value>${project.build.directory}/allure-results</value> </property> </systemProperties> </configuration> <dependencies> <dependency> <groupId>org.junit.platform</groupId> <artifactId>junit-platform-surefire-provider</artifactId> <version>${junit-platform-surefire-provider.version}</version> </dependency> <dependency> <groupId>org.aspectj</groupId> <artifactId>aspectjweaver</artifactId> <version>${aspectj.version}</version> </dependency> </dependencies> </plugin> ... </plugins> </build> Note
Due to a memory leak in Surefire 2.20 and problems running on Java 9, Junit5 developers recommend using Surefire version 2.21.0
Allure-Testng
This adapter allows you to collect information from tests developed on TestNG . To connect the adapter, you need to modify your project's pom.xml. In the properties section add:
<properties> ... <maven-surefire-plugin.version>2.20.1</maven-surefire-plugin.version> <aspectj.version>1.8.10</aspectj.version> <allure-testng.version>2.6.0</allure-testng.version> ... </properties> Add to the dependencies section:
<dependencies> ... <dependency> <groupId>io.qameta.allure</groupId> <artifactId>allure-testng</artifactId> <version>${allure-testng.version}</version> </dependency> ... </dependencies> It is also necessary to modify (or create) the build section as follows:
<build> <plugins> ... <plugin> <groupId>org.apache.maven.plugins</groupId> <artifactId>maven-surefire-plugin</artifactId> <version>${maven-surefire-plugin.version}</version> <configuration> <argLine>-javaagent:"${settings.localRepository}/org/aspectj/aspectjweaver/${aspectj.version}/aspectjweaver-${aspectj.version}.jar"</argLine> <systemProperties> <property> <name>allure.results.directory</name> <value>${project.build.directory}/allure-results</value> </property> </systemProperties> </configuration> <dependencies> <dependency> <groupId>org.aspectj</groupId> <artifactId>aspectjweaver</artifactId> <version>${aspectj.version}</version> </dependency> </dependencies> </plugin> ... </plugins> </build> Getting the source files for the assembly of the html report
Source files are a set of JSON files with test results, as well as some other file types (attachment files with various extensions, .properties, etc.). These files will be automatically generated after running your autotests (in our example in the target / allure-results directory). Then from these files it is necessary to assemble a readable html report.
Building an html report on a local machine
To build an html report, you need a utility called allure – commandline. There are several ways to get a report:
Method 1:
1. Download the latest version of allure – commandline by the link ;
2. Unpack the archive;
3. Add the path to the bin directory from the unpacked archive to the system environment variable.
To make sure the installation is correct, run the command in the command line
allure --versionA message like this should appear:
$ allure --version
2.6.0
After installing allure – commandline, open the folder with the source files in the explorer (in our example, target / allure-results) and in the command window (terminal) execute the command
allure serveAfter this, the html report itself should be generated, which will automatically open in the default browser.
Method 2 (recommended):
1. Add the allure-maven plugin to your project's pom.xml. To do this, we modify the build section as follows:
<build> <plugins> ... <plugin> <groupId>io.qameta.allure</groupId> <artifactId>allure-maven</artifactId> <version>2.9</version> <configuration> <reportVersion>2.6.0</reportVersion> </configuration> </plugin> ... </plugins> </build> 2. Make sure that the autotests for which you want to receive the report have already been completed (you can run the tests using the mvn clean test command) and the “target” folder of your project contains the “allure-results” with the source files for the report.
3. Run the command
mvn allure:serve
After that, the html – report itself should be generated, which will automatically open in the browser.
Building html report on Jenkins
To build an html report on Jenkins, you must install the Allure Plugin for your Jenkins (at this stage Jenkins should already be deployed, set up a Job to run your tests, and the results of the runs should be added to your Workspace).
Installing Allure plugin:
1. Go to Manage Jenkins → Manage Plugins
2. Go to the Available tab
3. In the filter field type Allure plugin
4. Mark the checkbox of the found Allure plugin and click Install without restart
Install Allure Commandline:
Consider the option to install Allure Commandline on a machine that has access to the Maven central.
1. Go to Manage Jenkins → Global Tool Configuration
2. In the Allure Commandline block, click the Add Allure Commandline button.
3. In the Name field enter the name Allure Commandline, for example, Allure 2.6.0
4. Select the version of the library that will be downloaded from the Maven central, for example, 2.6.0
5. Click the Save button.
Job configuration for report assembly:
1. Go to your Job configuration
2. In the Post-build Actions section, click the Add post-build action → Allure Report button.
3. In the Results field, specify the path to the “allure-results” directory with the source files for building the report: target / allure-results
4. Click the Save button.
After completing all the settings, run your job. After it is executed, the Allure icon will appear in the Build History block in front of the build number. Clicking on this will display the generated html report:
Overview of Report Pages
1. Page "Overview".
Overview is the main page of the Allure report. It has a block structure. Consider the blocks present on the default home page:
1. Block ALLURE REPORT. Includes the date and time of the test, the total number of cases drove out, as well as a chart indicating the percentage and number of successful tests that fell and failed.
2. Block TREND. Shows the trend of passing tests from assembly to assembly.
3. Block SUITES. Shows the distribution of test results across test sets. In this case, the tests were distributed in packages.
4. Block ENVIRONMENT. Shows the test environment on which the tests were run. This information enters the report from a special file located in the project.
5. CATEGORIES block. Shows the distribution of unsuccessfully passed tests by types of defects.
6. Block FEATURES BY STORIES. Shows the distribution of tests on the functionality that they check.
7. Block EXECUTORS. Shows the performer of the current build. If the execution was performed on a CI tool (for example, Jenkins), then information about the job and the build number will be provided.
2. Page "Categories".
This page provides information on the distribution of defects by type.
3. “Suites” page.
On this page, the standard distribution of the tests performed by test sets or classes containing test methods is presented.
4. Page "Graphs".
On this page, you can get information about the test run in graphical form: the status of the run, the distribution of tests according to their criticality, duration of passage, restarts, categories of defects, and so on.
5. Page "Timeline".
In the case of running tests in parallel mode:
This page visualizes the time frame for passing each test.
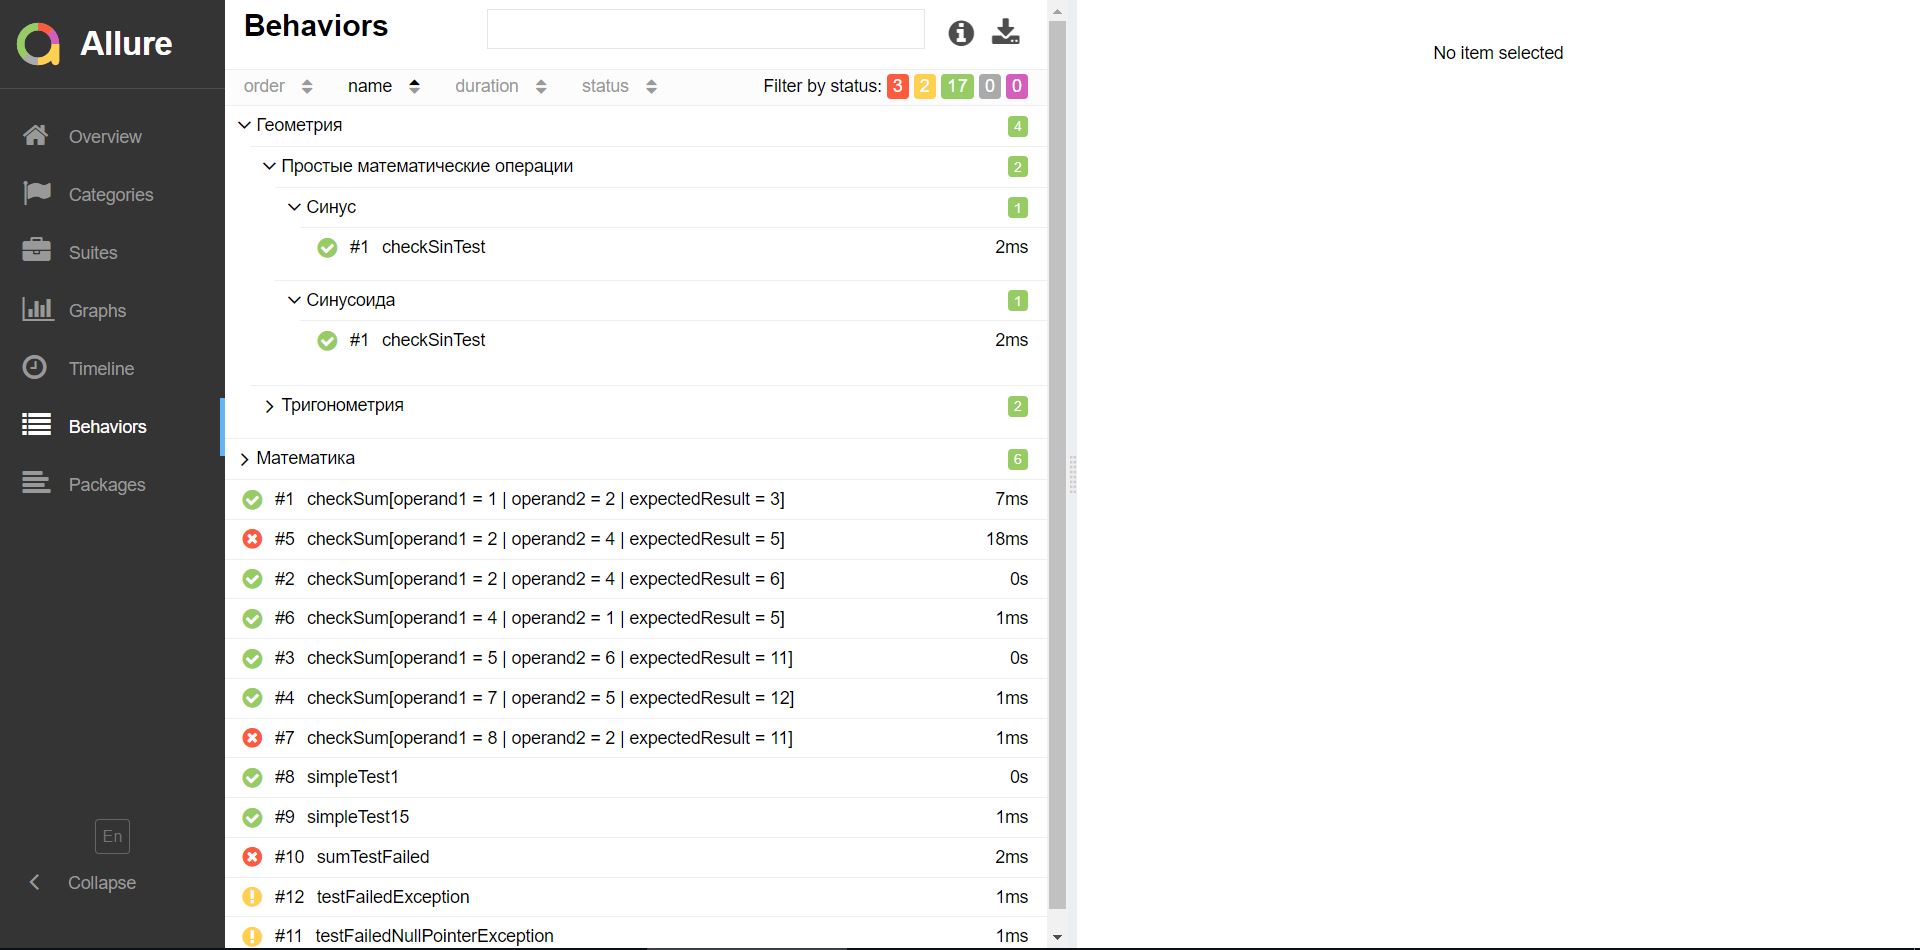
6. Page "Behaviors".
On this page, tests are grouped by the tested functionality (Epic, Feature, Story).
7. Page "Packages".
On this page, tests are grouped by packages, in which test classes lie.
Conclusion
Summing up the first article, we note that we got acquainted with the main features of Allure, reviewed its connection to some test frameworks, learned how to assemble a report on the results of a test run, and also reviewed all standard report pages.
Note
Sample code is presented by reference .
Source: https://habr.com/ru/post/358836/
All Articles