Integration of Veeam Backup & Replication and PureStorage
Today we present the guest post from Ilia Karina.
Recently, Veeam, together with PureStorage, released an integration plugin for Veeam Backup & Replication 9.5 with PureStorage arrays. And if you are a happy owner of a Veeam Backup & Replication Enterprise Plus license, then there is no reason not to back up your infrastructure from snapshots of storage.
However, since the solution is new, in Russia and the CIS countries there is no information in Russian about how to set up the infrastructure for working with backups from a lot of snapshots.
In my article I will try to eliminate this gap.
Let's get down to business.

We have the following infrastructure:
')
It is understood that the array itself is already connected to the iSCSI network, the network infrastructure is raised, where the vLAN you need are already configured, vSwitch, vKernel are registered on the hosts, everything works and thrives, but you want something else.
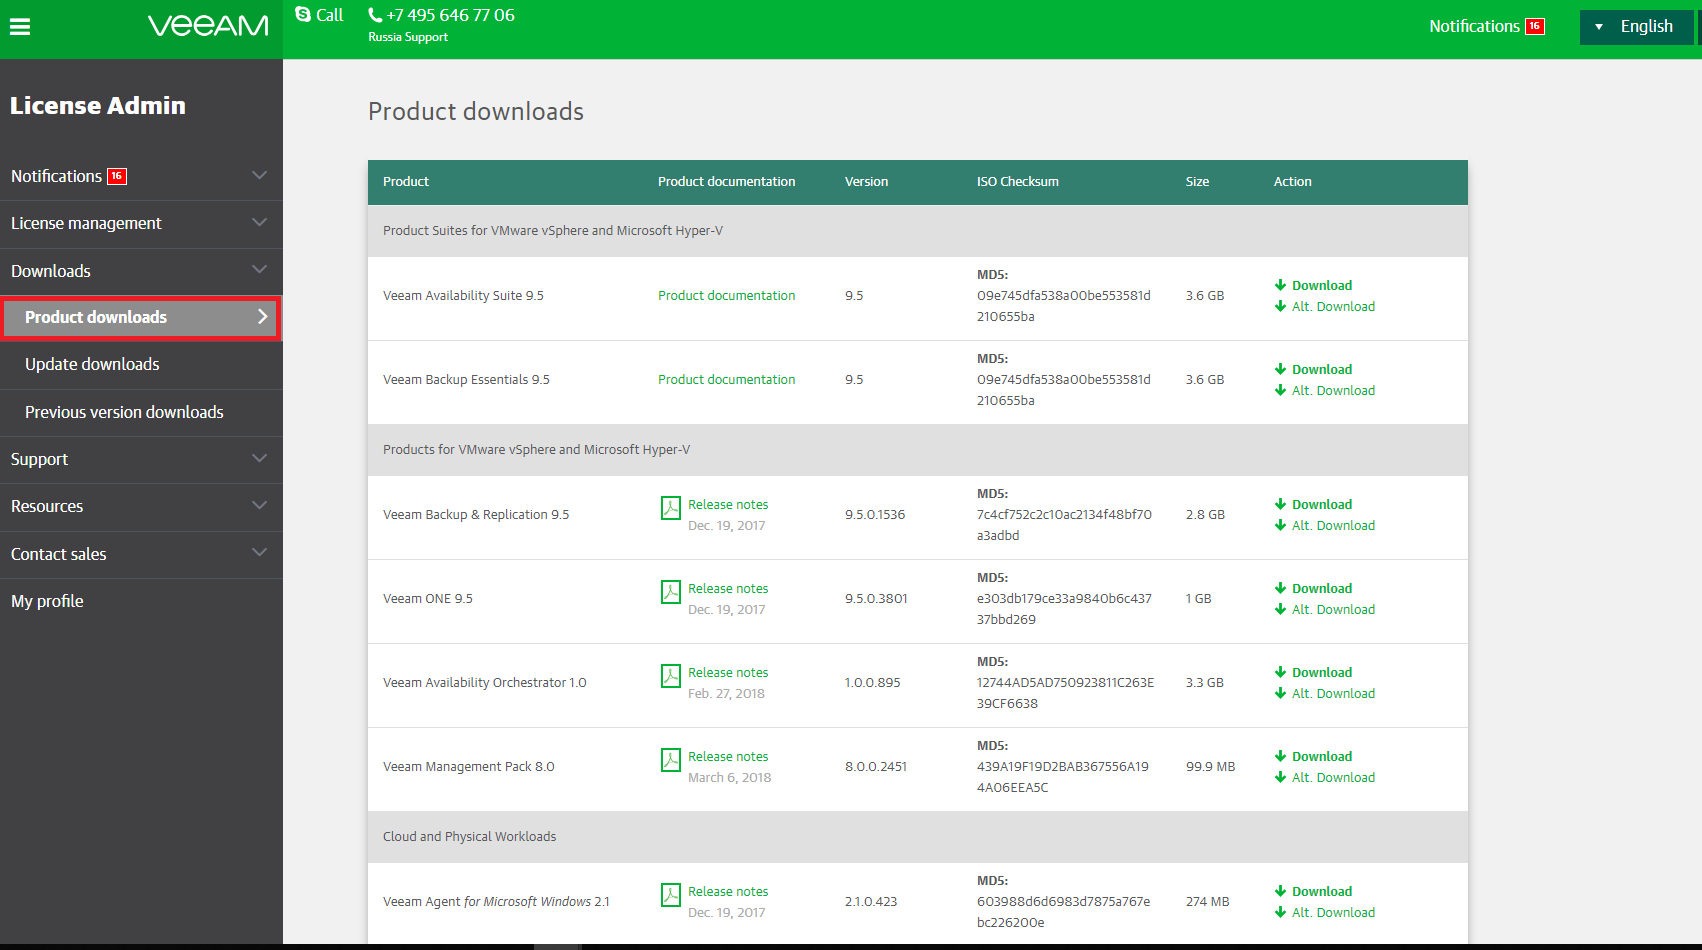
The first thing we need to download and install the desired plugin. This can be done in your account on the site my.veeam.com , in the section Downloads → Product downloads :
Go to the bottom of the page, where the Pure Storage Plug-In for Veeam Backup & Replication is located .

Before starting the installation, close all windows of the Veeam console or restart the server. There is nothing interesting in the installation of the plugin, in fact we press "further, further, further". At the end of the installation will require a reboot.
In our example, on each host, vmk1 and vmk2 are created by means of which hosts communicate with the iSCSI network:

In turn, they are used in vSwitch1:

To access the virtual machine with Veeam Backup & Replication on the iSCSI network, we need to create a VM Network iSCSI (visible in the screenshot above).
To do this in the Virtual switches toolbar:

Now you need to add 2 network adapters to our virtual machine and assign them a newly created network.

This completes the ESXi setup.
Next, we need to configure the operating system on the machine where Veeam is installed.
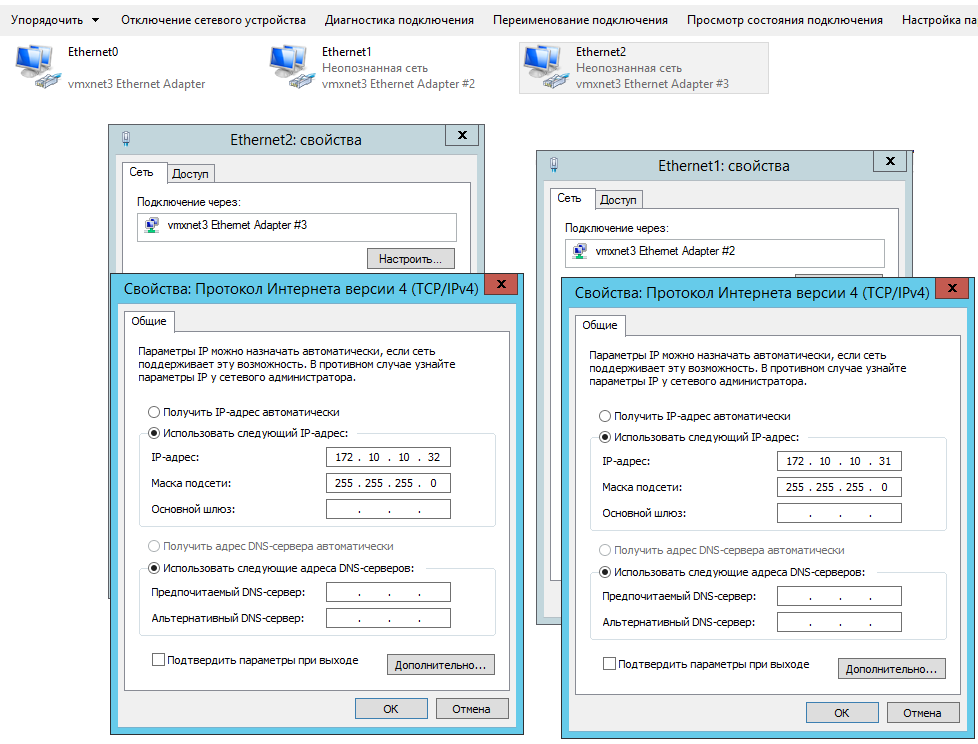
1. Go to Control Panel \ Network and Internet \ Network Connections
2. Set the IP addresses from your iSCSI network for the two network cards we added.
I also put in the settings of the network adapter Jumbo Frame 9000, but this is another tale in which you need to configure other network components (the same applies to vLAN, etc.).
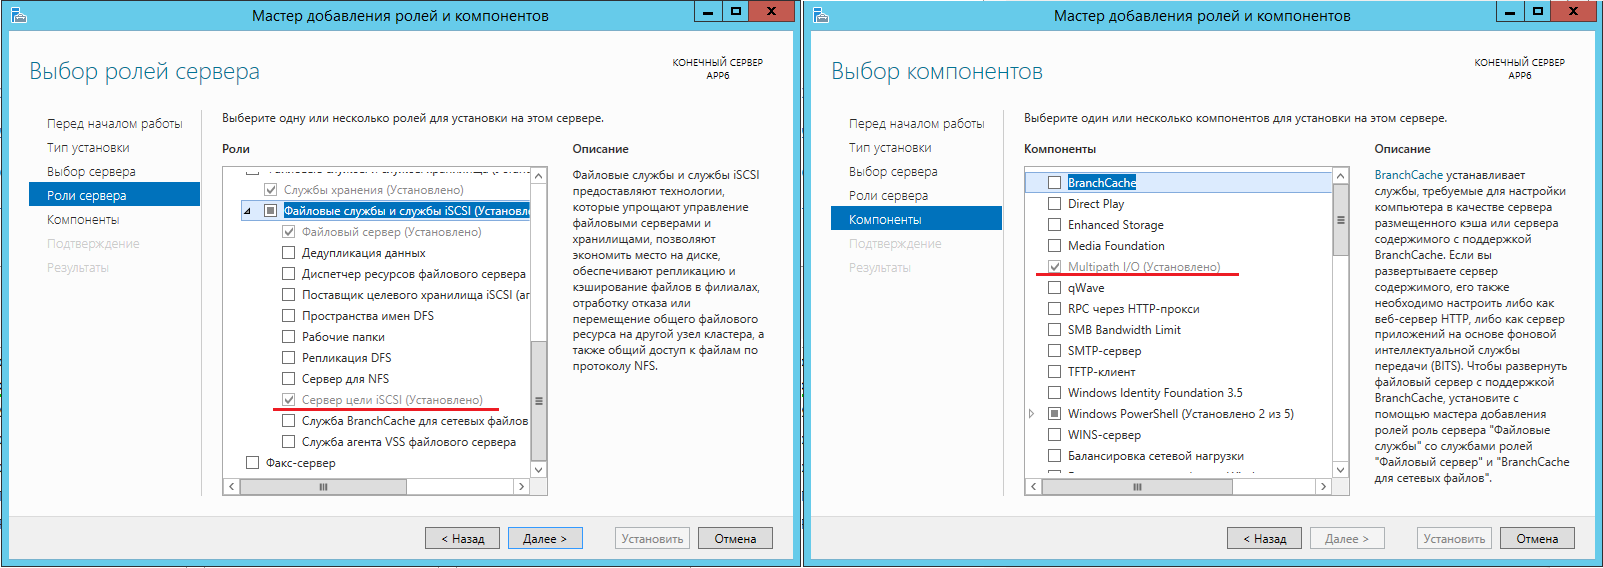
3. Using the Server Manager, install 2 components: MPIO and iSCSI Initiator.
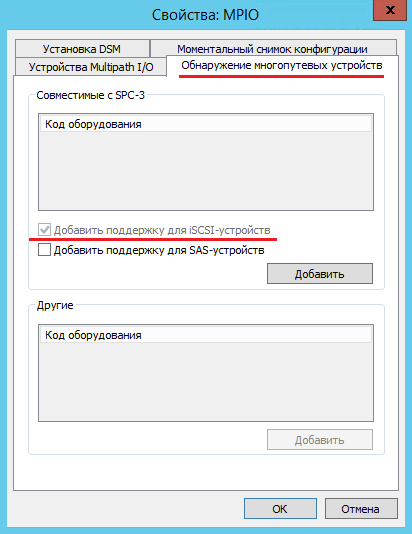
4. To add support for MPIO, open Server Manager → Tools → MPIO
5. In the dialog box that opens, go to the Multipath Device Discovery tab and check the Add support for iSCSI devices checkbox, then a reboot is required.
6. Now you need to configure the iSCSI Initiator. To do this, open Server Manager → Tools → iSCSI Initiator .
7. In the window that opens, go to the Discovery tab, where we click the Discover Portal button ...
8. In the IP address or DNS name field, specify the IP address of the target created on the storage system.
9. Click the Advanced button.
10. In the window that opens, you need to configure 2 values:
11. Repeat steps 8 - 10 as many times as necessary to connect all the paths.


As a result, you should see the storage icon on the Storage Infrastructure panel, revealing which you will see the LUNs created on it.
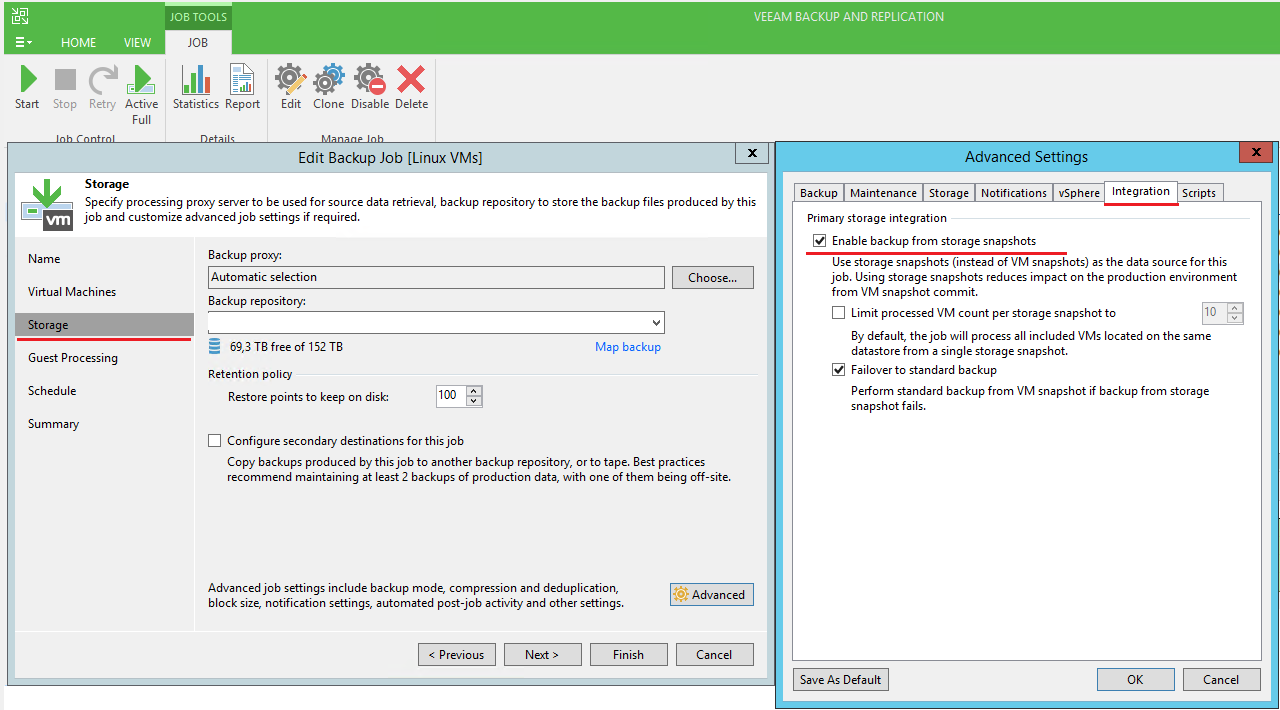
It remains to check whether the backup mode from the stack of snapshots for our jobs (jobs) is enabled in the Veeam console.
This can be done by right-clicking on the task, then selecting the Edit → Storage → Advanced section.
On the Integration tab → select Enable backup from storage snapshots .
I hope you have succeeded. Thank you all for your attention!
Good afternoon, Habr! My name is Elijah Karin ( Iliya_karin ). I have been involved in all matters of system administration in a large company for more than 7 years. Thanks to colleagues from Veeam for the opportunity to tell here a little about my experience.
Recently, Veeam, together with PureStorage, released an integration plugin for Veeam Backup & Replication 9.5 with PureStorage arrays. And if you are a happy owner of a Veeam Backup & Replication Enterprise Plus license, then there is no reason not to back up your infrastructure from snapshots of storage.
However, since the solution is new, in Russia and the CIS countries there is no information in Russian about how to set up the infrastructure for working with backups from a lot of snapshots.
In my article I will try to eliminate this gap.
Let's get down to business.
We have the following infrastructure:
')
- 4 hosts with the Vmware vSphere ESXi 6.5 hypervisor
- 1 vCenter
- 1 virtual machine with Veeam Backup & Replication, it is also a Veeam proxy server
- Separate subnet for iSCSI traffic, consisting of 2 separate 10G switches
- PureStorage m20 array
It is understood that the array itself is already connected to the iSCSI network, the network infrastructure is raised, where the vLAN you need are already configured, vSwitch, vKernel are registered on the hosts, everything works and thrives, but you want something else.
Plug-in installation
The first thing we need to download and install the desired plugin. This can be done in your account on the site my.veeam.com , in the section Downloads → Product downloads :
Go to the bottom of the page, where the Pure Storage Plug-In for Veeam Backup & Replication is located .
Before starting the installation, close all windows of the Veeam console or restart the server. There is nothing interesting in the installation of the plugin, in fact we press "further, further, further". At the end of the installation will require a reboot.
VMware Hosts and Virtual Machines
In our example, on each host, vmk1 and vmk2 are created by means of which hosts communicate with the iSCSI network:
In turn, they are used in vSwitch1:
To access the virtual machine with Veeam Backup & Replication on the iSCSI network, we need to create a VM Network iSCSI (visible in the screenshot above).
To do this in the Virtual switches toolbar:
- Click on the icon Add host networking .
- In the opened window, select Virtual Port Group for a Standard Switch .
- Click Next .
- Choose our iSCSI vSwitch, in our example it is vSwitch1 .
- Click Next .
- We set the name for our virtual network VM Network iSCSI .
- Click Finish .
Now you need to add 2 network adapters to our virtual machine and assign them a newly created network.
- Right click on the VM, select the Edit command.
- Next, select New device → network → add
- Choosing a VM Network iSCSI
- In the Adapter type, select VMXNET3, we still have 10G.
- Repeat steps 2-4 again.
- Click OK .
This completes the ESXi setup.
Set OC settings
Next, we need to configure the operating system on the machine where Veeam is installed.
1. Go to Control Panel \ Network and Internet \ Network Connections
2. Set the IP addresses from your iSCSI network for the two network cards we added.
I also put in the settings of the network adapter Jumbo Frame 9000, but this is another tale in which you need to configure other network components (the same applies to vLAN, etc.).
3. Using the Server Manager, install 2 components: MPIO and iSCSI Initiator.
- The first is in Server Roles → File Services and iSCSI Services → Server → iSCSI Target Server
- The second you will find on the tab Components → Multipath I / O
4. To add support for MPIO, open Server Manager → Tools → MPIO
5. In the dialog box that opens, go to the Multipath Device Discovery tab and check the Add support for iSCSI devices checkbox, then a reboot is required.
6. Now you need to configure the iSCSI Initiator. To do this, open Server Manager → Tools → iSCSI Initiator .
7. In the window that opens, go to the Discovery tab, where we click the Discover Portal button ...
8. In the IP address or DNS name field, specify the IP address of the target created on the storage system.
9. Click the Advanced button.
10. In the window that opens, you need to configure 2 values:
- Local adapter - there are no special options here, choose Microsoft iSCSI initiator
- The IP address of the initiator - here you can make a mistake. If you have 2 (and more) different switches for iSCSI that are not interconnected, then you should know which iSCSI target to which of the switches is physically connected to. For our example, this can be found out indirectly using the ping command, first pinging all 4 (or more) IP addresses of the storage target, and then through another.
- I got the following match:
- Through 172.10.10.31 you can see the target 172.10.10.9 and 172.10.10.12
- Through 172.10.10.32, the target sets are visible 172.10.10.10 and 172.10.10.11
- Accordingly, in the IP address of the initiator field, specify the address of the network adapter through which the corresponding target is pinged.
11. Repeat steps 8 - 10 as many times as necessary to connect all the paths.
Getting Started Setting Up Veeam Backup & Replication
- Open the main console Veeam Backup & Replication.
- Go to the section Storage Infrastructure → Add storage → Pure Storage . If you do not have this item, then something went wrong during the installation of the plugin.

Follow the prompts of the program. - Add our storage by IP address or DNS name (from the management network, or as it is called, the management network) and click Next .
- We provide accounting software to access the storage system.
- We select the protocol by which we will transmit iSCSI data, and leave the rest as is.
- Check the settings and click Finish .
As a result, you should see the storage icon on the Storage Infrastructure panel, revealing which you will see the LUNs created on it.
Making the final check
It remains to check whether the backup mode from the stack of snapshots for our jobs (jobs) is enabled in the Veeam console.
This can be done by right-clicking on the task, then selecting the Edit → Storage → Advanced section.
On the Integration tab → select Enable backup from storage snapshots .
I hope you have succeeded. Thank you all for your attention!
Additional materials:
Source: https://habr.com/ru/post/358750/
All Articles