Create a fighting game in Unity: the implementation of Hitbox and Hurtbox

Explanation
What is hitbox and hurtbox? Is it not the same thing?
The answer may depend on who you ask the question, but in the article we will take the view that hitbox and hurtbox are two different concepts with different uses, as is the case in any decent fighting game.
A hitbox is an invisible rectangle (or sphere) that determines where the attack hits.
')
The hurtbox is also an invisible rectangle (or sphere), but it defines the place where a player or object can hit with the help of Hitbox.

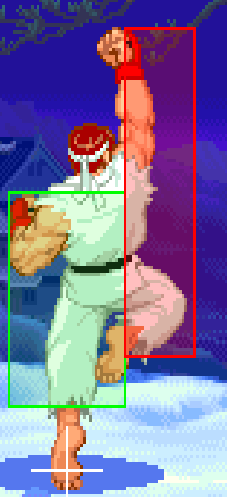
In this image from Street Fighter IV, the red box is the hitbox and the green is the hurtbox.
It is worth noting that the size and position of hitboxes and hurtboxes depends on the animation frame being played:
Gif of Killer Instinct. Note that hitboxes appear only in frames of impact and move along with the sword.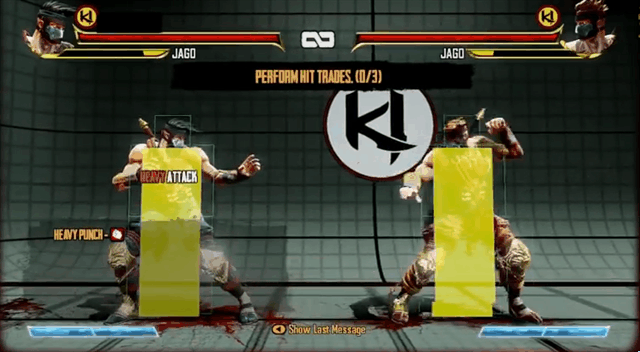
In the example from Killer Instinct, we also see another type of rectangles, namely Pushbox (yellow rectangle; Hurtbox - these are empty green rectangles). Pushbox is an area denoting a space that is physically occupied by a character and does not allow them to overlap each other.
In most games of the genre of fighting and beat 'em up, there are two more types of areas that we will not consider for simplicity:
Grab or throw box defines the area for which the character can be grabbed or thrown, and the block box determines the area in which the attacked player pressing the back button starts blocking the attack instead of moving backwards.
From a design point of view, all these areas are very important. Hitboxes and Hurtboxes of attacks determine not only the number of frames in which the attack deals damage, but also the blind zones of this attack, as well as player's vulnerabilities.
A good explanation of this on the example of Street Fighter is presented in the video .
So, having understood the terminology, let's get down to work.
What we want
Let's look at each type of area we want to work with, and say what we want from them:
Pushbox: we need two pushboxes to touch, but not overlap (that’s why they are called “pushboxes” - they push another character). Pushboxes should interact only with other pushboxes.
Hurtbox: it can register a punch, but should not perform collisions in the physical sense. Hurtboxes should only interact with Hitboxes.
Hitbox: we need to be able to check its overlay on the Hurtbox in arbitrary frames. It should only interact with Hurtboxes.
Using standard Unity components
First of all, we can try to bind different types of areas to standard Unity components. An obvious choice is any Collider .
Pushbox can be directly implemented as a Collider plus Rigidbody . It will behave exactly as we need - to react to collisions with objects and not overlap with other Pushboxes.
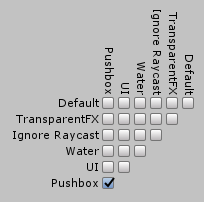
The only thing we need to worry about (except for the correct setting of the Rigidbody) is that the implementation of the property " can have collisions only with other Pushboxes ". If you are familiar with the Unity physics system, you already know that the solution is to use the layers and the layer collision matrix . For clarity, we can create a layer called Pushbox, assign it to our object and configure the collision matrix so that Pushbox performs collisions with Pushbox only .

For Hurtboxes, we can take a Collider using isTrigger . So we guarantee that he will not perform collisions in the physical sense and will only register other colliders that fall into his area. To register the impact itself, we need to add a script to the same object that implements the OnTriggerEnter event, possibly checking the incoming collider tag to make sure that the collider that caused the event is necessary for us, and then perform the damage and health calculations necessary for the game. You are probably familiar with this approach.
We also need to create the Hurtbox and Hitbox layers, and we will use the Layer Collision Matrix again so that the Hurtbox will only collide with the Hitbox and vice versa.
- Notice that we don't need a Rigidbody, but only because I believe that every trigger we add will be a child of the Pushbox object, which already has a Rigidbody. This is important because Colliders without a Rigidbody inside themselves or some of their parent objects will be defined by the Unity engine as Static and moving them will not lead to any actions .
- In addition, we will probably need to distinguish the Hitbox player from the Hitbox of one of the enemies. The same applies to Hurtbox-s. Thanks to this, the player’s Hitbox will only be able to hit the Hurtbox of enemies, and the enemies' Hitboxes will only be able to beat the player’s Hurtbox. If you want to allow damage to allies, but you should be careful here so that the player cannot hit his own Hurtbox.
Hitboxes are the hardest to implement. To avoid physical collisions, we can use Collider with isTrigger, in fact, we do not have colliders that are "included" in Hitbox. This problem can be solved in another way: Hitbox "enters" ( or checks the overlay with ) Hurtbox. Be that as it may, we need a Collider, otherwise Unity will never call OnTriggerEnter in our Hurtbox.
To damage the Hurtbox, we need to add the script to the same object so that our Hurtbox can use GetComponent <T> and get it to find out how much damage needs to be done. We can do this in another way: called for OnTriggerEnter for both Colliders. We also need to find a way to make our Hitbox active only when we want, and not in every frame and not when the character does not attack. To do this, we can simply disable the script, since, according to the documentation, Trigger events are sent by disabled MonoBehaviours to allow Behaviours to be enabled in response to collisions .
We can enable and disable the collider or add a boolean value to the script, telling whether it should hit or not.
Problems
- Hierarchy: we need to have a script in each object with a Collider to be able to respond to OnTriggerEnter. If you prefer to keep all the scripts in one place for the sake of order, then you will need to create a script just to delegate the call to all other objects.
- Excessiveness: with this approach, our Hitboxes have a huge functionality that we will not need.
- Events: our functionality is based on OnTriggerEnter. Using Unity events may not be a problem. but there are reasons , at least in order to reflect on their necessity. To know more, it is also worth exploring this (in the section “Avoiding expensive calls to the Unity API” ).
- Visual noise: if for different attacks you want to use different Hitboxes, then not only the problems mentioned above appear again, but visual noise appears in the editor window.
- Low flexibility: when used as a Hitbox Collider, it means that when changing the shape of the collider, for example, from Box to Sphere, you will have to manually delete all BoxCollider and add SphereCollider (or write an editor script that does the work for you)
Create everything yourself
As you probably understood from the above, Pushboxes and Hurtboxes are quite conveniently implemented with standard Unity components.
Hurtboxes still have the aforementioned problems, and we will solve some of them, but the main entity that requires its own abstraction is Hitbox.
If you create a fighting game with a variety of attacks and combos, then you probably want all the attacks to be well organized in the object and you can create several combinations of Hitboxes for each of them. To do this, you will need a script that strictly delegates the OnTriggerEnter calls to an active attack or performs something similar.
We do not want to create a separate Hitbox object for each of the attacks, and here we can use the same ones, changing their size!
Hitboxes
We need a new component to solve the following tasks:
- Possess Hitbox behavior: he must be able to check the overlay on the Hurtbox in arbitrary frames. He must interact only with Hurtboxes.
- Have a visual representation in the Scene window.
- Be customizable and flexible.
- Ideally, do not depend on Unity API events.
- Be independent enough to be able to use the script for another object.
- Do not be tied to a specific attack. Hitboxes should be applicable to several different attacks.
Behavior
First, how do we check if an area overlaps a Collider? The answer is to use UnityEngine.Physics .
There are many methods in Physics that can accomplish this task. We can specify the form we need (Box, Sphere, Capsule), and also if we want to receive Colliders, which we strike (if they have) as an array or pass an array to fill it with these Colliders. For now we will not think about it, but in the first case a new array is allocated, and in the second we simply fill in the existing one.
Let's start by checking if something hits a rectangular area. For this we can use OverlapBox .
We need to set the dimensions of the rectangle to be checked. To do this, we need the center of the rectangle, its half value, the rotation and the layers that it should hit. Half value is half the size in each direction, for example, if we have a rectangle with the size (2, 6, 8) then its half value will be equal to (1, 3, 4).
As a center, we can use the transform position of the GameObject, and to rotate it, we can use the transform rotation of the GameObject, or add common variables to set specific values.
The half value is just Vector3, so we will make it common and use it.
For layers that can be hit, we will create a public property of type LayerMask . This will allow us to select layers in the inspector.
Collider[] colliders = Physics.OverlapBox(position, boxSize, rotation, mask); if (colliders.Length > 0) { Debug.Log("We hit something"); } If the settings are correct and when the projected rectangle is superimposed on the Collider in the corresponding mask, we should see a message in the console.
Visual presentation
All this is great ... but not too functional. Until we can see a rectangle defined somewhere, it will be very difficult to specify the appropriate size and location of the Hitboxes.
So how do we draw a rectangle in the Scene window, but not in the game itself? Using OnDrawGizmos .
As stated in the documentation , Gizmos is intended for visual debugging or auxiliary constructions in the scene window . Exactly what we need!
We will give our Gizmo a color and transformation matrix . That is, we simply create a matrix with the position, rotation and scale of the transform.
private void OnDrawGizmos() { Gizmos.color = Color.red; Gizmos.matrix = Matrix4x4.TRS(transform.position, transform.rotation, transform.localScale); Gizmos.DrawCube(Vector3.zero, new Vector3(boxSize.x * 2, boxSize.y * 2, boxSize.z * 2)); // - } If desired, you can use OnDrawGizmosSelected to draw a rectangle only when an object is selected.
Customizability and flexibility
Configurability is an extensive topic, it largely depends on the type of game being created and the required functionality.
In our case, we will allow quick changes in the shape and color of the hitbox. If you use Anima2D or some kind of skeletal animation, then you may need. for Hitbox to scale to the scale of the bones.
To change the form, all you need to do is add a boolean property and change OverlapBox to any other form, for example, OverlapSphere . To configure a sphere, you will need to add a public radius property. Do not forget that to draw a new form, you will need to change the OnDrawGizmos event (in our example, this will be DrawSphere ).
It should be noted that we do not add a new component and do not delete anything, but simply created a boolean value that will choose the superimposed shape when checking for collisions. It allows us to change the form of the hitbox depending on the attack (or even for the same attack).
As for color, I want Hitbox to change color under the following conditions: it is inactive, it checks for collisions, or it detects a collision with something. Later we will need these states for logic, so let's add them.
We will create an enum for the state and three colors that we add as properties of our Hitbox.
public enum ColliderState { Closed, Open, Colliding } Your class might look something like this:
public class Hitbox: MonoBehaviour { public LayerMask mask; public bool useSphere = false; public Vector3 hitboxSize = Vector3.one; public float radius = 0.5f; public Color inactiveColor; public Color collisionOpenColor; public Color collidingColor; private ColliderState _state; /* */ } Now we can update gizmos, replacing the line
Gizmos.color = Color.red; to call a new method: private void checkGizmoColor() { switch(_state) { case ColliderState.Closed: Gizmos.color = inactiveColor; break; case ColliderState.Open: Gizmos.color = collisionOpenColor; break; case ColliderState.Colliding: Gizmos.color = collidingColor; break; } } So where are we going to change the state? We need three elements:
- way to tell hitbox to start checking for collisions
- way to tell him to stop
- collision checking method
The first two are obvious:
public void startCheckingCollision() { _state = ColliderState.Open; } public void stopCheckingCollision() { _state = ColliderState.Closed; } Now that Hitbox is active, we want to check in each frame whether it has any collisions with anything while it is active. In this case, we proceed to the next item.
Independence from the Unity Events API
As you probably know, we can use Update to check something in each frame (for the sake of simplicity, I don’t add a resize check):
private void Update() { if (_state == ColliderState.Closed) { return; } Collider[] colliders = Physics.OverlapBox(position, boxSize, rotation, mask); if (colliders.Length > 0) { _state = ColliderState.Colliding; // - } else { _state = ColliderState.Open; } } As you can see, we only return if the current state is “Closed”. This means that we still check for collisions if Hitbox encounters something, which allows Hitbox to hit several objects at the same time, and not just the first hit. In your game, you can process it differently.
We use Update, but do not want to depend on the Unity Events API! The solution may be to create your own public update method, which can be called hitboxUpdate (its contents will be the same as the Update method), and only be called in Hitboxes used in the current attack.
Obviously, we will need to call Update () in some objects up the hierarchy, but we definitely don’t need to use them in every Hitbox all the time just because they exist.
Using Hitbox with a script in another object
Remember - the problem with using Collider was that to implement OnTriggerEnter we needed a script in the same GameObject? Since we use our own script and can add it to anything, the solution is quite obvious.
We will add an object as a property so that you can call some method for it when a Hitbox collides.
To solve this problem, you can use different approaches:
- We can add a public GameObject and use SendMessage (this method has very low speed).
- You can do the same with Monobehaviour, which uses the method that is called when a Hitbox collides. This method has its drawback: if we want Hitboxes to use different scripts, then it will be necessary to add all these properties or inherit from the base script that contains the method being called
- You can create an interface with the method you want to call and implement it in each class that Hitboxes should use.
In terms of structure, the obvious choice for me is interface. The only problem with Unity is that the default editor does not display interfaces as public properties, so we cannot assign it to the editor. In the next paragraph I will explain why this is not a serious problem.
Let's create and apply the interface:
public interface IHitboxResponder { void collisionedWith(Collider collider); } Add it as a property to our Hitbox ...
public class Hitbox : MonoBehaviour { ... private IHitboxResponder _responder = null; ... /* */ } Also, if you wish, you can use an array instead of a single respondent.
Let's use the respondent:
public void hitboxUpdate() { if (_state == ColliderState.Closed) { return; } Collider[] colliders = Physics.OverlapBox(position, boxSize, rotation, mask); for (int i = 0; i < colliders.Length; i++) { Collider aCollider = colliders[i]; responder?.collisionedWith(aCollider); } _state = colliders.Length > 0 ? ColliderState.Colliding : ColliderState.Open; } If you are unfamiliar with the operator "?", Then read this .
Fine! But how do we set the
_responder property _responder Let's add a setter and look at it in the next paragraph. public void useResponder(IHitboxResponder responder) { _responder = responder; } Hitboxes should be applicable to several different attacks, and not tied to one
In this section, I will explain why it doesn’t matter that we cannot set HitboxResponders using an editor.
First, let's talk about these "respondents." In the approach we have chosen to implement Hitbox, the respondent is any class that has to do something when Hitbox is in collision with Collider, that is, it implements IHitboxResponder . For example, you can take the attack script: we want it to inflict damage on what we hit.
Since we want it not to be associated with a particular attack and could be used many times, the task of the respondents in the editor would not give us anything, because we want to be able to change respondents on the fly.
Suppose we have two types of attacks - a direct hit and an uppercut with the same hand, and each of them has its own script, telling which animation frames it should hit, how much damage to do and the like. Since both of these attacks are carried out with one limb, let's use one Hitbox.
public class Attack: Monobehaviour, IHitboxResponder { ... public int damage; public Hitbox hitbox; ... public void attack() { hitbox.setResponder(this); // } void collisionedWith(Collider collider) { Hurtbox hurtbox = collider.GetComponent<Hurtbox>(); hurtbox?.getHitBy(damage); } } Fine! We have created working hitboxes. As you can see from the code above, we added the Hurtbox method
getHitBy(int damage) . Let's see if we can improve it.Hurtbox enhancements
Ideally, for Hurtboxes, we want to implement more or less the same items as for Hitboxes. This should be easier, because Collider has the functionality we need. We also need to use Collider, otherwise Physics.Overlap ... will not report a bump.
Notice that due to the way we structured the code, we do not need to use OnTriggerEnter for anything, we get the script using GetComponent.
This gives us customizability and flexibility. To provide the same flexibility as Hitboxes, we need to add and remove colliders on the fly, and for customizability we can draw color on the collider depending on its state.
public class Hurtbox : MonoBehaviour { public Collider collider; private ColliderState _state = ColliderState.Open; public bool getHitBy(int damage) { // - } private void OnDrawGizmos() { // , // , } } Adding and removing Colliders on the fly is not as easy as Hitboxes. I have not found a satisfactory way to accomplish this task. We can add several different Colliders to the script and choose the one we need using a Boolean value, as we did in Hitbox. The problem here is that it is necessary to add each required Collider as a component and as a result we will have a strong visual noise in the editor and on the object.
Another approach would be to add and remove components through the code, but this solution will add a bunch of unnecessary garbage and probably will not be so accurate.
It would be ideal for Hurtbox to inherit from Collider, and all of its form logic was internal and we could only draw the form we are using, but I could not get this system to work as I wanted.
What's next?
If you repeated closely followed and repeated the operations in the post, now you have implemented hitboxes, hurtboxes and pushboxes implemented in Unity. But more importantly, now we know these abstractions, and this will greatly simplify the work if you build something on top of them.
Probably now the Script Inspector looks awful, but don't worry, we will look at it in the next post:

We can turn it ...

In something like this!
Source: https://habr.com/ru/post/358548/
All Articles