REST-API automatic documentation system in Laravel projects
Preamble
In order to describe and document client-server rules
interactions using Rest-api can be divided into three main methods:
- Describe to your colleagues the rules for accessing the server on your fingers
This method is fast and does not require long-term support, but it is highly likely that you will be beaten for it.
- Hands to compile Google-docs / Wiki / Readme in the project
Conveniently, once written documentation does not require a second explanation. It can be shown to colleagues and even sometimes to the customer. The disadvantage of this method is the long-term support of such documentation. When Api in a project grows to such an extent that the very thought "And when did I update the documentation?" causes a chill on the back, then you realize that this can not continue. Formally, you can update the documentation very often with small fixes, but this is before the first vacation. Use auto-documenting system
And so, in order to solve the disadvantages of the first two methods, mankind invented automatic documentation systems. The basic idea is that a plugin is docked to the project, which collects information on your code, compiles the documentation itself and wraps it in a readable format. But most of the solutions for this method are not perfect. Let's try to make a tool that will help get the documentation of our project with a minimum number of gestures.Problem
In order to ensure the self-documenting of the code, annotations are used mainly, that is, commented sections of code that carry certain information. But this approach also has several serious drawbacks:
Adding annotations to an already written project.
Adding annotations for all methods of all controllers of an already implemented project is a rather routine task. With a large amount of code it is easy to make mistakes even in such a simple task.Annotation support.
In fact, annotations do not solve this problem; they only combine it with code support. So you will inevitably have to monitor the relevance of all comments scattered throughout the project.Code jamming
To demonstrate, let's turn to the classic example from the Swagger system and see how the controller works ./** * @SWG\Get( * path="/pet/{petId}", * summary="Find pet by ID", * description="Returns a single pet", * operationId="getPetById", * tags={"pet"}, * consumes={ * "application/xml", * "application/json", * "application/x-www-form-urlencoded" * }, * produces={"application/xml", "application/json"}, * @SWG\Parameter( * description="ID of pet to return", * in="path", * name="petId", * required=true, * type="integer", * format="int64" * ), * @SWG\Response( * response=200, * description="successful operation", * @SWG\Schema(ref="#/definitions/Pet") * ), * @SWG\Response( * response="400", * description="Invalid ID supplied" * ), * @SWG\Response( * response="404", * description="Pet not found" * ), * security={ * {"api_key": {}}, * {"petstore_auth": {"write:pets", "read:pets"}} * } * ) */ public function doSomethingSmart() { return failItAllAndReturn500Response(); }Now imagine that you have 5 methods in your controller, each of which has 10 lines maximum? The ratio of comments to the code will be depressing.
- Relevance of documentation
This example demonstrates another flaw - the documentation does not depend on how your code actually works. Despite the fact that this method will always return a response with the code 500, the documentation will contain answers 200, 400, 404.
Decision
Since we have a fairly good test coverage, the solution suggests itself - the tests still run all the necessary scenarios. In the process of passing tests, you can collect codes and sample answers, a list of routes, input parameters and validation rules for them. In other words, most of the documentation. The rest is just remarks. In fact, we wrote this tool almost two years ago, but all hands did not reach writing an article about it.
Implementation
The whole principle of action is based on the Middleware pattern, that is, an intermediary. For each of the routes you can configure your list of resellers. Each of the requests before getting into the controller will go through a chain of intermediaries, each of whom can do something clever (or not so).
public function handle($request, Closure $next) { $response = $next($request); if ((config('app.env') == 'testing')) { $this->service->addData($request, $response); } return $response; } This code shows that the plugin starts collecting information during testing. The service collects the necessary information from the request and response. Request returns us URI and heders, as well as the route for which the current action is performed. The only difficulty is getting validation rules. In the middleware comes an instance of the class Illuminate\Http\Request , from which it is impossible to obtain data on validation. Therefore, it is recommended for the validation of "injecting" to the methods of the controller classes of requests.
For example, like this
public function someAction(MyAwersomeRequest $request) { ..... } Knowing which controller method should be called, we will be able to get access to the request that is injected into it. Knowing the specific class of the request you can get validation rules. It seemed to me appropriate in the annotation to the class of the request to place a full and brief description, description of response codes and description of parameters.
The whole point of the idea is that annotations should be clarification rather than an obligatory element.
Application
To demonstrate the capabilities of this plugin we will create a test project, the link to which is located at the bottom of the article. In this article we will consider the step-by-step creation of documentation.
Let's create a test controller.
/app/Http/Controllers/TestController.php
class TestController extends Controller { public function lists() { $data = [ 'some' => 'complex', 'structure' => [ 'with' => 'multiple', 'nesting' => [] ] ]; return response()->json($data); } ... } As you can see, this method simply returns a json object. Next, you need to register the route by which the lists method of our controller will be called.
/routes/api.php
... Route::get('/test', ['uses' => TestController::class . '@lists']); And accordingly apply middleware autodoc-plugin
/app/Http/Kernel.php
protected $middlewareGroups = [ 'api' => [ ... AutoDocMiddleware::class ], ]; To test it, let's create the following test.
class ExampleTest extends TestCase { public function testGetList() { $this->json('get', '/api/test'); $this->assertResponseOk(); } } In order to track the last test and the success of the tests created a special AutoDocTestCase . For the plugin to work correctly, you need to make your TestCase a successor to it or add the following code to your parent TestCase’s tearDown method:
public function tearDown() { $currentTestCount = $this->getTestResultObject()->count(); $allTestCount = $this->getTestResultObject()->topTestSuite()->count(); if (($currentTestCount == $allTestCount) && (!$this->hasFailed())) { $autoDocService = app(SwaggerService::class); $autoDocService->saveProductionData(); } parent::tearDown(); } After running the tests, we can see the collected documentation on the route that was specified for the documentation in the config config/auto-doc.php
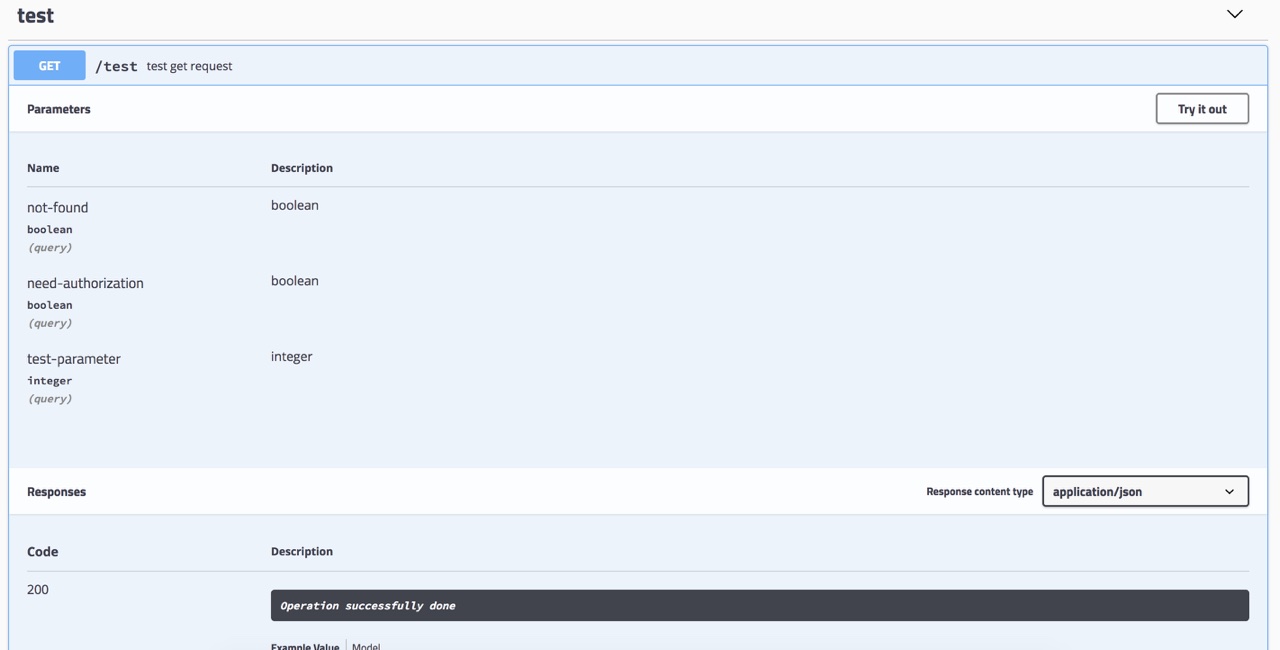
It will look something like this:

As we see, there is no complete or brief description, everything is dry - here is the request, here is the method, here is the answer. Nothing more can be obtained from this code (partly because there is nothing else there). Now let's create a request through
php artisan make:request TestGetRequest class TestGetRequest extends Request { /** * Determine if the user is authorized to make this request. * * @return bool */ public function authorize() { return true; } /** * Get the validation rules that apply to the request. * * @return array */ public function rules() { return [ 'not-found' => 'boolean', 'need-authorization' => 'boolean', 'test-parameter' => 'integer' ]; } } There are specifically not-found, need-authorization, test-parameter parameters to simulate different answers.
In order for this to work as expected, let's add a couple of checks to our controller's method.
public function lists(TestGetRequest $request) { if ($request->input('not-found')) { return response()->json([ 'error' => 'entity not found' ], Response::HTTP_NOT_FOUND); } if ($request->input('need-authorization')) { return response()->json([ 'error' => 'authorization failed' ], Response::HTTP_UNAUTHORIZED); } return response()->json([ 'some' => 'complex', 'structure' => [ 'with' => 'multiple', 'nesting' => [] ] ]); } Remaining small things - let's add three more test!
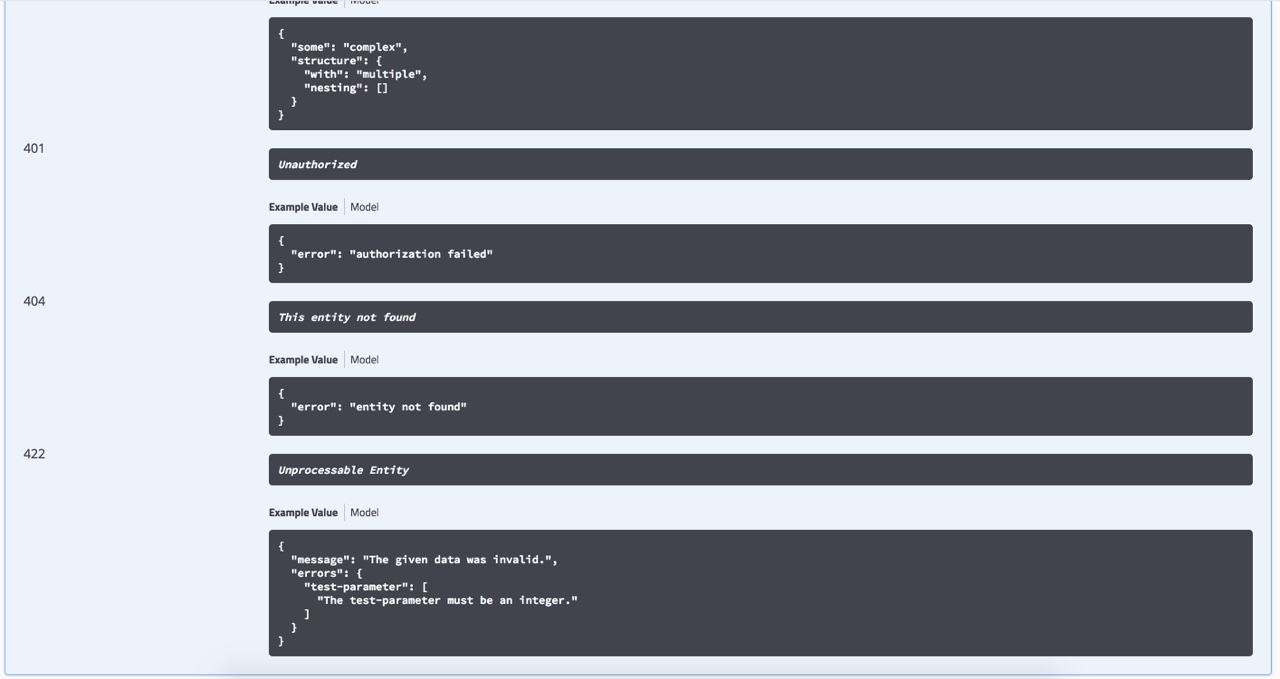
public function testGetListNotFound() { $response = $this->json('get', '/api/test', [ 'not-found' => true ]); $response->assertStatus(Response::HTTP_NOT_FOUND); } public function testGetListNoAuth() { $response = $this->json('get', '/api/test', [ 'need-authorization' => true ]); $response->assertStatus(Response::HTTP_UNAUTHORIZED); } public function testGetListWrongParameters() { $response = $this->json('get', '/api/test', [ 'test-parameter' => 'test' ]); $response->assertStatus(Response::HTTP_UNPROCESSABLE_ENTITY); } After running the tests, we can see more complete documentation.
But what is missing here? For example, the lack of a detailed description of our request. Test get request is a reformatted class name TestGetRequest. Also, standard descriptions of answers are used here, and sometimes I would like to specify what exactly is meant by a response code and input parameter. In short, I want
to play
Let's add annotations to the testGetRequest class.
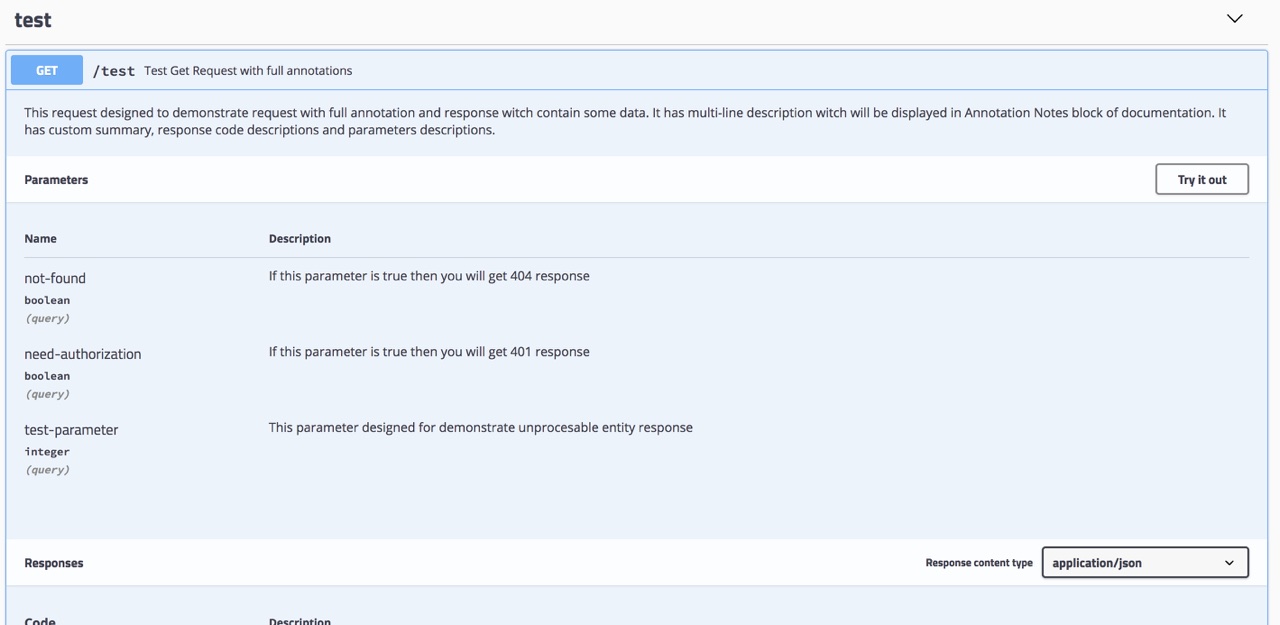
/** * @description * This request designed to demonstrate request with full annotation and response witch contain some data. * It has multi-line description witch will be displayed in Annotation Notes block of documentation. * It has custom summary, response code descriptions and parameters descriptions. * * @summary Test Get Request with full annotations * * @_204 This request has successfully done * @_401 You must remove need-authorization flag from input parameters for pass authorization. * @_404 We so sorry but you entity not exists. * @_422 Wrong input parameter. It must be integer * * @need-authorization If this parameter is true then you will get 401 response * @not-found If this parameter is true then you will get 404 response * @test-parameter This parameter designed for demonstrate unprocesable entity response */ class TestGetRequest extends Request {...} None of the parameters in the annotation is optional.


It is also possible to set a standard description of the response code at the application level. This is done in the file config / auto-doc.php . The priority of the descriptions is as follows:
- description of the response code in the annotation
- config value
- standard response code description
Also in this config is all you need to configure the project description in the documentation.
When you execute a command
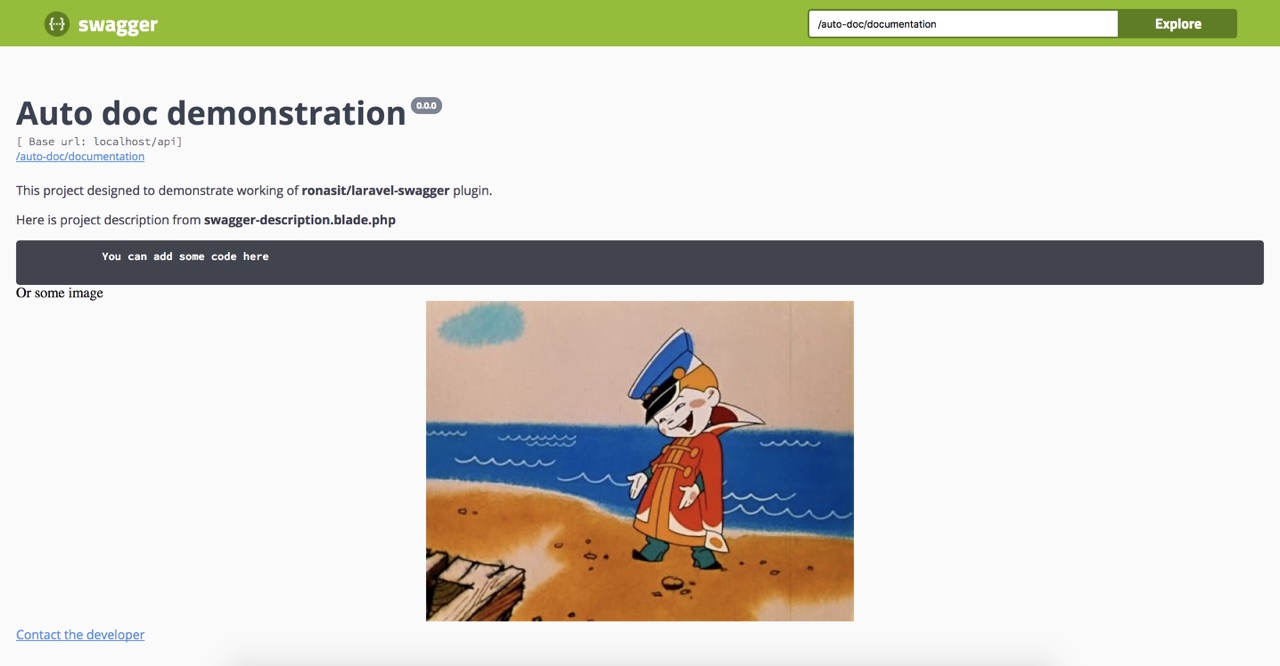
php artisan vendor:publish The folder swagger-description.blade.php is placed in the resources/views folder. For example, if you add the following code there
This project designed to demonstrate working of <b>ronasit/laravel-swagger</b> plugin. Here is project description from <b>swagger-description.blade.php</b> <div class="swagger-ui"> <div class="opblock-body"> <pre> You can add some code here </pre> </div> </div> Or some image <div style="display: flex; justify-content: center; width: 100%"> <img src="/img/hqdefault.jpg"/> </div> In the end, the project description in the documentation will look like this:
Total
The main goal of this plugin is the possibility of its integration with the minimum number of gestures and the possibility of further concretization of bottlenecks. All you need in order to have documentation in your project when using this plugin is to carefully write tests for each documented case, and also to store validations not in the controller method, but in the requester class. In other words, compliance with the rules is required, which in any case is useful to follow.
Links
The repository of this plugin is here
')
Source: https://habr.com/ru/post/358528/
All Articles