Ubuntu DSVM Review: Alchemy
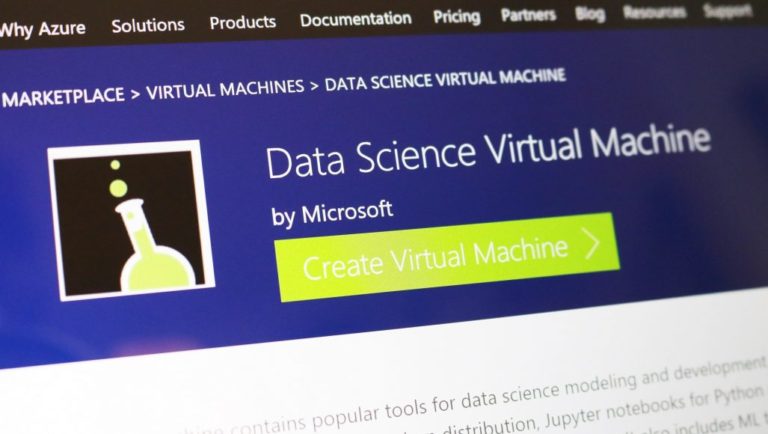
In recent months, in several projects, our partner has been using a Ubuntu-based virtual machine for data processing and analysis (DSVM) based on Microsoft. He decided to try it out already using the Amazon product. Consider all the pros and cons, as well as compare our tool with similar solutions. Join now!

I give the word to the author .
')
At first, I didn’t really want to test it in action — I already had a tuned AMI instance for deep learning in Amazon AWS . I often use it, and it is available to all PyImageSearch readers for use in their own projects.
I’m not a fan of the Amazon AWS UI, but over the years I have adapted to it. I guess there is something familiar about his awkward complexity. However, I came across so good reviews about Ubuntu DSVM that I finally decided to try it out. And she exceeded all my expectations. More convenient interface. Excellent performance. Reasonable price.
... And besides, all the code from the book Deep Learning for Computer Vision with Python worked on it without a single change. Microsoft kindly allowed me to publish a number of guest articles on the company's machine learning blog, in which I appreciated the virtual machine and shared my impressions of its use and testing:
Microsoft is actively working to ensure that their environment is considered as a priority when choosing a cloud platform for in-depth training, machine learning, data processing and analysis. The quality of their DSVM product is a clear illustration of this aspiration.
In this article, I would like to share thoughts about DSVM, show how to run the first instance of the machine, and start executing the code for deep learning on it. If you are interested in a virtual machine for deep learning from Microsoft (and you want to understand whether it is suitable for solving your problems), this article is for you.
When I first met the Microsoft virtual machine for deep learning, data processing and analysis (DSVM), I took all the code samples from the book Deep Learning for Computer Vision with Python and ran each of them in DSVM. Manual launch of each sample and verification of results is a monotonous work, but it helped to study the features of DSVM and evaluate it by the following parameters:
The program code accompanying the book Deep Learning for Computer Vision with Python is great for this kind of test.
The code from the Starter Bundle package is intended for the first acquaintance with image classification, deep learning and convolutional neural networks (SNS). If this code is executed without any problems in DSVM, it means that the machine can be recommended to beginners who need a ready-made environment for learning deep learning.
The training materials and the enclosed code from the Practitioner Bundle package are devoted to much more advanced technologies (transfer of training, fine-tuning of generative-competitive networks, etc.). Such technologies are used in their daily work by practitioners and engineers.
If DSVM can cope with these examples, then it can be recommended to practicing specialists in the field of deep learning. And finally, to run the code from the ImageNet Bundle package, you need a productive GPU (the more powerful, the better) and high bandwidth I / O operations. Within this package, I show how to reproduce the results from the most advanced publications (for example, in ResNet, SqueezeNet, etc.) obtained on huge graphic data sets (for example, the ImageNet set, consisting of 1.2 million images).
If DSVM is able to reproduce the results of the most advanced articles, then it can be recommended to researchers. In the first half of the article I will present the results of each of the described tests and my personal impressions. Then I will show you how to run your first copy of the deep learning system in the Microsoft cloud and execute the first piece of the corresponding code in DSVM.
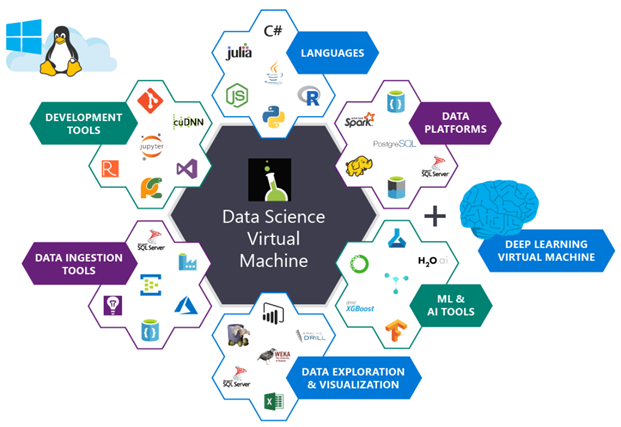
Fig. 1. The illustration shows the packages that are installed on the Microsoft Azure virtual machine for processing and analyzing data. They are already set up and ready to use.
Microsoft's deep learning virtual machine runs in the Azure cloud, which is also owned by the corporation. Technically, it can run both Windows and Linux, but for deep learning projects I would recommend using the company’s Ubuntu DSVM instance (unless you have a reason to use Windows).
The list of packages pre-installed on DSVM is quite extensive - a full list is available here. Below, I have listed the most important packages for solving deep learning and computer vision problems (in particular, those that might interest the PyImageSearch readers) so that you can imagine how many there are.
The creators of DSVM release new versions of the machine with the most current pre-installed and customized versions of the packages every few months. This is a huge amount of work, demonstrating both the incredible efforts of the DSVM team in terms of ensuring stable operation of the instance (eliminating potential conflicts between DSVM packages should be a daunting task, but the machine is completely transparent to the user) and Microsoft’s desire to produce convenient and pleasant to users.
To run DSVM, you can use both instances equipped only with CPUs, and instances with GPUs.
Most of the experiments and tests described below were performed on an instance of Ubuntu GPU, which is equipped with a standard NVIDIA K80 GPU. In addition, Microsoft provided me with access to the recently released NVIDIA V100 monster, and I ran a few quick tests on it (the results are below). To conduct all the experiments within the Starter Bundle and Practitioner Bundle packages, I used Microsoft Jupyter Notebook. The process was incredibly simple.
I copied and pasted the Jupyter Notebook server URL into the address bar of the browser, launched a new notepad, and after a few minutes I executed code snippets from the book.
I used SSH to experiment with ImageNet Bundle, since reproducing the results from the most advanced publications requires spending a few days on training. Besides, it seems to me that this is not the best way to use Jupyter notebooks.

Fig. 2. Learning the LeNet architecture on the MNIST dataset. This combination is often called "Hello World Deep Learning"
As part of my first guest blog post on Microsoft, I trained a simple convolutional neural network (LeNet) on the MNIST handwritten number set. Learning LeNet on the MNIST suite is likely to be the first “real” experiment for a newcomer to master the technology of deep learning.
Both the model and the data set are organized very clearly. For training, you can use the CPU or GPU. I took a sample code from the 14th chapter of the book Deep Learning for Computer Vision with Python (Starter Bundle package) and ran it in the Jupyter Notebook (available here ) on Microsoft DSVM. The results are shown in Figure 2 above.
After 20 epochs of learning, the classification accuracy was 98%. All other code samples from the Starter Bundle package of the book Deep Learning for Computer Vision with Python also worked without problems. I was delighted with the ability to execute code in a browser using Jupyter Notebook on Azure DSVM (without additional configuration). I am sure that newcomers to the field of deep learning will also appreciate it.
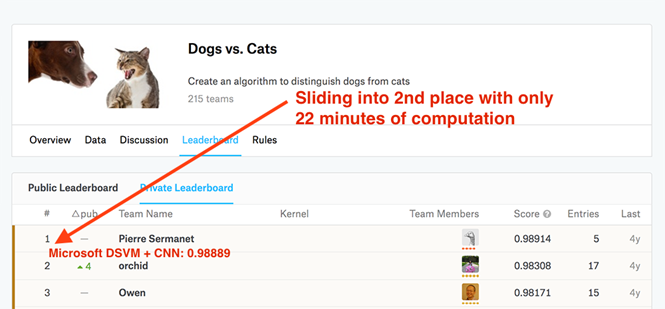
Fig. 3. A pre-configured copy of Microsoft Azure DSVM and code from the book Deep Learning for Computer Vision with Python made it easy to take the second line on the Kaggle leaderboard for solving the “Dogs vs. Cats "(recognition of the object in the photo - a cat or a dog)
My second article on the Microsoft blog was designed for practitioners. For the rapid training of a high-precision model, specialists often use an approach called transfer of training (more precisely, its variety, feature extraction).
To show how DSVM can help practitioners who need to quickly train a model and evaluate various hyperparameters, I did the following:
I set myself the task - to do it all in less than 25 minutes. The final model was able to take second place, requiring only 22 minutes to calculate (see Figure 3). A full description of the solution, a Jupyter notepad and code are available in this publication.
But is it possible to solve this problem even faster? After completing the Kaggle experiment, “Dogs vs. Cats "on the NVIDIA K80 Microsoft spokesperson allowed me to use the newly released NVIDIA V100 GPU. I had never dealt with NVIDIA V100 before, and I was very interested in what would come of it. The results were just awesome.
At NVIDIA K80, the entire process took 22 minutes, and the NVIDIA V100 coped with the task in 5 minutes, that is, more than 4.4 times faster. I am sure that the transfer of working solutions from K80 to V100 will significantly improve performance. But there is another factor - financial expediency (it is discussed below).

Fig. 4. Microsoft Azure DSVM easily trains SqueezeNet on the ImageNet dataset
DSVM is great for both beginners and experienced deep learning professionals. But what about researchers who work at the forefront of the industry? Will DSVM help in solving their problems? To find the answer to this question, I did the following:
I chose SqueezeNet for several reasons:
My SqueezeNet training on the NVIDIA K80 took 80 epochs. For training the network, SGD was used with an initial learning rate of 1e-2 (in one of the publications of Landola and the co-authors there is a remark that 4e-2 is too large a figure for stable learning). The learning rate decreased by an order of magnitude at epochs of 50, 65, and 75, respectively. Each era took about 140 minutes on the K80, so the total training time was about a week.
Using multiple GPUs would easily reduce the learning time to 1-3 days, depending on the number of processors.
After the training was completed, I conducted a test on a set of 50,000 images (they were taken from the training set, so I did not have to send the results to the ImageNet verification server). Total accuracy: 58.86% for rank 1 and 79.38% for rank 5. They correspond to the results reported by Landola and co-authors.
The full article on the SqueezeNet + ImageNet bundle is available on the Microsoft blog .
After learning SqueezeNet on ImageNet using the NVIDIA K80, I repeated the experiment with a single V100 GPU. The increase in learning speed was just awesome. With the K80, one era took about 140 minutes. The epoch on V100 was executed in 28 minutes, i.e. more than five times faster.
I managed to train SqueezeNet and reproduce the results of the previous experiment in just over 36 hours. DSVM is a very attractive tool for researchers, especially if you do not want to acquire and maintain hardware.

Fig. 5. Comparison of prices for the computing power of a GPU among various deep learning service providers and GPU resources
A copy of p2.xlarge in Amazon EC2 will cost you 0.90 (1x K80), 7.20 (8x K80), or 14.40 (16x K80) US dollars / hour. Thus, the cost of using a single copy of K80 is $ 0.90 / hour. In Microsoft Azure, prices are exactly the same: 0.90 (1x K80), 1.80 (2x K80), and 3.60 (4x K80) USD / hour. The total cost of using a single K80 device is also $ 0.90 / hour.
Amazon offers ready-to-use machines with the V100. Their cost is 3.06 (1x V100), 12.24 (4x V100) and 24.48 (8x V100) USD / hour. Thus, if you want to get a V100 in Amazon EC2, get ready to pay $ 3.06 per hour.
The cost of copies with V100, which recently appeared in Azure, is quite competitive: 3.06 (1x V100), 6.12 (2x V100) and 12.24 (4x V100) US dollars / hour. The final cost of one V100 also makes 3 , $ 06 / hour.
Microsoft has released the Azure Batch AI package , which resembles Amazon spot instances and allows you to take advantage of better prices for instances.
For a complete and fair price comparison, you should also consider the suggestions of Google, Paperspace and Floydhub.
Google Fees are 0.45 (1x K80), 0.90 (2x K80), 1.80 (4x K80), and $ 3.60 (8x K80) per hour using the suggested copies. This is half the price of K80 offers from MS / EC2 and definitely the best price. I have no information about the offers of machines with V100 from Google. However, they implement their own development, TPU, the cost of which is US $ 6.50 per hour per TPU.
The Paperspace rate is $ 2.30 per hour (1x V100). It is worth noting that they also offer endpoints for the API.
The Floydhub rate is $ 4.20 per hour (1x V100), but they offer great collaboration solutions.
In terms of reliability, EC2 and Azure offerings have proven themselves well. And if you consider how comfortable working in Azure compared to EC2, then unequivocally to say that Amazon is better suited for long-term use, will not work.
If you want to appreciate Azure’s capabilities, Microsoft offers free trial resources . However, this bonus cannot be used to start machines with a GPU (unfortunately, instances with GPUs are classified as “premium”).
Running a DSVM instance is easy. In this section I will explain how to do this.
If you need advanced settings, refer to the documentation - I will mainly use the default settings. To experience the power of the Azure cloud for free, you can sign up for a free Microsoft Azure trial account.
Note. You cannot create instances with a GPU as part of a Microsoft trial subscription. Unfortunately, instances with GPU are classified as "premium."
Step 1. Create a user account on the portal.azure.com page or login.
Step 2. Click the Create Resource button in the upper left corner.
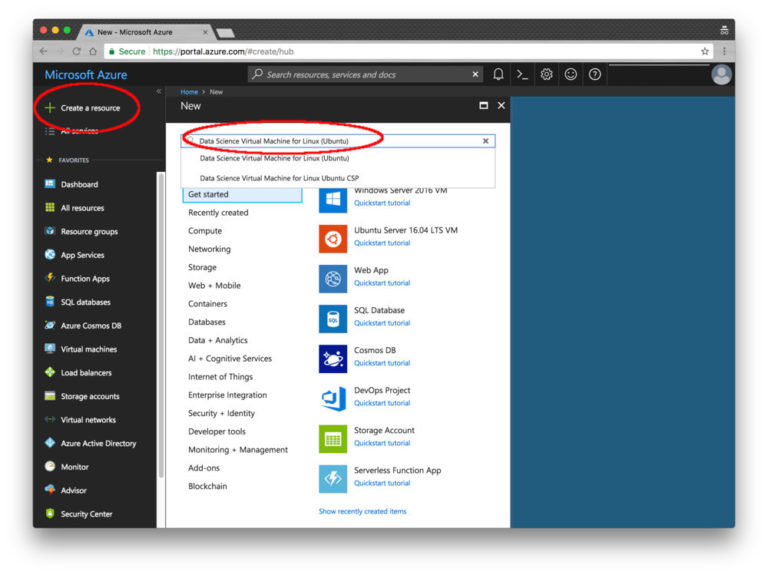
Fig. 6. Resource Creation Screen in Microsoft Azure
Step 3. In the search field, enter “Data Science Virtual Machine for Linux”. The option you need appears in the list. Select the first line with the word "Ubuntu".
Step 4. Configure the basic settings. Specify the name (without spaces and special characters). Select HDD (not SSD). Instead of setting the key file, I entered a simple password, but here the choice is yours. Explore the "Subscription" section: you may have free funds on your account. You will also need to create a resource group. I chose an existing one, rg1.
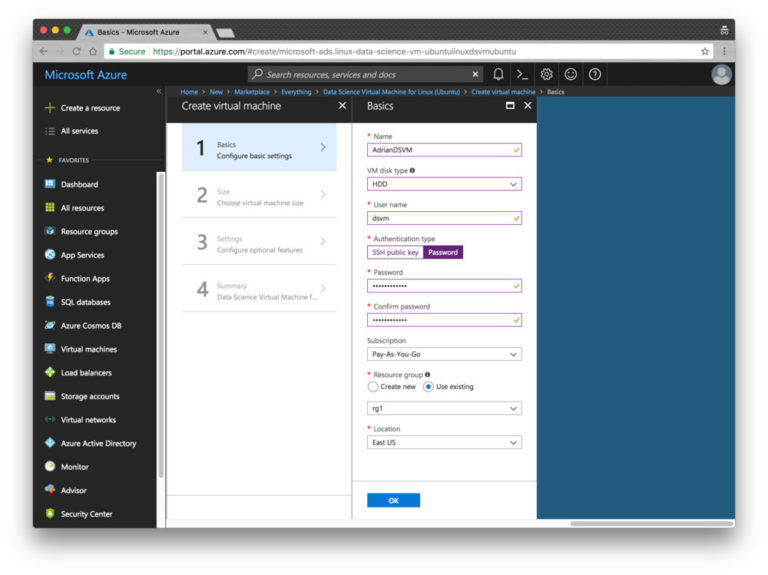
Fig. 7. The main parameters of the resource Microsoft Azure
Step 5. Select a region and virtual machine. I chose an affordable copy with K80 (NC65_V3). The instance with the V100 is lower in the list (NC6S_V3). I must point out that this naming system is incomprehensible to me. This is one of the negative impressions of using the platform. I was hoping that the naming system here would be about the same as that of sports cars; In the extreme case, a car with two K80 GPUs could be called "K80-2". But the names here are determined by the number of virtual CPUs, while we are interested in the GPU.

Fig. 8. Microsoft Azure DSVM virtual machine will work based on K80 GPU and V100 GPU
Step 6. Examine the Summary page and confirm your acceptance of the terms of the agreement.

Fig. 9. On the “Summary” page you can read the terms of the contract and confirm your agreement with them.
Step 7. Wait for the system deployment to complete. When the process is over, you will receive a notification.
Step 8. Select “All Resources”. This list lists everything you pay for.
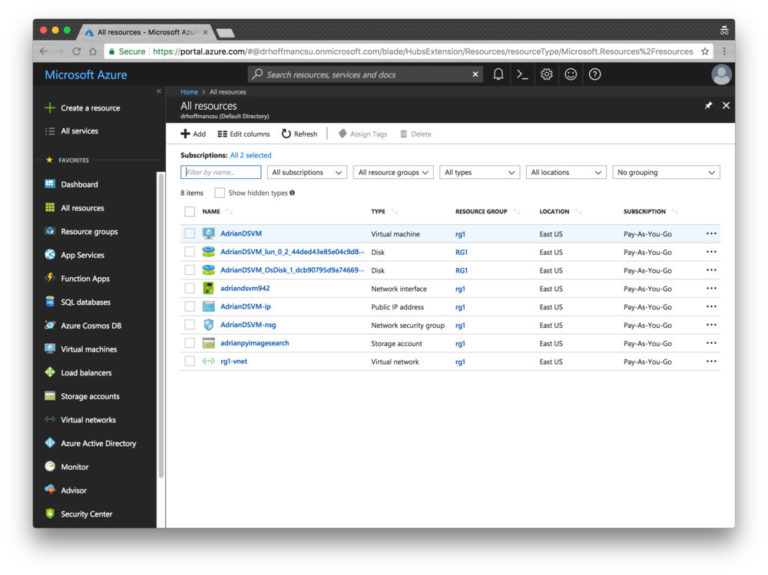
Fig. 10. The “All Resources” page of the Azure portal displays my DSVM machine and its associated services.
If you select a virtual machine, information about it will appear in the window (open the screenshot below in a new tab in order to study it at a higher resolution — the IP address is displayed there, etc.).

Fig. 11. On the Resource Overview page, you can view your instances.
Step 9. Connect to the machine via SSH and (or) Jupyter.
If you click the “Connect” button, the screen displays information for configuring an SSH connection (using a key or password file). Unfortunately, there is no convenient link to Jupyter here. To connect to Jupyter, follow these steps.
Now we’ll run the example of LeNet + MNIST, which is covered in my first posting on the Microsoft blog, in the Jupyter environment. This process consists of two steps.
Step 1. Connect to your machine via SSH (see step 9 in the previous section).
Go to the ~ / notebooks directory.
Clone repository with $ git clone github.com/jrosebr1/microsoft-dsvm.git
Step 2. Open the Jupyter page in a browser (see step 9 in the previous section).
Click the microsoft-dsvm directory.
Open the required .ipynb file (pyimagesearch-training-your-first-cnn.ipynb).
Do not run the notebook yet - at first I will tell you about one convenient method. It is not necessary to use it, but if you work with several notebooks in DSVM, it will make your life a little easier. The fact is that if you start a notebook and leave it in the “running” state, the core of the notebook will block the GPU. If you try to start another notebook, errors such as “resource exhausted” will appear.
To avoid this, add the following two lines to the separate cell at the very end of the notebook:
Now after all the cells have been processed, the notebook will carefully turn off its core, and you will not have to worry about manually stopping it.
Now you can click inside the first cell and select the menu item "Cell> Run all". So you start the execution of all the cells of the notebook and initiate LeNet training based on MNIST. Now you can follow the progress in the browser and end up with a result like this:
Fig. 12. Learning LeNet based on MNIST in a virtual computer for data processing and analysis (DSVM) in the Microsoft Azure cloud
Usually I delete the entire contents of the output after shutting down or before re-launching the modified notepad. To do this, select the menu item "Kernel> Restart & Clear Output".
In this publication, I talked about personal experience with the Microsoft virtual machine for deep learning, data processing and analysis (DSVM). I also showed how to run the first instance of DSVM and run the first sample code for deep learning on it. Initially, I had doubts about DSVM, but I'm glad that I tried to use this machine.
DSVM easily coped with all the challenges, from learning tasks for beginners to the most advanced experiments. After the transition from copies from the NVIDIA K80 to the new NVIDIA V100 GPU from Microsoft, the speed of experiments has increased fivefold.
If you are looking for a cloud-based instance with a GPU for deep learning, I advise you to pay attention to Microsoft's DSVM - my impressions were very positive, Microsoft support worked perfectly, and DSVM machine turned out to be powerful and convenient to use.
I give the word to the author .
')
At first, I didn’t really want to test it in action — I already had a tuned AMI instance for deep learning in Amazon AWS . I often use it, and it is available to all PyImageSearch readers for use in their own projects.
I’m not a fan of the Amazon AWS UI, but over the years I have adapted to it. I guess there is something familiar about his awkward complexity. However, I came across so good reviews about Ubuntu DSVM that I finally decided to try it out. And she exceeded all my expectations. More convenient interface. Excellent performance. Reasonable price.
... And besides, all the code from the book Deep Learning for Computer Vision with Python worked on it without a single change. Microsoft kindly allowed me to publish a number of guest articles on the company's machine learning blog, in which I appreciated the virtual machine and shared my impressions of its use and testing:
- Deep learning and computer vision in the Microsoft Azure cloud ;
- Algorithms of deep learning and Azure technology made it possible to take second place in one of the Kaggle competitions in just 22 minutes ;
- Learning advanced neural networks in the Microsoft Azure cloud .
Microsoft is actively working to ensure that their environment is considered as a priority when choosing a cloud platform for in-depth training, machine learning, data processing and analysis. The quality of their DSVM product is a clear illustration of this aspiration.
In this article, I would like to share thoughts about DSVM, show how to run the first instance of the machine, and start executing the code for deep learning on it. If you are interested in a virtual machine for deep learning from Microsoft (and you want to understand whether it is suitable for solving your problems), this article is for you.
Deep Learning Microsoft Virtual Machine: Overview
When I first met the Microsoft virtual machine for deep learning, data processing and analysis (DSVM), I took all the code samples from the book Deep Learning for Computer Vision with Python and ran each of them in DSVM. Manual launch of each sample and verification of results is a monotonous work, but it helped to study the features of DSVM and evaluate it by the following parameters:
- The ability to use by beginners (i.e. people who are just starting to get acquainted with deep learning);
- The ability to solve practical problems in which it is important to prepare a model of deep learning and quickly assess the effectiveness;
- The ability to solve research problems, that is, to train deep neural networks on large graphic data sets.
The program code accompanying the book Deep Learning for Computer Vision with Python is great for this kind of test.
The code from the Starter Bundle package is intended for the first acquaintance with image classification, deep learning and convolutional neural networks (SNS). If this code is executed without any problems in DSVM, it means that the machine can be recommended to beginners who need a ready-made environment for learning deep learning.
The training materials and the enclosed code from the Practitioner Bundle package are devoted to much more advanced technologies (transfer of training, fine-tuning of generative-competitive networks, etc.). Such technologies are used in their daily work by practitioners and engineers.
If DSVM can cope with these examples, then it can be recommended to practicing specialists in the field of deep learning. And finally, to run the code from the ImageNet Bundle package, you need a productive GPU (the more powerful, the better) and high bandwidth I / O operations. Within this package, I show how to reproduce the results from the most advanced publications (for example, in ResNet, SqueezeNet, etc.) obtained on huge graphic data sets (for example, the ImageNet set, consisting of 1.2 million images).
If DSVM is able to reproduce the results of the most advanced articles, then it can be recommended to researchers. In the first half of the article I will present the results of each of the described tests and my personal impressions. Then I will show you how to run your first copy of the deep learning system in the Microsoft cloud and execute the first piece of the corresponding code in DSVM.
Comprehensive set of deep learning libraries
Fig. 1. The illustration shows the packages that are installed on the Microsoft Azure virtual machine for processing and analyzing data. They are already set up and ready to use.
Microsoft's deep learning virtual machine runs in the Azure cloud, which is also owned by the corporation. Technically, it can run both Windows and Linux, but for deep learning projects I would recommend using the company’s Ubuntu DSVM instance (unless you have a reason to use Windows).
The list of packages pre-installed on DSVM is quite extensive - a full list is available here. Below, I have listed the most important packages for solving deep learning and computer vision problems (in particular, those that might interest the PyImageSearch readers) so that you can imagine how many there are.
- Tensorflow
- Keras
- mxnet
- Caffe / Caffe2
- Torch / PyTorch
- Opencv
- Jupyter
- CUDA and cuDNN
- Python 3
The creators of DSVM release new versions of the machine with the most current pre-installed and customized versions of the packages every few months. This is a huge amount of work, demonstrating both the incredible efforts of the DSVM team in terms of ensuring stable operation of the instance (eliminating potential conflicts between DSVM packages should be a daunting task, but the machine is completely transparent to the user) and Microsoft’s desire to produce convenient and pleasant to users.
What about the GPU?
To run DSVM, you can use both instances equipped only with CPUs, and instances with GPUs.
Most of the experiments and tests described below were performed on an instance of Ubuntu GPU, which is equipped with a standard NVIDIA K80 GPU. In addition, Microsoft provided me with access to the recently released NVIDIA V100 monster, and I ran a few quick tests on it (the results are below). To conduct all the experiments within the Starter Bundle and Practitioner Bundle packages, I used Microsoft Jupyter Notebook. The process was incredibly simple.
I copied and pasted the Jupyter Notebook server URL into the address bar of the browser, launched a new notepad, and after a few minutes I executed code snippets from the book.
I used SSH to experiment with ImageNet Bundle, since reproducing the results from the most advanced publications requires spending a few days on training. Besides, it seems to me that this is not the best way to use Jupyter notebooks.
Convenience for beginners in the field of deep learning
Fig. 2. Learning the LeNet architecture on the MNIST dataset. This combination is often called "Hello World Deep Learning"
As part of my first guest blog post on Microsoft, I trained a simple convolutional neural network (LeNet) on the MNIST handwritten number set. Learning LeNet on the MNIST suite is likely to be the first “real” experiment for a newcomer to master the technology of deep learning.
Both the model and the data set are organized very clearly. For training, you can use the CPU or GPU. I took a sample code from the 14th chapter of the book Deep Learning for Computer Vision with Python (Starter Bundle package) and ran it in the Jupyter Notebook (available here ) on Microsoft DSVM. The results are shown in Figure 2 above.
After 20 epochs of learning, the classification accuracy was 98%. All other code samples from the Starter Bundle package of the book Deep Learning for Computer Vision with Python also worked without problems. I was delighted with the ability to execute code in a browser using Jupyter Notebook on Azure DSVM (without additional configuration). I am sure that newcomers to the field of deep learning will also appreciate it.
Convenience for practitioners in the field of deep learning
Fig. 3. A pre-configured copy of Microsoft Azure DSVM and code from the book Deep Learning for Computer Vision with Python made it easy to take the second line on the Kaggle leaderboard for solving the “Dogs vs. Cats "(recognition of the object in the photo - a cat or a dog)
My second article on the Microsoft blog was designed for practitioners. For the rapid training of a high-precision model, specialists often use an approach called transfer of training (more precisely, its variety, feature extraction).
To show how DSVM can help practitioners who need to quickly train a model and evaluate various hyperparameters, I did the following:
- Applied feature extraction using the ResNet model, previously trained on the data set from the Kaggle task “Dogs vs. Cats. "
; - I applied a classifier based on logistic regression with the search for hyperparameters for the extracted features along the grid;
- Got a model that was able to take second place in the competition.
I set myself the task - to do it all in less than 25 minutes. The final model was able to take second place, requiring only 22 minutes to calculate (see Figure 3). A full description of the solution, a Jupyter notepad and code are available in this publication.
But is it possible to solve this problem even faster? After completing the Kaggle experiment, “Dogs vs. Cats "on the NVIDIA K80 Microsoft spokesperson allowed me to use the newly released NVIDIA V100 GPU. I had never dealt with NVIDIA V100 before, and I was very interested in what would come of it. The results were just awesome.
At NVIDIA K80, the entire process took 22 minutes, and the NVIDIA V100 coped with the task in 5 minutes, that is, more than 4.4 times faster. I am sure that the transfer of working solutions from K80 to V100 will significantly improve performance. But there is another factor - financial expediency (it is discussed below).
Sufficient power for advanced development in the field of deep learning
Fig. 4. Microsoft Azure DSVM easily trains SqueezeNet on the ImageNet dataset
DSVM is great for both beginners and experienced deep learning professionals. But what about researchers who work at the forefront of the industry? Will DSVM help in solving their problems? To find the answer to this question, I did the following:
- I downloaded the entire set of ImageNet data on a virtual machine;
- I took the code from the 9th chapter of the book Deep Learning for Computer Vision with Python (ImageNet Bundle package), in which I show how to train SqueezeNet based on ImageNet.
I chose SqueezeNet for several reasons:
- SqueezeNet was already running ImageNet on my local computer for a separate project, so I could easily compare the results;
- SqueezeNet is one of my favorite architectures;
- Due to its small size (less than 5 MB without quantization), the final model is well suited for use in work environments where networks or devices with limited capabilities are often used for deployment.
My SqueezeNet training on the NVIDIA K80 took 80 epochs. For training the network, SGD was used with an initial learning rate of 1e-2 (in one of the publications of Landola and the co-authors there is a remark that 4e-2 is too large a figure for stable learning). The learning rate decreased by an order of magnitude at epochs of 50, 65, and 75, respectively. Each era took about 140 minutes on the K80, so the total training time was about a week.
Using multiple GPUs would easily reduce the learning time to 1-3 days, depending on the number of processors.
After the training was completed, I conducted a test on a set of 50,000 images (they were taken from the training set, so I did not have to send the results to the ImageNet verification server). Total accuracy: 58.86% for rank 1 and 79.38% for rank 5. They correspond to the results reported by Landola and co-authors.
The full article on the SqueezeNet + ImageNet bundle is available on the Microsoft blog .
Highest learning speed when using the NVIDIA V100
After learning SqueezeNet on ImageNet using the NVIDIA K80, I repeated the experiment with a single V100 GPU. The increase in learning speed was just awesome. With the K80, one era took about 140 minutes. The epoch on V100 was executed in 28 minutes, i.e. more than five times faster.
I managed to train SqueezeNet and reproduce the results of the previous experiment in just over 36 hours. DSVM is a very attractive tool for researchers, especially if you do not want to acquire and maintain hardware.
But what about the price?
Fig. 5. Comparison of prices for the computing power of a GPU among various deep learning service providers and GPU resources
A copy of p2.xlarge in Amazon EC2 will cost you 0.90 (1x K80), 7.20 (8x K80), or 14.40 (16x K80) US dollars / hour. Thus, the cost of using a single copy of K80 is $ 0.90 / hour. In Microsoft Azure, prices are exactly the same: 0.90 (1x K80), 1.80 (2x K80), and 3.60 (4x K80) USD / hour. The total cost of using a single K80 device is also $ 0.90 / hour.
Amazon offers ready-to-use machines with the V100. Their cost is 3.06 (1x V100), 12.24 (4x V100) and 24.48 (8x V100) USD / hour. Thus, if you want to get a V100 in Amazon EC2, get ready to pay $ 3.06 per hour.
The cost of copies with V100, which recently appeared in Azure, is quite competitive: 3.06 (1x V100), 6.12 (2x V100) and 12.24 (4x V100) US dollars / hour. The final cost of one V100 also makes 3 , $ 06 / hour.
Microsoft has released the Azure Batch AI package , which resembles Amazon spot instances and allows you to take advantage of better prices for instances.
For a complete and fair price comparison, you should also consider the suggestions of Google, Paperspace and Floydhub.
Google Fees are 0.45 (1x K80), 0.90 (2x K80), 1.80 (4x K80), and $ 3.60 (8x K80) per hour using the suggested copies. This is half the price of K80 offers from MS / EC2 and definitely the best price. I have no information about the offers of machines with V100 from Google. However, they implement their own development, TPU, the cost of which is US $ 6.50 per hour per TPU.
The Paperspace rate is $ 2.30 per hour (1x V100). It is worth noting that they also offer endpoints for the API.
The Floydhub rate is $ 4.20 per hour (1x V100), but they offer great collaboration solutions.
In terms of reliability, EC2 and Azure offerings have proven themselves well. And if you consider how comfortable working in Azure compared to EC2, then unequivocally to say that Amazon is better suited for long-term use, will not work.
If you want to appreciate Azure’s capabilities, Microsoft offers free trial resources . However, this bonus cannot be used to start machines with a GPU (unfortunately, instances with GPUs are classified as “premium”).
Run the first instance for deep learning in the Microsoft cloud
Running a DSVM instance is easy. In this section I will explain how to do this.
If you need advanced settings, refer to the documentation - I will mainly use the default settings. To experience the power of the Azure cloud for free, you can sign up for a free Microsoft Azure trial account.
Note. You cannot create instances with a GPU as part of a Microsoft trial subscription. Unfortunately, instances with GPU are classified as "premium."
Step 1. Create a user account on the portal.azure.com page or login.
Step 2. Click the Create Resource button in the upper left corner.
Fig. 6. Resource Creation Screen in Microsoft Azure
Step 3. In the search field, enter “Data Science Virtual Machine for Linux”. The option you need appears in the list. Select the first line with the word "Ubuntu".
Step 4. Configure the basic settings. Specify the name (without spaces and special characters). Select HDD (not SSD). Instead of setting the key file, I entered a simple password, but here the choice is yours. Explore the "Subscription" section: you may have free funds on your account. You will also need to create a resource group. I chose an existing one, rg1.
Fig. 7. The main parameters of the resource Microsoft Azure
Step 5. Select a region and virtual machine. I chose an affordable copy with K80 (NC65_V3). The instance with the V100 is lower in the list (NC6S_V3). I must point out that this naming system is incomprehensible to me. This is one of the negative impressions of using the platform. I was hoping that the naming system here would be about the same as that of sports cars; In the extreme case, a car with two K80 GPUs could be called "K80-2". But the names here are determined by the number of virtual CPUs, while we are interested in the GPU.
Fig. 8. Microsoft Azure DSVM virtual machine will work based on K80 GPU and V100 GPU
Step 6. Examine the Summary page and confirm your acceptance of the terms of the agreement.
Fig. 9. On the “Summary” page you can read the terms of the contract and confirm your agreement with them.
Step 7. Wait for the system deployment to complete. When the process is over, you will receive a notification.
Step 8. Select “All Resources”. This list lists everything you pay for.
Fig. 10. The “All Resources” page of the Azure portal displays my DSVM machine and its associated services.
If you select a virtual machine, information about it will appear in the window (open the screenshot below in a new tab in order to study it at a higher resolution — the IP address is displayed there, etc.).
Fig. 11. On the Resource Overview page, you can view your instances.
Step 9. Connect to the machine via SSH and (or) Jupyter.
If you click the “Connect” button, the screen displays information for configuring an SSH connection (using a key or password file). Unfortunately, there is no convenient link to Jupyter here. To connect to Jupyter, follow these steps.
- Open a new tab in the browser;
- Go to "https: // public_IP_your_instance_Azure_Dsvm: 8000" (it is https, not http). Replace the relevant part of the URL with the public IP of your instance.
Code execution on a virtual machine for deep learning
Now we’ll run the example of LeNet + MNIST, which is covered in my first posting on the Microsoft blog, in the Jupyter environment. This process consists of two steps.
Step 1. Connect to your machine via SSH (see step 9 in the previous section).
Go to the ~ / notebooks directory.
Clone repository with $ git clone github.com/jrosebr1/microsoft-dsvm.git
Step 2. Open the Jupyter page in a browser (see step 9 in the previous section).
Click the microsoft-dsvm directory.
Open the required .ipynb file (pyimagesearch-training-your-first-cnn.ipynb).
Do not run the notebook yet - at first I will tell you about one convenient method. It is not necessary to use it, but if you work with several notebooks in DSVM, it will make your life a little easier. The fact is that if you start a notebook and leave it in the “running” state, the core of the notebook will block the GPU. If you try to start another notebook, errors such as “resource exhausted” will appear.
To avoid this, add the following two lines to the separate cell at the very end of the notebook:
%%javascript Jupyter.notebook.session.delete(); Now after all the cells have been processed, the notebook will carefully turn off its core, and you will not have to worry about manually stopping it.
Now you can click inside the first cell and select the menu item "Cell> Run all". So you start the execution of all the cells of the notebook and initiate LeNet training based on MNIST. Now you can follow the progress in the browser and end up with a result like this:
Fig. 12. Learning LeNet based on MNIST in a virtual computer for data processing and analysis (DSVM) in the Microsoft Azure cloud
Usually I delete the entire contents of the output after shutting down or before re-launching the modified notepad. To do this, select the menu item "Kernel> Restart & Clear Output".
Conclusion
In this publication, I talked about personal experience with the Microsoft virtual machine for deep learning, data processing and analysis (DSVM). I also showed how to run the first instance of DSVM and run the first sample code for deep learning on it. Initially, I had doubts about DSVM, but I'm glad that I tried to use this machine.
DSVM easily coped with all the challenges, from learning tasks for beginners to the most advanced experiments. After the transition from copies from the NVIDIA K80 to the new NVIDIA V100 GPU from Microsoft, the speed of experiments has increased fivefold.
If you are looking for a cloud-based instance with a GPU for deep learning, I advise you to pay attention to Microsoft's DSVM - my impressions were very positive, Microsoft support worked perfectly, and DSVM machine turned out to be powerful and convenient to use.
Source: https://habr.com/ru/post/358436/
All Articles