Making the Marketplace integrated into the online cash desk cloud
Last December, we participated in the hackathon with our prototyping platform. For the allotted two days, we swung from scratch to deal with the online cash register and its cloud ecosystem, as well as to make a prototype of the service - Marketplace. As expected, we spent 80% of the time integrating with an unfamiliar device, and for the remaining 20% we had a good time and did the rest.
Honestly, we were surprised by the ease of entry into this cloudy world, its scope (160 thousand users almost at the start), opportunities and ... holes. As a result, everything worked out for us, and the organizing company, according to their statements, is about to launch a marketplace project.
In this article I will show how a web service was made in 2-3 hours, integrated with cloud cash registers and suitable for running in on a focus group of clients. The project itself is available for review and cloning as source code in github and online version.

We came to the hackathon not so much without groundwork, but generally vaguely presenting what it was about. The only person who was aware and who signed us here is not engaged in development. Therefore, it was necessary to do everything very quickly - TK was written immediately to the platform, debugging its work.
In our case, the marketplace is a system for delivering goods to the seller (owner of the online cash register) as needed, that is, when the goods are finished.
The purpose of the hackathon was to create an application that will be available in the cloud service store and will perform some useful functions to clients. The main objective of our application is to register a user in the service and give him quick access to the Marketplace personal account. In the mobile application, Marketplace also works in the form of a web-view, but, of course, we did not begin to debug the service for different mobile platforms.
The integration part looks quite simple: a registered client receives a token with which our service contacts the cloud and requests information about stores, products, cash desks and employees in JSON format. Next, we synchronize data with our database and then we are ready to work with the outside world, what the core of the platform is already doing.
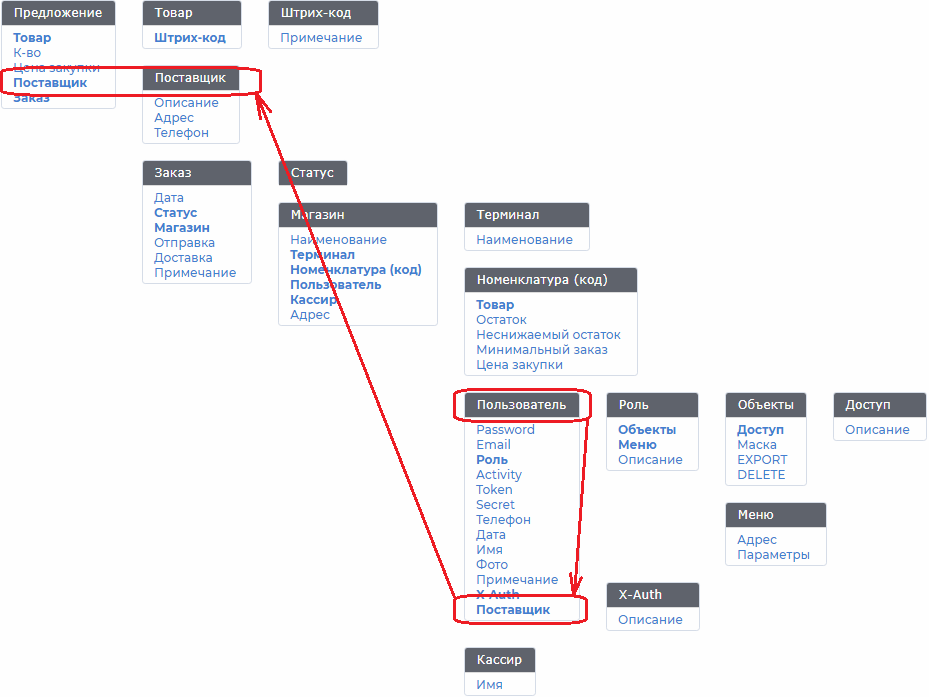
The scheme of its data in the Platform Type Editor looks like the image below - this is how our TK begins.
I remind you that in the type editor the hierarchy of objects is displayed according to a simple rule: all the details of the object are located to the right of the parent and are distributed downwards.
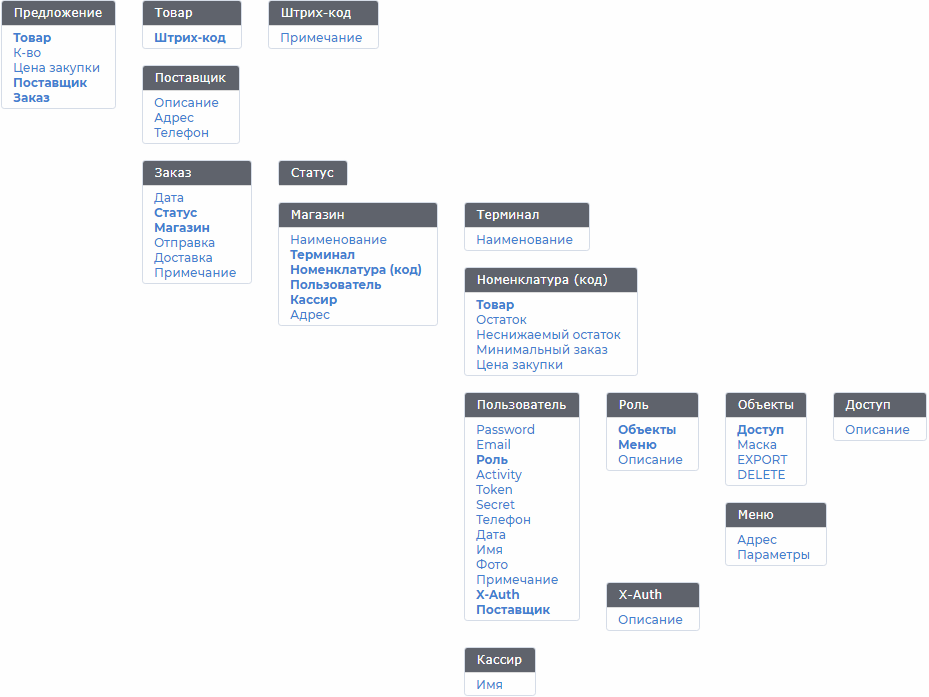
However, the data scheme is hidden from users of the system, and only the administrator can change it.
When installing our application in a cloud service store, the client gets access to a personal account, where he sees information about all his stores, products, users and terminals. This is how the cloud sync workplace, created by our designer on the second morning of the hackathon, looks like:


We repeated the data structure of the cloud, and in the Synchronization menu, the data in the service is updated: shops, products and other objects are created, prices are updated, etc. The synchronization page shown in the figure above, javascript draws all objects received in JSON from the cloud and from the service database.
The code of the synchronization page itself, if anyone is interested, is available in the githaba . It is made on bare javascript, there is 7 kilobytes of code, which, for sure, can be reduced, but for the hackathon it was not important.
The interface of this form is built on 3 service reports that collect data for building a synchronization form and a menu. There are also several reports that are directly displayed to the user, they are all interactive.
A report is a collection of fields from various data schema tables. The platform core selects all these fields, independently linking the necessary tables into an SQL-like query, applying filters, grouping, sorting, and other SQL features. The linking of the tables itself is left behind the scenes, and the user sets only the set of fields and query parameters he needs.
Here is the list of reports in the basic interface of the platform:
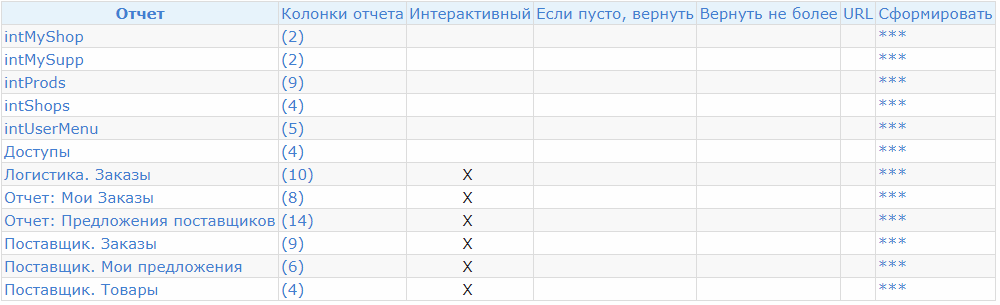
The report fields selected by the user are located in subordinate tables. The report columns are discussed in detail in the hidden text below under the article.
We called the service reports with the prefix int. User reports are named in Russian, and user access to them is limited by the mask of the report name specified in the Role (all details are also described in hidden text, if anyone is interested).
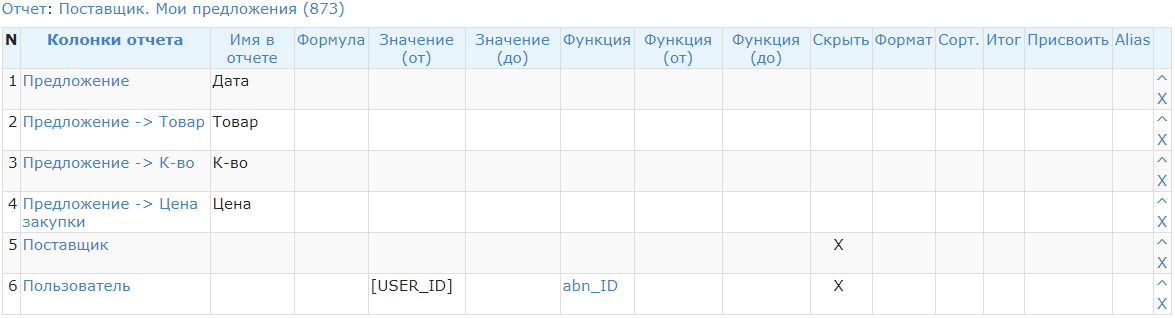
The intMyShop and intMySupp reports return, respectively, the Store and Supplier codes associated with the user. For example, intMyShop inside looks like this:

When executing the query for this report, the platform engine will select from the database all references to the User that are equal to the user ID that launched the report ([USER_ID] and [USER] - the user ID and user name, runtime settings). Appropriate Shops will also be selected. The abn_ID function used here returns the object ID, not its name, because identifiers are used as a reference. In addition, comparing numeric IDs is faster than symbolic object names.
The report will return a value that can be used to auto-complete the form field when creating an order. We specify this report in the Type Editor as the default value for the Store field:
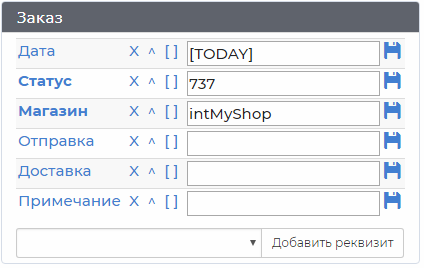
Thus, when creating an order, the current date, the “New” status code (737) and the Store code to which the user is associated will be immediately substituted into it.
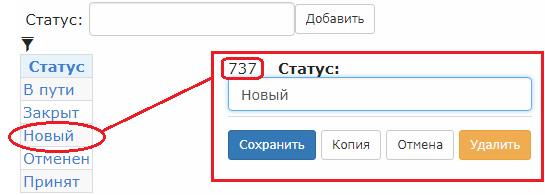
In the Service Dictionary, we can look at the Status Guide, where you can find out the codes (system IDs) that are inserted into the order to indicate its status.
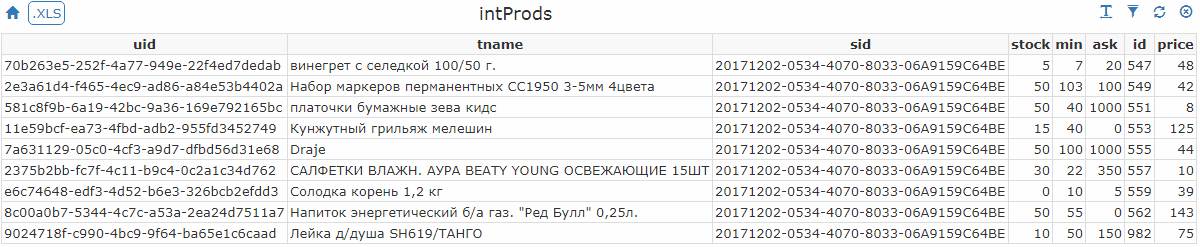
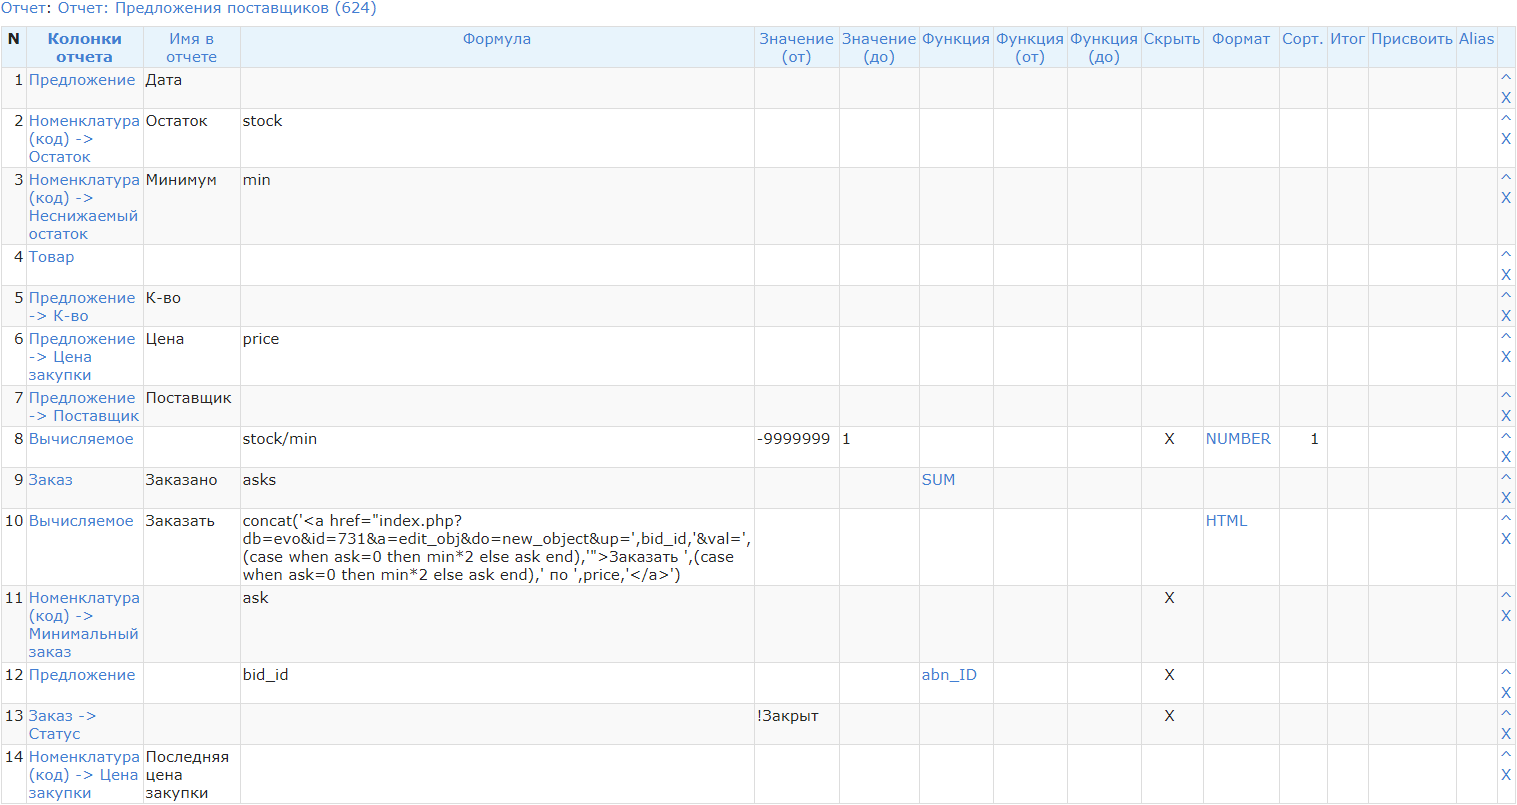
The intProds report collects information about the products of the Store to which the user is attached. Here are the report columns, which are given the names that are then used in the template:

The set of records returned by the report looks like this:
This report is used in the synchronization form to populate a javascript array in this code snippet:
<script> var s=new Array(), p=new Array(); <!-- Begin:intShops -->s['{uid}'] = {i:{id}, n:'{n}'}; <!-- End:intShops --> <!-- Begin:intProds -->p['{uid}'] = {i:{id}, s:'{sid}', n:'{tname}', stock:'0{stock}',min:'0{min}',ask:'0{ask}',costPrice:'{price}'}; <!-- End:intProds --> </script> The <! - Begin: intProds -> ... <! - End: intProds -> construct tells the parser to call the intProds report, and use its result columns to fill the {uid}, {id}, {sid} insertion points and others inside this design. The code fragment inside the insertion point will be repeated as many times as the records will return the report.
Having processed this code, the parser will fill it with data, getting the javascript executable, something like this:
<script> var s=new Array(), p=new Array(); s['20171202-0534-4070-8033-06A9159C64BE'] = {i:529, n:' '}; s['20171204-C914-409F-8028-405CA94D6FE4'] = {i:1178, n:' '}; p['70b263e5-252f-4a77-949e-22f4ed7dedab'] = {i:547, s:'20171202-0534-4070-8033-06A9159C64BE', n:' 100/50 .', stock:'05',min:'07',ask:'020',costPrice:'48'}; p['2e3a61d4-f465-4ec9-ad86-a84e53b4402a'] = {i:549, s:'20171202-0534-4070-8033-06A9159C64BE', n:' 1950 3-5 4', stock:'050',min:'0103',ask:'0100',costPrice:'42'}; p['581c8f9b-6a19-42bc-9a36-169e792165bc'] = {i:551, s:'20171202-0534-4070-8033-06A9159C64BE', n:' ', stock:'050',min:'040',ask:'01000',costPrice:'8'}; p['11e59bcf-ea73-4fbd-adb2-955fd3452749'] = {i:553, s:'20171202-0534-4070-8033-06A9159C64BE', n:' ', stock:'015',min:'040',ask:'00',costPrice:'125'}; p['7a631129-05c0-4cf3-a9d7-dfbd56d31e68'] = {i:555, s:'20171202-0534-4070-8033-06A9159C64BE', n:'Draje', stock:'050',min:'0100',ask:'01000',costPrice:'44'}; </script> Further, these arrays are used to draw synchronization tables with the cloud.
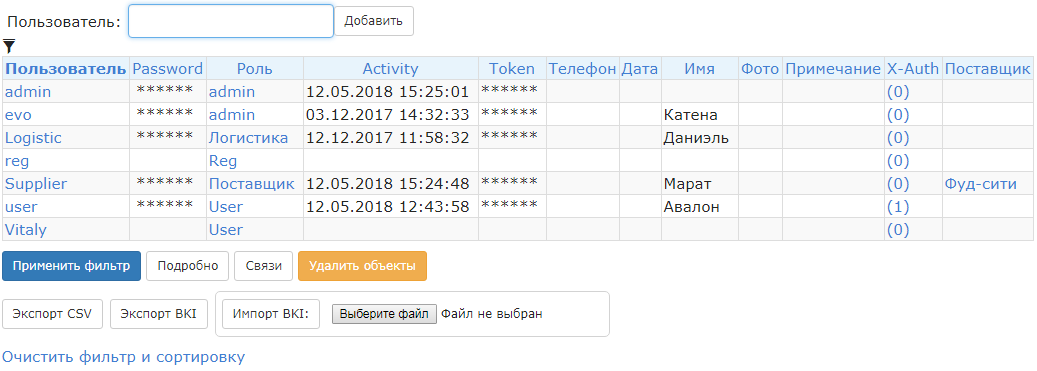
There are three user roles in the service: Seller (User), Supplier and Logistics company. This is how users look in the Dictionary:
User roles are set to the menu displayed by the user - a set of items in the form of links to reports.

For each role, a set of accesses is also set, which can be output to the summary report:
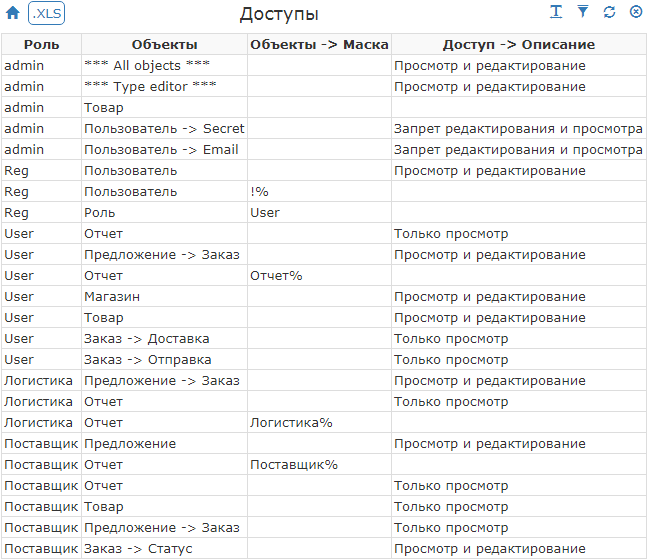
For a role, a set of objects, a mask for visibility restrictions, and an access level — ban, read, write — are indicated.
The report shows that user roles have read access to the reports, in addition, access is limited by the mask for the report name. So everyone sees only their reports.
There is also a Reg user who can create users with the User role (and only for her - access to the role directory is limited by a mask). He cannot view users, because the “!%” Mask sets a “empty” username, which cannot be. This user is used by the site registration form, which, after checking the captcha and validating the fields, can record a new user by sending a POST request to the service, imitating the sending of a user creation form.
The source of the access report is extremely simple:

Deliveries are made on a competitive basis, both in relation to suppliers of goods, and to the organizers of delivery. The scheme of work was thought out so as not to force anyone to do someone else's or extra work - all the information is already in the cloud, and it is available to market participants:
- The seller once specifies the minimum balance, upon his achievement, he receives offers to choose from.
- The supplier sees all the goods for which there is demand, and indicates its price and volume in stock.
- The logistic company sees all possible delivery routes and ships orders.
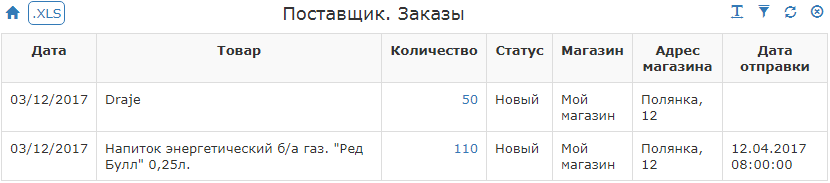
Seller
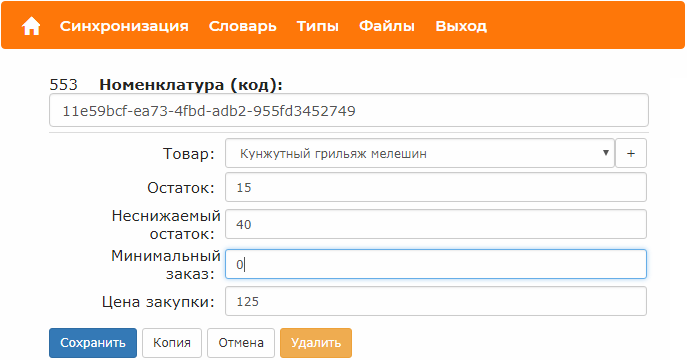
For the purposes of the project, the seller can add to the goods properties: the minimum balance and the minimum order, which helps to create orders to suppliers faster.

We specify the desired values, and they are stored with reference to the product.
When the button is pressed, javascript is called, which asynchronously saves the data with a GET request.
// Save the parameters for this Product function saveDiv(d){ save = new XMLHttpRequest(); save.open('GET' ,'index.php?db={_global_.z}&a=edit_obj&next_act=nul&do=save_val&id='+p[d].i +'&t216='+document.getElementById('s'+d).value +'&t217='+document.getElementById('m'+d).value +'&t716='+document.getElementById('a'+d).value ,true); save.send(); save.onload=function(e) { save.abort(); // Light the "Saved Ok" icon document.getElementById('b'+d).style.display='inline'; } } This request emulates the form submission, as if the user found this item in the Store in the basic interface, edited and clicked to save:
We simply pulled out all the fields we need from the html-code of this form automatically generated by the platform parser and drew them in a compact form that is understandable to the user.
<FORM method="post" action="index.php?db=evo&a=edit_obj" ENCTYPE="multipart/form-data" ONSUBMIT="savebtn.disabled=true; return true;"> <TABLE > <TR> <TD>553 <B> ():</B> <input type="hidden" name="do" value="save_val"> <input type="hidden" name="typ" value="211"> <input type="hidden" name="id" value="553"> </TD> </TR> <TR> <TD><input type="text" name="t211" value="11e59bcf-ea73-4fbd-adb2-955fd3452749" autofocus class="form-control"> <div style="height:5px; "></div> </TD> </TR> <TR> <TD> <div style="height:3px; "></div> <TABLE class="table table-condensed"> <TR> <TD style=" max-width:400px; " ALIGN="right"> : </TD> <TD> <nobr><select name="t213" class="form-control"> <option> </option> <option value="1139">""-</option> <option value="532">Draje</option> <option value="536"> 100/50 .</option> <option value="535" SELECTED> </option> <option value="980"> / SH619/</option> <option value="1170"> 3 </option> <option value="533"> 1950 3-5 4</option> <option value="539"> / . " " 0,25.</option> <option value="534"> </option> <option value="537"> . BEATY YOUNG 15</option> <option value="538"> 1,2 </option> </select> </nobr> </TD> </TR> <TR> <TD style=" max-width:400px; " ALIGN="right"> : </TD> <TD> <input class="form-control" type="text" name="t216" size="10" value="15" > </TD> </TR> <TR> <TD style=" max-width:400px; " ALIGN="right"> : </TD> <TD> <input class="form-control" type="text" name="t217" size="10" value="40" > </TD> </TR> <TR> <TD style=" max-width:400px; " ALIGN="right"> : </TD> <TD> <input class="form-control" type="text" name="t716" size="10" value="0" > </TD> </TR> <TR> <TD style=" max-width:400px; " ALIGN="right"> : </TD> <TD> <input class="form-control" type="text" name="t1025" size="10" value="125" > </TD> </TR> </TABLE> </TD> </TR> <TR> <TD colspan="2"> <input type="submit" name="savebtn" class="btn btn-primary" value=""> <input type="submit" name="copybtn" class="btn btn-default" value=""> </TD> </TR> </TABLE> </FORM> * Part of cosmetic and other minor information has been removed from the form code
The service uses the product names identified by the barcode cloud service.
It is worth noting that a very successful approach is used in the cloud - using a single directory of popular product names for all - this minimizes name conflicts. The user is "imposed" the most used option.
Due to some peculiarities of working with nomenclature codes, these codes are stored in conjunction with the human names of the goods, and one product can be described by different codes. So the directory of goods looks in the basic interface:
Products exist in an independent directory, but items that use their names are tied to specific stores along with the parameters saved by the user:

Provider
The supplier sees the goods that are used in the cloud by all users, and can filter them by name and barcode.
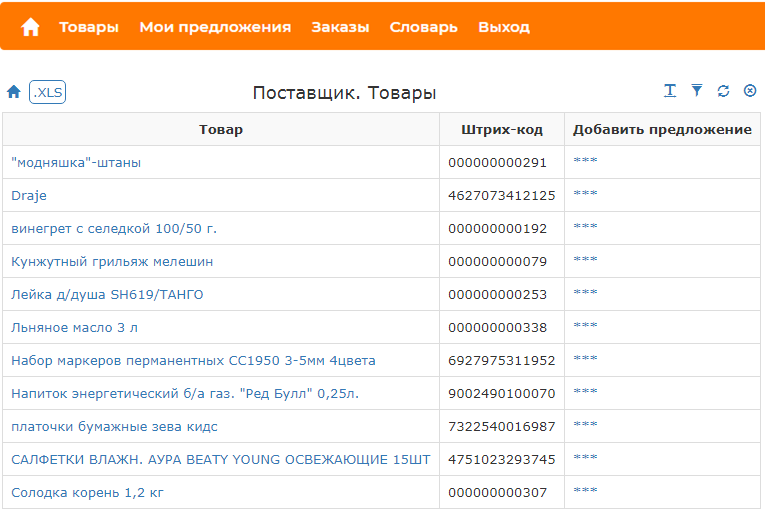
Products may have several barcodes by which they can be searched, although only one of them is shown in the table.
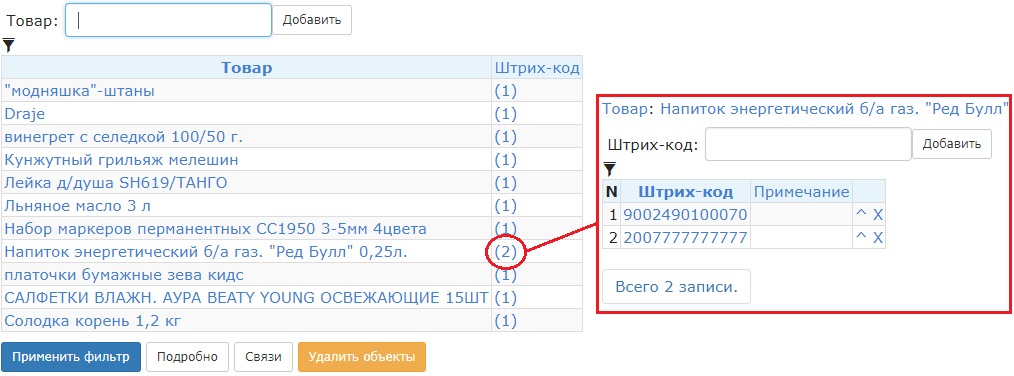
We are looking for a bar code ending in% 7777 (for example, the Red Bull product has several different codes), we see how it works:


Only one barcode for each product is selected in the report - the last one, if you sort them alphabetically. When applying a filter by barcode, only products with a suitable code will be displayed.
Here we also collect the html-code of the “button” - see the Formula field that will be drawn in the report and start the action of creating the “Offer” object (type 591), fill in its “Product” property (type 593).
The hackathon was done before we implemented the CNC in the core of the platform, so then the relative addresses looked like
index.php?db=evo&id=591&a=edit_obj&do=new_obj&t593=prod Now the same address looks like this:
evo/new_obj/591?t593=prod which is more pleasant to see a man.
Further, the supplier can create an offer for the delivery of a certain quantity of goods at the price indicated by them in order to participate in the competition among other suppliers. The sentence editing form is the basic interface of the platform; nothing extra was needed here.
We keep the offer in the form of its creation date:
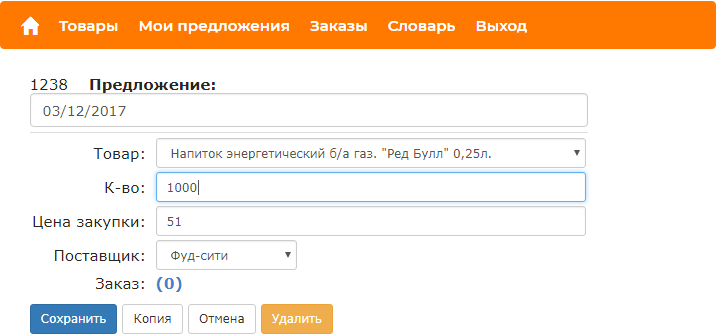
The proposal has a system ID = 1238, the value of December 3, 2017 and details, some of which are filled automatically.
The list of all offers of the Supplier (menu My offers) allows you to select and edit offers, delete irrelevant ones. To do this, the reports are made interactive so that you can quickly navigate to the objects from the report, in this case, clicking the “Date” value:
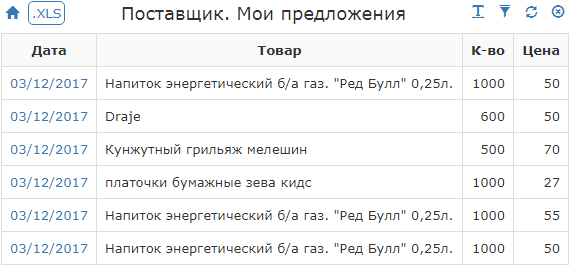
The 6th column filters the report data - it will only include offers generated by the Supplier to which the current user belongs. The query to the database will work approximately as follows:
- The value of the context parameter [USER_ID] - the identifier of an authorized user - is compared with the identifiers (ID) of the System Users
- The User found by ID has a link to the Supplier, by which the latter will be found in the database
- Further, all Offers of this Supplier will be selected, which the current user will see in the report.
The query will probably be executed exactly in the given sequence, because the optimizer will first select the smallest objects, according to the statistics of the indices.
Why does this work that way?
Let me remind you that when creating a data model, the platform does not require (and does not allow) to specify indexable fields, because everything has been indexed in its database.
The query optimizer does the dirty work for the programmer — eliminates non-optimal scans of data tables, as if the administrator analyzed the structure and built all the necessary indices manually. This is a routine task that is usually done as needed, however, if you don’t seriously engage in this, the database is unproductively consuming server resources. Sometimes very unproductive.
The seller sees all the offers of suppliers that are suitable for him: the product, the price of the supplier and the available quantity of the product, information about the orders already created, the latest purchase price.

This query to the database will display the offers of the Suppliers, sorted by relevance: in the 8th column is the minimum balance filling factor, the ascending of which is sorted. The report also forms a hyperlink for ordering goods in the 10th column. In addition, in the report you can see the quantity of goods already ordered for this offer and the latest purchase price.
Here you can immediately make an order, in two clicks. Clicks are marked with numbers 1 and 2, all form fields are already automatically filled.
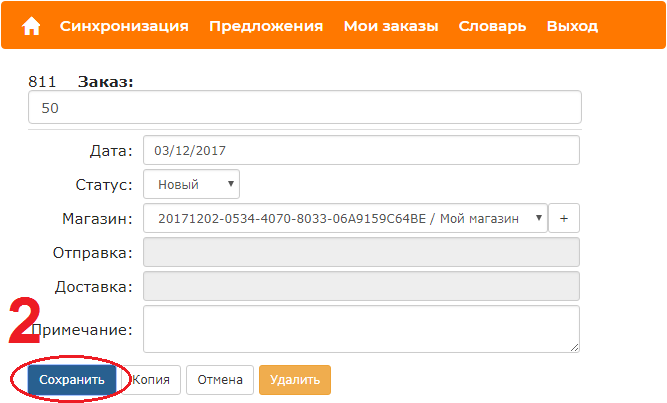
The Shipping and Delivery fields (these are dates over time) are not editable, as the logistics company will fill them in.
Next, we observe the status of our orders and the estimated time of their delivery.

The supplier also sees related orders and planned shipping dates, can prepare for shipments and plan their purchases.
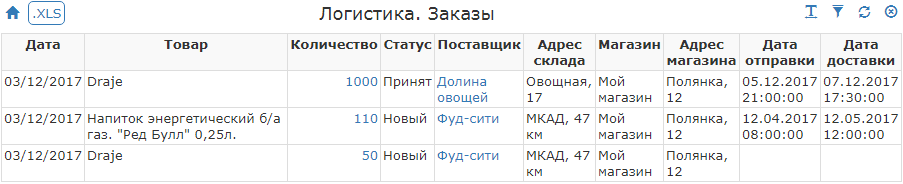
Logistic company
The third participant in the process is a logistics company. His main job is a list of orders:
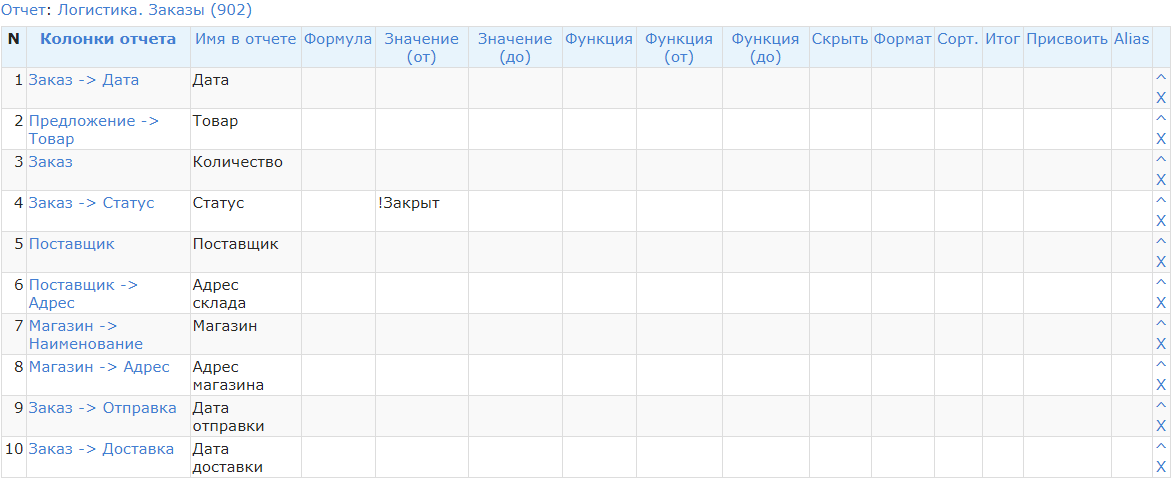
The report is quite simple - columns from four different tables are selected, a filter is applied to them: the order status should not be “Closed”.
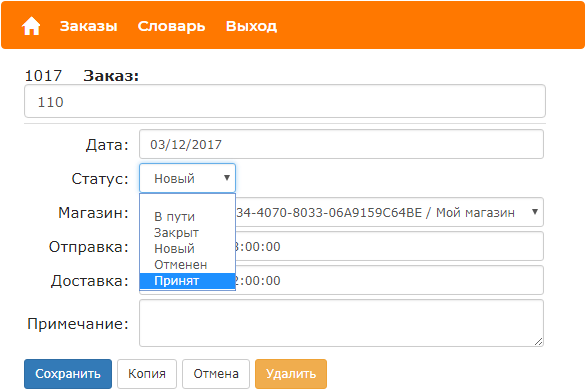
He can see all orders, process them and deliver. You can go to work with the order directly from the report, because it is interactive.
Logistics can be quite complicated, but we still see here only a change in the status of orders and the date of dispatch and delivery of goods.
For logisticians at this stage there is no filter by company or user — only one company with two to three dispatchers will be used for running in.
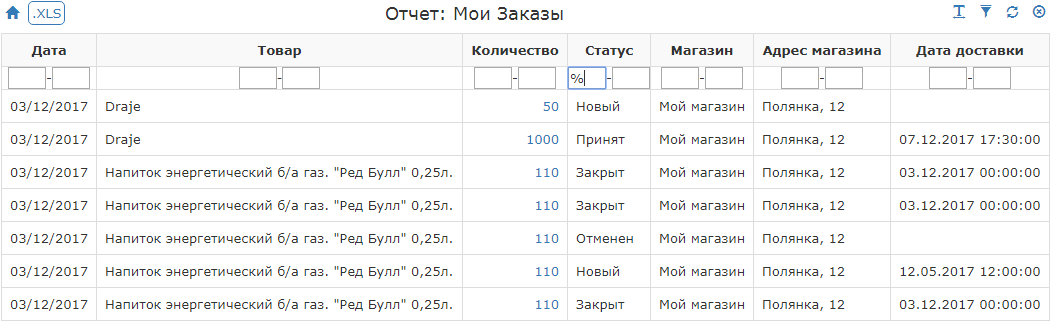
The completed order is automatically removed from the list of orders of the Seller, but is available in the order history through a filter by order status:% (all statuses).
This completes the full cycle of the service for pilot clients.
As you can see, we didn’t need anything other than the prototyping platform and a text editor to create this project (a startup!). We saved a lot of time using our ORM, which you can see if you try to do the same in any CRM, designer, or from scratch in your favorite development platform. All development steps are placed above in the hidden text and, in fact, performed on your eyes. It seems to me that all this is reflected in a fairly accessible way and does not require special knowledge for working with the data scheme and queries.
Expansion of functionality as the startup develops — the complexity of the data model, the addition of details, reports, analysis cuts, existing roles and corresponding constraints — is done in the Type Editor and reports just as quickly as we sketched this prototype.
')
Source: https://habr.com/ru/post/358422/
All Articles