Navigation with architectural components from Google. Part 1. Introduction
One of the problems faced by the developer of a slightly growing application is navigation between screens. When scripts become non-linear, it is hard to do with standard startActivity and changeFragment. Everyone solved this problem in his own way: he made some kind of his own solution for navigation, used third-party (for example, Cicerone ) or left everything as it was and got a lot of flags and if else. This is very upsetting Google engineers, and now on Google I / O 2018 the Navigation solution appeared, which comes bundled with the rest of the architectural components!
In this article, we will understand what is required of the framework for navigation, learn how the solution from Google works and what abstractions it operates on.
Navigation requirements
Let's start with the requirements that we make to the framework for navigation. In the series of articles we will return to them when we realize that they are executed or not.
Priority 1 (Required):
[1] Unlinking from the life cycle.
[2] Ability to implement nested navigation.
[3] Opens the previous screen automatically with the “Back” command.
[4] It is possible to add animation for changing screens.
[5] Passing arguments.
[6] Ability to rebuild navigation in runtime.
[7] Shared element support.
[8] The ability to open and close a chain of screens.
Priority 2 (desirable):
[9] A convenient mechanism for working with deeplink.
[10] Possibility of implementation on Activity, Fragment, View.
[11] Navigation testing.
[12] Flexibility with changes.
[13] Ability to navigate from business logic.
[14] The ability to replace the screens that are in the navigation stack.
[15] Validation of arguments at compile time.
[16] Has a visual presentation for simple design.
Navigation postulates
So, for starters, let's look at the new principles that Google dictates to us:
Principle 1. Fixed starting point
All links to the application lead to one point. This means that we always start from one screen (in fact, this is SplashScreen), and then we decide where to go in the application.
Principle 2. Navigation works in the form of a LIFO stack.
We can only do push and pop operations, and the screens that lie in the middle of the stack are inviolable.
Principle 3. The Back and Up buttons work the same.
Finally, the toolbar arrow and the hardware “Back” will work the same way! No more confusing users!
Principle 4. Deeplinks to the application spawn a screen stack similar to if we got to the screen ourselves.
If we opened the application by diplink, pressing the "Back" button, we will go through all the screens, just as if we opened them without a diplink.
Definitions
For a quick dive, you can download a sample from Github to watch everything in practice.
At the end of the article is also written how to overcome Android Studio, if it did not immediately start.
So, how does the new navigation framework work? It consists of the following components:
Destination - the screen that opens during navigation. We will keep this designation so that it is convenient to refer to the documentation. It can be Fragment , Activity , View and in general everything that you mean by the navigation screen. In the future I will talk about the fragments, but do not forget that you can use not only them.
The NavHost interface is a view-container through which screens ( Destination ) are switched when the user navigates through the application. The default implementation for it is NavHostFragment . In it by means of xml the graph for navigation is installed.
NavGraph is an xml navigation rendering. It describes the Destination screens and the relationships between them.
NavController is an entity that implements a navigation mechanism. It is to him we will turn when we switch between screens ( Destination ). NavController is installed in NavHost . If we are dealing with a ready-made NavHostFragment , then all the logic of creating and providing NavController is already done for us.
Action - a command to switch to another screen. We send it to NavController to change Destination
FragmentNavigator is an internal class that encapsulates fragment transactions in itself.
Principle of operation
Constructed NavGraph is set to NavHostFragment (as a special case of NavHost ). Now he knows what Action is and which screens correspond to them.
NavHostFragment provides NavController, which informs it of an upcoming transaction. We access NavController from the code, issuing the necessary Action command. FragmentNavigator with which NavHostFragment interacts is responsible for the final screen switching.
Implementation
It is time to figure out how to work with this beast.
To begin with we connect all necessary libraries and plug-ins. Check the latest information in the appropriate section on Google.
buildscript { ext.kotlin_version = '1.2.41' repositories { google() jcenter() } dependencies { classpath 'com.android.tools.build:gradle:3.2.0-alpha14' classpath "org.jetbrains.kotlin:kotlin-gradle-plugin:$kotlin_version" } } dependencies { def nav_version = '1.0.0-alpha01' implementation "android.arch.navigation:navigation-fragment:$nav_version" implementation "android.arch.navigation:navigation-ui:$nav_version" // } Create a navigation graph
Next, create a navigation map. For it, a separate type of resource is fixed - navigation , for which a special editor is provided.
To do this, create a file res / navigation / nav_graph.xml with the contents. You can do this not with your hands, but through a standard constructor
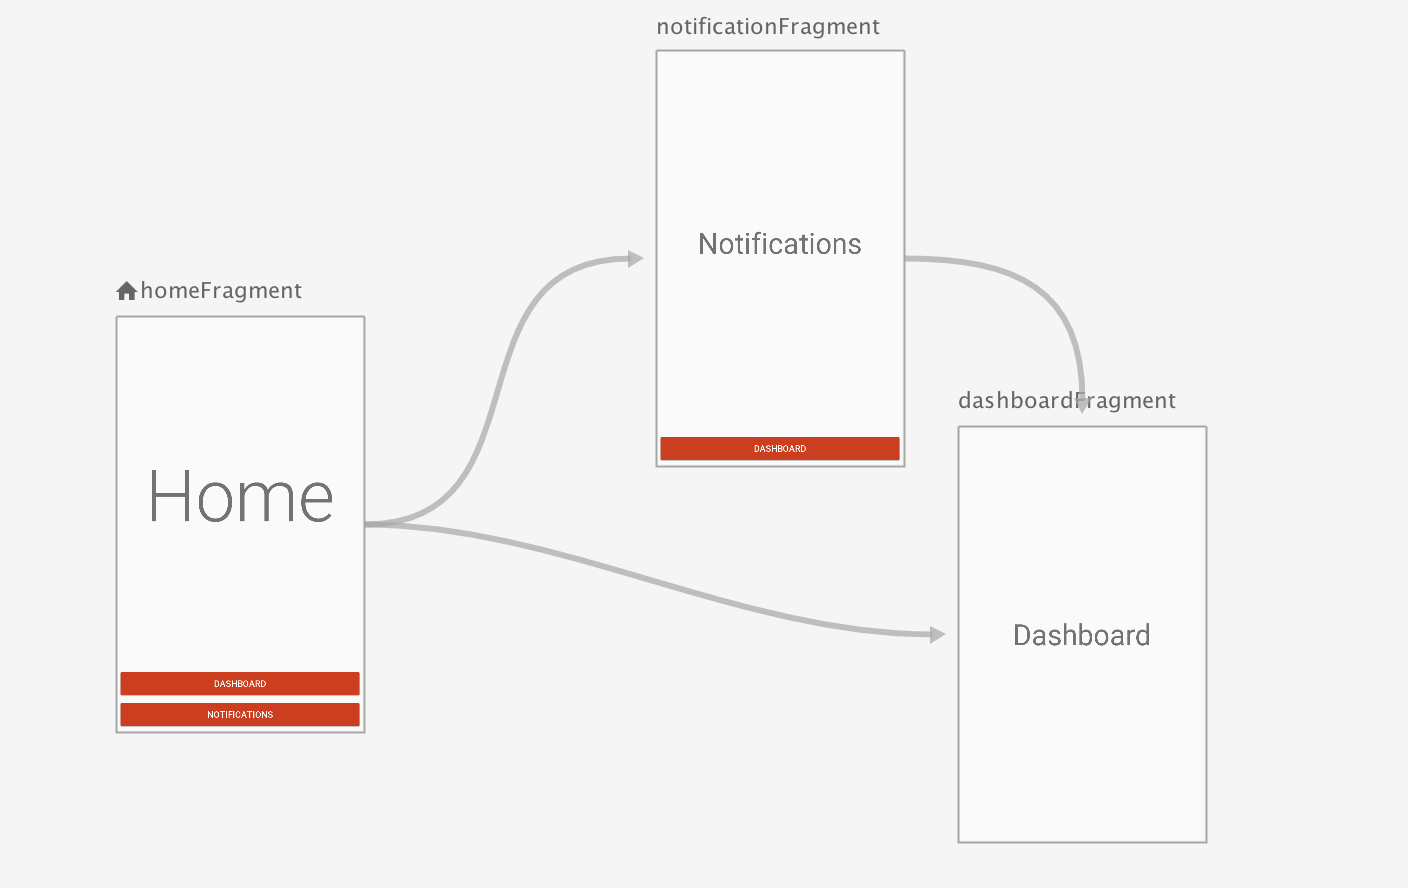
<?xml version="1.0" encoding="utf-8"?> <navigation xmlns:app="http://schemas.android.com/apk/res-auto" xmlns:android="http://schemas.android.com/apk/res/android" xmlns:tools="http://schemas.android.com/tools"> </navigation> Switch the editor to the Design tab, and in it we throw screens ( Destination ) and link them with the help of the Actions arrow.
The mechanics are very intuitive and similar to the interaction with ConstraintLayout. If you have any problems, you can look at the detailed guide from Google. (Requirement [3] is fulfilled).
The constructor consists of two types of entities: Destination (screens) and Action (arrows).
Destination has a set of attributes:
- ID - screen identifier, to communicate with others through Action.
- Class - the class of this screen (for example, LoginFragment).
Additionally, there are three groups of parameters: - Arguments - the arguments that parameterize it.
- Actions - commands that determine where to go from the current screen.
- Deeplinks - diplinks for switching to the screen from outside the application.
It is also possible to make this screen a start.

Action has a set of attributes.
- ID - ID Action: we will use it to switch screens.
- Destination - the Destination ID to which the Action leads.
Additionally, there are 4 groups of parameters: - Transition - animation to switch. You can specify different types for actions: Enter, Exit, Pop Enter, Pop Exit. Animations are taken from xml resources. It's easy to define your own, just add the corresponding resource in the res / anim folder. (See example with nav_custom_enter_anim.xml)
- ArgumentDefaultValue - the value of the arguments for the default fragment.
- PopBehavior - how to navigate to behave when closing a fragment. For example, we may want to close all screens from the stack and go back to the starting one. (See an example with Action action_notificationFragment_to_dashboardFragment - in it we just go to the main screen). (Requirement [16] is fulfilled)
- LaunchOption - options for working with the stack, reminiscent of launch mode when working with the stack Activity.

The result is a picture similar to the title of the article.
Bind navigation graph to container
The navigation graph is, now we bind it to the container. To do this, we add to xml MainActivity , which acts as a holder for all NavHostFragment navigation, and set its attributes :
<?xml version="1.0" encoding="utf-8"?> <FrameLayout android:id="@+id/container" xmlns:android="http://schemas.android.com/apk/res/android" xmlns:app="http://schemas.android.com/apk/res-auto" xmlns:tools="http://schemas.android.com/tools" android:layout_width="match_parent" android:layout_height="match_parent" tools:context=".MainActivity"> <fragment android:id="@+id/nav_host_fragment" android:name="androidx.navigation.fragment.NavHostFragment" android:layout_width="match_parent" android:layout_height="match_parent" app:navGraph="@navigation/nav_graph" app:defaultNavHost="true" /> </FrameLayout> The penultimate line indicates that the navigation will be carried out according to the navigation graph we have created.
The last line means that NavHostFragment is set to default, this guarantees the processing of the system 'back'. To implement principle 3, navigation also needs to be redefined in the Activity to the action on the back arrow:
override fun onSupportNavigateUp() = findNavController(R.id.nav_host_fragment).navigateUp() Run a navigation command
In order to switch to another fragment, we need to get the Navigator.
This can be done in several ways.
NavHostFragment.findNavController(Fragment) Navigation.findNavController(View) Navigation.findNavController(Activity, @IdRes int viewId) In fact, these are commands from different contexts for searching the View , implementing NavHost , and getting NavController in it.
Next, the resulting NavController calls one of the methods for navigation.
fragment_home_button_dashboard.setOnClickListener { activity?.let { findNavController(it, R.id.nav_host_fragment) .navigate(R.id.action_homeFragment_to_dashboardFragment) } } To navigate with NavController
we have at our disposal:
- Several overloaded navigate () methods. In them, the parameters are
- ActionId - the same Action ID from xml
- Bundle - a set of arguments
- NavOptions - arguments for Action, which determine the animation, stack, etc.),
- NavDirections is an abstraction wrapping the Bundle and ActionId
- A couple of popBackStack () overloaded methods for navigating to screens from the current stack.
In our example, only Action is used to go forward. The command 'Back' is processed automatically and causes the opposite action of the Action (the same attribute PopBehavior )
So, when you go back after Action (commands) action_notificationFragment_to_dashboardFragment from the DashboardFragment screen, we are not on a NotificationFragment , but on HomeFragment .
<action android:id="@+id/action_notificationFragment_to_dashboardFragment" app:destination="@id/dashboardFragment" app:enterAnim="@anim/nav_custom_enter_anim" app:popUpTo="@+id/homeFragment" /> Results
At first glance, the framework from Google did not cause a sharp condemnation and looks like something that you need to look more closely.
In this part, we made sure that the requirements of [3] and [16] are fulfilled. After the first glance, the table of our navigation requirements for a Google solution looks like this:
Priority 1 (required):
[1] Unlinking from the life cycle.
[2] Ability to implement nested navigation.
[3] Opens the previous screen automatically with the “Back” command [✓].
[4] It is possible to add animation for changing screens.
[5] Passing arguments.
[6] Ability to rebuild navigation in runtime.
[7] Shared element support.
[8] The ability to open and close a chain of screens.
Priority 2 (desirable):
[9] A convenient mechanism for working with deeplink.
[10] Possibility of implementation on Activity, Fragment, View.
[11] Navigation testing.
[12] Flexibility with changes.
[13] Ability to navigate from business logic.
[14] Ability to replace the screens that are in the navigation stack.
[15] Validation of arguments at compile time.
[16] Has a visual presentation for simple design [✓].
What's next?
In the following parts we will consider (maybe the order will change):
- Transactions for opening fragments with arguments.
- Deeplinks.
- Built-in tools for working with BottomNavigation and Toolbar.
- Different types of navigation: nested and with multiple Activity.
- How everything is arranged inside and how well it works with the life cycle.
- How to make a view navigation.
- How to build a navigation graph from the code.
- How to test navigation.
- How much is all this ready for battle and what abstractions should be added.
How to run now
The described example is on my Github . In order to run it, you need Android Studio at least 3.2 Canary.
I only had it with the Build Tools 28.0.0-rc1 SDK version (at 28.0.0-rc2 everything was sent to an endless download)
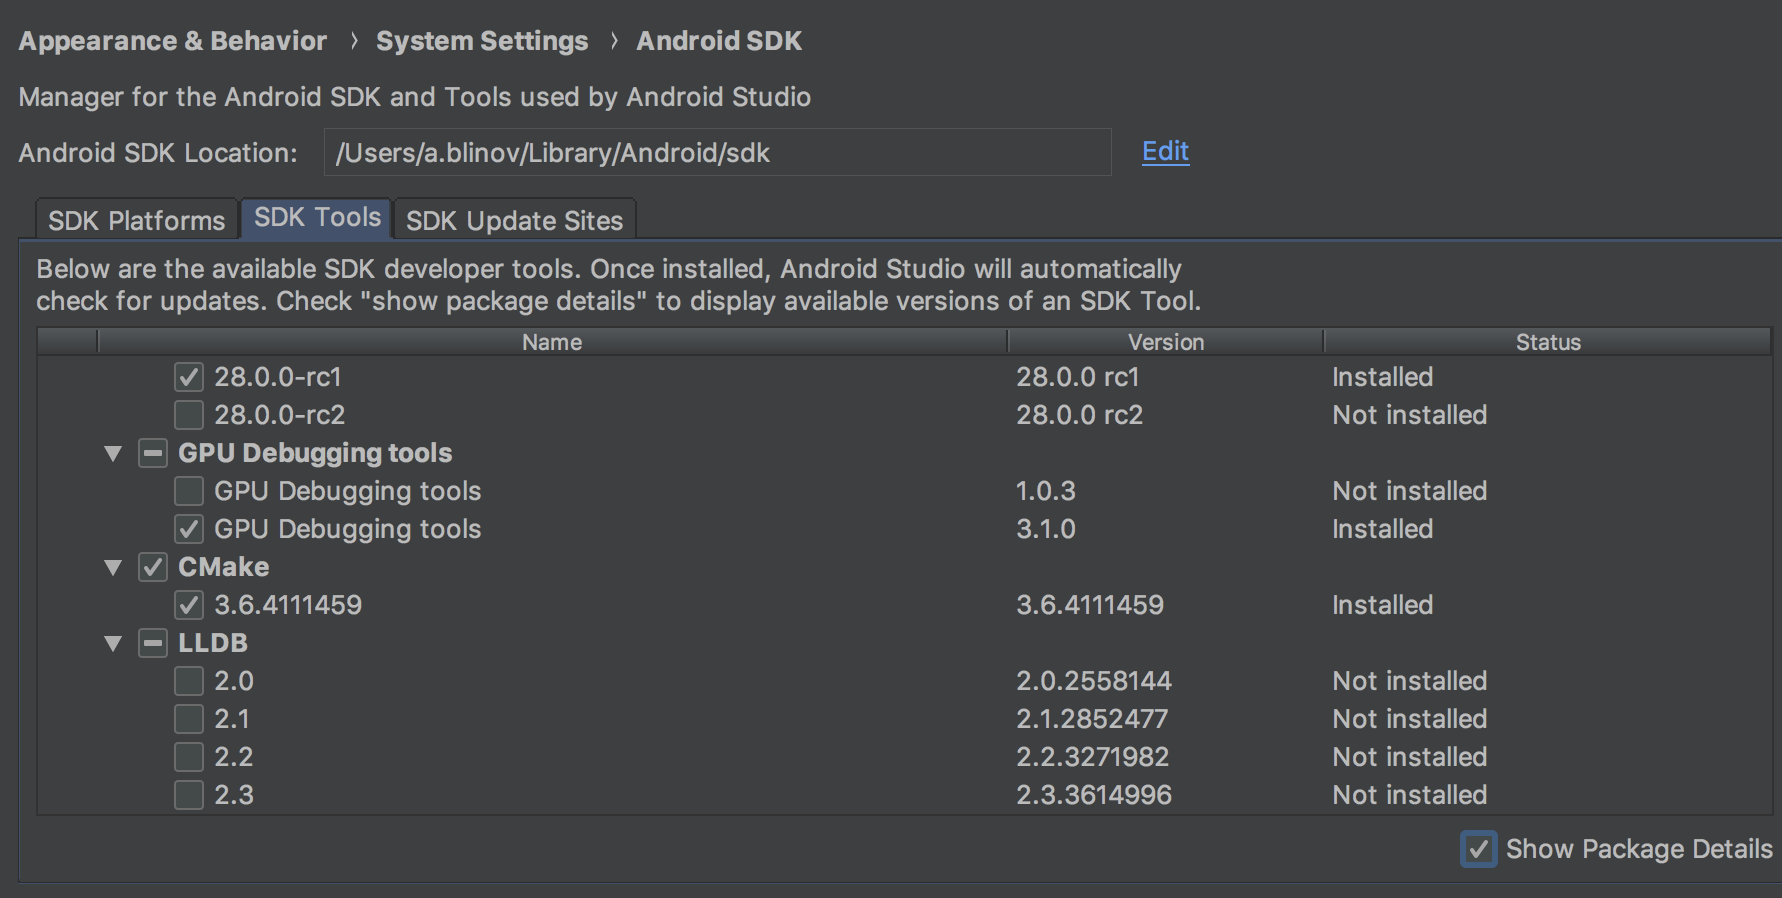
If suddenly this did not help, then make a clean - it helped me in a couple of cases.
')
Source: https://habr.com/ru/post/358414/
All Articles