Analysis of the VIPER architecture using the example of a small iOS application on Swift 4
"Everyone has their own VIPER." author unknownIn this article I would like to look at the VIPER architecture with a small concrete example, which at the same time showed the full power of this architecture and was written in the latest Swift 4 . For those who want to immediately look at the code without reading the entire article, the link to the rep is at the bottom.

Table of contents
- Introduction
- Chapter 0. VIPER Architecture Diagram
- Chapter 1. An example of a very simple module.
- Chapter 2. An example of a more complex module
- Conclusion
- Repository link
Introduction
About VIPER architecture has already been written quite a lot , including on the habr ( 1 , 2 ).
Therefore, developers needed a different architecture that would be more or less flexible, consistent with the SOLID principles (especially the “ Only Responsibility Principle ”) and pure architecture ( review in Russian ).
')
Rambler picked up this topic and devoted an entire conference to it and even wrote a book . By the way, if you are not familiar with VIPER, I would recommend reading this particular book as familiarity with architecture. It is well described and chewed, what this VIPER is for and how it appeared. The book also addresses the problems of the classic VIPER, and that the Rambler developers have changed a bit in it. Unfortunately, the book was written in 2016 and there are examples in it on Objective-C , like their open source project , which at the time of this writing was not compiled and seemed to be too complicated for the first study. The project is hung with many additional pieces, excessive abstraction and too many classes. What at first glance may seem too complicated and repulsive.
Therefore, I wrote a small application " Currency Converter " on VIPER architecture to show what needs to be written in each layer and what rules are set for each layer. Immediately it should be said that I used not so-called. classic VIPER, and its slightly modified version, inspired by the experience of Rambler and by their example.
I will ask you not to find fault with much if you could write something more elegantly on Swift . All the same article about the architecture, and not about the beauty of the Swift . Also, I intentionally did not use third-party libraries and dependencies. The entire example is written using only native iOS libraries.
Chapter 0. VIPER Architecture Diagram
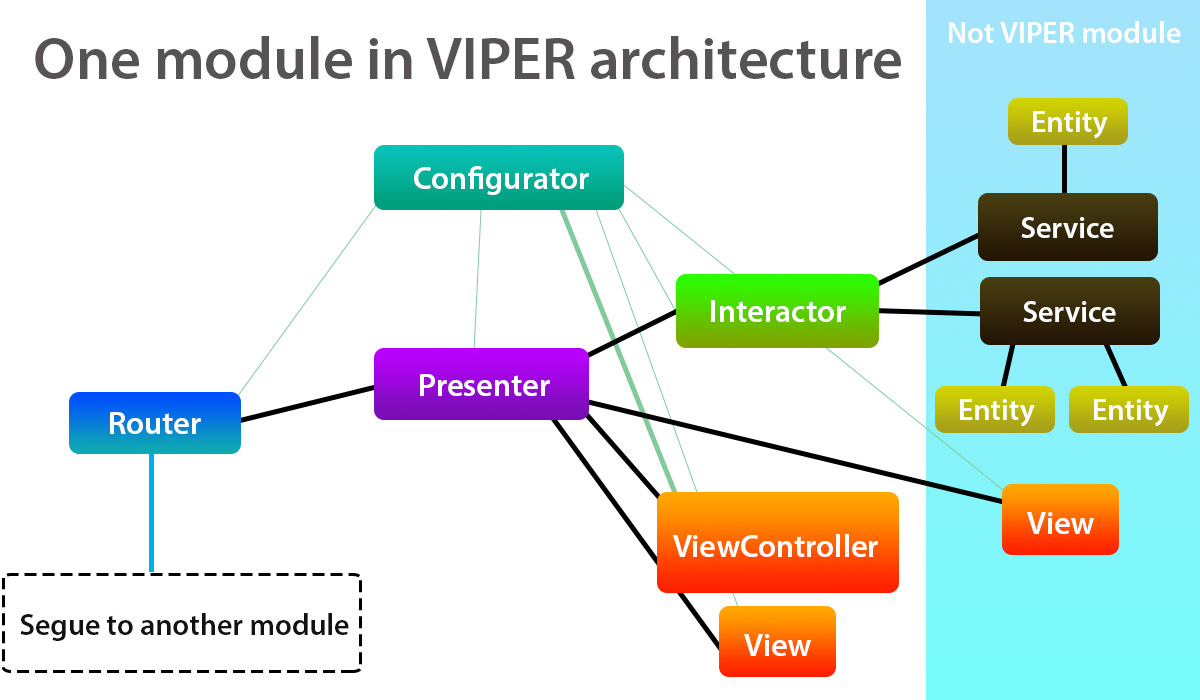
Let's run through the principles of VIPER. One screen or more precisely one view controller should correspond to one module in the VIPER. If in general, then VIPER is designed to split the multi-track view controller into multiple layers, where everyone will fulfill their role. The connection inside the module is schematically shown in the figure below.
You probably saw other schemes.
This, for example: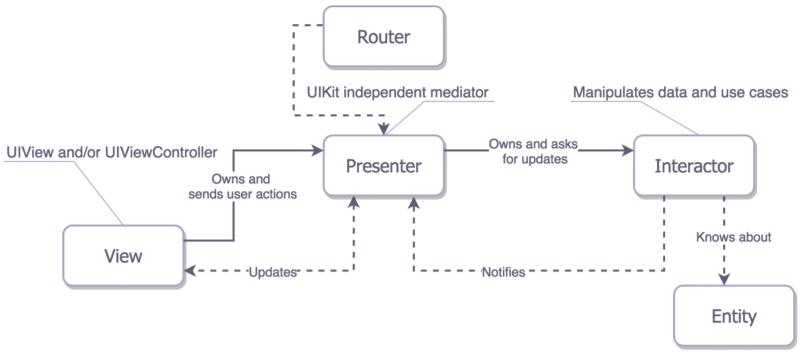
Each letter from the VIPER abbreviation on it indicates something: V iew – I nteractor – P resenter – E ntity – R outer. But the reality is that the module includes not only these components, but Entity in general may not include the concept of a module, since is a self-sufficient class that can be used in any module or service. On complex screens, the module can be divided into submodules, where everyone will have their own presenters and interacators.
Unlike the classic VIPER, there is no Wireframe in mine, because it performed 2 roles: it assembled the module and made the transition to another screen (module). The diagram shows that the Configurator will be responsible for assembling the module and Routers for the transitions. I adopted this logic from Rambler, with the only difference that instead of the Configurator, they have an Assembly . But the essence is the same.
The configurator is aware of all dependencies within the module. It establishes that the ViewController has a Presenter , the Presenter has an Interactor, and so on. More will be discussed further in the example.
Also in the classic VIPER abandoned Segue , so you can not use storyboards to navigate between screens. In our case, as with Rambler, the Segue transitions work and are recommended for use, as Apple wanted.
It so happens that a 100% passive View from the view controller will not work. Apple itself laid a certain role for it with its life cycle and the methods it calls ( viewDidLoad , viewDidAppear , etc.), so we have to take this into account and build our architecture based on this. Module assembly is launched from viewDidLoad , when the view controller has already loaded, and not just initialized. It also gives us the opportunity to set the Initial View Controller from a storyboard, and not in AppDelegate , as it is done in the classic version. This is much more convenient, because there is no tight binding to a particular entry point, and it can be easily changed.
After the module is assembled, the further behavior of the module is rather classic. View / ViewController is not responsible for the logic of clicking on buttons, entering text or any other interaction with the UI . All this is immediately transferred to the Presenter . View can be as part of a module, or be a general View , and used in different modules.
Presenter decides whether to redirect the action - to Router or Interactor . Router will either close the current screen or open a new one. The concrete implementation of the transition is carried out in it. Interactor decides what to do next with the received events and what service to call. It contains the module logic.
But the more important Presenter function is the preparation and transmission of visual data for the View / ViewController , which will be visible to the user. Presenter is the heart of our module, it knows what data will be displayed and in what form. Even in different schemes, it is always in the middle. (And Interactor , probably, brains)
Interactor is a facade for other services. Interactor can also contain logic itself. In MVC, it can be compared to a controller, but which knows nothing about how the data will be displayed.
The service in our interpretation refers to various helpers and other classes that can be accessed from different modules and parts of the application (authorization logic, work with the database, work with the server, encryption, etc.). Services can interact with each other and with Entity . Entity is just passive entities (user, book, word). As mentioned earlier, Entity is not a component of the VIPER module. In general, the architecture was originally called VIP .
If you do not understand, it does not matter. Further on, everything will become clear, it was only a superficial description.
Chapter 1. An example of a very simple module.
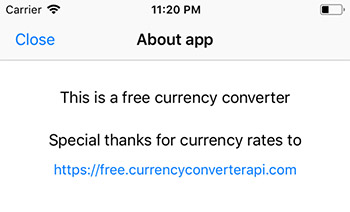 Strangely enough, I’ll start to look at the architecture not from the first more complex screen, but from the “About Application” screen, which is very simple. The screen itself has a couple of labels, a “Close” button and a button with a link to the site. Clicking on “Close” will close the current screen and the previous main screen will be shown, and when you click on the link, it will open in Safari. The labels are passive and do not change.
Such screens in the application do not show all the power and necessity of VIPER, because everything could be placed in the ViewController , as some might think. But the ideology of pure architecture contradicts this principle; therefore, even the simplest screen and even the simplest application can and should be written on the VIPER architecture. You must adhere to the rules always.
Module names should preferably be short, because within the module for classes additional words will be added to this name. For example, the “About Application” module is called About . The view controller will be called AboutViewController . The remaining classes are AboutPresenter , AboutInteractor , AboutConfigurator , etc.
If module initialization begins with a view controller, then the module should be considered starting from it. Create the AboutViewController and AboutConfigurator classes . The AboutConfigurator class must comply with the AboutConfiguratorProtocol protocol and will have only one method:
protocol AboutConfiguratorProtocol: class { func configure(with viewController: AboutViewController) } class AboutConfigurator: AboutConfiguratorProtocol { func configure(with viewController: AboutViewController) { } } In the future, inside this method, I will configure the module. AboutViewController will have a configurator property, which will be configured in viewDidLoad , and a presenter property, which will comply with the AboutPresenterProtocol protocol.
Important rule! All components communicate with each other only through protocols, and not directly! This is necessary to write unit tests in the future and to keep the code clean as a whole.
AboutPresenterProtocol must contain the configureView () method, which will initialize and configure the initial data for the visual elements in the view controller. At this stage, AboutViewController will look like this:
class AboutViewController: UIViewController { var presenter: AboutPresenterProtocol! let configurator: AboutConfiguratorProtocol = AboutConfigurator() override func viewDidLoad() { super.viewDidLoad() configurator.configure(with: self) presenter.configureView() } } Presenter will also have a router and methods that will be called when you click on the "Close" button and a button with a link to the site. AboutPresenterProtocol will look like this:
protocol AboutPresenterProtocol: class { var router: AboutRouterProtocol! { set get } func configureView() func closeButtonClicked() func urlButtonClicked(with urlString: String?) } This module is very simple, so the entire configuration of the view controller will be that the label for the button with the URL will be installed from the code, and not from the visual editor. For AboutViewController such a protocol:
protocol AboutViewProtocol: class { func setUrlButtonTitle(with title: String) } Inside the AboutPresenter we implement the method:
func configureView() { view.setUrlButtonTitle(with: interactor.urlRatesSource) } Now the turn came and interaktora. Logic and data storage / retrieval should always be transferred there. In our case, the interactor will have a property that will store the URL of the site and the method that will open this URL :
protocol AboutInteractorProtocol: class { var urlRatesSource: String { get } func openUrl(with urlString: String) } But what about handling the event of clicking on the "Close" button, you might think? Here the presenter decides that this event is connected with the transition between the screens, so the processing will be transmitted to the router. For this module, the router can only close the current view controller.
His protocol:
protocol AboutRouterProtocol: class { func closeCurrentViewController() } A protocol presenter will look like this:
protocol AboutPresenterProtocol: class { var router: AboutRouterProtocol! { set get } func configureView() func closeButtonClicked() func urlButtonClicked(with urlString: String?) } Now that we have all the described protocols for the components of the VIPER module, we proceed to the implementation of these methods. Do not forget to add that the view controller complies with the AboutViewProtocol protocol. I will not describe how to associate a button with a storyboard with the property of the view controller and link the events of clicking on them, so I will immediately write the methods of the view controller:
@IBOutlet weak var urlButton: UIButton! @IBAction func closeButtonClicked(_ sender: UIBarButtonItem) { presenter.closeButtonClicked() } @IBAction func urlButtonClicked(_ sender: UIButton) { presenter.urlButtonClicked(with: sender.currentTitle) } func setUrlButtonTitle(with title: String) { urlButton.setTitle(title, for: .normal) } The view controller has no idea what to do after pressing the buttons, but he knows exactly what to do when the setUrlButtonTitle method (with title: String) is called. The view controller only updates, moves, repaints, hides UI elements based on the data with which the presenter called this method. At the same time, the presenter does not know exactly how all this data is located in the View / ViewController .
The full class of presenter looks like this:
class AboutPresenter: AboutPresenterProtocol { weak var view: AboutViewProtocol! var interactor: AboutInteractorProtocol! var router: AboutRouterProtocol! required init(view: AboutViewProtocol) { self.view = view } // MARK: - AboutPresenterProtocol methods func configureView() { view.setUrlButtonTitle(with: interactor.urlRatesSource) } func closeButtonClicked() { router.closeCurrentViewController() } func urlButtonClicked(with urlString: String?) { if let url = urlString { interactor.openUrl(with: url) } } } We completely forgot about our configurator. After all, without it, nothing will work. Its code is:
class AboutConfigurator: AboutConfiguratorProtocol { func configure(with viewController: AboutViewController) { let presenter = AboutPresenter(view: viewController) let interactor = AboutInteractor(presenter: presenter) let router = AboutRouter(viewController: viewController) viewController.presenter = presenter presenter.interactor = interactor presenter.router = router } } Understandably, not to get the Reference cycle , the presenter at the view controller is indicated as strong , and the view controller at the presenter as weak , the interpreter at the presenter is indicated as weak , and so on. The ViewController remains the most important one in this chain. Therefore, to talk about the passive View is inappropriate here. When you close the ViewController, all other elements are also destroyed, because no one can have a strong link to the ViewController . Otherwise, we would get a memory leak .
The class of interactor looks like this:
class AboutInteractor: AboutInteractorProtocol { weak var presenter: AboutPresenterProtocol! let serverService: ServerServiceProtocol = ServerService() required init(presenter: AboutPresenterProtocol) { self.presenter = presenter } var urlRatesSource: String { get { return serverService.urlRatesSource } } func openUrl(with urlString: String) { serverService.openUrl(with: urlString) } } The code is pretty simple, so no comments are needed. It is worth paying attention to the ServerService . This is the service that will give the URL for our button on the view controller and open the link in Safari (or in some other way). The ServerService code and its protocol looks like this:
protocol ServerServiceProtocol: class { var urlRatesSource: String { get } func openUrl(with urlString: String) } class ServerService: ServerServiceProtocol { var urlRatesSource: String { return "https://free.currencyconverterapi.com" } func openUrl(with urlString: String) { if let url = URL(string: urlString) { UIApplication.shared.open(url, options: [:]) } } } Here, too, everything is simple. Only the router remains:
class AboutRouter: AboutRouterProtocol { weak var viewController: AboutViewController! init(viewController: AboutViewController) { self.viewController = viewController } func closeCurrentViewController() { viewController.dismiss(animated: true, completion: nil) } } Once again, all the source code is in the repository. Link at the end of the article.
Chapter 2. An example of a more complex module
It is time to consider the architecture in a more complex example and summarize the rules for each layer.
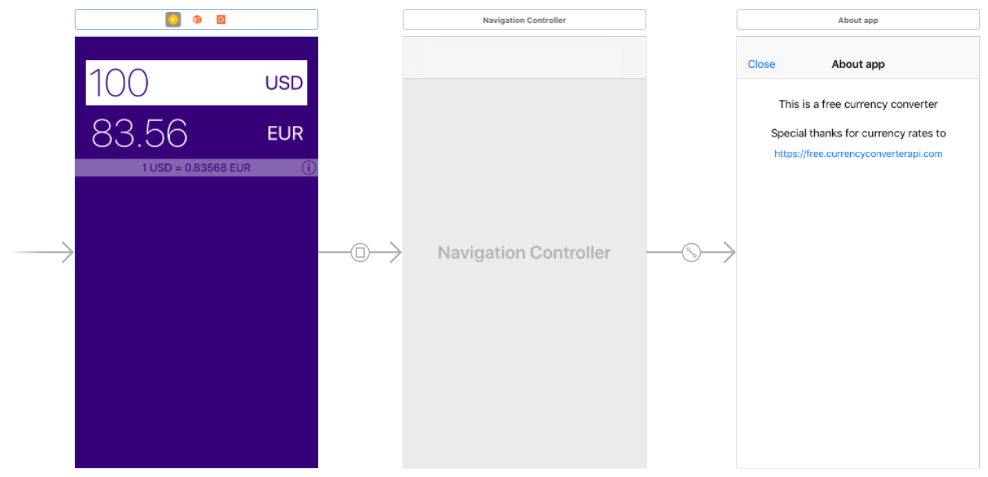
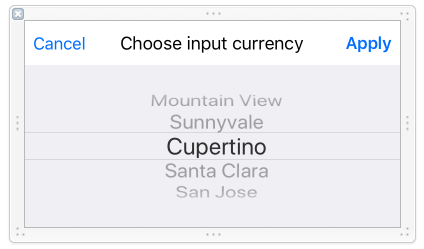
Storyboard with all the screens looks like this. The main screen allows you to choose the currency from which we convert and in which we convert. You can also enter the amount from which you need to convert to another currency. The amount converted to another currency is displayed under the input field. And at the very bottom of the conversion rate and the button to go to the screen " About the application ."
Data on all currencies and their rates are requested from the free website https://free.currencyconverterapi.com . For simplicity, the data will be stored in UserDefaults , but you can easily redo only one class to store it in Core Data or in any other way.
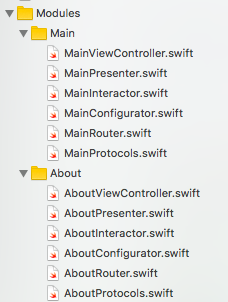 Now that we know what the VIPER module framework looks like, we can easily do the same for the main screen. The right shows the files of the module Main (main screen). A minor inconvenience of the architecture is that for each module you need to create a lot of files, and manually it takes a lot of time. Therefore, Rambler invented the Generamba code generator , which performs routine work for us. If you dig, it can be customized. Or you can use templates for Xcode , there are plenty of examples on the web. For example, https://github.com/Juanpe/Swift-VIPER-Module or https://github.com/infinum/iOS-VIPER-Xcode-Templates . In more detail, these topics will not be considered, because this is beyond the scope of the article.
It is striking that for the protocols I created a separate file in each module. If you do not like this approach, then you can describe the protocols directly in the file of the classes themselves. Personally, it is more convenient for me when all the protocols of the module are collected in one place. A matter of taste.
By tradition, we will also begin to consider the module with a view controller. An important rule for the View / ViewController is that they do not directly transfer the Entity . For this, additional layers / services should be created.
The viewDidLoad method will be identical to the implementation from the About module. Configuring the module will be called up and instructed the operator to configure the View ( ViewController in our case).
 Configuring the module is almost the same as in the “About” module. But on the main screen, you need an additional View- component of CurrencyPickerView , it is created as a separate class and can be reused in other places or even applications. In the storyboard, an ordinary UIView is added on the main screen and the CurrencyPickerView class is set for it.
All CurrencyPickerView code will not be considered. Although the IBOutlet for it is in the view controller, its logic will be processed in the presenter. Therefore, the link to it is written in the configurator. CurrencyPickerView also has a delegate, and they will not be a view controller, but a presenter. In the configurator we add the following calls:
class MainConfigurator: MainConfiguratorProtocol { func configure(with viewController: MainViewController) { ... presenter.currencyPickerView = viewController.currencyPickerView viewController.currencyPickerView.delegate = presenter } } On a more complex example, it becomes clear that the view controller is unloaded, and the logic is transferred from the presenter to the interactor and further to the services. Configuring the View in this module is more complex and includes setting the saved values that were used the last time before closing the application. The code is:
func configureView() { view?.setInputValue(with: inputValue) view?.setOutputValue(with: outputValue) view?.setInputCurrencyShortName(with: inputCurrencyShortName) view?.setOutputCurrencyShortName(with: outputCurrencyShortName) view?.addDoneOnInputCurrencyKeyboard() updateRateText() interactor.getAllCurrencies() } In addition to setting the initial values for the UI components, a request is sent to the interactor about getting a list of all currencies. The presenter does not know where this data will come from, but he knows that he needs it. Also, the inputValue , outputValue , inputCurrencyShortName and outputCurrencyShortName values are requested from the interpreter , since Only he knows where to get this saved data:
var inputValue: String? { set { if let value = newValue { interactor.inputValue = Double(value) ?? 0.0 } } get { var input = String(interactor.inputValue) if input.hasSuffix(".0") { input.removeLast(2) } return input } } var outputValue: String? { get { let formatter = NumberFormatter() formatter.numberStyle = .decimal formatter.maximumFractionDigits = 2 formatter.roundingMode = .down formatter.usesGroupingSeparator = false let number = NSNumber(value: interactor.outputValue) var output = formatter.string(from: number)! if output.hasSuffix(".00") { output.removeLast(2) } return output } } var inputCurrencyShortName: String { get { return interactor.inputCurrencyShortName } } var outputCurrencyShortName: String { get { return interactor.outputCurrencyShortName } } In the comments to the VIPER, I met the opinion that the presenter does nothing much and just sends the data from the view controller to the interactor and back. From the code above, it becomes clear that the presenter does not just request data from the interactor and give it "as is", but also prepares and formats the data in the required form. Remember that the presenter is responsible for exactly what data and in what form will be transferred to the view controller. The view controller no longer cares about formatting them; it only assigns them to the required UI components.
Presenter knows nothing about UIKit , he does not know about UIButton , UILabel and no other visual components. It is very important. All work with UIKit takes place in view controllers and other View components. Also, when you press a button, you cannot pass the parameter UIButton , the presenter should not know about it. Therefore, pressing the buttons and entering text in the input field are processed in the view controller in the following way:
@IBAction func inputCurrencyButtonClicked(_ sender: UIButton) { presenter.inputCurrencyButtonClicked() } @IBAction func outputCurrencyButtonClicked(_ sender: UIButton) { presenter.outputCurrencyButtonClicked() } func textFieldDidBeginEditing(_ textField: UITextField) { presenter.textFieldDidBeginEditing() } func textField(_ textField: UITextField, shouldChangeCharactersIn range: NSRange, replacementString string: String) -> Bool { if textField == inputTextField { if textField.availableAdding(string: string) { textField.addString(string) self.presenter.inputValueChanged(to: textField.text ?? "") } return false } return true } func textFieldShouldClear(_ textField: UITextField) -> Bool { if textField == inputTextField { textField.clear() self.presenter.inputValueCleared() return false } return true } Suppose you need to write a custom UI element or add an extension for the finished one. Consider, for example, a UITextField from the main module. A component may contain its own internal logic relating only to it. For example, the input field for the currency amount can be fractional, but you cannot enter 2 zero consecutively at the beginning (“00”) or enter several points (“0.11.2”) , the comma is converted into a point, you can enter only numbers, an additional button is added to keyboard, etc. In this case, it is allowed to bring this logic into the element itself. After all, this logic does not affect the logic of other components of the application, but refers only to it itself. For example, like this:
extension UITextField { func availableAdding(string: String) -> Bool { switch string { case "": return self.text != "" case "0"..."9": return self.text != "0" case ".", ",": return self.text!.count > 0 && self.text!.range(of: ".") == nil && self.text!.range(of: ",") == nil default: return false } } func addString(_ string: String) { var newValue: String = self.text ?? "" var addingString = string if addingString == "", newValue.count > 0 { newValue.removeLast() } else if addingString != "" { if addingString == "," { addingString = "." } newValue.append(addingString) } self.text = newValue } func clear() { self.text = "" } func addDoneOnKeyboard() { let keyboardToolbar = UIToolbar() keyboardToolbar.sizeToFit() let flexBarButton = UIBarButtonItem(barButtonSystemItem: .flexibleSpace, target: nil, action: nil) let doneBarButton = UIBarButtonItem(barButtonSystemItem: .done, target: self, action: #selector(dismissKeyboard)) keyboardToolbar.items = [flexBarButton, doneBarButton] self.inputAccessoryView = keyboardToolbar } @objc func dismissKeyboard() { self.resignFirstResponder() } } Another thing is when such logic can affect external data, for example, the availability of a login for a user during registration, since there will be a request to the server or database. Or repeat the password, because it will affect another component. In general, you can add logic to a UI component that only applies to itself. Although for some it may seem a controversial point.
Consider how data is obtained about currencies from the server. In the presenter there was a call to the getAllCurrencies () method and that's it. What should happen next, the presenter does not know. Further logic is written in interactor and, if necessary, commands are sent to the presenter, what should be done. The implementation is as follows:
func getAllCurrencies() { presenter.showHUD() serverService.getAllCurrencies { (dict, error) in if let error = error { self.presenter.hideHUD() self.presenter.showLoadCurrenciesButton() self.presenter.showAlertView(with: error.localizedDescription) return } if let dictResponse = dict { self.currencyService.saveAllCurrencies(with: dictResponse, completion: { (error) in if let error = error { self.presenter.hideHUD() self.presenter.showAlertView(with: error.localizedDesc) return } self.currencyService.sortAndUpdateCurrentCurrencies() self.getOutputCurrencyRatio(newCurrency: nil) }) } } } Two services are already involved in this integrator : CurrencyService , which is responsible for working with currencies, and the previously known ServerService , which is responsible for working with the server. Of course, the ServerService would be better divided into several service classes in order to reuse the methods of working not with a specific server, but with any. But I limited myself to one class here, in order to simplify and not to create a million classes for everything, because it does not hurt for the architecture of the VIPER modules.
For services, it is also very desirable to create protocols in order to work through them and not be tied to specific classes, according to one of the SOLID principles of dependency inversion .
CurrencyService will help you work with a data structure such as Currency . He will give all the available currencies, the current value entered for the currency, the types of currencies, as well as the ability to save, sort and receive the rate relative to two currencies. His protocol looks like this:
protocol CurrencyServiceProtocol: class { var currencies: [Currency] { set get } var currencyNames: [String] { set get } var inputValue: Double { set get } var outputValue: Double { get } var inputCurrency: Currency { set get } var outputCurrency: Currency { set get } func saveAllCurrencies(with dict: [String: Any], completion: @escaping (CurrencyError?) -> Swift.Void) func sortAndUpdateCurrentCurrencies() func saveOutputCurrencyRatio(with dict: [String: Any], completion: @escaping (CurrencyError?) -> Swift.Void) } CurrencyService requests data from another StorageService , which stores the data in UserDefaults , and the editor does not even suspect that the data is stored at all, let alone how it is stored. The integrator does not even know that the StorageService service exists, because the CurrencyService service helper does all the work itself and only gives the data to the interactor.
The main module integrator mainly consists of abstractions and calls to the methods of the service protocols, so for such layers it is very easy to write unit tests, since create moki and stubs for them will not be easy. No binding to specific classes.
I will not further examine in detail each method and each line of the remaining classes. The overall essence of the architecture and the role of each layer should already be clear. The last thing I would like to say is to switch to another screen via Segue .
Apple laid this functionality for the view controller, so we need to proceed from this approach, and not go through the navigationController? .PushViewController (vc, animated: true) . After clicking on the "Info" button, the "About application" screen should open. Therefore, the event of pressing the button is presented by the presenter to the router, and it calls the following method:
func showAboutScene() { viewController.performSegue(withIdentifier: viewController.selfToAboutSegueName, sender: nil) } The view controller calls system prepare (for segue ...) , and it directly sends this event to the router:
override func prepare(for segue: UIStoryboardSegue, sender: Any?) { presenter.router.prepare(for: segue, sender: sender) } It turned out that the presenter is passed in this case. If someone does not like such a violation, then you must either skip the method through the presenter, passing the UI element as a parameter, which will also be a violation. Or come up with something else. I myself have not yet found a better option. If you could set a delegate for prepare (for: segue, sender: sender) , then, of course, it would be a router.
Conclusion
The specified architecture option is not ideal. It was not for nothing that at the beginning of the article I gave a saying that everyone has their own VIPER. How many people, so many opinions. I met options when several modules were grouped within one user-story and wrote one router for several modules. Or in another embodiment, one interactor into several modules. Many use the classic version with Wireframe , others come up with something else. Someone passes to the Entity view controller. The latter, of course, is wrong.
Even if you have a written application as horrible, VIPER allows you to rewrite everything gradually. View controller for view controller. This is also the presentation layer and each module is independent of the architecture and implementation of the other. Start transferring logic to services gradually. Unload the view controller. And in the further support of the code, such a division by layers will pay you back many times.
In the article, I did not touch on Dependency Injection in modules for iOS, for example, Typhoon . And there are many more
Whatever your VIPER, it is important to follow a clear division of responsibility between the layers and work with abstractions (protocols). Writing tests for VIPER-modules will no longer be considered, but for such code it will be much easier to write them.
Probably, the article turned out a bit messy and voluminous, but for that I provided all the source code so that you could figure it out for yourself. Constructive criticism and discussion is welcome. Maybe I wrote something wrong. Write in the comments.
Link to the repository .
Source: https://habr.com/ru/post/358412/
All Articles